Why doesn't calla lily bloom?
There are several reasons that prevent the formation of inflorescences on a plant. All of them are similar to each other both for growing calla lilies at home and in open ground in the garden.
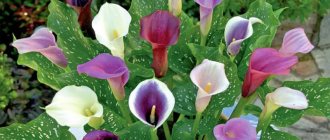
Types of flowerpots for home and garden
At home
When kept indoors, the plant blooms only twice throughout the year (late spring and mid-autumn). If inflorescences do not appear, then the growing conditions should be changed. The most common reasons why callas do not bloom at home:
- overgrown tubers;
- lack of light;
- frequent change of location of the flowerpot;
- improper care during the growing season;
- constant transplants;
- lack of nutritional components.
For your information! It is recommended to add fertilizer to the soil once a week in winter and spring.
To avoid troubles when growing an African flower, the top layer of soil should be removed and replaced with a new, more fertile one. All manipulations must be done with extreme caution so as not to injure the root system. This technique allows you to reduce the frequency of transfers.
Outdoors in the garden
Callas that are planted in the garden react negatively to shade and lack of sun. It is better to choose a place with diffused lighting, where ultraviolet rays will appear in the first half of the day. Planting a plant under the scorching sun is considered no less destructive, resulting in burns on the leaves. Calla lilies must be exposed to indirect light to bloom.
Flowering in open ground
The reason for the lack of flower stalks can be planting callas on a hill, so it is better to place them in a low-lying area. The plant is not afraid of even close proximity to groundwater, but frequent transplants and excessive neglect are detrimental to the flower.
Important! The distance between callas should be maintained at 30-40 cm, and the planting depth should be from 10 to 20 cm.
Flowers will not bloom if the soil is highly acidic. The soil should only be neutral.
What you don’t need to feed callas for abundant flowering is preparations with a high nitrogen content, so as not to delay the appearance of flower stalks.
Optimal conditions for the growth and flowering of calla lilies
Calla loves warmth and moisture. She will feel especially comfortable at air humidity of 70 to 80%. That is why it is recommended to spray the plant or wipe the leaves with a damp sponge. You can reduce the intensity of watering after flowering has ended.
Slightly acidic soil is best suited for calla lilies. The ideal combination would be a mixture of sand, soil and peat in equal proportions with the addition of humus. If this is not possible, you can water the calla lilies in universal soil with a weak solution of table vinegar at the rate of 10 ml per five-liter container of water. This method can also oxidize the soil for other plants.
Calla is very sensitive to sudden changes in air temperature. Such changes are detrimental to the vegetative system of the culture. The most optimal temperature for calla flowering is from 18 to 24 C. During the rest period, it is recommended to reduce the temperature to 10 C, but this must be done gradually. Only small daily temperature fluctuations have a positive effect on calla lilies.
By putting together all the rules and approaches to the plant, and also trying to put them into practice, the gardener can achieve good and stable calla flowering. In this case, the person will receive pleasure both from the result and from the process of care itself.
Factors causing lack of flowering
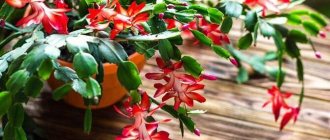
The beauty of calla lilies is compared to anthurium, which is distinguished by large white flowers and bright large leaves. Gardeners love to grow both flowers not only indoors, but also in open ground. Sometimes it happens that the plant grows well, new leaves appear, but there are no flowers.
Why rhododendron does not bloom in open ground in the garden: what to do
There are several factors that are the reason for this:
- wrong landing site. It is better to grow the plant in lowlands, especially since it is not afraid of groundwater;
- lack of light. Calla requires diffused lighting throughout the day, shade prevents flowering, and open sun provokes burns on the leaves;
- increased nitrogen content in the soil leads to oversaturation of the root system and slows down flower growth;
- tight fit. The optimal distance between holes is 30-40 cm;
- increased soil acidity. It is necessary to select neutral soil; to reduce it, it must be treated with a vinegar solution;
- surface landing. The tuber should be deepened 10-20 cm into the hole, depending on the size of the root.
Improper care is one of the main reasons why there are no flowers. Callas require periodic loosening of the soil, moderate watering and mineral fertilizing during the growing season.
For your information! The absence of flowers in a young plant is considered a natural factor, because calla lilies form inflorescences only from the second year of life.
Caring for newly planted tubers
As soon as the callas are planted, watering should be stopped for about 1.5-2 weeks, depending on weather conditions, since the tubers already end up in fairly moist soil.
If watering is not stopped, the root system can succumb to the process of rotting and die. If after the specified period the sprouts are not visible, the flower should be slightly moistened, trying not to touch the tuber itself when watering. After the leaves appear, the bush should be watered 2-3 times a week, taking into account the weather conditions of the region.
How to make calla lilies bloom
Beginning gardeners, when purchasing a plant, are faced with various problems and do not know how to solve them themselves at home. Calla lilies can be made to bloom in simple and effective ways.
Ensuring proper watering
Why amaryllis does not bloom at home - what to do
Callas are moisture-loving plants, so they need constant watering. The optimal frequency of irrigation is daily or every other day, and the water should also be in the pan. Moisturizing is especially important at the stage of appearance and blooming of inflorescences. Taking a flower pot out into the summer rain shows good results.
Note! The humidity level for tuberous callas is from 50 to 60%, and for rhizomatous callas - 70-80%.
How to water black flowers correctly
The plant is moistened as soon as the soil dries 1 cm deep. When the soil completely dries out, the flowering stage is delayed for 6 months. Soft or settled water is ideal for irrigation, but not cold. At the end of the bud blooming stage, white callas can be watered less frequently, and colored callas can be moistened completely after 1-2 months.
Transplanting calla lilies into a spacious pot
The plant actively develops in natural conditions, but at home it experiences stress. After purchasing, the flower must be transplanted into a deeper and wider container. As the root system grows, you will have to change the pot to avoid the occurrence of various diseases.
Suitable pot for transplanting
The main parameters for purchasing a new container:
- the width should exceed the crown size by 5 cm or more;
- the height is selected depending on the length of the root system, exceeding it by 2 times.
It is necessary to control the reproduction of calla lilies and babies in the pot, which can displace the adult plant and prevent it from flowering. To avoid bad consequences, it is necessary to plant the shoots in time or replant them together with the main flower in a larger pot.
Providing calla lilies with a period of rest
Calla is a flower that periodically needs rest. In winter, the plant should be stopped watering so that the leaves can dry out on their own. Tubers that are in the ground need to be sprinkled with sawdust, placed in a cool, dark place and watered in very rare cases.
During the dormant period, the flower bulb gains strength. The minimum rest period is from 1.5 to 2 months. From mid-April, you can resume abundant watering, and in the summer season it is allowed to take it out into the sun and plant it in the garden. This will strengthen the tubers and make the calla bloom for a long period. If it is not possible to plant the plant in open ground, you can simply place the pot on the balcony or street. It is worth remembering to protect calla lilies from excessive scorching sun.
For your information! A symbol of the plant’s successful exit from the dormant period is the growth of lush green foliage and the formation of buds.
Increasing the amount of fertilizing
To achieve long and abundant flowering, regardless of the plant variety, it is necessary to fertilize it periodically. If calla lilies are transplanted into open ground in the summer, then it is enough to feed them once a month. Any organic fertilizer for garden calla lilies is suitable for this, but during the flowering period it is better to add minerals, eggshell infusion, and urea.
Feeding for active flower growth
Callas that grow in a pot at home need to be fertilized with combined products at least once every 2 weeks. An excess of nitrogen components will cause increased leaf growth, but at the same time leads to the absence of inflorescences. If flower stalks begin to appear on the stem, then what to feed the callas with is potassium and phosphorus-containing substances.
Note! If you are afraid to use different drugs, then it is better to ask a consultant at a garden store about permitted and prohibited drugs.
Callas occupy the top of the list of ornamental crops that are used in home floriculture. The plant of African origin is quite unpretentious with the right approach. Before purchasing, you should familiarize yourself with the information about what temperature conditions the flower needs, the frequency of moisture, and how calla lilies reproduce. If you follow all the recommendations, you can prepare for the appearance of beautiful buds to extend the flowering period.
Requirements for conditions of detention
Let's get acquainted with the most important nuances of keeping indoor calla lilies.
Lighting
Calla has high demands on the level of illumination. Perhaps this is the most important point when choosing where to place a flower at home.
Sunlight should be plentiful, but indirect. It is good to keep calla in partial shade under conditions of sparse lighting. In summer, it is better to place the plant near a window, but do not forget to protect the delicate flower from direct sunlight.
In the dark winter time, callas acutely feel the lack of sun. And even during the dormant period, plants must be sufficiently illuminated - otherwise development, flowering, and other negative consequences may be delayed.
In general, for normal development and growth, calla lilies must be illuminated for at least 12 hours a day in summer and 8 hours in winter. If your apartment’s climate and location cannot provide such conditions, you will have to additionally illuminate the calla lilies artificially.
Temperature
In nature, callas grow in warm climates, so they cannot tolerate low temperatures. The optimal year-round temperature is +15-25 degrees: in summer +22-25, in winter +15-18.
White callas love cooler temperatures - during the growing season they should be kept at +18-20 degrees, in winter - at +10-12 degrees. The transition from summer to winter temperatures should be gradual, without sudden jumps.
Sudden temperature changes should not be allowed, as such shocks are detrimental to the plant. In the mildest case, the calla lilies will stop blooming. Too much heat is also unacceptable, especially in combination with dry air: such a microclimate can lead to calla lily damage from pests.
It is permissible to grow a flower on the balcony only in summer, but in winter you should definitely move the plant to a heated room.
Air humidity
This parameter should be high - dry air is not suitable for callas. The ideal humidity level for the plant is 70-80%.
And if in summer it is possible to provide the flower with normal living conditions, then when winter comes, working batteries often make the air in the apartment dry. To avoid problems, spray the air around the plant with a spray bottle. You can also place the pot on a tray with expanded clay pebbles moistened with water. Use the same measures in the summer if the weather is dry.
The appearance of new bulbs and the reproduction of calla lilies
Calla lilies have bulbous rhizomes. They divide, there are more of them, they grow and occupy an ever larger area. Excess must be regularly dug up and replanted or thrown away. The bulb is transplanted into well-drained soil. You need to choose a sunny place for planting.
After planting the bulbs, the soil must be watered generously.
The bulb should be planted horizontally. The hole should be approximately 10 cm deep. Water the soil generously so that the tuber begins to grow well. You need to separate the bulbs with your hands. Each one must have at least one kidney.
Growing seeds for seedlings
Typically, calla lilies are propagated in this way by breeders. But if you grow it at home, the seeds are first soaked for 6 hours in a natural plant biostimulator - potassium humate. Then they are laid out on a tray with a damp towel. Cover the top with the same towel and place in a warm place for a week. Make sure that the seeds do not dry out. The towel should be damp, not wet. When the seeds germinate, they need to be sown in trays with soil and left in a warm place until shoots appear. Discard ungerminated seeds. Then you can transplant the seedlings into a pot.
Completion of the growing season
The crop continues to grow as long as it is in moist soil. The growing season ends in September – October. The leaves begin to gradually die. As yellowing begins to appear, watering should be reduced. After 2-3 weeks it should be stopped completely. The leaves should dry out on their own, allowing the remaining microelements to enter the tubers.
If calla lilies grow in a pot, you don’t have to dig them up. Move the plant to a cool place (balcony, veranda)
It is important that the rest period lasts at least 3 months. Otherwise, the calla runs the risk of not blooming.
Planting calla tubers
At the end of February - beginning of March, before planting in the ground, calla tubers are planted for germination. If the tubers have wilted a little, before planting, keep them in a damp cloth for 2-3 days until they become elastic again and the buds are clearly visible on the surface of the tubers.
Carefully inspect the tubers.
If you notice damage on them or signs of dry rot, which often appears due to improper storage, strip the tuber with a sharp knife to healthy tissue.
Lubricate the wound surface with brilliant green and let it dry.
To prevent fungal infections, before planting, treat calla tubers with any fungicide intended for treating tubers and bulbs. The drugs Fundazol and Vitaros, which have a systemic effect, are well suited for this purpose. They not only destroy fungi on the surface of the tuber, but are also absorbed by the plant, providing it with long-term protection. Dry the tubers a little before planting.
In the photo: 1. cleaning the wound surface of calla tubers 2 and 3. Treating the wound surface with brilliant green 4. treating calla tubers in the foundation
Fill a small pot with nutritious earthen mixture to about 2/3 full. The mixture should have a slightly acidic reaction. Soil composition for planting calla lilies: peat, humus or compost, leaf or garden soil, washed sand (2:1:1:0.5). Compact the soil in the pot and place the tuber on top.
Cover the tuber with the prepared soil mixture. The planting depth for calla tubers is 1.5–2 cm from the top of the tuber to the soil surface.
Water carefully, being careful not to wash away the soil. Place the pot in a bright place
Calla develops well at daytime temperatures of about +15...+20 °C. It doesn’t matter if at night the temperature of the calla lilies drops to +13…+15 °C, the difference between night and day temperatures is beneficial for the plant.
in the photo: 1 and 2. planting a tuber in a pot, 3. watering a newly planted calla tuber
Calla lily roots grow in all directions. To prevent them from coming to the surface of the soil, as soon as the sprouts reach a height of 5–7 cm, add another 2–3 cm layer of soil to the pot. Keep the soil moderately moist. Tubers do not tolerate excessive watering and stagnant water, so drain the water from the pan immediately after watering. Once every 2 weeks, feed with a solution of complete mineral fertilizer for seedlings. Fertilizing with liquid gumized fertilizer brings good results.
The photo shows sprouted calla lily tubers in pots
When the soil in the garden warms up to +15°C and the threat of frost has passed, calla lilies can be planted in open ground. Calla does not like direct sunlight, so choose a place for it that receives full sun until noon. Prepare a hole measuring 30x30 cm for planting, add half a bucket of humus and peat into it and mix well.
Carefully remove the plant from the pot. Despite the fact that calla lilies have powerful roots, they are very fragile and cannot be restored if damaged.
Place a ball of earth in the hole.
in the photo: preparing the planting hole and planting calla lilies
Gently fill the area around the roots with soil. When planting, it can be deepened again by 1.5–2 cm, so that during care you do not accidentally damage the surface roots.
Water and wait until the water is completely absorbed into the soil. After watering, mulch the plantings with peat to prevent the formation of a soil crust.
in the photo: planting calla lilies in the ground in May
Callas: care during the season
Further care consists of watering, loosening, weeding and regular fertilizing.
Watering callas in summer
Calla lilies should be watered moderately, avoiding overwatering. But you can’t leave it in hot weather without watering: when the soil dries out, the calla stops blooming, turns yellow, sheds its leaves and goes into a dormant state.
Feeding callas
If you have well filled the planting hole for calla lilies with humus or compost, in the summer you can limit yourself to mineral fertilizing. Calla lilies react to excess nitrogen with powerful growth of the bush to the detriment of flowering, so the fertilizer must be balanced. You can use special instant or liquid fertilizers to feed flowering plants. They usually include approximately equal ratios of nitrogen, phosphorus and potassium (information is given on the packaging).
On soil not filled with humus, you can feed calla lilies with an infusion of mullein (1:10) or chicken manure (1:20).
What to do with flower stalks?
If you are not going to collect seeds, then at the end of flowering (when the color cover turns green), remove the flower stalks so that the plant does not waste energy on producing seeds and blooms longer.
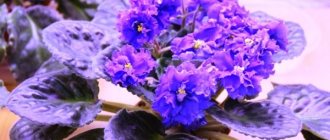
in the photo: calla lilies blooming in the garden