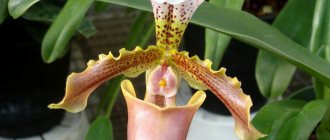
Description of appearance and photo
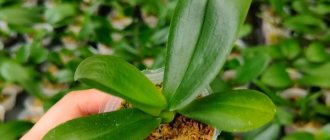
The baby is a shoot on a peduncle, which has its own root system, leaves, and sometimes even its own peduncle.
The baby grows and develops on the mother plant within 5–6 months. This time is necessary for it to form its root system, leaves, and gain strength for independent life.
Purpose of appearance
The main purpose of the appearance of a baby is reproductive; the plant thus produces offspring and tries to prolong life. Propagation of orchids by children appearing on the arrow is one of the most popular methods of propagating certain types of orchids at home among gardeners.
Before raising a baby, you need to know what to do when an orchid has released a peduncle, and also how to force an orchid to produce several peduncles if it is stubborn and does not produce even one.
Methods of propagation of the phalaenopsis species
In the wild, the life cycle of phalaenopsis is similar to that of a regular flower. It consists of six stages:
- plant flowering;
- pollination;
- seed germination;
- seed formation;
- seed ripening;
- germination.
The pollination stage occurs with the help of insects flying to the fragrant flower, after which the plant develops seed capsules. The seed pod usually matures within 6-8 months, after which it bursts, and small seeds fly through the air and germinate on tree bark, on stones and other stable surfaces.
But how does an orchid give birth to babies at home? There are 4 ways:
- Budding/cuttings.
- Root propagation.
- Division.
- Reproduction by seeds/sexual method.
Answering the question where do orchid babies come from, we emphasize: babies appear on the peduncle or from the growing point.
Budding
Most often, this species reproduces at home by budding, although experienced gardeners also practice the sexual method. This process is quite labor-intensive and not suitable for beginners.
In order for a baby phalaenopsis to appear on an orchid, or more precisely on the stem of a peduncle, the plant in most cases needs to go through a flowering cycle. This method is called cuttings.
The plant does not dry out the stem, and after some time the dormant buds wake up and swell. Often side shoots appear from them, forming new buds, but sometimes 2 small leaves appear there first. Over the course of 2-3 months, the leaves will increase in size, gain strength and feed on the resources of the mother plant.
After a few more months, roots appear on the baby and as soon as they reach 2-3 pieces with a length of 5 cm or more, the baby phalaenopsis can be planted.
Root propagation
In critical situations, a basal shoot appears on the flower. Why critical? Because the phalaenopsis will try with all its might to continue its cycle in babies, but the orchid will not have the necessary conditions for flowering.
The basal baby appears in the lower part of the trunk: at first it will resemble a growing peduncle, but after 7-14 days it will become clear that this is offspring.
Division
In fairness, one more method of propagating orchids should be mentioned, but it is in no way related to the natural processes of the plant and is quite rightly considered barbaric. This is a method of dividing a trunk and it consists of the following.
After the orchid has collected good tops and aerial roots, it is cut horizontally along the growth point, separating the top from the bottom, leaving only 2 leaves. It is here that the future orchid can appear, and the upper part is dried from below and planted in a new pot along with aerial roots.
Quite often, orchid lovers try to provoke reproduction and force them to produce offspring using hormonal paste. This method is considered quite effective, but it should be used exclusively on healthy plants.
It is also possible to obtain 2-3 children from 1 bud at once, united by one growth point. Such “Siamese twins” have low viability and often die before transplantation. Well, naturally, the owners of such plants then ask why the orchid does not bloom, does not grow roots, and does not grow leaves. The reason is a violation of the plant’s genetics and its natural qualities.
Conditions of appearance
In order for babies to form on the arrow of the orchid, after the plant has finished blooming, it is necessary not to cut off the peduncle completely (read about what to do with the arrow when the orchid has already bloomed). It should simply be shortened, the cut point is 2 cm above the “sleeping” bud. In addition, the plant must be provided with a sufficient amount of intense light, which awakens the bud from sleep, and a high temperature regime.
Reference. If after flowering the arrow is left untouched, the orchid can “dry” it completely in order to save nutrients.
Find out in this material whether you should worry if the peduncle of an orchid has dried up and what to do in such a situation.
The cut must be made with a disinfected pruner. This must be done with great care, as the trunk and leaves of the plant can easily be damaged. In addition, if any hangnails or roughness remain, this can lead to the orchid becoming infected with infectious diseases. It is recommended to treat the cut area with cinnamon or crushed activated carbon.
A visual video on how to stimulate the appearance of a baby on a peduncle after the orchid has bloomed:
Methods for obtaining children
There are various methods for getting babies on orchid plants.
Cuttings
You can take cuttings from an already faded peduncle. For this :
- It's being cut with a sterile pruning shears into pieces so that each contains a waiting bud;
A baby orchid can be grown on a cut peduncle. - The cuts are treated with wood ash so that the infection does not enter the peduncle through the cut;
- To ensure that a baby appears, the waiting bud is treated with cytokinin ointment and all cuttings prepared in this way are placed in a greenhouse;
- The greenhouse must be prepared in advance . A food container with a well-fitting lid is suitable for this purpose;
- Moistened sphagnum moss is placed on the bottom and cuttings are placed on it so that the bud is directed upward;
- After laying the cuttings, the container is tightly closed with a lid and placed in a bright place.
Cutting off the tip of a monopodial orchid
The top of Phalaenopsis can also serve as a cutting . This propagation is called flower rejuvenation. For this:
- Cut off the crown, on which there are 8 leaves;
- The cut is treated with activated carbon or wood ash;
- After which the cuttings are dried and planted in the bark, like a young baby, covering the aerial roots with pine bark;
- To prevent the flower from wobbling, it is secured with wire or plastic sticks to support the flower stalks.
The remaining stump is placed in a bright place and the care that was provided to the orchid before division is continued. After a long time, babies may appear on the stump, which can be left right there in the container or planted out when they reach a certain size.
IMPORTANT! Whatever method the grower chooses, he must follow all the recommendations, and then the young sprout will take root in the new place.
Shortening a faded peduncle
When the peduncle stops flowering, it must be shortened to the first waiting bud. This will help stimulate a side shoot for flowering or the baby will begin to develop.
Pruning is carried out using pruning shears treated with alcohol to avoid infection getting inside the plant. The cut is made 4 cm above the bud, since the remaining peduncle will dry out. To prevent this from injuring the bud, leave a small section of the peduncle to dry.
Step-by-step instructions on how to get offspring
An orchid will begin to form “offspring” only if it is provided with proper care and optimal conditions for reproduction are created.
- Prepare a peduncle that has faded but is still green: it must be trimmed, 2 cm away from the second “dormant” bud from the bottom.
- Treat the cut area with crushed activated carbon tablets or cinnamon.
- Provide the plant with differences in night and day temperatures (+15C-+30C). To do this, you can place the orchid on the windowsill or on the veranda of your house.
- Watering should be scanty: the stressful state that the epiphyte will experience will make it possible to awaken the “sleeping” buds.
- Spray the epiphyte daily with a spray bottle, thereby ensuring a high level of humidity in the room.
- Promote air access to the orchid roots: make additional holes in the walls of the pot.
- Provide access to a large amount of intense diffused light to the epiphyte (south and southeast windows).
- The orchid should be systematically fed with fertilizers high in nitrogen.
Reference. You can often find information about stimulating “dormant” buds with hormonal drugs so that the flower stalk throws out the baby. One of the most famous such drugs is cytokinin paste. Having opened the bud, it should be smeared with this paste on top.
This procedure can be repeated 3 – 5 times. Babies may appear within 2-3 months, but a lateral arrow may also appear from a “dormant” kidney. But it should be remembered that this method of raising children greatly depletes the mother plant.
How to separate from mother?
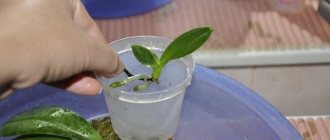
What to do after a shoot has appeared on the peduncle and given roots? When the roots reach 5–6 cm, the baby can be transplanted into the ground. But first you need to properly separate it from the mother plant.
Prepare everything necessary for planting the baby: substrate (base - coniferous tree bark), expanded clay, sphagnum moss, small plastic pot, disinfected pruning shears, cinnamon or activated carbon.- Cut off the baby with part of the peduncle on which the baby developed (a gap of 1.5 cm).
- Dry the cut area for half an hour, then treat it with cinnamon or activated carbon.
- The new orchid is placed in a pot in the center (a prerequisite is the presence of holes in it for drainage and aeration), the bottom of which is covered with drainage.
- Holding it by the root collar, the container should be filled with moistened substrate.
- The top layer of the substrate should not be compacted. To avoid voids in the pot, you need to knock on its walls.
- You can sprinkle the top layer of the substrate with sphagnum moss.
Some gardeners recommend placing the pot with the already separated plant in a “greenhouse”: cover it with a transparent plastic bag, which should be removed for some time every day for ventilation.
We invite you to watch a video on how to properly separate a baby orchid from a peduncle:
Stimulation of root formation
It happens that it was possible to get a new baby orchid, but the roots do not develop on it. Some gardeners say that you just have to wait, stimulation does not help. Others offer methods to help speed up root formation.
Stimulation with sphagnum moss
Stimulating the roots of baby orchids using sphagnum moss is one of the simplest and most popular methods. Step-by-step instructions:
- Moss for 30 min. soak in boiled water until it begins to swell.
- Form a lump and tie it with thread.
- Tie the moss to the base of the growing keika.
- Tie the plant to a support.
- To increase efficiency, the moss is covered with a film on top. It is removed daily to ventilate the young shoots.
- Spray with water every day, use the Kornevin stimulator several times a week.
It is possible to achieve the appearance of roots within a couple of weeks. When they reach normal length, the keika is separated and planted. If the method does not produce results, try other methods.
Germination in foam
The technique requires ingenuity and skill. Build a foam structure and place a container of water there. In this case, the shoot is left on the peduncle, and the structure is attached to the mother flower.
The base of the keiki, where roots are expected to appear, is lowered into water. Make sure that it does not dry out and that the shoot does not rot. A rooting stimulator is added to the water 1-2 times a week to force the root system to develop better. Be sure to check whether the shoots are rotting or whether they show signs of any disease.
Germination in a greenhouse
With this method, it is recommended to separate and plant the baby orchids in a separate pot. The optimal age of the shoot is 4 months. It is cut off along with part of the peduncle. Then transfer it to a shallow container with the substrate, but do not dig in too deeply. Cover the top with sphagnum moss and a plastic bottle to create a small greenhouse.
Spray with water once a day. Make sure that the liquid does not get into the center of the rosette of leaves. Rooting lasts 4-6 months. All this time they check whether the shoot is rotten. To speed things up, stimulants and fertilizers are periodically applied.
When choosing a shoot for rooting, take into account that the baby orchid developing on the trunk will not take root at all and cannot be planted. If it forms near the root collar, the process will be slow.
The strongest keiki grow from flower stalks. But it is not always possible to root such shoots. The best stimulator of development is the mother flower, which provides all the necessary substances. When detached, the small process often dies.
How to care for a flower?
In order for an orchid to give birth to “offspring” in the form of children, it is important for it to provide the necessary conditions for this: a large amount of light, high temperatures during the day and low at night (+15C - +30C), high humidity levels, systematic application of nitrogenous fertilizers, which can be purchase at a specialized flower shop.
When the peduncle has already released the baby, the plant should be moved to a warm and more shaded place. It is also necessary to provide it with systematic watering according to the basic rule: as the substrate dries out. On average, the interval between waterings can be 5 – 10 days.
After every second watering, it is recommended to continue to apply fertilizers with a high percentage of nitrogen. It is better if this feeding is foliar, that is, the baby itself will be irrigated from a spray bottle. Sometimes you can irrigate the plant in the shower, which will only contribute to the formation of healthy and strong children.
After the baby is cut from the peduncle, it must be cut off completely, since it will no longer produce buds or new shoots. And the plant needs to be at rest for some time - to restore its strength.
How does it appear on the stem?
It is very easy to distinguish a new plant from an old one. The future orchid is formed from irregularities located on the stem - dormant buds.
If a flower has sprouted a shoot on the trunk, then first thin white shoots (sticks) begin to extend from the base. They increase in size over time. The buds gradually swell, from which leaves will appear in the future. The roots are the last to form.
In the first 10 days, it is difficult to determine what will develop from the swollen bud. It is important to pay attention to the tip: if it is slightly pointed, then a flower will grow, if it is blunt, then a baby will grow.
Caring for young offspring
Watering should not be done during the first days, since the young orchid was planted in a damp substrate. You can irrigate the plant with warm water from a spray bottle. The first watering is only 4 days after planting. Keep in a room with high humidity, high temperature (not lower than +25C) and a sufficiently large amount of diffused sunlight.
Such “greenhouse” conditions must be maintained throughout the year: the plant must grow 3–4 leaves, and the roots must reach the bottom of the pot. But we should not forget about daily ventilation of the plant.
In the video you can see how to care for baby orchids:
Preparation process
Getting a shoot
If the children live directly on the flower arrow of the original rosette, then it is not necessary to wait for the roots to form. And when 4 leaves appear on it, you can simply separate it. After this, you need to perform a number of preparatory steps:
Cuts on the peduncle and on the baby must be treated with crushed activated carbon or cinnamon.- Dry the baby for about a day, and then plant it in a fine-grained substrate, in which it should take root. The lower pair of leaves of the baby will turn yellow after a while.
- To root a baby orchid, it is better to use a mini-greenhouse, in which the temperature regime must be maintained at 22-25 degrees. Roots take a very long time to form; sometimes for these purposes it is necessary to use phytohormones and spraying the soil with Epin.
It is not recommended to treat the leaves themselves with hormones, since the formation of roots will be delayed, but the leaves will grow.Important! You cannot pick off the leaves, as they will fall off on their own when the supply of caloric elements decreases. By this time, the first roots may already have developed.
- To stimulate root growth on a child, you can use another method - placing it close to water. For these purposes, you will need plastic boxes, a flat piece of foam plastic, in which to make a small recess. Secure the orchid rosette firmly and firmly in it.
- Next, pour water into the box, lower the foam with the baby and cover with polyethylene. Under the influence of increased moisture and warmth, roots will form faster.
Choosing a future landing site
The first step is to prepare a container for planting. The roots of the baby orchid should have enough light, so it is better to choose a pot with transparent polymer walls. You can also use glass vases to highlight the beauty of the flower and its elegance. But if exposed to direct sunlight, the delicate roots of the orchid run the risk of getting burned.
After the pot, you have to prepare a nutrient substrate.
It must meet all the needs of the plant and its conditions. If the air in the room is dry, then a moisture-intensive mixture is used, which includes the following components :
- pine bark;
- moss;
- sphagnum;
- charcoal.
Take all ingredients in a ratio of 5:2:1:1. If you take all the components, but in equal proportions, you can get a soil mixture with high or medium moisture capacity. The place should be well lit, but only without direct exposure to sunlight. Humidity is allowed 60-70%, and air temperature 21-23 degrees.
How to reproduce?
The process of propagation of orchids by children is as follows:
- Carefully separate the shoot from the mother plant. Do this with a sharp knife. Before transplanting the baby, you need to make sure that the orchid is completely ready to live separately and it has a root system.
- After removing the seedling, it does not need to be immediately buried in the ground. First, dry the cut area a little, or better yet, lay the baby in the sun for 30 minutes. Next, grind the activated carbon and sprinkle the cut area with the resulting powder for disinfection purposes.
- Drill special holes in the selected pot, except those that serve as drainage.
- Now you can begin the landing process. Planting work should be carried out so that the root neck is at the level of the surface of the container. During transplantation, watch the roots so as not to injure them. The pot should not be too spacious, but even a little small. In this case, there is a better chance that the baby will take root.
- Fill the container with soil mixture prepared in advance. You need to carefully monitor the roots so that they are completely covered with soil. If for some reason the roots do not fit, then they can be placed on top, but then you will have to cover them with a certain amount of moss.
- When adding the substrate for the first time, you need to shake the pot so that the soil subsides. It is prohibited to compact the soil with your fingers.
- After transplanting, place the flower near the window. In the first days you cannot water, and do this only on the 3rd day. It will take time for the cut to become completely dry. This will protect the orchid from the development of diseases under the influence of moisture or moss microorganisms.
- After transplantation, the plant should be kept in a room with high humidity.
Photo
And this is what the reproduction procedure looks like in the photo.
Problems with the appendage
Stayed on the mother shoot for a long time, but never produced roots
In this case, you can still give more time for the shoot to take root. If there are no shifts, then you can try using pre-wetted sphagnum moss to wrap the place where the baby is attached to the frog, securing it with a bandage or strong thread. Every day for a month it is necessary to irrigate the moss with water with the addition of the drug “Kornevin”.
To create greenhouse conditions, the moss nest can be additionally wrapped in cling film, but do not forget to remove it for a while every day in order to prevent the plant from rotting.
Placed on a curved arrow
Some types of orchids have quite flexible flower stalks. In the case of flexible and curved peduncles, the baby does not need to be trimmed. The arrow of the orchid with the baby is simply pulled to a pot with bark so that the roots of the young plant go into the ground. The peduncle itself is fixed to the wall of the pot using wire. In such cases, the baby develops especially quickly, as it receives nutrition from the mother plant and from its own root system. There is no need to use a greenhouse here.
All the main points on raising children and separating them from their mother, the orchid, were outlined above. It remains to add that the obligatory components of success in this troublesome, but still rewarding task are love, patience and care. With these feelings and qualities, you can easily cope with the task and not be afraid, but look forward to the appearance of a shoot on the peduncle of your favorite orchid.
Where can the baby appear?
On the peduncle after flowering
The most common case is when, after flowering, buds appear on the peduncle and a baby grows from them . Unfortunately, this phenomenon can be confused with a leafy flower stalk.
Most often, the baby appears on a peduncle.
A young plant, unlike a leaf, has its own body, where roots later appear . There may be several babies on the peduncle; this is nothing unusual. But if several children grow on a peduncle, what to do with them? The photo above shows what the baby looks like on a peduncle.
On a peduncle without flowers
There are times when an adult orchid shoots arrows specifically for a baby . In this case, instead of flowers, a young plant will grow. Dormant buds can also wake up and produce babies or flowers.
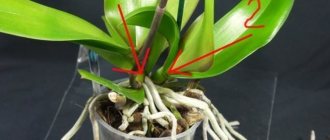
At the roots
Children are still growing both on the roots and at the roots. Such a baby develops near the mother's body . If you notice young leaves in the roots of an adult orchid, then this is a basal baby.
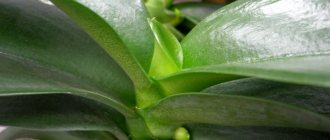
On the trunk
Such babies often appear due to damage to the growth point of Phalaenopsis. The growing point is the place from which new leaves grow. If this place has been damaged (looks empty, black, dry), then he grows the baby on his body.
This is the only option to continue growth and development , so such a baby is not separated from the mother. In this case, there will be two orchids in one pot instead of one.