For what reasons do orchids have no babies?
If the orchid was grown incorrectly or was poorly cared for, then the cuttings may not appear at all or will turn out to be underdeveloped, with no roots. The nutrition and maintenance of the mother bush is reflected in the growth of shoots and their number.
Reasons why there are no layers:
- Lack of lighting affects the development of children. The length of the day should be 10-12 hours. The light needs to be diffused; the plant should not be in direct sunlight. In winter, when the days are short, additional lighting is installed.
- Lack of fertilizers, wrong composition, or excess fertilizing. Without fertilizers, the orchid will not be able to supply itself and its shoots with nutritional components, but overfeeding will also have a bad effect on the children.
- Lack of moisture will cause even the rudiments of layering to dry out. If the water does not arrive on time, the mother plant will dry out, then we are not talking about any children, the orchid itself will have to be saved.
Stress and unfavorable conditions also force the orchid to form a new plant. Especially when this threatens her life, the flower insures itself by leaving offspring for further reproduction. Such layerings do not develop roots for a long time and take root with difficulty.
Factors for the appearance of shoots in an orchid:
- dying off of the growing point;
- trunk damage;
- drought;
- development of a peduncle from the center of the rosette.
What is the reason for the lack of rhizomes in the shoot?
The reasons lie in improper care of the mother orchid, because it is from her that the young shoot feeds. Let's list them:
- Little light. Remember that an orchid, and especially one that produces babies, needs a lot of light. It must be absent-minded, and its duration cannot be less than twelve hours a day. You may have to purchase phytolamps to help.
- Wrong fertilizer. Sometimes gardeners use fertilizers that are unsuitable for orchids. There may be a lot of some element, but not enough of another. And sometimes the whole point is that fertilizers are applied irregularly or rarely. The plant on which the baby develops gives off a lot of nutrients, so their reserves must be constantly replenished.
- Insufficient watering. If there is little water in the soil and in the root system of an adult plant, then even the smallest roots that appear on the shoot will instantly dry out, since moisture does not reach them.
Review the factors listed and change them if they do not meet the orchid's requirements.
Why the lack of a root system is a problem
The appearance of a phalaenopsis baby causes joy. Who doesn't want to get another beautiful plant in the house. But if the shoot does not acquire a root system or the roots are too weak, the young growth will not survive the transplant and will die.
To separate and transplant the cuttings into a new container, you first need to grow roots. If this is not done, the young shoot will take all the nutrition from the mother flower and flower stalks may not appear on it. Without good nutrition, the orchid itself will begin to get sick often, and its immunity will weaken.
What measures need to be taken
The new growth needs to be observed. If roots do not appear on it within 5-6 months, then it will be necessary to help grow the roots. You can separate the shoot from the mother bush and transplant it into water, a greenhouse, or grow it on bark. The task is not easy, but good results are obtained.
You can grow a rhizome in different ways - artificial or natural. They raise the baby in a piece of polystyrene foam or create greenhouse conditions for the flower by planting the young in cups with a substrate under the film.
Naturally
This can be done even if the shoot is not separated from the mother plant. To do this, you need to do the following manipulations:
- Get some moss and soak it in water for about thirty minutes until completely swollen.
- Form a ball of moss and wrap it with thread so that it does not fall apart when attached to the baby.
- Attach a lump of moss with a thread to the base of the peduncle so that it does not fall off, but at the same time so that the thread does not damage the plant.
- A heavy young plant can be attached to a stick-stand with clamps, this will protect the plant from tipping over.
- If the air in the apartment is very dry, then the structure with moss can be wrapped in cling film to create a greenhouse effect. But then the baby orchid must be ventilated every day.
- Moss must be sprayed every day. You can add “Kornevin” to the water (use the stimulant every other time with plain water) to stimulate root formation.
- When young root shoots appear, we plant the young orchid.
On average, in any extension method the process lasts about three months, but sometimes it can take up to six months. All these time frames are the norm, so all you can do during this time is just watch and wait for the “miracle” to happen.
Is it necessary to separate from the mother?
You can leave the cuttings on the mother plant until the roots grow. Usually the orchid itself takes care of the sprout. After 60-90 days, the rudiments of roots appear.
It will take six months for the formation of a full-fledged shoot on the orchid peduncle. By this time, the cuttings will have roots and the necessary maturity for transplanting into a separate container. The offspring is planted when the roots are at least 5-6 cm and there are 4-5 full leaves. In this case, layering no longer allows the orchid to develop normally, taking away the flower’s strength, so in order to save the plant, the baby is separated.
Important!
If a young plant has only one root, it may be damaged during transplantation and there will be nothing to replace it with. Therefore, there must be at least 2 developed roots.
Is it possible to separate the baby from the flower if it is blooming?
When the plant blooms, it is not advisable to separate the shoots. Having disturbed a flower, it is not known how it will react to such actions. But there are hybrids that bloom endlessly. A flowering plant grows children that develop, and the peduncle, shedding some flowers, immediately forms new buds.
If the cutting is already more than 4-5 months old, it has formed roots 6-7 cm long, has 4 leaves, then it can be disconnected from the mother bush even during the budding period. You should also pay attention to the condition of the adult flower; if it is sick, it is better not to disturb it and wait until it recovers.
You don’t have to separate the shoot from the mother bush; it won’t “eat” the parent. The layering root system is already capable of feeding on the substrate on its own. We must not forget to feed and water the orchid. It is advisable to transplant the overgrown plant into a larger pot so that everyone has enough space and soil.
Time to drop off your baby
Even experienced flower growers often make mistakes regarding determining the time for planting the baby. First you need to decide where the process is located, since each type has its own development time.
Overgrown rhizomes
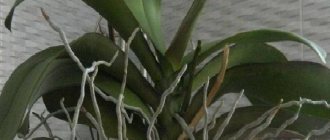
To determine the possibility of detaching a copy from the “mother”, you need to pay attention to the root. The sprouts must be at least 5 cm in length. The roots should be white and rope-like.
Duration of the baby's stay
It is possible to transplant a baby after its formation only after half a year. During this time, the copy will get stronger and create an autonomous power system. You can perform the deposition procedure later. Then the plant will become as strong as possible and will definitely survive after planting.
And other signs
The main sign that a copy can be separated from the main plant is the formation of 5 leaves. If the foliage is strong and healthy, the root system is already complete and ready for independent growth.
Normally formed seedling
Particular attention should be paid to the top sheet. It should be dark green in color without damage or signs of wilting.
How to separate a baby
If the main plant is not sick, and the baby is at least 6 months old and has its own roots, then you can disconnect it. First you need to prepare a pot and planting mixture for the seedling. You can buy it in a store, or you can make it yourself. You will need pine bark, sphagnum moss, peat, and fern roots. Additional components: coal, walnut peel, coconut fibers.
Separating tools.
- knife, scissors, pruning shears - only sharp ones;
- cinnamon, crushed coal;
- disinfectant;
- container, substrate.
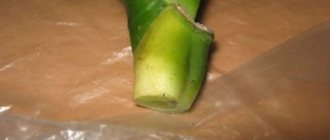
Peduncle cutting
Layers can grow on a flower shoot, from the roots of the main plant, or in the axil of a leaf. How to cut off a baby depends on its location. The growing shoot on the flower branch is cut off along with part of this stem. On each side, cut 3 cm from the place of attachment of the layering. Using pruning shears, carefully cut off part of the peduncle with the baby, dry the sections, sprinkle with charcoal or cinnamon.
The cuttings are cut off when they become really heavy for the peduncle. It has at least two long roots and 3-4 leaves.
Important!
All instruments must be disinfected.
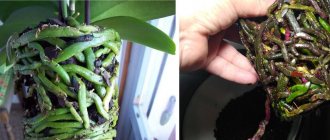
Branch at the root
It is necessary to carefully examine the adult plant, find where the layer is attached at the root, and find all its roots. Carefully remove the roots from the substrate so that during removal the roots are not damaged or torn. They are freed from the soil, then the shoot is separated with pruning shears.
If the root system of the young plant is absent, and the layering was formed a long time ago, then it is cut off along with the root on which the baby grew and 1.5 cm of tissue from the adult plant is captured. With a weak root, the seedling needs good rooting. There is a risk when separating a root shoot - the root on which the shoot grows may be damaged. Therefore, the procedure must be done very carefully.
Removal from the stem (trunk)
The appearance of a baby on an orchid's trunk is often a sign of the death of the orchid. You don’t have to rush to separate the orchid shoot from the stem, but wait until the adult flower dries. If the plant is healthy, then the layer on the trunk must be disconnected as quickly as possible, otherwise the baby will kill the parent.
The shoot is carefully cut into a sector. The sections are dried and sprinkled with cinnamon. Plant the baby in a new pot with the prepared mixture.
How to properly care for an orchid
Looking at a blooming orchid, many gardeners don’t even think about whether to buy this extraordinary plant or not. Of course, buy! But will it bloom just as well at home?
Everyone knows that an orchid is a rather capricious plant and requires meticulous care. You can achieve repeated flowering from it if you know all the factors that contribute to this and follow a certain care regimen. Then the orchid will bloom for 2 to 6 months. And some genera, like phalaenopsis or vanda, can bloom all year round.
For an orchid to bloom...
The frequency of orchid flowering depends on compliance with certain care rules. In order for a plant to bloom, you should remember 9 important conditions that contribute to this.
1. Find out the age of the orchid
If you bought a non-flowering plant, and it is in no hurry to please with flower shoots, perhaps it is still too young. Different types of orchids bloom at the age of 1.5 to 3 years.
To determine that an orchid is old enough, you need to count the number of shoots. An adult plant ready to flower should have from 5 to 8. If flowers appear on an orchid earlier, this is not always good. The fact is that a plant that is too young may not have enough strength to recover after flowering, and the orchid may die.
2. Don't move the potty
Many people know that moving is a real stress for an orchid. But this flower does not like even minor movements. The orchid reacts to its position in relation to the light. Therefore, if there is a need to rearrange a pot with a plant, it is necessary to place it with the same side to the light source as it was before. Also, do not move the orchid while watering. Movement adversely affects the growth of the flower, especially at the moment the peduncle appears.
3. Pay attention to the roots
As you know, orchid roots are actively involved in the process of photosynthesis, so it is important to ensure that they have enough light. Since it is not recommended to move the orchid again, it is worth taking care of the roots in advance. For example, instead of ceramic pots, it is better to use transparent plastic containers with plenty of drainage holes.
It is not recommended to use containers with corrugated walls for planting this flower, since its roots tend to grow to uneven surfaces. In addition, sharp edges and elements can injure the root system, which will harm the entire plant as a whole.
4. Take care of lighting
Sunlight is a very important factor affecting the flowering of an orchid. Without full daylight (10-12 hours a day), these plants will not bloom. Therefore, in autumn and winter, when there is very little natural light, flowers should be illuminated with lamps.
Phytolamps are special lamps designed to illuminate plants: they provide a lot of bright light without drying out the air around the flowers.
If an orchid produces a peduncle in autumn or winter, care should be taken to ensure that it does not die due to the short daylight hours. Without additional lighting in the dark season, the peduncle may stop developing or dry out. If it is not possible to illuminate the entire plant, it is enough to provide illumination only for the tip of the peduncle. The main thing is to make sure that neither it nor the plant itself gets hot.
5. Ensure acceptable temperature differences
The catalyst for flowering of many types of orchids is a slight difference between day and night temperatures. Therefore, for an orchid to bloom, the temperature at night must be 4-6°C lower than during the day. Of course, creating such conditions throughout the year can be problematic. But from late spring to early autumn, orchids can be kept outdoors, where the temperature difference is achieved naturally.
In cooler times, when flowers should already live at home, rooms with orchids need to be ventilated. Just do this very carefully, remembering that these plants are very afraid of drafts.
6. Water your orchid correctly
You need to water the orchid after the soil dries out - this will make it possible to avoid rotting of the roots. These requirements apply both in summer and winter and apply to both children and adult plants. However, there are some exceptions here. After the orchid has faded, watering should be reduced by about a month.
In nature, after flowering, orchids begin to set seeds, which should scatter in different directions for several kilometers. This is only possible during dry periods, but not during the rainy season. Therefore, it is necessary to provide the orchid with conditions that are as close to natural as possible - then the flower will grow healthy and bloom often.
Before and during flowering, the orchid requires more intense watering than usual. Further, during the dormant period, specimens with hard leaves and the presence of pseudobulbs should be watered according to the basic principle (after about 10-12 days).
7. Humidify the air around the plant
Another important condition for flowering is air humidity. If there is not enough of it, the orchid may stop growing or unopened buds and flowers may dry out prematurely.
To increase the humidity in the room where the orchid grows, you can place a plate of water next to the flower. Also, during very dry periods (when the heating is turned on in houses), the plant should be sprayed. Suitable humidity for orchids is 60% and above.
8. Choose the right fertilizers
To feed orchids, it is recommended to use formulations based on phosphorus and potassium, as they stimulate the appearance of flower buds. In addition, the use of such fertilizers ensures that the plant produces healthy and strong flowers. But it’s better not to get carried away with nitrogen-based fertilizing: this element, on the contrary, inhibits the development of flower stalks.
9. Don’t be afraid to “scare” the plant
Sometimes, to make an orchid bloom, it needs to be given a little stress. It happens that all the conditions for flowering are met, but the flower stubbornly refuses to shoot. This sometimes happens because the orchid is doing too well. In this case, the plant directs all its energy to the growth of green mass. One way to stimulate flowering is to “shock” the orchid a little: reduce watering or move the plant pot to a cooler place.
Dormant period in orchids
After flowering, the orchid enters a period of rest, when it begins to accumulate strength for a new flowering. Care at this time is no different from care during other periods. The flower still needs good watering, high humidity, sufficient lighting and regular prevention against diseases and pests.
As for fertilizing, their frequency and volume during the rest period should be reduced. If there is a need to replant an orchid, then the time to do this procedure is now, when the plant no longer blooms.
Replanting is necessary if roots are sticking out of the drainage hole, or the soil dries out quickly after watering. As a rule, the need for this procedure appears after 2-3 years.
Are orchids suitable for cutting?
What could be more beautiful than a bouquet of orchids? But these flowers do not live long, and not every species is suitable for cutting. Let's try to figure out how to extend the life of an epiphytic bouquet and which orchids to choose.
Phalaenopsis, cymbidiums and paphiopedilums can stand in a vase and retain freshness and aroma for several weeks (and sometimes even a month). Other orchids risk not standing for even an hour, literally withering before our eyes.
How to root a baby
To root the cuttings, prepare cups - small holes are made at the bottom to drain liquid. Make a double glass (insert one into one) in one there are many holes at the bottom and on the walls, lay out the substrate in it. The second glass is filled with ¼ volume of expanded clay. All tools, containers and soil must be disinfected.
It is better that the roots do not come into contact with the wet substrate. The root collar is suspended above it at a height of 0.5 cm. This method will prevent the lower part of the shoot from rotting, and the roots will develop successfully. The soil must be constantly moistened. If the roots grow to the side, they are carefully bent and lowered down. Children are planted from cups into pots with planting mixture. Under no circumstances should the soil be compacted. First, expanded clay is poured, and then a shoot is placed and the substrate is slowly added.
Growing baby roots on the mother plant
It is not difficult to grow roots from a baby on an adult bush; for this you will need moss, thread and water. It is easiest to stimulate the shoot on the peduncle. Sometimes cling film is used to wrap the moss with the baby. In this case, it is necessary to regularly ventilate, removing the film, otherwise the increased humidity will destroy the young animals.
Steps to grow roots:
- Sphagnum moss is soaked in water and squeezed well. It is enough to spray the moss with a spray bottle.
- Make a small lump and apply it to the bottom of the layering, where roots should form.
- They tie the moss around the shoot with a nylon thread so that it does not fall apart. The nylon thread stretches well and will not pull the peduncle tightly.
- If the young plant has become heavy, then the branch is attached to a stand (stick) with clamps so that the flower does not fall.
- The moss is sprayed daily; it should not dry out, but water should not drip from it. You can make a solution with Kornevin and moisten the moss with it to speed up root growth.
Within 70-90 days, the roots will grow and the baby can be transplanted into another container. Sometimes full-fledged roots grow only after six months. If the roots have not appeared, then the baby is cut off and the development of the root system is stimulated artificially.
Young growth needs ventilation, but the orchid does not like drafts. Twice a week the seedling is sprayed with a spray bottle. Moisture should not get into the root rosette, it can rot. In order not to take risks, water is poured into a tray and a container with a flower is placed in it.
Once a week, during spraying, nitrogen-containing fertilizers are added to the water, alternating them with a growth stimulator. Do not forget about the mother bush, which after transplantation experiences stress and requires increased attention. The room should be bright and warm. Humidity is maintained at 60-70%.
What problems might arise?
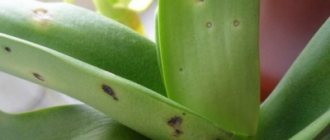
In the process of growing roots in an orchid shoot, a problem may arise; this is the main one.
The problem is yellowing or drying of the shoot itself. In this case, the baby needs constant monitoring; if there is no improvement, then it is necessary to change the conditions for root growth. To do this, you need to add light or fertilizing, control the humidity in the room, and the air temperature. Do not create drafts or cool the air too much.
When you decide to grow an orchid at home, you need to remember all the subtleties. The process of independently growing such a beauty is long and painstaking, requiring special attention and patience. All efforts are not in vain, the flower will in the future delight and attract the attention of not only the grower himself, but also those around him.
How to properly grow in different ways
You can root a baby orchid without roots either naturally or artificially. To stimulate the development of rhizomes, greenhouse conditions are created artificially or roots are grown in polystyrene foam.
In polystyrene foam
Polystyrene foam is an unusual way to awaken the baby for root formation. A hole is made in the foam the size of the root collar of the seedling. The width of the material should be at least 3-4 cm, so that the shoot is completely in the foam and does not stick out from it, the plant should not touch the liquid, the distance to the water is left 5 mm. Place the baby in this hole and send it to a jar of water. The evaporation in the container is enough for the shoot. Moisture causes roots to appear.
If, after 3-4 months, roots have not formed, the lower part of the cuttings is immersed in water for 5-6 days. Some varieties do well in water, but not all orchids are as hardy. As soon as the roots grow, the young plant is transplanted into moist pine bark. From time to time it is moistened around the seedling.
Attention!
To increase humidity, cover the surface of the container with a plastic bag.
Greenhouse cultivation
A 4-5 month old child without roots is separated from an adult orchid and transferred to a greenhouse. It is necessary to create conditions close to tropical, to which the beauty is accustomed. Place drainage and moss in a cup (it cannot be compacted). Make a hole in the container, two holes in the top to insert a support on which the leaves will rest. Cover the top with a cut plastic bottle. Leave this structure until the rhizome of the seedling is formed. Ventilate the greenhouse 2-3 times a day, raising the bottle for 15-20 minutes. For efficiency, place the greenhouse in a place with bright, diffused light.
Another way to replant a baby orchid without roots. The young plant is planted and grown in pine bark. It is sprayed periodically 1-2 times a week. Frequent watering can stop the root formation process. Fertilizers are added to the water once a week. Before planting the cuttings, the bark is kept in water for several hours to soak it. If the material comes from the forest, it must be disinfected by boiling for half an hour over low heat. Instead of bark, moss is used, it is moistened, a shoot is placed on it, and moistened 1-2 times every 7 days.
A natural way of growing is when the cuttings are not removed from the “mother”, but rather the root collar on the peduncle is wrapped with damp moss. The roots grow in about 80-90 days, but you need to be patient for six months.
Care in progress
Often the root growth process does not cause any complications. But experienced flower growers advise:
- In the first place is to provide the child with growing roots - a large amount of light and the use of a growth stimulant instead of fertilizer.
- The baby needs to be constantly monitored and as soon as the condition of the offspring worsens, immediately reconsider the conditions of detention and care.
- If root growth is carried out on polystyrene foam, then it is worth periodically checking the quality of the water in the container, as it tends to sour and evaporate, so it needs to be changed and topped up.
- Provide the plant in the greenhouse with timely spraying and ventilation.
Care and further transplantation of children
A greenhouse or container with foam plastic is placed under a phytolamp or on a southern windowsill with diffused light. Without good lighting, young growth will not take root.
No watering is needed for the first 8-10 days. It is useful to spray the plant with Epin-Extra. It helps adapt young animals to new conditions. A humid climate and a warm room will promote root formation.
When the roots appear, the flower is transplanted into a plastic pot with holes. Soil composition: bark 60-70%, moss 30-40%. The beauties are also hung in hanging baskets, with the aerial roots hanging down.
Transfer:
- the shoot is cut with scissors from a mature plant or taken from a greenhouse;
- leave to dry for 30 minutes;
- the cut is disinfected with alcohol;
- planted in a pot with the prepared mixture.