The Vanda orchid has recently become one of the most popular epiphytes grown at home.
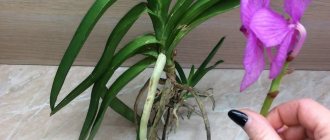
According to the type of growth, the Vanda orchid is a monopodial orchid: it has one vertically growing stem and one apical growth point. The plant surprises with its numerous powerful, well-developed aerial roots, capable of growing about 1 m in length. The Vanda orchid is grown in glass vases, flasks, hanging baskets - a bunch of bare roots is an interesting sight.
The stem of this orchid is cylindrical in shape, reaches a height of just over 1 m, it is completely covered with leaves located in the same plane. The leaf blades are cylindrical (rolled) or belt-shaped, leathery, 0.7-1 m long, 25-30 cm wide, they are green, and may have a bluish tint. With proper care, the Vanda orchid grows one leaf within 1.5-2 months.
When does the Vanda orchid bloom?
Vanda orchid in a flask care and cultivation photo
Depending on the variety, the Vanda orchid blooms in the autumn or winter months.
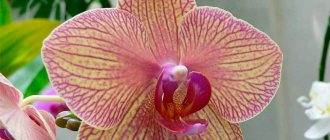
Flower buds are laid in the axils of the leaves, the flowering stem can be straight or drooping, the length is 30-60 cm. The racemose inflorescence bears 2-15 flowers with a diameter of up to 10 cm. Even after blooming, the corollas continue to grow for several days, not only increasing in size , but also acquiring a brighter shade. A blue, red-violet or pinkish tint is laid out in a mosaic pattern, which gives originality and special attractiveness.
The lifespan of the Vanda orchid is about 30 years. It is notable for the fact that it does not have a dormant period; the growth rate of leaves stops only during flowering.
The plant was discovered and described by William Johnson in 1795 during a trip to India. The natural habitat of the Vanda orchid is India, China, and Thailand. There are about 53 plant species, which served as the basis for the development of many varieties. Representatives of the genus Vanda successfully cross with Ascocentrums (they have more compact sizes), many interspecific hybrids have been bred, and work is underway to create a miniature orchid.
Compared to other epiphytes, the Vanda orchid is less demanding to care for.
Ways to grow Vanda orchid
The plant leads an epiphytic lifestyle and can be grown in three ways:
Using a substrate - growing in a pot
Growing vanda orchid in a pot with substrate photo
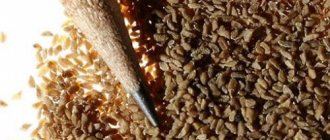
Use a plastic pot that is loose enough so that the roots are not crowded. It is desirable that the container be transparent. Make plenty of holes to provide ventilation. The substrate for growing orchids can be purchased at a flower shop or prepared yourself. To do this, take 2 parts of pine bark, 1 part each of perlite and foam chips, ½ part peat, add pieces of charcoal.
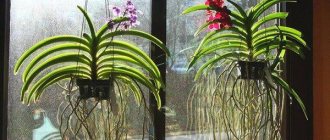
Growing Vanda orchid in a glass vase
Vanda orchid how to care at home photo
You will need a stable but not too tall vase or flask. Only the rhizome should fit into the container, and the green part should be outside (the plant needs bright light, and glass blocks access to sunlight, plus there is a risk of leaf rotting). The shape of the vase can be varied: oblong, spherical, goblet, etc. It looks very impressive, the Vanda orchid in a glass vessel is a great idea for a gift.
Watering Vanda in a glass vase is very simple: carefully pour water along the walls so that the roots are in the water, and after half an hour, carefully tilt the vase and drain all the water, making sure that no moisture remains. In summer, when it’s hot, water it 2 times a week; on cool days, once a week is enough.
This method of growing has its drawbacks: the glass gradually becomes cloudy and dirty, the vase must be constantly washed, and it is inconvenient to remove the orchid, especially if the roots are tightly “grown” to the wall of the vase and are damaged when trying to remove them.
Tricks for growing Vanda orchid in a glass vase
The Vanda orchid, grown in a glass vase, is a stylish interior decoration.
Take care of the comfort of the plant:
- choose a container with a wide base;
- the plant will live longer if the green part is outside the glass container;
- when growing in a glass container, no substrate is needed;
- Keep the roots dry in the container. To water or feed the plant, it is better to take out the orchid, immerse it in ordinary water or a fertilizer solution, let the water drain well and dry the roots, then return it to the vase. This method is better because the vase remains clean and is easier to wash than if you water the plant in a vase and then drain the water.
Growing Vanda orchid in hanging baskets with bare root system
Growing Vanda orchid with an open root system photo
You can grow vanda in hanging baskets or pots with large side holes through which the roots will freely penetrate outward. Water such plants under a warm shower, allowing them to dry and thoroughly blotting off excess water in the axils of the leaves. Watering can be replaced with conventional spraying from a spray bottle. On hot days you need to spray daily, on cool days - once every 2-4 days.
Home care
All orchids, and Vandas are no exception, need good care, and if you decide to grow them at home, you will have to work hard to create these very conditions; they are incredibly demanding to keep and require a lot of attention. Vanda is often called the queen of orchids and her care is also royal.
These plants do not have a dormant period; they belong to evergreen orchids and can bloom almost all year round, more abundantly in the spring and summer. After flowering, the flower stalks need to be cut off. The temperature for Vanda should not be below twenty degrees (otherwise the plant loses its ability to resist diseases), and they feel best at twenty-five degrees.
There should be a lot of lighting for this type of orchid (but not under the scorching sun). If there is little light, the orchid will not bloom, and if there is a large deficit of sun, then Wanda will get sick. The duration of daylight for this orchid should be twelve hours (which is quite difficult to organize at home).
The humidity in the room where Vandas grow should be at least seventy percent and no more than ninety percent, which can be maintained at home only with the help of a humidifier. Spraying orchids in dry, cool air or at night is harmful to these plants and leads to the development of diseases. Changes in humidity are very dangerous for this plant, so the orchid must be protected from this phenomenon.
Another important condition for Vanda’s well-being will be sufficient air circulation, since the plant must be well ventilated, otherwise this will lead to rotting of the neck. At home, you can install a fan next to the plants for this.
Popular articles How to grow catharanthus from seeds at home
The Vanda orchid needs additional feeding, which is using complex fertilizers (once a week and only in the morning), and washing (every few months with a lemon solution in the ratio of one teaspoon of freshly squeezed juice per one liter of water at a temperature slightly above room temperature ). You can increase fertilizing during flowering, but if the plant is sick, then on the contrary, fertilizing will only cause harm.
Watering the Vanda orchid should be plentiful, but careful. You need to water in the morning, and in the summer take a morning bath (place the plant in water for a third of an hour until the root system acquires a green tint). In autumn, water only when there is sunlight, otherwise the plant is watered every few days. In winter, you can water the plant only after the substrate has completely dried.
The health of a flower depends on proper care for it.
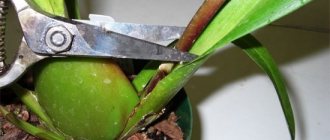
These orchids are replanted as they grow from the pot (approximately every three years). They don’t take large pots for Wanda, because in such spaces she slows down her growth. It grows in a specialized mixture, which is bought in flower shops (you can prepare it yourself, but it’s unlikely to be cheaper or of better quality). There is no need to trim the Vada (only if the stems have become too tall, you can cut off the top part and replant it in the substrate).
As a container for the Vanda orchid, you can use hanging baskets, pots with side holes or a vase. If you grow Vanda in a vase, then there should be no water in it; in this case, the plant must sometimes be taken out and dipped in water with fertilizer, dried and moved back. Although you can simply pour water into a vase and wait until air bubbles stop coming out, indicating the need for liquid. When the orchid “gets drunk,” the water is poured out of the vase. If the orchid is constantly in water, then it begins to rot, and if the container is closed, then the plant will die altogether. It is ideal when the vase has a wide base and the green shoots are located outside it. Hanging baskets are convenient because they give “freedom” to roots, which can reach a length of more than a meter.
Conditions for growing Vanda orchids
The Vanda orchid is light- and heat-loving; the most suitable place for its placement would be windows facing east and west.
Air temperature
During the spring-summer period, maintain the air temperature at 22-25 ° C (the plant can tolerate temperature increases up to +28 ° C). To stimulate flowering at night, lower the air temperature by about 10 °C. In winter, dry maintenance with an air temperature of 14-16 ° C will be required. With strict adherence to the rules of care (watering, air humidification, ventilation), the Vanda orchid grows and develops well. When ventilating, do not allow a draft; in the summer season you can move it to fresh air (on the balcony, in the garden, in the gazebo).
Lighting
The plant is demanding in terms of lighting: all year round, the duration of daylight hours should be 12 hours a day. Lighting must be diffused; direct sunlight will cause burns on the leaf blades. In the autumn-winter period, additional artificial lighting will be required. Use regular fluorescent lamps.
The level of illumination is indicated by the size and shade of the leaves. They should be a normal green color and almost the same size. If the shade of the leaf blades is dark green, there is not enough lighting; if it is pale green, yellowish, the lighting is intense. If the last pair of leaves grows longer than the penultimate one, the lighting level needs to be increased, and when it’s the other way around (the penultimate pair is longer), the lighting level should be reduced.
How to care for a Vanda orchid
The Vanda orchid is sensitive to water conditions. During the period of active growth (spring-summer), the substrate should be constantly slightly moist. In winter, water moderately; in cold conditions, watering is minimal (water when the substrate is completely dry).
Alternate wet and dry cycles to avoid causing root rot. In summer, when it is very hot, water almost every day; in winter, when it is warm, water every 2 days (it is better to water before lunch).
There are several ways to water a Vanda orchid:
A warm shower is the most suitable watering option for Wanda. Place the plant in the bathtub and run it with very warm water from the shower until the roots turn green. Then leave the plant for 30 minutes to allow the water to drain. After an hour, wipe the leaf plates with a soft cloth.
Immersion - a pot with a plant is placed in a container filled with water for 30 seconds. Let the liquid drain. In this way, only completely healthy plants are watered.
Soaking - the orchid’s roots are immersed in a container of water and left to “drink” for half an hour to several hours. So water it 2 times a week.
Watering can - add water by moving along the edge of the pot. Pour water until it begins to appear in the pan, drain off excess water.
The optimal indicator of air humidity when growing Vanda is 70%. Regularly spray the aerial roots of the plant, do not allow water to get into the axils of the leaves.
Interesting video about caring for Vanda orchids:
How to feed Wanda
The Vanda orchid is very fond of feeding, and it needs to be fed throughout the active growing season. Use special formulations for orchids, but dilute them with more water, 2-3 times the recommended dose. You can feed by mixing fertilizers into the water for irrigation or spraying the leaves with the solution. Fertilize every week while the orchid's roots are growing. During the dormant period, feeding is stopped.
Lack of nutrients leads to poor flowering. But you shouldn’t be too zealous with fertilizing: the plant will become elongated, the top will soften, and will bend under the weight of the inflorescences. Pay attention to the young leaves: on their surface there is a stripe of a pale green hue, normally its width is a centimeter. If the strip is narrower, there is not enough fertilizer; if it is wider (up to 2 cm), there is an excess of nutrients.
Features of care
When growing orchids in a vase, you need to pay special attention to watering. The procedure is different from that for flowers in pots. It is not recommended to leave water in vases, otherwise excess water will lead to the death of the root system of the flower. Usually the plant is given 20-30 minutes to “quench its thirst”, after which the remaining water is poured out of the pot. Water for irrigation must be soft; it is allowed to mix ordinary tap water with distilled water in a 1:1 ratio. In summer, orchids are watered every other day, but without allowing the soil to become waterlogged. In winter, one watering per week is enough.
In order for vanda to grow well in a glass vase, bloom profusely and regularly, the flower must be fed. To do this, it is enough to add a little fertilizer to the water for irrigation.
Don't forget about spraying. A regular spray bottle is suitable for these purposes. In summer, this procedure should be carried out at least three times a day. It is better to spray the flower in the morning, so that by the evening the leaves of the plant have time to dry.
When caring for an orchid, remember that it loves light, but you should avoid exposing the plant to direct sunlight. The ideal option for placing a flower is windows facing south. If it is not possible to provide the flower with sufficient amounts of sunlight, additional artificial lighting is used. If there is a lack of light, the plant may die.
Orchids are prone to fungal diseases. To prevent this, it is necessary to remove dry and broken roots in a timely manner. Fortunately, they are clearly visible in vases and the danger can be noticed in a timely manner. If you see that the leaves are turning yellow or falling off, cut off the affected area and treat the area with iodine or brilliant green.
If you comply with the above care conditions, add love, attention, and care to them, then Vanda in a glass vase will give you the opportunity to enjoy the beauty of flowering up to 3-4 times a year.
In the world of flowering plants
When to replant a Vanda orchid
Replanting Vanda after purchasing photo of the root system in the substrate
Replanting is carried out immediately after purchase, and also as necessary, when the roots no longer fit in the pot or the growth rate of the Orchid slows down. In general, transplantation has to be done once every 3-4 years.
Emergency transplant cases:
- The substrate is compacted (poor air and water permeability, takes a long time to dry);
- The plant was initially planted in an unsuitable substrate;
- The roots are too deep into the substrate;
- Root system rotting.
Features of propagation and transplantation
Every gardener needs to know the features of propagation and transplantation. The need for transplantation occurs every two to three years. The plant does not need to be replanted more often, and it should not be touched unless necessary, since vanda, like any other orchid, reacts negatively to disturbances in its tranquility. The need for a transplant is indicated by:
- caked, contaminated, damp substrate (it does not allow air to pass through, does not retain water well and takes a long time to dry);
- the presence of rot on the root system;
- excessive depth of the root system into the soil;
- The plant does not fit in the pot.
If you notice any of these factors, it's time to start replanting. You need to prepare fresh substrate and a new larger pot. Then proceed like this:
- Carefully remove the plant from the pot.
- Immerse the root system in warm (4-5 degrees warmer than room) water and soak for twenty minutes.
- Remove any remaining substrate and inspect the roots. If you see rotten or dried roots, they need to be cut off, the cut areas should be treated with ground cinnamon or crushed activated carbon and dried.
- Next, take a pot and cover the bottom with a drainage layer two centimeters thick (expanded clay is excellent), then add a little bark and install a vand. Holding it with your hand, sprinkle with the remaining substrate, but not tightly so that the roots can breathe. Sphagnum moss is laid on top.
- You can water the plant two to three days after transplanting.
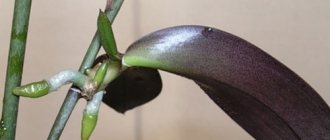
Vanda propagation is carried out by transplanting its children. They can form in any part of the plant, but this variety is characterized by their appearance on the roots. It is necessary to separate the children only after the roots have reached at least five centimeters in length. The baby is cut off with a disinfected sharp knife, and the cut areas are treated with ground charcoal, which helps to avoid infection.
The baby needs to be placed in a separate pot with a small amount of substrate. Moreover, the ratio of tree bark and sphagnum moss should be 4:1, respectively
It is important to maintain a temperature of 26-27 degrees and a humidity of about 90% until the roots grow to a length of 20 centimeters. It is most convenient to do this in a greenhouse.
Next, the baby is transplanted into an ordinary pot and cared for as an adult plant.
All other methods of reproduction are not available for Vanda. Some gardeners strive to grow an orchid from a seed, but this is quite difficult and time-consuming. In particular, greenhouse conditions will be needed (temperature about 28-29 degrees constantly, humidity above 90% and illumination for at least 12-15 hours a day). You will have to wait at least nine months for the sprout to appear from the seed. Next, the shoot will grow for three years, and only then can it be transplanted. You will have to wait another four to ten years before the first flowers appear, even if you know all the secrets of keeping and caring for an orchid.
Reproduction of Vanda orchid by children
Seed propagation of the Vanda orchid is used mainly by breeders.
In home floriculture, Vanda is propagated vegetatively.
Babies form at the base of the stem. Also, lateral shoots appear in the leaf axils. They can be separated when they reach a height of at least 5 cm and have at least one root. Carefully separate the sprout and treat the cut area with a fungicide. For rooting, plant in a small pot with a universal substrate for growing orchids, cover with a jar or cut-off plastic bottle on top - it is important to maintain air humidity of at least 85%. After 14-20 days, gradually accustom him to room conditions. When the plant reaches a height of 20 cm, it can be transplanted into a container for continuous growth.
When the orchid becomes very long (tall), its top can be used for rooting. Cut off the top, treat it with a growth stimulant and plant it in the soil for rooting, creating a greenhouse effect.
Over time, the lower part will also give birth to “babies”.
Reproduction options
Reproduction of orchids of all varieties is considered a rather complex process, especially if it is carried out at home.
If you provide the flower with proper care at home, over time you will be able to propagate the crop with lateral shoots (Figure 7). Each of them must have its own root system, and the height of a viable shoot must be at least 5 cm. It is carefully separated from the mother plant and placed in a pot with a light and loose substrate, having previously sprinkled all the sections with charcoal powder. It is advisable to keep the seedling under cover, maintaining a high level of humidity.
Despite the fact that this method is very simple and effective, it is extremely rare for a home orchid to form such daughter shoots at home. Therefore, if you need to grow a young plant, it is better to use the cutting method.
Figure 7. Vegetative propagation method is practiced at home
To do this, the top of the stem with aerial roots is cut off from the mother plant and placed in a light substrate consisting of tree bark and sphagnum moss. In the first three days, the cuttings are actively watered, and then grown at a reduced humidity level (watering is carried out more often than 2 times a month).
Diseases and pests of the Vanda orchid
Spots on Vanda orchid photo
The Vanda orchid is susceptible to various diseases, the causes and signs of damage, control methods are described below.
Fungal infections
Fungal infection on Vanda orchid photo
Treating plants with Physan according to the instructions helps against fungal infections (as in the photo above).
Spotting - spots similar to warts form on the underside of leaf blades. This happens from waterlogging of the soil or high air humidity.
Fusarium - round black spots appear at the base of the leaves. The reason is that the environment is too warm and humid.
How to treat spots on a Vanda orchid
Black spots on Vanda orchid photo
Treat the leaves and roots with a fungicide, provide shade, do not spray the orchid on the leaves, reduce air humidity, avoid too high and too low temperatures (it is advisable to maintain 24°C).
Bacterial rot
Overmoistening of the substrate (especially in combination with low air temperatures) causes rotting of the root system and stem. The roots of the plant soften and turn black, the stem turns yellow, without intervention the plant will die. Carry out an emergency transplant: cut off the affected areas, treat the entire plant and cut areas with a fungicide (phytosporin, Bordeaux mixture), replace the substrate with a new one, also disinfect the container, keep the orchid in the shade until it shows signs of growth. Treatment with an antibiotic helps against bacterial rot (1 gram of tetracycline is dissolved per liter of water).
As a last resort, you have to cut off the rhizome completely. It takes some effort to grow the root system again. Be sure to treat the cut area with crushed charcoal. The ideal option for resuscitation is to place it in a basket made of natural raw materials with large weaving. Maintain a high level of air humidity and water by spraying. Under such conditions, young roots will appear after 7-10 days.
Viral lesions
Infection by various viruses is especially dangerous. Viruses do not spread as quickly as bacterial or fungal rots, but they are almost impossible to cure. If you decide, it is better to get rid of the diseased plant so as not to infect all the orchids. The virus can be kept dormant: cut off all affected parts, treat the orchid with a fungicide. Avoid elevated temperatures and excessive humidity. Remember that viruses are most aggressive during the warm season.
How to treat an orchid against thrips and mites video:
Among the pests that can cause trouble:
- Thrips
Light dots and streaks appear on the surface of the leaf blades, over time they become covered with a whitish coating, then turn brown and die. Thrips and flowers are affected: they become covered with spots and become deformed.
- Shields
Yellowish dots appear on the leaves and stem, which over time take on the appearance of warty growths. Scale insects suck the juices from the plant, causing the orchid to dry out.
- Mealybug
Small insects collect on the reverse side of the leaf and can be recognized by the presence of a coating similar to cotton wool. The growth rate of the orchid slows down, the leaf blades die off.
- Spider mite
How to deal with mealybugs video:
The pest attacks the plant when the indoor air is dry. Thin whitish cobwebs can be found on the plant. The pest settles on the reverse side of leaf blades. The leaf blades turn yellow and dry out.
If any pests are detected, they must be removed mechanically. To do this, moisten a cotton pad with soapy water and wipe the leaf blades on both sides, then treat with an insecticidal preparation.
How can Wanda get sick at home?
The plant is of medium complexity; if not properly cared for, it is often affected by diseases. Pests are rare for vandas. The plant begins to get sick only when the wrong growing conditions are provided. More often, with excessive moisture, root rot occurs, and the leaves turn yellow and quickly fall off. Remember that if a perennial loses its lower plates, its decorative value will decrease. The main problems when growing are:
- Fusarium is a fungal infection that occurs due to waterlogging;
- Yellowing and falling of vanda leaves is a consequence of excessive watering;
- Vanda does not bloom if there is insufficient lighting or if not very powerful lamps are installed.
Varieties of Vanda orchid
Among the variety of species and varieties, only a few are grown indoors. Let's look at the best of them.
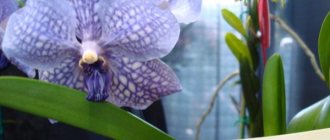
Blue Vanda Vanda coerulea
Vanda blue Vanda coerulea photo
Discovered in 1837 in the tropics at an altitude of 1000 m above sea level. The length of the strong, erect stem is 0.8-1 m; often the base of the stem is exposed. The leaf blades are hard, dark green, 12-18 cm long, about 3 cm wide. The leaves are located opposite. The lateral inflorescences are 30-60 cm long and bear 14-20 large corollas. The color scheme is lavender-blue, the shade can be lighter or darker. Most often, the first buds bloom in August, the flowering period ends in December-November.
Vanda Sanderiana Vanda sanderiana
Vanda Sanderiana Vanda sanderiana photo
Originally from the warm rainy tropics. The racemose inflorescence consists of flowers with a diameter of 10-15 cm. The sepals are greenish-yellow in color; chestnut veins may be present. The color of the petals is white, pinkish, yellow.
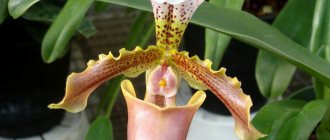
Vanda tricolor
Vanda tricolor photo
The plant can reach a height of 1.5 m. The flowering stem is short and bears about 10 corollas. Petals and calyxes are egg-shaped with wavy edges, the nail is wide. The lip is three-lobed: the central lobe is larger, guitar-shaped, pink or purple, the remaining lobes are spotted.
Vanda Rothschildiana Vanda rothschildiana
Vanda Rothschildiana photo
Less demanding in care. The color range of inflorescences includes pinkish and blue shades. The flowering period is from March to October.