There are types of bulbous crops that cannot winter in open ground in the northern regions and cities of central Russia.
They cannot tolerate frost, they freeze, and even if they survive the winter, it is impossible to wait for them to bloom in the spring. Most often, such plants are planted in winter, as soon as stable warm weather sets in outside. As a rule, this is the beginning and end of May.
Most of our popular garden bulbous flowers are not at all capricious, do not require complex care, and grow well in different soils.
The main thing is to plant it correctly. What is important:
- choice of location;
- soil preparation;
- healthy bulbs;
- correct planting depth;
- correct landing time.
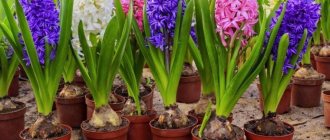
The main requirements for planting bulbs of tulips, daffodils, snowdrops, hyacinths, muscari, crocuses, and many other bulbs are soil preparation, fertilization, healthy bulbs. Planting time is also very important.
Choosing a place for bulbous flowers
Almost all garden bulbs do not tolerate stagnation of moisture in the soil. In wetlands, the bulbs rot. If there is melt water in your garden for a long time, if the groundwater level is high, then the best place for bulbous plants is a slope, an alpine hill or a high flower bed.
Early spring flowers - galanthus, muscari, crocuses - can be safely planted under trees. Their growing season occurs during a period when the trees are still practically without leaves and have enough light.
Small bulbs in one place can grow from 4 to 10 years, so it is better to plant them among ground cover plants or between perennials. You can plant small bulbous flowers on the lawn.
How to grow tulips in containers
Very beautiful are low-growing tulips growing in containers, having a height of 15-25 cm, but quite large flowers. Different colors: bright red, white, yellow, pink, cream, two-tone. Bulbs are planted in containers in the second half of September. Until spring, containers are placed in a dark, cold room, sometimes moistening the soil. With the emergence of seedlings, the containers should be installed in the garden, choosing a place well lit by the sun.
Container for tulips made of decorative stone
Yellow tulips in a large container
Border of container tulips
Tulips in a large pot
Tulips in a plastic box
White tulips
Small flower containers-pots are convenient to move around the site
Miniature tulips in a container-basket
Beetroot tulips
Tulips grow in the garden - in a wicker basket
Tulips of different colors in original containers
Bright tulip flower bed in a container
Orange and burgundy tulips in large pots
In spring, we feed tulips with organic fertilizer (slurry or bird droppings diluted with water 1:10), as well as mineral fertilizer with a high nitrogen content. With the appearance of flower stalks, it is advisable to feed the plants with phosphorus (for better and longer flowering), and when the flowers fade - with potassium (this will improve the ripening of the bulbs). By the way, to prevent the bulbs from becoming smaller, during this period feed the tulips with boron (you can dilute 10 g of boric acid powder per 10 liters of water).
If the tulips have grown taller than you expected and the stems are bending, tie the composition in the container with green wire - it will not be noticeable among the foliage. After flowering ends and the leaves wither, the bulbs are dug up, dried and stored until planting.
Soil preparation
Before planting, dig up the soil and apply fertilizer. The soil needs to be dug up to a depth of 30 cm. It is advisable to do this not just before planting, but a little earlier so that it settles.
Sand, peat, and humus are added to heavy clay soil to improve its structure. Infertile sandy soils are enriched with humus.
Excess fertilizer is not always beneficial. In rich soils, many plants grow well with leaves and bulbs at the expense of flowering.
Muscari in containers
Blue, blue, white muscari
Low-growing muscari are good in low pots
Elegant spring flowers
Container for flowers made of logs
Muscari in a wicker basket
How to choose healthy bulbs?
Before planting, the dug up bulbs need to be sorted out. Remove all damaged, moldy, and rotten spots. Not only will they not produce good flowering, but they can infect other plants with fungal diseases.
Immediately before planting, it is advisable to treat the bulbs with a pink solution of potassium permanganate for 30-60 minutes.
Helpful advice . If you have a lot of “defective” bulbs of tulips, daffodils, and crocuses, don’t rush to throw them in the trash. It is more practical to soak them for an hour in potassium permanganate and plant them away from flower beds, somewhere in an abandoned corner of the garden, near a fence or shed. You will be surprised, but many of them will bloom in the spring, and if you dig up the soil at the end of summer, you will find quite healthy large bulbs.
How to grow crocuses in containers
There are crocuses that bloom in the spring and crocuses whose flowers bloom in the fall. Bulbs of early spring crocuses are planted in a container in the fall, and autumn ones - in mid-summer. Although it is possible to transfer already flowering plants from open ground into a container, replanting usually does not affect the condition of the crocuses.
Blue crocuses in a container
Crocuses wake up
Yellow crocuses in a tall container
Crocuses of four colors
Blue and white crocuses - clearing in a container
These flowers are especially tender
Container insert for small bulbous flowers
The soil in the flower container can be decorated with pebbles
The crocuses have fully opened
Half-opened crocus buds
White crocuses in identical containers look fresh and tender
The flowers of sharp-petalled crocuses look like stars
These plants have no special requirements for soil, but if the container has light, moderately fertile soil and good drainage, they grow and bloom better. It is better to install pots with crocuses in sunny areas or in light shade. In extreme shade, these plants are likely to wither.
When to plant bulbs?
The planting period for bulbs may vary annually, and be different in each region. Everything depends on climatic conditions, namely soil temperature. The soil temperature at a depth of 10 cm should be no more than + 9 - 10 degrees C. The best period for planting bulbous flowers begins in mid-September and continues until early November.
Once in the ground, the bulbs must produce roots before the soil freezes, after which further development of the bulb stops with the onset of winter. The rooting time of the bulbs is up to 30 days after planting the bulb.
Small bulbous plants should be planted first: muscari, crocuses, snowdrops. Daffodils are planted in mid-September. If they are planted later, they will not develop enough roots.
The end of September is the time to plant hyacinths. Hyacinths require more fertile soil; the amount of organic matter is increased to 6 kg per 1 m2.
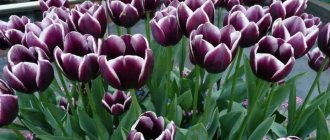
It is recommended to plant tulips in early October, although the timing depends on the variety. It should be noted that many specialists do this earlier.
These dates are approximate. In the northern regions, it is likely that the soil will freeze earlier; planting dates will be shifted to the end of summer. In the south, you can plant bulbs later, but spring comes earlier here, many species bloom in February-March, and before that time they must have time to go through their entire development cycle.
What is needed for abundant flowering of bulbous plants?
Most of our popular garden bulbous flowers are not at all capricious, do not require complex care, and grow well in different soils. The main thing is to plant it correctly. What is important:
- choice of location;
- soil preparation;
- healthy bulbs;
- correct planting depth;
- correct landing time.
The main requirements for planting bulbs of tulips, daffodils, snowdrops, hyacinths, muscari, crocuses, and many other bulbs are soil preparation, fertilization, healthy bulbs. Planting time is also very important.
Bulb planting depth
The planting depth of various bulbous flowers depends on the size of the bulb itself. The basic rule is simple: planting depth is equal to three bulb heights . The exception is the bulbs of daffodils and hyacinths; we plant them at double height. For example, if a bulb reaches 4 cm in height, we plant it at a depth of 12 cm. Children usually do not bury as deep as adult bulbs (although this sometimes causes them to freeze out).
The distance between the bulbs also depends on their size. When forming a flower bed, you need to know the height of each flower. Low bulbous flowers are planted in the foreground. Large tulip and daffodil bulbs are planted at a distance of 10 cm from each other, and the distance between rows is 25 cm.
It should be noted that a beautiful flower bed is obtained if the bulbs are planted densely. But with this placement, the plants do not have enough nutrition to form a new bulb after flowering.
For ceremonial flower beds, exactly this method of planting is used, removing the plants completely after flowering and filling the vacant space with prepared seedlings of other species. The usual planting method involves combining bulbous plants with other types of plants. Tulips are planted with arabis, forget-me-nots, pansies, periwinkle, daffodils go well with muscari. It is best if, when planting together, the roots of the plants are located at different depths.
Basket for bulbs, how to use. About landing rules
Beginning flower growers ask the question: “How to plant bulbs in baskets?”
Everything is much simpler than it seems at first glance. First, prepare the soil needed for planting. Mix garden soil with peat and add mineral fertilizers. Flower bulbs are treated in a solution of the drug "Maxim".
In the garden bed where the flower bed is supposed to be planted, the soil is completely dug up. Prepare small holes, the size corresponding to the diameter of the container. A layer of sand 5 cm thick is poured onto the bottom. A basket is placed on top. Sand is also added to it. Then the planting material is laid out and covered with prepared soil.
Planting bulbs in baskets is done in several ways. If it is necessary to create clumps in a flowerbed of the same color, then only one variety is planted in each basket.
Mixborders have a variety of color compositions. Here you can make a combination of large and small-bulb flowers. The following condition must be observed: the larger the planting material, the greater the depth it is planted. Therefore, large plants are placed on the bottom of the container, medium-sized ones in the middle, and small-bulbous plants in the top layer. All layers are covered with a layer of earth.
In order not to lose the planting site in the spring, you need to mark it with flags or markers.
These baskets can be used to decorate an existing lawn without damaging it. Cut the turf to the size of the planting container. Carefully remove the top layer and make a small hole. Place a container with bulbs and return the soil. Lay a layer of turf on top. Water it with water. After flowering in the spring, the basket is removed and the turf is returned to its place.
What else do you need to know
When planting, bulbs should not be pressed into the soil with force, so as not to damage the root roll. After planting, the area should be leveled so that water does not stagnate in the planting holes.
If autumn is dry, then the places where bulbous flowers are planted need to be watered regularly.
With the onset of frost, it is advisable to mulch the place where the bulbs are planted with compost or dry leaves. Small baby bulbs are covered especially carefully. They are planted closer to the surface and the risk of freezing is greater.
How to grow daffodils in containers
In container gardening, low-growing daffodils 10-15 cm high are often used. Bulbs are planted from the second half of August and throughout September. The unpretentiousness of daffodils is known, but you can get beautiful plants if the soil in the containers is loose and fertilized with organic matter.
Small containers for miniature daffodils cups
Daffodils in a beautiful container
White terry daffodils in containers
Daffodil bushes in pots
You can grow a whole bouquet in one container
White and yellow spring flowers in pots
Tall, medium and miniature daffodils in a container
Decorative flower container - wicker basket
Small-flowered white daffodils
It is advisable not to skip watering, especially during the formation of peduncles and flowering. It is better to fertilize with a weakly concentrated solution of mineral fertilizers: at the emergence of seedlings, the formation of flower stalks and at the end of flowering.
Which bulbous plants to plant in spring: top 6 flowering plants
As a rule, bulbs with low frost resistance are planted in spring. First of all, these are: dahlias, ixias, glamines, babians, gladioli, sparaxis, acidantheras and tigridia.
Tigridia
This flower culture is very amazing. Tigridias are very beautiful in bloom and delight them for quite a long time - a whole month and a half.
Flower bulbs are planted in open soil at the end of May. Planting is carried out in sunny areas of the land. Tigridia bulbs are buried at a depth of a maximum of five centimeters.
The peculiarity of the plant is its flowering - the tigridia flower blooms for only one day. Then it is replaced by other flowers on the same bush. Tigridia bulbs are dug up in mid-autumn and then sent for storage.
Gladioli and their subspecies - acidanthera and glamine
Atsdanthers and glamines are subspecies of gladioli. All these crops are planted in open ground between May and June. At this time, the probability of return frosts is minimal. To speed up growth and speed up flowering, you should germinate the bulbs in advance at home. They need to be soaked and planted in containers.
Forcing is especially important for late varietal gladioli, acidantheras and glamins, since these plants cannot bloom with the classic method of planting in open soil.
The depth of planting the bulbs is about four centimeters, but no more.
After watering, water the plants lightly. It is better to plant bulbous plants in the morning or late evening.
Bulbs are dug up for storage in September. The main thing is to make it before frost. Before sending for storage, the bulbs need to be dried and cleaned of soil residues. If the stems of the plants are still succulent at this time, they should be trimmed and only ten centimeters of greenery should be left.
Babiana
This late-flowering bulbous plant is planted in mid-May. The planting depth of babiana is about two centimeters. The crop blooms from late August to early September. Immediately after flowering, the bulbs are dug up and sent for storage. Babiana bulbs can overwinter under cover in the soil, but only during very mild and snowy winters.
The dug up babiana bulbs must be stored separately from each other in a warm place. This is due to the fact that the greens do not have time to dry out before the bulbs are removed from the ground. As soon as all the stems have dried, you should cut them off, clean the bulbs of soil residues and send the planting material into the cold for storage. If you adhere to the storage, planting and growing conditions, such a tropical plant can easily be grown in the regions of the middle zone.
Ixia
This plant looks very similar to crocuses. However, Ixia flowering does not begin in spring, but at the beginning of summer.
To achieve lush and beautiful flowering, you should germinate Ixia bulbs before planting them in open soil. The germination procedure is carried out five weeks before planting.
Bulbs are planted in containers at a moderate distance. Germination will allow you to achieve early flowering and prepare Ixia before planting in the soil in May. Bury the bulbs shallowly in the ground - one centimeter deep, but not deeper.
Ixia blooms in early autumn. The plant does not have time to ripen before frost, so at the end of flowering the bulbs are dug up along with the stems. All stems should be allowed to dry completely for a month in a dry and warm room with good ventilation. Next, the bulbs are sent into cool conditions until April.
Dahlias
Dahlias are one of the longest flowering bulbous crops. Dahlia tubers should be planted in mid-May.
Planting material is buried in the soil at a depth of twenty-five centimeters. If the tubers are large enough, they need to be divided.
Dig up the tubers for winter storage after the flowering period ends. This must be done before the onset of severe night frosts. After digging up the tubers, you need to trim the stems of the plant, leaving twenty centimeters of greenery.
Sparaxis
This plant should be planted in open soil in mid-May. Planting location: sunny and warm areas. The bulbs are deepened into the soil by six centimeters, sprinkled with soil. The culture will delight you with bright flowering at the end of August.
After flowering, the bulbs are dug up and stored in early October. Sparaxis bulbs should be stored only in cool and ventilated areas, placing them in a dry wooden container.
Summer bulbous crops have amazing flowering. They are beautiful both individually and in group plantings. They are quite easy to grow.
It is important to choose the right time for forcing and planting, and also to dig up flower bulbs for storage in time. Also in spring you can plant crocosmia, some varieties of lilies, freesia, Deppe's sorrel, hippeastrum, and eucomis.
You may also find the following materials useful:
- Gorgeous philodendron: the basics of growing an ornamental foliage plant
- Planting and replanting violets in 2022 according to the lunar calendar: favorable days, care
- Garden lupine: features of cultivation and care
- Feeding clematis in spring: what to feed for flowering and growth, types and methods of fertilization
- Amazing Top 10 Ornamental Plants for Sandy Soils
Forcing lilies
When to plant
Low-growing varieties of golden, long-flowered, Japanese, tiger, Taiwanese, Philippine, snow-white, regale, etc. lilies are suitable for forcing at home. As in the case of other bulbous plants, the planting material must be impeccable: large, dense, healthy bulbs, treated before planting for half an hour with a solution of medium-strength potassium permanganate. Another condition is age - the bulbs should not be younger than three years.
On average, the time period from planting a bulb in the ground to the start of flowering lasts 3-4 months, or more precisely, for Asian hybrids it is 55-70 days, for oriental and tubular lilies 3-4.5 months, for long-flowered lilies - 6-8 months from the moment the sprouts appear, and the flowering of the tiger lily begins after the emergence of shoots in just 1.5-2.5 months. For early forcing, the bulbs are planted in the ground in October-November, for late forcing - in February or March.
- Tulips: late planting method
Proper care and planting of lilies in the garden
Forcing at home
The container for lilies should be deep and wide - at least 15 cm in diameter. A drainage layer is placed at the bottom of the pot, then a few centimeters of substrate consisting of equal parts of turf, humus, leaf soil and sand, a bulb is placed on the substrate layer, which is covered with the same substrate, immersing it to a depth of 5 cm. After planting, the bulb is watered, Lay a layer of wet sphagnum on the surface of the substrate and place the pot in a bright place with a temperature range of 8-10 ºC - a window sill in an unheated room is most suitable for this.
Planting care involves periodically moistening the soil. From the moment the sprout appears, the temperature is gradually increased, eventually bringing it to 20-25 ºC. Lighting should also be maximum, but without direct sunlight. Watering gradually becomes more frequent and then more abundant; developed leaves need to be sprayed. The water temperature for watering and spraying lilies should be no lower than room temperature.
After the leaves appear, the lily needs to be fed alternately with mineral and organic fertilizers of weak consistency every ten days. When flowering comes to an end, spraying the leaves and fertilizing is stopped, and watering is gradually reduced until it stops completely.
Planting onions and garlic
When planting onions in the fall, it is important to follow some rules to get a good harvest. Late planting is much more beneficial than early planting - the bulbs are frost-resistant and harden quickly, garden pests at this time either die or hibernate. Important!
Early planting is harmful not only due to germination and death of the plant when winter frosts set in, but also due to bolting in the spring, which negatively affects the quality of the crop.
Dates for planting onions and garlic in the fall
The standard time for planting onions and garlic for the winter is late September - early October. Depending on the weather forecast, they may move, but it is better to place the plants in the ground a month before a permanent frost.
Preparing the site
The soil for onions and garlic is processed in a standard way - the area is cleared of debris and weeds. It is better to loosen the soil without digging - a pitchfork is suitable for this.
Important! When planting onions and garlic, it is necessary to observe the neighborhood regime: they can be planted after green and nightshade crops, cabbage, cucumber, and garlic.
- You should not plant onions in one place for several years in a row: despite its antiseptic properties, it is susceptible to a number of pests. Planting after celery or radish is also harmful.
- Any organic matter, humus or granules will be suitable as a fertilizer.
Preparing onions and garlic for planting in the fall, planting diagram
Like flowers, onions and garlic must be disinfected when planting with potassium permanganate or a special preparation. The planting scheme assumes a depth of 7 cm, the distance between the bulbs is up to 10 cm. The distance between the rows should be 15 -20 cm for ease of loosening the plantings and weeding them.
Features of planting winter garlic
Despite the similarity of the crops, garlic is more demanding on conditions than onions. When planting garlic, the beds must be prepared two weeks before planting: dig up to a depth of 30 cm, mulch with peat, and be sure to water.
Mulching is especially important for garlic, as peat warms the soil, retains water, and provides better wintering. The bulbs themselves must be hardened off before planting in the refrigerator or cellar for a month.
Methods for planting winter garlic
Planting garlic in the fall is possible in several ways: cloves, single cloves and bulbs.
Planting winter garlic cloves
Chives and cloves must be embedded deeply (approximately 8-9 cm) into the soil to protect them from frost and increase root growth. The planting scheme using this method assumes a distance between cloves of 10 cm, and 20 cm between rows.
Planting winter garlic from bulbs
Bulbs are small parts of garlic that grow on the arrow when flowering. They are considered vegetative organs and are equivalent to aerial layers. The advantage of growing garlic from bulbs is the absence of fungal diseases and pests.
The planting scheme for bulbs assumes a distance between rows of 15 cm, and between plants up to 5 cm. Their planting depth is less than that of cloves - only 3 cm. Just like cloves, bulbs are sprinkled with humus and spilled in dry weather. Read about the intricacies of planting winter garlic in a separate article.
Planting bulbous plants in the fall hardens the plants, relieves the gardener of the load and brings joy with the first shoots and harvest.