Even in the most modest interior of an apartment, luxurious bright gerbera flowers can create coziness and a festive mood. You can, of course, grow garden gerberas in the summer, cut them and collect them into bouquets that will stand in a flower vase in your room for a couple of weeks. But, nevertheless, it is much more interesting to grow this beauty at home in a pot and enjoy its amazing flowering for several months. Good lighting, a mild microclimate in city apartments and knowledge of some of the nuances in caring for indoor gerberas at home will allow anyone to achieve the desired results.
Location
Gerbera loves sunny window sills facing east or west, but will also thrive in other places well lit by diffused sunlight. It should be shaded from direct midday sun, but at other times it simply needs sun. Thanks to its compactness and the chic appearance of its inflorescences, gerbera can decorate any corner of your home. You can find a place for it in the bedroom, in the living room, in the living room and even in the kitchen. It is safe for allergy sufferers. She’s not afraid of drafts, but she loves fresh air - so don’t forget to ventilate her corner regularly. In the summer, the plant can be taken out onto the veranda, balcony or even into the garden, where it will have a great time in the warm season in the open ground.
Temperature and humidity
Proper care of indoor gerberas also includes observing temperature restrictions. Although this is a fairly hardy plant, there is still no need to overuse it. Having entered a dormant period, Transvaal chamomile (another name for a flowerpot) may stop blooming altogether. The optimal conditions for its cultivation are:
- in winter at least 11-14°C;
- in the warm season from 20 to 25°C;
- limit the possibility of frequent temperature changes;
- provide relatively high humidity.
It is not recommended to keep the plant on the balcony in winter. Dampness and cold put the gerbera in a sleepy state. Over time, she may just die.
The homeland of this flower is Africa (Madagascar Island), as well as Asia. In this regard, it is important to take into account that the climate in those parts is tropical. Therefore, it is best to create natural living conditions for an indoor gerbera flower.
Lighting
Gerberas really respect direct sunlight. This is a prerequisite for the formation of a lush crown of leaves and flowering. Only, if the flower is on a south window, it is better to protect it with a curtain or blinds at midday.
The optimal length of daylight for comfortable maintenance of gerbera throughout the year is at least 12–13 hours. Therefore, from approximately mid-autumn to mid-spring, we recommend illuminating the flower to these levels using conventional fluorescent, LED or special phytolamps, placing them at a slight angle at a distance of about 80 cm above the pot. Sufficient lighting is a necessary condition for flowering.
Problems during cultivation
When growing gerberas, gardeners may encounter problems such as wilting foliage. This happens for the following reasons:
- Lack of moisture . In this case, you just need to water the flower; if the leaves straighten, it means that the plant did not have enough liquid.
- Excess moisture . This problem can arise when transplanting a plant into a new container and leads to acidification of the soil and rotting processes.
- Presence of peat in the soil mixture . Peat takes moisture from the soil and does not release it to the plant.
As the flower grows, the leaves may also turn pale . This happens when there is excessive lighting. To avoid the problem, you need to shade the plant from the midday rays of the sun. If the leaves lighten after purchasing a flower, this may be due to getting used to new conditions or to poor lighting.
Why do the leaves turn yellow?
When the leaves turn yellow and fall off, this indicates rotting of the root system due to excessive watering or air humidity. To save the plant, you need to dry the soil and water it moderately. If this does not solve the problem, then the flower should be replanted, removing the rotten roots.
Yellowness of leaves can also appear in the following cases:
- lack of room lighting;
- dry air;
- water getting into the plant outlet when watering;
- excessive dryness of the soil;
- non-compliance with spraying rules;
- watering with cold water.
If the appropriate maintenance conditions are observed, problems can be avoided, and if they have already arisen, the care of the plant can be adjusted.
The reasons for the yellowing of gerbera leaves are described in the video:
How to achieve lush flowering?
The abundance of gerbera flowering directly depends on compliance with the growing rules:
- Lighting . In order for the flower to bloom well, it is necessary to maintain a daylight hours of 12 hours. The most abundant flowering is achieved during the period of natural light from August to November.
- Feeding . It is better not to use large amounts of nitrogen-containing fertilizers. They should be replaced with mineral fertilizer, which includes potassium and phosphorus.
- Transplant . When replanting a plant, you need to choose the right size of the pot so that it is not too cramped or large.
Temperature
The optimal temperature during the growing season and flowering is considered to be 20–25 degrees. in the daytime and 18-20 degrees. at night. This corresponds to natural indicators in its homeland. During the winter holidays, the temperature in the room is reduced to 14–16 degrees, while reducing the watering rate. At 12 gr. In warm temperatures, gerberas go into “hibernation”: almost all processes slow down, flowering is excluded. Temperature 8-10 degrees. is critical for home gerbera, although in its native places it can withstand lower temperatures due to the fact that the roots there are, after all, in warmer and more humid layers of soil.
The flower does not like sudden changes in temperature, especially during flowering. The heat is 30 degrees. Gerbera also does not tolerate higher levels well - the inflorescences quickly wither, the leaves lose their tone. On such days, remove the flower to cooler places, shade it, and ventilate the premises more often.
Growing from seeds
You can buy gerbera in a pot at a flower shop, but if you want to grow a flower from the very beginning, you should buy seeds. What to do with them next:
- Small containers (for example, boxes) are filled with substrate.
- Seed material is sown and a little sand is sprinkled on top.
- The soil is sprayed with a spray bottle.
- It is very important to create greenhouse conditions; for this you can cover the crops with glass or film.
- The boxes are placed in a warm and bright place.
The first growths can be seen already on the 7-8th day. During this period, the glass (film) is removed to avoid combustion.
After two full-fledged leaves are formed on the seedlings, you can start picking. The seeds are planted in the spring, and during this year the gerbera will bloom.
Watering
During the growing season and flowering, gerberas in a pot need to be watered regularly, and the amount of liquid with each watering should be approximately the same. The soil in the depths of the pot should be kept slightly moist and slightly dry on the surface of the soil. The ideal watering scheme is as follows: the soil should be damp for 4 days, and then dry for 2 days. On cool days, the dose of water is reduced accordingly, and on hot days – increased.
It is best to pour water around the edges of the pot using a watering can with a long spout. It is not necessary for water to directly fall on the roots, much less on the leaves and inflorescences.
Watering through a tray is also allowed. Just remember to remove excess water that has not been absorbed into the soil from the pan approximately 20-30 minutes after watering.
We recommend loosening the soil in the pot between waterings so that the roots have free access to oxygen.
Water for irrigation should be soft (rain, snow, boiled or standing for 24 hours), at room temperature, not lower than 20 degrees, to avoid the development of fungal infections. Even in the summer heat, you cannot water this plant with cool water - the roots will rot.
This may be interesting: Care for Medinilla at home
In autumn-winter, watering should be significantly reduced, as well as the temperature of the flower. Water only after the top layer of soil has dried at least 2-3 cm. You can determine the need for watering using a match or a toothpick, as well as by the appearance of the plant: if the gerbera is “thirsty,” its leaves droop and lose tone.
Conditions for growth
Light mode
Indoor gerbera will develop well in diffused light, but during active sun it is better to hide it in the shade. Northern windows are unlikely to be suitable for a flower; there they will receive the least amount of light.
In the summer, if it is not very hot on the balcony, you can keep a pot with a plant there. If you take a gerbera outside, you need to gradually accustom it to the sun's rays so that the leaves do not get burned.
In autumn and winter, the flower will need additional lighting in the form of a fluorescent lamp.
Room temperature
The indoor gerbera flower is a heat-loving plant. Temperatures below 20 degrees can be destructive for it; in spring and summer you should keep the thermometer readings around +24.
When the gerbera fades, it enters the sleep phase and then the temperature can drop to +14 degrees, no less. Night and daytime fluctuations in indicators can affect flowering.
Important! During the dormant period, the flower should not be left on the balcony, especially if it is damp, as such maintenance worsens the condition of the plant and leads to its death.
Watering mode
It is not recommended to water with water that has just been drawn from the tap, even in summer. Some diseases can appear from hypothermia of the roots.
The soil in which the gerbera is planted should not be too wet, but it should not be allowed to dry out. High humidity can provoke the appearance of nematodes, which are very difficult to deal with in the future.
There are several watering secrets that can increase the chances of successful cultivation:
- you need to pour water along the walls of the pot so that it does not fall on the root system;
- spray the plant, capturing only the leafy part;
- Watering using the bottom method is done through the tray of the pot, filling it with water for half an hour, after which the remainder is drained.
- For irrigation, use water that has stood in room conditions for at least a day.
Interesting! Experienced flower growers advise increasing the frequency of watering in winter, when the heating is on, and before the active growth of stems in the spring.
Soil for gerbera
The best option would be to buy soil with reduced acidity from a flower shop. When making the mixture yourself, you need to take 2 portions of leaf soil, and one portion each of sand and peat. If the filling components are taken from the street, it is advisable to disinfect them at high temperatures to avoid the risk of pests or diseases.
Fertilizing home gerbera
In order for a gerbera flower to develop correctly, it needs to be fertilized periodically.
The application complex depends on the period of development.
- It is better to feed a flowering plant with a liquid solution containing potassium.
- During the growth of leaves, namely from the beginning of February to mid-spring, the flower will need nitrogen.
Interesting! In the spring-summer period, 14-20 days should pass between fertilizing, and about a month during dormancy. In order for the roots to receive enough oxygen, the soil needs to be loosened 3-4 times every 30 days.
Choosing a growing container
A more suitable option should appear to replace the transport pot in which the gerbera is stored in store conditions.
The pot should not be too cramped, but it should not be large either, otherwise flowering will be delayed until the roots fill the space.
Gerbera during flowering
It is certainly worth growing gerbera at home for its bright and large flowers.
In order for flowering to always occur on time, you need to know about the plant’s daily routine:
- short daylight hours in winter are a signal for the gerbera to enter the resting phase;
- lighting a flower for more than 11-12 hours provokes an increase in green mass, which occurs in spring and summer;
- From late August to mid-autumn, gerberas are in the flowering phase.
Beginning flower growers can provoke unscheduled flowering by additional lighting in winter; such conditions greatly deplete the gerbera, and it will not grow for more than 2 years.
Important! After the flower withers, the peduncle must be broken off completely to the base. This procedure prevents rotting of the rosette and provokes the growth of new flower stalks.
Air humidity
Gerbera does not tolerate dry air well. The optimal humidity level for it is 70–80%. If the indicators are greatly reduced, especially during the heating season, the humidity must be increased by all available means. It is not advisable to spray the plant itself - neither the leaves nor the flowers like it. But regularly spraying the space surrounding the flower, creating a water suspension or fog around the gerbera, is very necessary. There are other ways to increase indoor humidity, for example:
- place the pot in a deep tray, at the bottom of which is a layer of wet expanded clay, pebbles, sphagnum moss or coconut fiber;
- cover the radiators with wet towels;
- create a gerbera “company” of other plants that evaporate moisture from the leaves;
- Place wide containers of cool water around the gerbera;
- Buy a household humidifier and use it.
If the humidity in the room, on the contrary, is too high, above 80-85%, this will make the gerbera vulnerable to fungal and other infections, especially in winter. In this case, ventilation, reducing the amount of watering, and canceling spraying will help.
Spraying
Gerbera prefers high humidity . Daily spraying with a fine spray bottle will help create just such conditions.
For the procedure you need to use only warm water. It is important to ensure that large drops of moisture do not remain on the leaves - this can lead to rotting.
To increase air humidity, especially during the heating season, you can place small containers of water near the plant.
The soil
To grow indoor gerbera, it is best to purchase ready-made store-bought universal soil for flowering indoor plants. In the wild in South Africa, gerbera grows in soils rich in minerals but almost devoid of organic matter.
It is also possible to prepare the substrate yourself. It should be nutritious, loose, with a slightly acidic reaction. Mix leaf soil, peat chips, coarse sand (or sphagnum moss), small pieces of charcoal in a ratio of 2:1:1:1. Add some pine bark. It is important that the soil does not contain humus or compost - a minimum of organic matter! (They may burn the tender gerbera roots). The soil mixture of the specified composition will be quite fertile and permeable, it will provide free access of air to the root system of the plant.
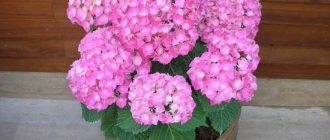
What do gerbera flowers look like?
- Gerbera is very similar to chamomile. But unlike the white petals of chamomile, gerbera has a different color
- There are white, scarlet, pink, yellow and other gerberas. Almost all varieties are distinguished by bright colors
- Gerbera belongs to the Aster family, so there are similarities with lush asters
- Low-growing varieties are ideal for growing indoors. However, it is worth noting that the height of the gerbera stem can reach 60 cm
- The diameter of the flowers ranges from 4 to 12 cm
Gerbera indoors
Gerbera transplant
The bright life span of indoor gerberas is short, only 3–4 years. Then the bushes lose their decorative properties and bloom less frequently and sparingly. Through reproduction, young specimens are grown, and old ones are thrown away. Therefore, you will only have to do the transplant a couple of times.
Replanting after purchase
The first transplant is carried out soon after purchasing the flower, since a store-bought transport pot and the substrate in it are not suitable for long-term cultivation of the flower. Plan this procedure 2-3 weeks after purchase - this time is enough to adapt the gerbera to new conditions. You will need to remove the flower from the shipping pot and shake off or scrape off as much of the store-bought substrate as possible with a wooden stick. Do not trim or pick off the gerbera roots. It is better to disinfect the prepared pot, even if it is completely new.
There should be drainage holes at the bottom of the pot, then a layer of drainage made of expanded clay (pebbles, crushed stone, pieces of polystyrene foam, small ceramic shards) at least 2-3 cm thick. Next comes a layer of fresh, preferably sterilized substrate (about a third of the pot) . Place the bush on the substrate in the center and carefully fill the roots along the edges of the pot. Make sure that the root collar is not buried. The root rosette should rise 2-4 cm above the ground surface.
The transplant should be done during the dormant period, when the gerbera does not bloom. If you were given a pot of blooming gerbera, then it is better to leave it in the same pot so as not to disturb the flowering process and not spoil your pleasure. Replant after the plant has finished flowering.
Planned transplant
You will have to plan the next transplant for next year, when the gerbera has grown enough. The optimal time for transplantation is the end of the dormant period. This is approximately from the end of February to mid-March. Some gardeners recommend replanting after flowering has ended, somewhere in late autumn. We are for the first option.
- Replant the gerbera using the transshipment method, while trying to disturb the roots as little as possible.
- After transplanting, compact the substrate and water it moderately. Place the flower pot in the shade for 3–5 days to prevent direct sunlight.
- If after a week the transplanted gerbera bush does not look cheerful, as if it has not yet recovered from stress, spray the surrounding air and build a greenhouse around the flower, for example, from polyethylene. Let the plant in it grow stronger and begin to grow. Get rid of accumulating condensate in a timely manner by ventilation, so as not to provoke the development of rot.
This may be interesting: Why Eucharis does not bloom and other problems with growing Amazon Lilies
Carry out the first feeding no earlier than a month after transplantation. Use mineral nitrogen-containing fertilizers that stimulate the flower to actively grow green mass.
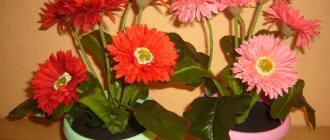
Description and photo of a houseplant
Indoor gerbera is a perennial, magnificently flowering plant. The foliage is collected in a small basal rosette. The flowers, which look like large chamomiles, are a huge advantage. The color palette is surprising, it is so diverse that you can grow a whole rainbow on your windowsill. There is no blue tint.
Indoor gerbera is low-growing and takes an average of 3-4 years to grow. Then its development and flowering decreases, and the flower is replaced with a new specimen.
Look at the photo of what an indoor gerbera looks like.
What kind of pot do you need?
The diameter of the pot should not be too large, only 2–3 cm wider than the root system of the flower. Crowding in a pot is one of the conditions for abundant flowering of gerberas. Volume - approximately 1–1.5 liters.
A deep pot made of unglazed ceramics is best suited for gerberas - this will allow air to pass well to the roots of the plant. But in winter, on a cold windowsill, the roots of the gerbera in such a pot can become hypothermic. This should not be allowed, because gerbera is very sensitive to this. In this case, foam or a wooden stand under the pot for thermal insulation will help.
How to choose when buying in a store?
When choosing a flower in a store, you should pay attention to the color and shape of the leaves. They must be of the correct shape and have a uniform color. It is best to buy a young plant , as it will quickly adapt to new conditions.
You should not choose a gerbera that was close to the door or window - in such places there are sudden changes in temperature, and this may later affect the condition of the flower.
When inspecting the plant, you should make sure that there are no insects or damage on it, and that there are no visible signs of disease.
It is necessary to check the condition of the soil. If the flower is easily reached, this indicates a violation of watering and the death of the root system.
Thus, home gerbera requires special, but not complicated care. The main thing is to observe the temperature regime, soil and air humidity, monitor the lighting and periodically feed the plant. Then it will delight you with inflorescences several times a year.
Fertilizers
Fertilizing is applied only during the active growing season. From the beginning of spring to the end of November, the plant is fertilized every 1.5–2 weeks. Indoor gerbera does not like natural organic matter. It is preferable to feed with mineral supplements. Purchased complex fertilizers for flowering plants (Master, Uniflor, Florovit, Agricola) are suitable. We recommend halving the concentration of the product in the solution compared to the instructions.
Pay attention to the composition. During different periods of gerbera development, use a specific composition of fertilizer. For example, during the growth of green mass, fertilizers should contain more nitrogen components. During flowering - potassium and phosphorus. It’s good if iron is included in the fertilizer, since indoor gerberas also need it. You will learn about its deficiency in the soil by pale yellow spots spreading on the leaves, indicating the development of chlorosis. Rusty nails buried in a pot help. Among chemical agents, you can use Micro-Fe and Ferovit preparations.
Potting Guide
If there is a need to rejuvenate the plant, it is removed from the pot and the bush is divided into parts. This procedure is best performed after flowering, before the gerbera goes to bed. The planned annual planting in a larger container takes place in the spring. In this case, a step-by-step algorithm is followed:
- a layer of expanded clay, broken brick or ground stones is placed in a new pot;
- the plant is carefully removed from the old container by transshipment and relocated along with the earthen lump;
Important! During the replanting process, it is important not to damage the roots, otherwise the gerbera will get sick or will not be accepted into the new pot at all.
- the space between the earthen lump and the walls is filled with fresh substrate.
In the process of transplantation
All that remains is to water the plant and put it in its permanent place. The first days after transplantation, the bush requires special attention.
Reproduction of gerbera at home
Gerbera readily reproduces in captivity in several ways. Let's look at them in order.
Dividing the bush
This is the easiest way to get a new gerbera bush from a healthy plant at the age of 3-4 years, on which several basal rosettes have formed. In the spring, when replanting a flower, it is divided into parts so that each has 2-3 growth points (at least one) and part of the root system. The root system should first be soaked for 2–3 hours in warm water, slightly pink from potassium permanganate. Afterwards, the roots should be carefully cleaned from the soil and unraveled, if possible, by hand. Divide the roots with a clean knife or scissors. Sprinkle all cuts with crushed charcoal (activated) charcoal or cinnamon.
Transplant the bushes obtained by dividing into separate small pots filled with a substrate suitable for adult gerberas, and water. Carry on with your care as usual. When replanting, make sure that the growing points are 2-3 cm above the soil surface. Rooting takes a long time, from six months to a year, then flowering can occur only 10-12 months or the next year after replanting.
By cuttings
This method is less effective - the cuttings often rot. But you can try. Cut a part of the stem diagonally from the plant, about 10 cm in length, with 2-3 leaves. It is possible to root the cuttings in sand, perlite or vermiculite, covering the container on top with a plastic bag or glass cup (jar), maintaining high humidity, a temperature of 25–27 ° C and, if possible, bottom heating. When a new leaf appears on the cutting, we can assume that rooting was successful. Now the cutting can be transplanted into a pot with suitable soil and cared for as an adult plant.
Growing from seeds
Growing gerbera at home from seeds is a rather complex and time-consuming method. Moreover, it does not guarantee the preservation of the main varietal characteristics of the flower, such as dwarfism, double petals, their shades and other “highlights” of the variety. However, you can collect the seeds yourself or purchase them at the store. Seeds retain good germination rate (more than 50%) for six months. If the seeds are more than eight months old, there is no point in planting them. Gerbera specimens grown from seeds will bloom only after two years.
The optimal time for sowing seeds is from late January to March. Sow seeds in containers or other containers from which you can build a greenhouse. As a substrate, use a mixture of sand and peat chips, which must be well moistened before planting.
- Spread the seeds over the surface without burying them, sprinkle with a thin layer of fine sand on top.
- Close the lid of the container (cover the container with glass or film). Keep in a dark, warm place until germination. Ventilate daily to remove condensation. After 8-10 days, the first shoots will begin to appear.
- Now move the greenhouse to a bright place at a temperature of 18-20 degrees. Protect from direct sunlight.
- When the second true leaves appear on the seedlings, they should be planted in small plastic cups (drainage holes and a drainage layer are required!), and into the same substrate. Try to harm the roots as little as possible.
- When young gerberas have 4–5 leaves, they should be transplanted into pots with a diameter of 9 cm in a substrate suitable for adult gerberas. Then take care as usual.
Reproduction methods
There are two ways to propagate gerbera at home:
- seed;
- dividing the bush.
How it all happens:
- Seed propagation. Seed material can be purchased at a flower shop.
For planting you will need a wooden container. The seeds are deepened by 3 centimeters and irrigated with water. Cover with glass to create a greenhouse effect. Full shoots will appear in 2 weeks. When the seedlings get stronger, pick them. Pots are chosen no more than 10 centimeters in diameter. Planting is best done from February to April. - Dividing the bush. You can divide the rhizome at the time of transplantation, in the spring.
The plant must be mature (from three years old). The gerbera is carefully removed from the container, the remaining soil is removed from the root system, and the rhizome is cut into 5 parts. Each new specimen must have at least a couple of growth points. New plants are planted according to the standard scheme.
Diseases and pests
Yellowing and falling leaves of the plant indicate that it has been infected by spider mites. This is caused by insufficient soil and air moisture. The disease can be eliminated by spraying the stems.
Excess nitrogen fertilizers, sudden changes in temperature, and the use of cold water for irrigation can provoke a fungal disease in the plant called powdery mildew. To prevent such a disease, it is necessary that at home this flower does not stand close to plants susceptible to this disease, for example, roses.
Lack of moisture can cause the appearance of whiteflies and aphids. The result of excess moisture can be white or gray mold. The affected leaves are removed, the humidity is reduced by reducing watering, the stems are treated by spraying them with copper sulfate in solution.