Perhaps there are no gardeners who are indifferent to orchids. Some are afraid of them and often “love” them with their care. For others, orchids grow actively, bloom almost all year round and readily reproduce. Today we want to dwell in detail on the latter case. What to do if your beauty has long grown out of her flowerpot and acquired offspring? How to plant an orchid while preserving new plants and without harming the mother plant?
When to plant orchids?
Orchids begin to propagate only when they reach the age of three to four years. Cuttings and shoots are cut from healthy samples so that the mother bush and the young harvest do not disappear. It is impossible to grow an orchid from leaves because they do not have growing points. Plant division is carried out in early spring, when the flower gains green mass. During this period, orchids actively absorb useful minerals from the soil, so transplanting into another pot will not be stressful for it, and the cuttings will close in about 2-4 days.
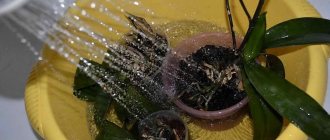
Orchids, like many tropical flowers, are easily infected with infectious diseases. Therefore, when starting to sit down, put on gloves and disinfect your tools. The scissors need to be sharpened well, the blades should be washed with a solution of potassium permanganate and wiped with any antiseptic (for example, alcohol). The cuts on the stems can be sprinkled with charcoal; it will protect the “wound” from harmful microorganisms.
Do not replant your tropical flower in autumn, winter or during flowering. It is better to propagate orchids in the spring before the first flowers appear or after flowering. Be sure to remove flower stalks from faded orchids.
If the time for replanting is chosen correctly, and all procedures are carried out without errors, the young flowers will certainly germinate and take root.
Shutdown
Considering the step-by-step process of replanting an orchid at home, it is worth noting that the new pot must be disinfected. It is dipped into a strong solution of potassium permanganate. It is filled to 2 cm with drainage (expanded clay).
The roots of the orchid are straightened out to fit the volume of the new pot. The soil is added gradually, compacting it a little (knock on the pot). Some roots can be left above the surface. Peduncles (if any) are fixed with a support. The plant is attached to it using special clothespins. It is better to choose a stick from natural materials. A support made of bamboo or a tree branch looks impressive (you need to choose even, smooth twigs, pre-sterilized).
We breed orchids with seeds - a generative method
Breeding orchids using seeds is not a vegetative method, but a generative method. This is the longest method as it will take about 4-5 years to obtain adult samples. It’s quite difficult to do this in your own home, but it’s still worth experimenting.
The process begins with the seeds being placed in wet soil, to which chopped moss and leaf soil are added. You need to spread the contents in a thin layer, without sprinkling with soil. Then greenhouse conditions are created with a constant level of humidity and the same temperature. There is no need to water the soil; it is better to spray with warm water. The artificial environment must be sterile.
The emerging sprouts are picked at the stage of the first leaf, the second pick is when the second leaf sprouts, the third is at the stage of the fourth leaf. After this, the seedlings are planted in flower pots. The plant will grow, but flowering will begin after a few years.
Please note that the resulting flowers may not be similar to the mother flower. Therefore, be prepared for the fact that the shade of the petals may not meet your expectations. The advantage of seed propagation is the ability to obtain a large number of sprouts in just one sowing.
Propagation by side shoots
Certain types of orchids, such as phalaenopsis, have difficulty with division. In this case, it will be safe to propagate phalaenopsis by lateral shoots, or aerial babies. The upper lobe of a peduncle that has reached the age of 1-1.5 years is cut off, leaving a dormant bud in the lower half of the flower. This should be done after all the petals have fallen.
The plant is prepared in two stages. The first stage begins in February or March:
- reduce watering (once every 10 days);
- move the flower pot to a dark place; the air temperature here should remain within +16 - +18 degrees at night, and +22 -+24 degrees during the day;
- Every day, take the orchid to a well-lit corner, leaving it for one hour.
Sparing irrigation and exposure to a high temperature environment promotes the awakening of the kidney. When it appears, you can proceed to the second stage:
- move the plant to a warm room, the temperature should not drop below +20 degrees, since the shoots will stop forming;
- protect the tropical bush from direct sunlight, curtain the windows and keep the plant in the shade;
- water the flower 2-4 times a week, insufficient moisture will slow down the growth of the children, and excess moisture will lead to the formation of fungus;
- water for irrigation must be prepared in advance: it must sit for 2-3 days, after which it should be heated to +30- +34 degrees;
- spray the leaves of the plant 2-3 times a day with water with the addition of special complexes to nourish the flower;
- feed the orchid with nitrogen-containing fertilizers.
In the conditions of improvised tropics, the plant will soon develop shoots, which will later form its own roots and leaves. These small bushes are located in the place of buds; their further development depends on the microclimate. Maintain an atmosphere with warm air and high humidity.
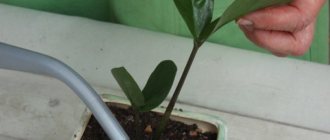
Children are cut from the stem when the roots reach four to five centimeters in length. Young shoots should be planted in a transparent container, first filled with pine bark (up to 1 cm). It acts as drainage and is able to retain moisture, so the roots do not dry out.
Sprinkle substrate onto the bark. It is necessary to take soil from the pot where the mother specimen grows. Plant new orchids in this soil, water them and periodically feed them with fertilizers. In the first year of life, continue to keep the flowers in a miniature greenhouse with high air humidity (80%).
Recommendation: occasionally flower stalks develop on the side shoots. Do not remove them, let them fade and only then separate the young flower from the stem.
Cuttings - process sequence
The method of propagating orchids by cuttings is suitable for fast-growing species. The role of the cutting is performed by the upper part of the shoot with leaves and aerial roots. The procedure is carried out in the spring so that the flower adapts and gains strength. Seating is done in the following way:
- the selected cutting is cut with a sharp, disinfected knife;
- the cut is sprinkled with charcoal;
- plant the plant in a transparent pot and transfer it to the greenhouse.
The oblong stems can be divided into several parts, leaving two axillary buds on each. Planting material is placed on damp sand or moss without deepening it into the substrate. The greenhouse (greenhouse) in which the orchid will be located is made of glass, since the plant must develop in a humid, warm environment.
After the white roots appear, the seedlings should be placed in separate containers (for example, plastic cups) with water. Cuttings that are in the same pot will intertwine. And it is very difficult to separate the tender shoots: they break easily, so you risk ruining all the seedlings.
Change the water in the glasses on the second day, do not let it stagnate. Feed the fresh liquid with a drop of orchid fertilizer. If the shoots develop slowly, treat them with a hormonal paste or solution for exotic plants.
Don't forget about the greenhouse effect. Plastic containers with flowers must be covered with a plastic bag to maintain the desired temperature. Young flowers are transplanted into the soil when the roots grow 5 cm. Caring for the hatched plant is similar to caring for an adult specimen, but you need to keep the orchid in the shade for some time.
Why replant the plant?
Before considering the process of transplanting an orchid at home step by step with a photo, you should pay attention to the importance of this procedure for the flower. Domestic phalaenopsis are much less capricious than their wild relatives. However, an orchid that is accustomed to growing in a pot has certain requirements for its growing conditions.
After purchasing this flower, in most cases, replanting is not required. You need to pay attention to the root system and the condition of the substrate. If they are in unsatisfactory condition, it is time to start replanting. It is worth considering that the orchid is an epiphyte. It grows on tree crops in warm and humid climates. Therefore, rooting is not an important aspect of this plant's survival.
In the wild, the orchid weaves its fleshy, thick roots around the branches and bark of trees. From them the plant receives moisture during rain or dew. At home, the orchid is cut off from its usual habitat. She can no longer obtain the essential nutrients that are found in abundance on the tree bark. For this reason, it grows in soil, which needs to be changed periodically.
Transplantation is one of the most important procedures in the process of caring for epiphytes. These plants grow very quickly, depleting the substrate in their container. You need to learn about some features of the process before starting an orchid transplant at home. The step-by-step video of this procedure is worth watching before starting work. It is presented below.
By updating the nutrient substrate at certain intervals, you can provide comfortable conditions for flower growth. It is worth noting that the soil is completely changed. Novice flower growers complain that after carrying out such a procedure, the plant began to hurt and did not bloom for a long time. This is explained by the characteristics of the orchid. Transplantation and care require certain knowledge from you.
Phalaenopsis can absorb nutrients from the soil only after they are treated with fungi and saprophytes. In the previous soil, their community was characterized by a certain ratio. Therefore, when transplanting, the microchemical composition becomes unusual for the plant. It takes time for the plant to adapt to new conditions. To speed up this process, you need to add a minimum amount of old soil to the new substrate.
Dividing a bush - propagating an orchid correctly
Sympoidal plants are propagated in this way: Dendrobium, Cymbidium, Miltonia, Cattleya, Oncidium. Only mature bushes are suitable for this method. When dividing, at least four false bulbs are left, otherwise the orchid will die. The division and replanting procedure is as follows:
- the soil needs to be well moistened and softened, this will make it easier to remove the plant from the pot;
- pull the bush by the base of the stem and remove the flower;
- clear the roots from the soil;
- cut the main onion with a sharp knife into 2-3 parts, taking care that at least 4 pseudobulbs remain on all divided parts;
- Sprinkle the cuts with cinnamon or crushed coal, dry the workpieces in the air;
- after this, plant the divisions in different pots, covered with moss and useful substrate.
After division, the bulbs nourish the orchid and help it recover. If the seedlings are lethargic and weak, you can root them in a plastic bag, first filling it with damp moss. In such conditions, it will be easier for the flower to take root. Keep the bag in a warm room, because in a cool place it is more difficult for the cutting to take root.
If you do not want to spoil the appearance of the mother specimen, you need to wait before dividing the adult bulb. You can start propagating an orchid at a time when fresh shoots form their own bulbs and they enter the dormant stage. This is the most favorable period for their division.
Plant the bulbs in separate containers, but remember that the resting period for the flowers is still ongoing. When the plants leave this phase, they will begin to actively form a root system, begin to grow and gradually turn into an adult orchid.
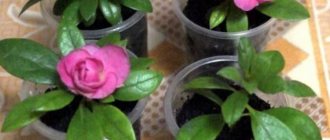
Recommendations for caring for young flowers
An orchid takes 4 years to fully mature. Before this, “young” flowers are kept in pots suitable for the size of the bush. The container must match the volume of the roots. A mandatory requirement is the presence of a drainage layer, since water should not stagnate near the roots.
Expanded clay, brick chips, and foam granules can be used as drainage. The latter material will do if the window sills in the house are cold. The substrate is prepared from pine bark, sphagnum (moss) and charcoal. Some gardeners add high-moor peat; this substance populates the soil with beneficial microflora and does not allow it to dry out quickly.
Sometimes young flowers have roots pointing upward. Do not try to force them back in: the plant is fragile and can be seriously damaged. Spray such roots with warm water to prevent them from drying out or cover with moss.
Teenage orchids need to be watered more often than adult plants. After all, the pot in which they develop is smaller. Add growth stimulants and other fertilizers to the irrigation liquid. Provide proper lighting and adhere to the required temperature conditions, and then at the right time your beauty will give her first flowering.
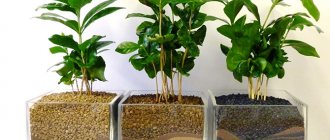
Soil and container
In order to correctly replant herbaceous plants for open ground, experienced gardeners prepare in advance. The first thing to do is prepare the pot. Pots for Phalaenopsis orchids must meet the following requirements:
- Volume. The pot for the Phalaenopsis orchid should be large enough to accommodate all the roots. But it should not be huge, as this will cause fluid stagnation and rotting.
- Transparency. Transparent walls are best suited for replanting Phalaenopsis, since through them it is very easy to visually monitor the development of roots and identify diseases and pests in time.
- Availability of drainage and aeration systems. Aeration and the absence of stagnation of water after watering are very important for the roots. The holes at the bottom of the container and on the sides help ensure this.
Important! Properly selected pots for phalaenopsis orchids are the key to the health and good development of the flower.
Soil for this type can be purchased in specialized stores, or you can make it yourself. The substrate must meet the following standards:
- Well crushed. Large pieces of collection take up a lot of space and do not hold moisture at all.
- Dry and sterilized. The components of the soil are the support of the roots. If they are wet and infected, rotting and infection will begin, which will lead to the death of the entire plant.
Suitable for creating your own substrate:
- pine bark
- Sphagnum moss
- White coarse sand
- Crushed fern roots
- Charcoal
- Pumice
- Expanded clay
Important! Pumice and expanded clay usually make up the drainage for the orchid, which is created at the very bottom of the pot.
Composition option:
- Pine bark – 5 parts
- Moss – 1 part
- Charcoal – 1 part
- Expanded clay and pumice - drainage
The simplest substrate:
- Charcoal – 1 part
- Pine bark – 5 parts
Medium complexity substrate:
- Charcoal – 1 part
- Moss – 2 parts
- Pine bark and wood chips – 5 parts
Important! The components of the substrate must be well mixed and under no circumstances should they be crushed, as stuck together parts lose conductivity.
Transplant stages
- Preparation. Make sure the flower is ready to move. This is done either in emergency cases, or when the plant can definitely withstand this stress.
- Seizure. Slowly and carefully, holding the base of the flower, the orchid is pulled out of the slide. If the roots have grown to the walls, then the pot must first be gently crushed. If there are a lot of roots and the pet is stuck in the container, you will have to use scissors.
- Inspection of the entire plant. To ensure the health of the flower, they examine not only the roots, but also the peduncles, growth point and leaves.
- Sanitation. After the entire plant is outside, the roots are carefully cleaned of the old substrate, while simultaneously inspecting for diseases and viability.
Important! Healthy roots can look different. A silvery root color indicates the need for watering, while a deep green color indicates that watering is not required. If the color of the roots of your Phalaenopsis is different from these two, then there is something wrong with them.
Dried roots are cut off with a sterile instrument, and the sections are rubbed with charcoal. Yellow leaves and dead flower stalks are also removed. If rotten areas are noticed on any of the plant organs, they are completely cleaned and treated with antiseptics. It happens that a flower almost completely loses its roots and it is necessary to grow new roots before replanting.
- Drying. The orchid is left without substrate for 6-8 hours so that the roots dry completely.
- Strengthening the flower. A pre-prepared, disinfected pot is filled a quarter full with the new mixture, then the roots of the plant are placed there. If some of them do not fit, then they need to be carefully hung. Next, the rest of the soil is poured on top. Read more about how to properly plant an orchid in a pot.
Do not press down the new substrate under any circumstances, as this will ruin the entire procedure. You need to replant your Phalaenopsis orchid by shaking the pot periodically. The growing point of the orchid is placed in the center of the pot and soil is not poured above the growing point.
You need to plant an orchid very carefully, trying not to damage the plant, but if one of the roots breaks, it’s not a big deal. As time passes, he regenerates. If the question arises whether orchids need drainage, the answer is simple. Yes, drainage is needed for an orchid!