Gloxinia has faded, what to do next?
The 21st century is a time of high technology and constant movement, so everyone, from the average clerk to the desperate housewife, experiences stress. Some people are in this state permanently, others are “overcome” in places, and psychologists advise both of them on ways to get out of it. Sports, interest groups or having a pet. But what should those who do not have the time and energy for all of the above do? An excellent solution is a houseplant. Spathiphyllum, violets, ficus, or maybe exotic gloxinia?! It will delight its owner not only with beautiful, unusual flowers, but also with an incomparable aroma. It is not surprising that after gloxinia has faded, what to do next is perhaps the most popular question, both among beginners and among already experienced gardeners.
Peculiarities
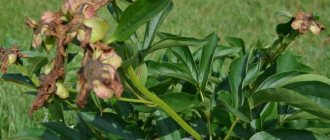
Flowering is the most beautiful stage of a plant's annual cycle. At this time, the buds gain strength and bloom. Every gardener can admire the results of his work. But even during this period it is important to continue caring for the buds. When watering, try not to get water on the delicate petals.
again , provided that the first flowering was not too late . There are situations when gloxinia blooms last all summer. Before the first rosettes have time to bloom, new ones are already growing in the axils of the lower leaves.
You just need to remove the faded parts along with the stem, then new bushes will spread their leaves to replace the faded ones. No preparation is required for the next flowering. Apparently, you are comfortable with gloxinia, and it will delight you with its lush and bright flowering for a long time.
Sometimes gloxinia buds do not bloom and turn black, or the plant does not bloom at all. Read about why this happens and what to do in our articles.
Gloxinia description, photo
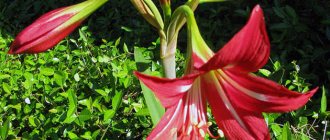
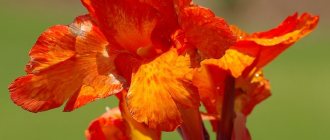
Gloxinia flowers can be very unusual, velvety or, on the contrary, simple and smooth. The palette of this beautiful plant is varied, from small white buds to huge purple ones. This perennial herbaceous plant either has no stem at all or a very short one. It can have many large flowers (the number can reach up to 50), with bright perianths, or a single beautiful flower.
Gloxinia leaves are green, bizarrely shaped, as if created to emphasize the unique shape of the “bells”. This is a tuberous plant that loves the sun's rays.
Attention! Despite the fact that gloxinia is photophilous, it is afraid of direct sunlight. If you place a flower in the southern part of the house, under the “open sun,” the plant risks getting burned and dying.
The homeland of this miracle plant is Brazil, although it can often be found in South America. Garden gloxinia (genus Sinningia) is popular among us, as it requires no less, although diametrically opposed, care than its domestic counterparts.
How to make gloxinia re-bloom
When gloxinia has faded, novice plant lovers can simply push the pot into the far corner, hiding the plant behind a palm tree or ficus. But the bush is capable of producing a second wave of buds and remaining beautiful until late autumn. The main thing is to remove the stem or shorten its crown and provide proper care.
What to do with the above-ground part
If after the first wave of flowering you leave everything as it is, the tuber will increase. The plant can re-bloom the corollas without pruning, but they are single and much later. Sometimes buds no longer appear at all during the current season.
The most important operation that triggers re-flowering is the removal of the above-ground part. The method depends on the owners. When they are happy with the result, there is no need to change anything.
When the stem is twisted, new shoots emerge from the tuber and produce a full-fledged, beautiful rosette with many flower stalks. If gloxinia is pruned, stepsons will develop from the axils of the leaves, the plant will turn out less beautiful, often leans to one side, and produces fewer buds. But flowering begins 2-4 weeks earlier.
Trimming
Sometimes they start pruning when the gloxinia has not yet completely finished flowering - there are a few buds left on the bush, but the bulk of the corollas have already withered. The stem is cut off, leaving 1 pair of leaves.
The above-ground part that has become “superfluous” is used for reproduction. Anything can be used – whole leaves and fragments, pieces of stems, even flower stalks.
Perhaps stepsons have already begun to develop in the sinuses. Sometimes, by the time of pruning, they manage to put out buds, and with a large tuber, they bloom. If not, new shoots will appear very quickly, literally within a few days after feeding gloxinia.
From the grown daughter rosettes, choose one strong one, break out the second and use it for rooting.
If you leave 2 internodes on the gloxinia stem, 4 stepsons may appear from the leaf axils. Sometimes novice gardeners feel sorry for breaking out daughter rosettes, or they want to get a lush, symmetrical bush, and leave 2 new stems. This is acceptable, but you need to consider:
- the more side shoots, the thinner and weaker they are;
- the second wave of flowering is not too abundant, and the number of buds will further decrease - the powers of gloxinia are not unlimited, it will have to service several daughter rosettes;
- the corollas will become smaller.
Twisting the stem
If you do not cut the stem, but unscrew the above-ground part completely clockwise, leaving only the tuber in the pot, gloxinia will produce new sprouts in about 2 weeks. This is exactly what experienced culture lovers usually do, and the stem is cut extremely rarely.
Advantages of the method:
- the new plant will be symmetrical;
- gives more flowers.
There is only one drawback - the development of buds is delayed for at least a month. This method is good if the first flowering ends early, or the owners can provide the crop with intense lighting in the fall.
Digging up tubers
It is not clear why there is such complexity if the stem can simply be unscrewed. But there is a way, we need to consider it. Step by step:
- Cut off the above-ground part, leaving a column of about 1 cm without leaves.
- Dig up the tuber.
- Place gloxinias in gripper bags with a small amount of substrate.
- Store in a cool, dark place for about 4 weeks.
- Remove from storage, raise the temperature, expose to light, and germinate as after a winter dormant period.
- Plant in fresh substrate.
In addition to the additional amount of work, this method greatly delays re-flowering.
Care after flowering
After the gloxinia's stem has been cut or unscrewed, green mass should grow. The tuber is fed with fertilizers for decorative leafy crops with a high nitrogen content. As soon as the buds appear, the drug is changed to one intended for beautifully flowering plants.
To trigger a second wave of flowering, fertilizers are applied weekly until the corollas bloom. Then fertilizing is done as usual.
The rest of the care is as follows:
- kept at a temperature of 18-24° C;
- regular watering with warm water;
- maintaining high humidity (the bush cannot be sprayed);
- ensuring maximum light conditions (at least 10 hours a day) without direct sunlight;
- protection from drafts.
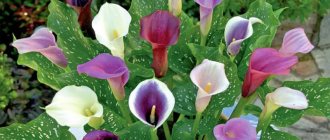
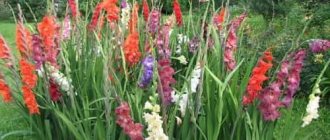
Types of Gloxinia
In general, there are more than 25 species of this flower, and each of them has its own characteristics and requires individual, careful care. It just so happens that terry gloxinias are especially popular in our country. A distinctive feature of this type of plant is the large number of petals. Today, more than 70 varieties of this particular type of flower are known.
Terry gloxinia, depending on color, can be divided into the following subspecies:
- calico;
- brindle;
- plain.
Calicos owe their name to the presence of various dots and specks on their surface; plain ones, as you might guess, do not have this feature; their buds are painted exclusively in one color. And tiger ones are decorated not only with all kinds of small spots, but also with rims around the edge of the flower. There is a direct relationship between the “fastidiousness of a flower” (demandingness in care) and its color. Gloxinia flowers have either the shape of a bell (they are more common) or tidea (popularly a slipper).
Important to remember! Plant care and its life cycle may vary depending on the type and variety of the plant.
The most popular and favorite varieties of gloxinia include the following:
- Winter cherry;
- Yesenia;
- Gloxinia tiny;
- gloxinia perennis;
- gloxinia regal;
- gloxinia beautiful;
- South night;
- Cleopatra;
- Triumph Tender;
- Kristin Ireland;
- Pink Flamingo.
Winter cherry - there are suggestions that this variety was bred from Purple beads, hence the similarity in color, white flowers, as if deliberately strewn with burgundy peas. It is considered semi-miniature, has medium-sized buds and medium-sized green leaves with a fleecy surface.
Yesenia - the petioles of this gloxinia are medium, it grows as a small bush, the bud shape is gramophone. Legends can be made about the rich color and size of the flowers of this plant, especially since they are ready to please the owner with their flowers for a long time.
Gloxinia is tiny - this decorative representative of the species barely reaches 2.5 cm in length. On small pedicels there is one miniature flower, which contrasts quite strongly with the velvet leaves, oval in shape. The color of the petals is from light lilac to blue-violet, the throat is white.
Gloxinia perennis (Speckled Gloxinia) is quite large, compared to others, it can reach up to 70 cm in length. During the flowering period, it blooms beautiful pale blue bell flowers (several on one stem) and pampers with the intoxicating aroma of mint. The leaves also have a rather unusual color, with a glossy green top and red bottom.
Gloxinia royal - grows as a bush, the height can reach up to 30 cm. A silver pattern is visible on the dark green heart-shaped leaf. The flowers are bell-shaped, dark purple, large, up to 7 cm in diameter. With proper care it blooms profusely and for a long time.
Gloxinia is beautiful - the color scheme of this queen is truly diverse, from small white or scarlet flowers to bright two-color or purple. The leaves are heart-shaped at the base and diverge into a beautiful oval towards the end. The length of the bell-shaped flower can reach up to 5 cm, the bud seems to stretch towards the sun (pointed upward). Depending on the variety, size and color may vary.
Southern Night - This species has gained popularity due to its rich purple color. Large velvet petals are covered with barely noticeable specks.
Cleopatra - due to the fact that this is an artificially bred plant, caring for this gloxinia should be especially careful. The beautiful wavy petals are notable not only for their shape, but also for their semolina colors (they can be white, light pink, and some representatives of the species have small, pronounced dots that turn into stripes closer to the edge). Despite the straight flower stalks, Cleopatra resembles a bouquet. With proper care it blooms vigorously and for a long time.
Triumph Tender - this gloxinia is sometimes compared to an apple tree flower, it’s all white (marshmallow color), with a soft pink tint; if you look closely, you can see small veins on the petals and dark specks. Flower growers compare its bud to cotton wool and do not call it anything other than “delicate.” A very heat-loving plant, changes in temperature are fraught with sticking of the petals and poor opening of the bud.
Kristin Irish - if you manage to cope with the vagaries of this gloxinia, then as a reward the gardener will receive white, densely double flowers, with a bright crimson border. The plant has a shortened peduncle, making the bush look compact. Can reach up to 25 cm in height.
Pink Flamingo - the name speaks for itself, this is a stunning flower of deep pink color, sometimes has a purple tint, it all depends on the care and conditions in which the plant is located, it has long flower stalks - so you need to take care of support for them. The leaves are green, dense and medium in size.
Interesting fact! In the 18th century, a gift of gloxinia meant a declaration of love at first sight.
Features of this period
When the number of leaves on gloxinia reaches three to four pairs, buds appear. Their number depends on the age of the plant, the mass of the tuber and the conditions of detention. The formation of buds occurs only with proper care. A striking feature of gloxinia is its cap flowering. Up to a dozen buds can form on one peduncle .
The flowers are large, oblong, and can sometimes have an irregular shape and be drooping. Based on the shape of the inflorescences, gloxinias are classified as bells and shoes. The second name for shoes is tidei. They look like bells, but are more elongated at the base. Depending on the type of gloxinia, flowers can be simple or double. Simple petals are arranged in one row, while double petals have several rows of petals.
Coloring is characterized by diversity. There are white, pink, red, blue and purple flowers. There are not only varieties with single-color buds, but also multi-colored varieties. Some gloxinias have small specks on the petals, and there may also be an additional contrasting border around the edges.
Features of the flower life cycle
Any gloxinia annually experiences several mandatory stages of its development:
- dormant period (usually in the winter months);
- stage of growth and development;
- flowering period.
Sometimes, gloxinia surprises a novice gardener by the fact that in winter it grows and develops very actively. This is how a young plant behaves; it can be recognized by its small tuber. In order for this flower to form correctly in the future, it needs special conditions: artificial lighting (morning and evening) and a temperature not higher than 22 ° C. If everything is done correctly, the first flowers will appear in the summer. When it comes to adult gloxinia, it should rest for 3-4 months.
How to seat?
Gloxinia can be propagated and planted in five ways:
petiole
- To grow a flower from a leaf, you need to take one leaf from the bottom of the plant in June-July.
- Place the leaf stalk in a container of water so that it is immersed in water by 1.5-2 centimeters.
- Do not change the water, but add it periodically.
- Soak the leaf in water until young roots form on the cuttings.
- After this formation, plant the young shoot in the ground to a depth of 2-3 centimeters. For better rooting, cover the cutting with a glass jar or plastic bag.
Watch a video about the propagation of gloxinia by leaf cuttings:
Stem cutting
Cut off the lower lateral shoot with several leaves from an adult gloxinia. Place it in a container of water until roots form, as in the case of a leaf. After the roots appear, plant the plant and root it by creating a greenhouse effect using glass or a bag.
Leaf
- At the very base of the rosette, cut off the sheet.
- Cut the leaf blade from the back side across the protruding veins in thickened places.
- Place the sheet on moistened soil and press the cut points into the soil.
- Create a greenhouse effect using film.
- In the places of the cuts, roots will soon appear, and then small nodules, which then need to be planted according to the standard pattern.
Read more about gloxinia leaf propagation here.
By dividing the tubers
- Only large tubers that have two or more shoots are subject to division. It is cut with a knife so that there is a sprout on each part.
- The sections should be sprinkled with charcoal and dried for 3-5 days.
- Plant in moist soil, just like whole tubers.
Seeds
The seeds of the plant are formed through artificial pollination. On the second day after the bud blooms, you need to transfer the pollen to the flower using a small brush. Seeds ripen in boxes within 2 months. Gloxinia seeds are moistened and covered with glass until young shoots form. 2 weeks after germination, the glass is removed and the seedlings are exposed to light.
We talked in more detail about how to grow a flower from seeds in this article.
There are a number of rules for caring for gloxinia at all stages of its growth and development.
Growing temperature
This indicator may vary under different conditions:
- at the stage of tuber germination, the temperature should be − +25°C;
- after rooting - +18оС - +22оС;
- at the early stage of the growing season - not lower than + 18 ° C;
- during the active growing season - from + 22 °C to +25 °C.
Air humidity
Gloxinia feels good at air humidity of 50%, not lower. If it is not possible to organize such conditions, then the acceptable limits of this indicator are 70-80%. To increase humidity levels, place the pot with the plant on a tray:
Do not spray the above-ground part of the plant, as the gloxinia will get sick, brown dry spots will appear on the leaves and it will die.
Watering
When watering, it is recommended to use only soft water (rain, melt, boiled, filtered). Water from a tray or along the edge of the pot so as not to get on the plant. Water for irrigation should be 2-3 degrees warmer than the air temperature. 30 minutes after watering, the remaining water should be drained from the pan.
When does gloxinia bloom?
The flowers of this plant are so unusual that they immediately attract the eye, but to see this beauty you will have to make a lot of effort. After all, with proper care, it can usually bloom from May - July, and until October. Despite the fact that gloxinia is photophilous, during the flowering period its exposure to sunlight should be minimized. This is the time when the flower is placed on the north side. But the absence of buds and the elongation of the flower are sure signs that it needs more light. If measures are not taken in time, the buds and leaves of the plant will become paler. If all care rules are followed, flowers appear after the 3-4th pair of leaves. After flowering, a stem (about 2 cm) is left.
It should be noted! Repeated flowering, which, by the way, is not inherent in all gloxinia varieties, will no longer be as bright as the primary one. The flowers will become smaller, and their number will decrease.
When and how long does it bloom?
The flowering period of gloxinia begins in mid-spring - early summer . If the plant fades at the end of summer - beginning of autumn, then gloxinia will prepare for wintering. If gloxinia has bloomed earlier, you can achieve re-blooming.
The duration of the flowering period of gloxinia is determined by the variety, age and conditions of the plant.
You can find out why gloxinia does not bloom and how to make it produce buds here.
Care after flowering
When the long-awaited flowers have faded, the beautiful gloxinia still needs care. First of all, you need to carefully examine the stem, if there are new shoots on it - most likely these are places for new flowers to appear. In this case, the plant needs to be pruned: cut off the leaves and stem, and leave a cutting about 2 cm high. Thanks to this simple manipulation, several new shoots appear on the stem, and buds are formed from them. It is necessary to preserve the strongest shoots, otherwise it will have a detrimental effect on the growth and appearance of the plant. Typically, flowering for gloxinia is an energy-consuming process; it needs to be fed especially carefully, and the first buds should be removed along with the stem.
Attention! Despite the fact that Gloxinia loves humidity of 60-80%, it does not tolerate spraying.
Rules for cuttings at home
Cuttings are one of the most common and easiest methods for propagating flowers. The method is based on the fact that when the apical cutting is cut and rooted, it forms a new tuber, and the old tuber, in the absence of a growth point, produces new shoots. Another advantage of this method is that the rooted plant can bloom in the same year.
Propagation of a plant by apical cuttings is used to rejuvenate the plant if it is sick, stretched out or does not want to fall asleep. Because when the plant is no longer young (more than 2 years old), its tuber needs rest. In this case, we cut off the apical cutting, re-root it and reduce watering of the mother plant. Thus, gloxinia will go into hibernation.
Attention: Indoor and greenhouse plants can be propagated from apical cuttings at any time of the year. However, gloxinia should be provided with an acceptable temperature of 20-25 ºС, as well as sufficient lighting. If there are no such conditions, then it is better to propagate it in spring or summer
If there are no such conditions, then it is better to propagate it in spring or summer.
Rest period
In September or October, the plant will slowly begin to bloom, the buds will fall off, the leaves will dry out - this means that the flower has begun a dormant period, and it is time to reduce watering, and then stop it altogether. This should be done only when the gloxinia has completely faded and its leaves have withered and turned yellow. Another indicator that the plant needs rest is its “age” (more than a year) and the size of the tuber (more than 2 cm).
At this stage, the flower is not fed, with the only exception being potash fertilizers. When the above-ground part of the plant has completely withered, it is cut off, leaving 1-2 cm. And the tuber is prepared for wintering.
It should be remembered that cutting off all the upper leaves of the plant is prohibited, because They contain all the necessary vitamins and minerals that the flower needs to survive the winter.
Preparing for transplant
When moving a flower from one pot to another, it is important to first find out how to transplant gloxinia correctly. Compliance with basic requirements will avoid many problems
Choosing a pot
When choosing a planting container for gloxinia, it is important to take into account the characteristics of the root system of the flower. The roots spread out to the sides of the tuber, so it is recommended to select a low but wide pot. The depth of the pot should allow the drainage layer needed by the flower to be placed in it
The depth of the pot should allow the drainage layer needed by the flower to be placed in it
Of all materials, it is better to choose ceramics
The depth of the pot should allow it to accommodate the drainage layer needed by the flower. Of all materials, it is better to choose ceramics.
Important! Before planting, the container should be washed, dried and disinfected.
The flower feels most comfortable in a low, wide pot.
Selection and preparation of soil
The soil for indoor gloxinia needs to be light, loose, air- and moisture-permeable. Its acid value must be neutral so as not to provoke rotting of the tubers. Of the universal ready-made mixtures, soil for violets is most suitable.
You can prepare your own soil mixture from sand, leaf and peat soil in proportions 1:2:2. The soil should be disinfected by heat treatment.
Drainage
Delicate tubers of flowering gloxinia require a drainage layer. The following components can be used for it:
- expanded clay or pebbles;
- ceramic shards;
- Styrofoam.
If you choose a pot that is too deep, the height of the drainage layer will help compensate for this disadvantage.
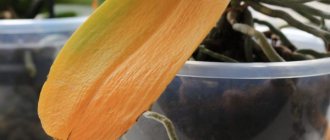
Tuber preparation
Preparing gloxinia for moving to a new pot begins with a thorough inspection of the tubers. Dry roots are removed from them and washed in water, removing any remaining soil, after which it becomes possible to assess the condition of the tissues.
Any parts of the tubers that look unhealthy are removed with a sharp, disinfected knife. The sections are sprinkled with crushed activated carbon or any fungicide. The tuber treated in this way is left in the open air until the next day.
Note! It is recommended to wrap root tubers that look lethargic for 3 days in a damp cloth so that they are saturated. If at the time of transplantation the tuber still has not sprouted, but looks healthy, it is placed in a plastic bag with peat soil and left in a sufficiently warm and lighted place. If at the time of transplantation the tuber still has not sprouted, but looks healthy, it is placed in a plastic bag with peat soil and left in a sufficiently warm and lighted place
If at the time of transplantation the tuber still has not sprouted, but looks healthy, it is placed in a plastic bag with peat soil and left in a sufficiently warm and lighted place.
Leaves hatch within 2 weeks
Storing gloxinia during dormancy
After the beauty fades, you need to take care of the tuber. After all, proper storage guarantees that the plant will overwinter well, gain strength and delight its owner with beautiful flowers for many years.
There are several ways to store tubers during the dormant period:
- in pots;
- in packages;
- in pots and bags;
- in a refrigerator;
- in cool places.
In method 1, gloxinias are stored in the same pots in which they grew, while the plants are not removed from the soil; containers with tubers are placed in boxes. Since the air in the room is dry and warm in the autumn-winter period, the tubers need moderate watering, 2-3 times a month, otherwise the flower will simply die. Even if it is possible to reduce the temperature to 18 ° C, soil moisture remains relevant.
Storage in bags: regular plastic bags or special zip-lock bags are suitable for this method. Place some peat soil on the bottom and put them in a cool, dark place. If the temperature is above 16 ° C or they are exposed to sunlight, the tubers begin to germinate.
The absence of light and heat is also required for the third method. With it, gloxinia is stored in the same soil in which it grew. The bag is tied and removed until spring, and the flower does not need watering.
Some people store flowers in the refrigerator, at a temperature of +11... +12 ° C, in a closed plastic bag with soil (2-3 months), and then place them in a warm and bright place so that they wake up.
In a cool place: this method is similar to the previous one. Such suitable places could be: a pantry, a cellar, etc.; you can also store gloxinia not in the ground, but in the sand. Here the main conditions are temperature from +11 to +18 and the absence of light, and it is also necessary to monitor soil moisture.
Reminder! Comfortable temperature, lack of light, moderate humidity guarantee a healthy tuber in the future.
Gloxinia flowering
Sometimes, among amateurs who accidentally fall into the hands of gloxinia, the bush produces only a few buds per season. They are beautiful, but the owners do not understand the enthusiasm for the plant.
The beauty of the flower is that at the peak of decorativeness, new corollas appear continuously, literally dotting the bush. To achieve this, you need to have an understanding of the culture and provide proper care.
When, how long and how many times does gloxinia bloom?
From the moment the tuber is transplanted into a fresh substrate until the first buds open, they wait about 2 months. Typically, flowering lasts the same amount of time, occurring in May and June, often extending into July.
Then the bush rests. If the faded corollas along with the elongated stems are removed, new buds will form in about a month. The second wave is not as abundant as the first, perhaps the flowers will be smaller, but it continues until late autumn.
A large old tuber that has not been divided produces powerful stems. When the stepsons are not removed, buds appear on the daughter rosettes around June, and flowering continues throughout the summer, approximately until September.
Young plants obtained by propagating gloxinia by cuttings or seeds overwinter on the windowsill as leafy plants. With sufficient light and good care, they can produce single flowers in winter.
Do I need to remove the first buds?
Experienced gloxinia lovers never do this. The first corollas are the largest; new ones will take time to emerge. Moreover, if the bush does not bloom in May, there will most likely not be a second wave. Or it will start too late, and with a lack of sunlight, the corollas grow small and become deformed.
What to do with wilted flowers
If the owners do not intend to get their own seeds, faded buds should be removed immediately. They spoil the appearance of the bush; if pollination has occurred, they prevent the formation of new corollas.
Reason: having set fruit, gloxinia considers its mission accomplished. Seeds will give life to offspring - new plants, and all the energy goes into their maturation.
How to get seeds
If the owners need their own planting material, do not touch the bush; care at home should be the same as for an ordinary houseplant:
- keeping in a bright place;
- watering;
- fertilizing
You can cut off the top only when the seed pod cracks. Dry in a well-ventilated warm place. If the fruits ripen early enough, perhaps the bush will have time to produce new buds before the fall.
Awakening and leaving after a period of rest
Waking up and further caring for gloxinia often depends on which plant the gardener chooses.
Young flowers are planted in new soil. If the size of the tuber reaches at least 5 cm, then it is recommended to extend the dormant period; to do this, you need to break off the sprouts and then plant them.
On a note! At this stage, shoots may appear in some varieties; it is recommended to remove them, but this can only be done if the plant is mature and strong.
Since gloxinia usually blooms in summer, it may require replanting during the dormant period. The ideal time for this is considered to be March-April, but if the tuber is stored in old soil and grows strongly, then the procedure can be done even in February.
Gloxinia after flowering - what to do with the plant
Experienced owners of green spaces can tell you how to care for gloxinia after flowering. During this period, you need to properly prepare the plant for wintering. This procedure consists of several steps that must be completed so that the tuber safely survives a long hibernation.
Trimming
The orchid has faded - what to do next with the plant
It is not recommended to trim the rosette immediately after the last flowers have faded. It is necessary to maintain metabolic processes in plant tissues, thanks to which nutrients are transferred from the leaves to the tuber.
Subsequently, the shoots will begin to wither on their own, and then you need to cut off the rosette, but leave a small stump 2 cm high. As a result, when it also dries out, it must be carefully unscrewed from the tuber.
Important! If you prune gloxinia immediately after flowering, this will stimulate shoot growth, which will significantly weaken the plant.
In young seedlings, the rosette is maintained throughout the winter. This is due to the fact that their tubers are not sufficiently developed and are not yet able to survive the winter without additional nutrition. Therefore, it is impossible to cut off the above-ground part of them, otherwise they will never come out of hibernation.
In this case, you need to provide the plant with proper care, which consists of a 12-hour daylight hours and regular watering.
Regenerative feeding
What else needs to be done when gloxinia fades? Before the plant goes into hibernation, it is necessary to restore the spent energy. To do this, it is recommended to fertilize with potassium fertilizers. This will allow the tuber to fully ripen and stock up on nutrients that will be needed for 3-4 months of hibernation.
Experienced gardeners recommend using potassium monophosphate for this. To prepare a nutrient solution, you need to dissolve 5 g of the product in 2 liters of settled water. After this, mix thoroughly until the components are completely dissolved. Water the plants with the resulting liquid at the rate of 150 ml per 1 pot.
Important! Fertilizers with a high nitrogen content cannot be used during this period, as they stimulate the growth of the above-ground part, which negatively affects the immunity of gloxinia.
Restorative fertilizing is applied once, immediately after removing all faded buds, but in the presence of leaves.
Drying of the rosette is a sign of gloxinia preparing for hibernation
Preparing the plant for hibernation
Caring for gloxinia after flowering at home also involves observing certain maintenance conditions. Starting in September, the flower pot needs to be moved to a less lit place. In this case, the temperature should be lowered to +15 degrees. When kept in such conditions, watering should also be reduced to once a week.
All this together stimulates the process of wilting of the rosette and prepares the plant for the upcoming hibernation.
If this is not done, then some varieties of gloxinia may continue to grow. As a result, the shoots stretch, the rosette becomes deformed, and the plant loses its decorative effect. All this weakens the flower and may cause a lack of flowering next season.
Important! Gloxinia, like many tuberous plants, requires a long cool dormant period to form buds.
Landing in the ground
When a healthy stem appears on a beautiful gloxinia, the plant is ready for replanting, but in order to achieve gorgeous flowering, you need to check the tuber. It should be damp, but not wet, without damage or cracks, and without signs of pest damage.
What to do if the tuber looks unhealthy:
- wet - dry at a comfortable temperature no higher than 24° C;
- remove dead parts (with a knife);
- process with crushed coal;
- place in a weak solution of potassium permanganate;
- wrap in a damp cloth and leave for several days.
Remember! Only healthy tubers can be planted in the ground.
As for the soil itself, the main conditions here are its moisture permeability and not too high density. Ready-made peat mixtures perfectly correspond to these parameters. The pot should be 4-6 cm wider than the planting material.
The tuber should be planted in sterile soil, having previously created a drainage layer of up to 3 cm. You should not fill the gloxinia completely; the top of the tuber with the stem should be on the surface; if the plant has managed to take root, depressions are made for them. When moistening, water should not get on the tuber, as this can lead to the death of the plant.
Planting or transplanting a gloxinia tuber (step by step)
Towards the end of February, gloxinia tubers wake up. This is exactly the time when they need to be replanted or planted in a new flower pot. There is also an active sale of gloxinia tubers and seeds in stores. But there are no flowering plants there yet.
Sometimes I allow the next awakening of a gloxinia tuber in the same pot without replanting. The plant itself will tell you when it needs to be transplanted into new soil.
We leave the gloxinia to grow in the same pot
In front of me is a pot in which a young gloxinia sprout has appeared. This indicates that the tuber overwintered safely and began to sprout.
The velvety leaves of young shoots seem perfect
It is important not to spoil them by pampering them in the warmth and pampering them with feeding. It is more correct to create Spartan conditions for them by moving the pot on the windowsill closer to the glass
And in order to prevent the plant from getting too cold, I place the pot with it on a foam stand (for example, on a packaging trough or on any foam block).
Here are pictures that clearly show how a young shoot of gloxinia grows. Until recently (in winter), the tuber was not even visible.
I wrote about how it feels during the dormant period in the article “How to preserve a gloxinia tuber in winter?” At the end of February (sometimes later) his awakening begins, which cannot be missed.
The price of a mistake is frail, elongated shoots (at best) or the death of the plant from drying out of the tuber (at worst).
Transplanting (planting) gloxinia in a new container
This year I bought new gloxinia tubers. Terribly shaggy due to remnants of old roots. First of all, the tubers had to be “shaved”. Tear off some of the dried roots with your hands, and cut some with nail scissors. The sawdust and shavings in which the purchased tubers were stored were shaken out and removed with tweezers.
Tubers prepared for planting should be as bare as possible (almost like a potato tuber) and strong, not flabby. I heard and read that it is possible to confuse where the top of a tuber is and where its bottom is. In order not to plant gloxinia upside down, you need to leave the part of the tuber on top where there is a small depression. At the bottom there will be a more rounded and sometimes convex part.
Those tubers sold in stores usually already have tiny sprouts or the beginnings of sprouts. Therefore, there are no problems.
It is better to plant such tubers in moist soil and water it as it dries. Then there will be a gradual return to life. It’s hardly worth working on tubers that are completely unviable.
Unless, of course, these are particularly valuable plants.
When planting tubers, it is better to take smaller pots. The bottom part is occupied by drainage. I use expanded clay or charcoal, which remains after sifting wood ash. The depth of the drainage layer allows you to regulate the volume of the pot to some extent.
Some amateur gardeners leave the crown of the gloxinia tuber above the soil level. I almost completely cover it with soil, but do not cover the shoots. This imposes a number of obligations on me: when watering, you cannot soak the upper part of the tuber.
It is worth mentioning what the soil mixture should be. First of all, loose and nutritious. I add hydrogel granules to it so that there are no problems with drying out. It is advisable to take into account one “cute” detail: the soil, for the first time increased in size from the swollen hydrogel, noticeably rises and tends to crawl out of the pot. It has to be either lightly compacted or all excess removed.
At the very end, you need to sign the variety and place the pot with the newly transplanted (planted) gloxinia on the windowsill. As soon as a strong sprout appears, the pot can be moved closer to the glass.
Source
What to do if gloxinia does not bloom
To resolve the issue of gloxinia flowering, you must first understand the reasons for its absence; there may be several of them:
- tuber age;
- landing errors;
- overfeeding or infection of the tuber;
- contaminated soil;
- low humidity;
- quality of fertilizers;
- processing errors;
- violation of light and temperature conditions.
If your pet has stopped blooming, and proper watering, expensive fertilizing and changing the care system have led nowhere, the plant is at rest. If gloxinia recently rewarded its owner with wild color, but now it suddenly stops, it makes sense to cut off the stem and leave only the strongest leaves on it. Then you need to feed the flower and within a month the long-awaited buds will appear on it again.
Interesting fact! Gloxinia is recognized as the best plant that saturates the air with oxygen, compared to 20 other flowers.
Gloxinia after flowering: what to do, where and how to store tubers
There are two methods that will keep the tubers intact during the winter.
During the storage period there is a risk of developing fungal or any other diseases. It is improper storage that most often causes illness. Sudden and frequent changes in temperature and dampness lead to problems with gloxinia in the future.
Note! Under the right conditions for storing planting material, the plant can wake up earlier than usual, in the first ten days of February. Then the first buds will begin to bloom in the first half of March
flower tubers
Pot
After the flower has bloomed, it can winter at home. In this case, the tubers are left in the pot.
What to do when gloxinia fades and how to store tubers in a pot:
- moisten the soil with a little water around the edges of the pot. Abundant watering is fraught with rotting of roots and the appearance of mold, so it is better not to overdo it;
- containers with tubers need to be sprinkled with sand, covered with a tray and wrapped in a plastic bag;
- then the containers need to be moved to a dark, cool place;
- The main thing is that the room in which the planting material is located is not damp, otherwise all the tubers will become moldy and can be thrown away.
Note! The optimal temperature at which planting material should be stored is 12 °C. Gloxinia tubers need to be watered regularly with a small amount of water.
As a rule, by the end of January - beginning of February, the first shoots begin to appear from the planting material. This is the first signal that the flower needs to be taken indoors and replanted in new soil.
Gloxinia tubers need to be watered regularly with a small amount of water. As a rule, by the end of January - beginning of February, the first shoots begin to appear from the planting material. This is the first signal that the flower needs to be taken indoors and replanted in new soil.
This method is most preferable for young gloxinia tubers, which are going to rest for the first time.
Storage of planting material
Possible problems after flowering, wintering and when storing tubers
Difficulties after flowering:
- Wilting of buds and leaves - in this case, you need to treat the plant tubers or remove the draft.
- Insects: only replanting will help get rid of this scourge.
- If a plant doesn’t bloom well, it either doesn’t have enough light or lacks nutrients.
Tubers should be stored very carefully in the autumn-winter period, as mentioned above. Otherwise it will freeze or die. Another outcome is also possible: gloxinia will awaken ahead of schedule, and emergency measures will have to be taken to resuscitate the flower.
It may seem to some that gloxinia is a very whimsical flower; it requires special conditions in order to grow, bloom and develop. But these problems are compensated a hundredfold by the fabulous beauty of the plant. Moreover, in the literature and on various floriculture forums there is quite a lot of information and recommendations about caring for it, how it overwinters, behaves during the dormant period and what to do when gloxinia has faded. With proper care, the flower will delight its owner for many years.
Why the plant may not bloom and what to do
Old plants usually bloom poorly. To correct the situation, that is, to achieve flowering, you need to water them more abundantly.
Is it too hot and dark in the room where the flower stands? The best temperature is 18–20 degrees Celsius. In addition, if there is insufficient humidity (in addition to watering, it is advisable to humidify the air with a spray bottle of warm water), it blooms quite late.
Its leaves can “tell” how favorable the conditions are for a plant. Are you reaching for the light? This means that he is clearly missing. Are they located horizontally? Everything is fine. If the leaves are drooping, it means the flower is frozen. Strongly raised ones indicate overheating.
A pot that is too spacious also does not contribute to lush flowering. In this case, only the root feels great.
Signs of a falling asleep gloxinia
Externally, the onset of the dormant period is manifested in the death of leaves, starting from the edges towards the stem. The plant looks like it was killed by frost. The leaves lose turgor, turning into gray-brown rags, gradually dry out, the stem looks like a dry thread. As soon as the leaves begin to wilt, watering is reduced to lightly moistening the soil, and fertilizing is stopped. The pot is removed from bright light to the twilight zone. The flower is allowed to fade naturally. The dried above-ground part is cut off, leaving a stump 1–2 cm high. This pimp will serve as a beacon indicating the location of the tuber.
The dormant period begins with gradual withering and drying of the aboveground part of the plant
When gloxinia goes to rest
Starting from the second year of life, in October-November, gloxinias that have grown a nodule of 2 cm or more go into hibernation. This is a natural process, once a year they need to be sent to rest, otherwise they will gradually wither and die even with ideal care.
Dry spots on gloxinia indicate that it is retiring
Gloxinias should be buried for at least 3 months. If they wake up earlier, they break out the sprouts and send the nodules to rest further.
Sometimes gardeners limit themselves to a 2-month dormant period in winter. Or they allow plants whose above-ground parts do not want to die off on their own in the fall to spend the cold season on the windowsill. But this is wrong; next season it will affect flowering. And if it repeats for several years in a row, the plant will weaken and the tuber will die.
Overwintering of first-year gloxinias is significantly different. They are not sent to sleep; they are kept with moderate but regular watering and bright lighting.