Effective ways to save roots. How to grow phalaenopsis orchids?
- Signs of a healthy system
- Why do they dry?
- Ways to save a plant that has rotted
- Grow in a greenhouse
- Soaking and drying
- Reconstitute in water
- Above the water
- Fast with fertilizers
- On moss
- In the substrate
- On a piece of bark
- When can it be transferred to the ground?
- What to do to save?
- Useful video
Many gardeners at least once encounter the death of the root system of phalaenopsis. You shouldn’t say goodbye to the plant right away. There are many proven ways to restore an orchid and its roots.
Errors
- The main mistake when rooting an orchid is removing the leaf plates that wither during the rooting process. Cutting off leaves that have begun to die is strictly contraindicated . The fact is that a plant that has lost its root system is forced to look for alternative ways to obtain energy. To survive, the orchid uses up nutrients stored in other parts of the plant, including the lower leaf blades, causing them to wilt and turn yellow. With a removed leaf, the plant is deprived of its only possible source of nutrition, therefore, the chances of recovery are significantly reduced.
- Another common mistake is insufficient lighting intensity during resuscitation efforts. Many gardeners place the plant away from the light source, mistakenly believing that the orchid needs less sun during rooting. As a result, the process of photosynthesis becomes difficult, and as a result, the plant experiences oxygen starvation, which negatively affects not only the formation of new roots, but also other vital functions.
How to plant an orchid without roots?
To save your flower, it will need to be helped to grow new healthy roots . Since without them this epiphyte cannot exist. The reasons may be different, but you should not refuse to help this flower.
Planting without roots is a very difficult and expensive process, but the orchid will feel good.
Preparatory activities
How to plant orchid shoots without roots? First of all, the flower is removed from the substrate and the roots are examined to assess the damage. After that, with sharp scissors or better yet, pruning shears, cut off what:
- Rotten;
- Dried;
- Hangs on one conductor.
Cut off all non-viable roots of the plant. After pruning, they must be treated with any antiseptic :
- Charcoal;
- Activated carbon;
- Zelenka;
- Cinnamon.
Moreover, only one from the list is used, and not all at once. If the plant has already rotted before pruning, it is treated with a systemic fungicide against rot. It can be purchased at a specialty store.
After treatment, the flower must dry its cuts for 7-8 hours. Therefore, it must be placed on paper and left in the shade for the required time. After all these procedures, we begin resuscitation. To do this, you need to have various tools with you that will be indispensable assistants.
Creating greenhouse conditions and choosing soil
To create a mini-greenhouse at home, you can use various plastic containers . The main thing is that it has transparent walls. For this purpose, experienced flower growers use water bottles of the required volume.
An orchid without roots is often planted in greenhouse conditions.
To do this, it is cut at the required height along the diameter . But they don’t cut it off completely, but leave 2 cm, which will hold the two parts of the bottle together. The required substrate is placed at the bottom, moistened, and only then the plant is exposed.
After which the bottle is closed and both parts are secured with tape. In a mini-greenhouse, moisture is retained in the middle for a long time, creating greenhouse-humid conditions.
You can create greenhouses using food containers with airtight lids. A substrate is placed at the bottom, and a plant is placed on it and the lid is closed tightly. But such a greenhouse will already cost the gardener money, and there is not always an appropriate selection of containers in the store. When choosing it, you need to pay attention to the transparency of the walls and the size so that the entire orchid fits into it.
Each grower selects the optimal soil for planting a plant for resuscitation independently,
choosing from the proposed list :
- Sphagnum moss;
- A mixture of moss, vermiculite and fine bark;
- Water.
Orchid babies
For propagation of orchids, children are used that appear on the mother bush under favorable conditions. It doesn’t matter at all whether the shoots appeared naturally or thanks to stimulants; this will in no way affect the growth of the rosette.
Technology of separation from the mother plant
Baby separation process:
- The baby is cut off with a sharp, disinfected instrument.
- All sections are carefully treated with activated carbon, which helps prevent the development of fungal diseases.
- Allow to dry for 2 hours.
After this, the young shoot can be planted.
Rooting in high humidity environments
In this case, you will need to create greenhouse conditions:
- Cut off the top of the bottle.
- Place moss on the bottom and moisten it first.
- Secure the orchid so that it does not touch the moss.
The root system will emerge in a moist environment.
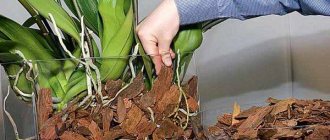
In the substrate
This rooting method is suitable for orchids that have at least a small part of the roots remaining. In this case, moss, vermiculite or a mixture of them can be used as a substrate. They proceed as follows:
- Select a wide, closing container. For example. You can use an empty aquarium or build an impromptu greenhouse from a plastic container or a large cut-off bottle.
- A layer of expanded clay is poured onto its bottom.
- A layer of pre-moistened moss is laid on top of the expanded clay.
- The orchid is placed on the moss so that its root collar is exposed to the air, and the intended place of root formation is in contact with the moist substrate.
When rooted, moss is an almost ideal substrate; it easily releases and accumulates moisture, the main thing is not to over-moisten it. The degree of moisture content can be determined as follows: a small amount of moss is squeezed in a fist. If moisture begins to release, it should be squeezed out. If your hand remains slightly damp, then everything is fine.
In the absence of moss, vermiculite is used as a substrate. It is also capable of releasing and storing water well. It allows you to quickly grow roots without the development of pathogenic microflora. This method can also be used if you need to grow the roots of a baby orchid.
Experienced gardeners also use special root formation stimulants. For example, kornevin is very suitable for rooting orchids. This product is available in powder form. It's very easy to use. A small amount of root is simply applied to the intended location of root formation.
Another secret to successful rooting on the substrate is high air humidity. That is why the rooted plant should be placed in a greenhouse. If, despite this, the orchid's leaves still begin to wrinkle, it needs to be helped by providing nutrition through the leaves. To do this, the orchid is immersed in warm, clean water with the addition of a small amount of sugar for several hours. After removal from the water, before placing it in a greenhouse, the plant should be dried.
Preparing for rooting
The affected plant should be carefully removed from the pot, the remaining substrate should be removed, the lower part of the rhizome should be washed with warm (+25-30°C) water and dried in the open air.
First of all, it is necessary to find out the degree of damage to the rhizome and assess the general condition of the orchid. Total resuscitation is required in case of loss of more than 95% of the root system . If 2-3 roots of at least 3 cm in length are preserved, it is enough to secure the orchid in a small container with fresh substrate, having first removed all the affected areas.
| Vegetative parts of the plant | State | Recommendations |
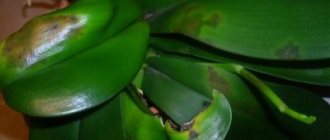
| Roots | Blackened, beige, light brown, dried out or, conversely, wet, slimy | Cut to healthy tissue |
| Elastic, fleshy, light green, white in the center of the root ball | Leave | |
| Leaves | Drying, fading, yellowing | Should not be deleted |
| Covered with black spots | Cut out all areas of rotting to healthy tissue | |
| Arrows of peduncles | Regardless of development phase | Remove to the base (you can save the lower third for easier fixation of the plant in the container) |
Important! When preparing an orchid for rooting, compliance with antiseptic rules is of paramount importance. Wound surfaces must be disinfected, and all manipulations to clean lesions must be performed only with disinfected instruments. Otherwise, there can be no talk about the success of resuscitation measures.
Existing rooting methods
An orchid completely devoid of roots can be revived in several ways:
| Rooting | Technology | Advantages | Flaws |
| In a moist substrate | Place the orchid in a greenhouse with a moist substrate | High guarantee of success | Requires constant monitoring of substrate humidity and regular ventilation, otherwise the moss becomes moldy and the plant begins to rot. |
| Above the water | Secure the plant in the vessel so that the lower part of the plant does not touch the surface of the water | The method is convenient when there is not enough time to perform regular manipulations with the plant. | There are practically no contraindications |
| In water | Keep the orchid in a vessel with water without intermediate drying | Does not require daily intervention | Low (no more than 15%) plant survival rate, subsequent difficulties with rooting in the soil substrate |
| Roots up position | Place the orchid in a container of water, top down. | High reliability and ease of implementation | There are practically no contraindications |
| Alternating soaking and drying | Soak the plant daily for 5-6 hours and then dry it | Minimizes the risk of bacterial and fungal diseases during resuscitation | Requires daily procedure |
| On the block | Fix the prepared plant on a damp piece of bark | There is no need to additionally spray or water the plant during rooting | If roots do not appear for more than 3 months, re-soaking of the bark is required. |
Caring for the plant after “revival”
Successful and complete restoration of an orchid after loss of the root system depends on creating favorable conditions for the plant and carefully caring for it. It is enough to follow the following recommendations:
- Water the plant by immersing the pot in a tray with warm, filtered or settled water for 25 minutes.
- Inspection for pest attacks on leaves and roots. If insects crawl out of the soil during watering, the soil will have to be replaced and the leaves and roots treated with an insecticide.
- Maintaining the room temperature at 22-25 degrees, humidity – 60-70%.
- Providing intense but diffuse lighting. The duration of daylight is at least 12 hours.
- Protection from drafts and hypothermia. If the resuscitation procedure is carried out in winter, the pot cannot be placed on the windowsill, since the cold from the glass is detrimental to the fragile plant.
Is it possible to save a sluggish and damaged flower: methods of restoration
How to help grow using a greenhouse?
If you have a window greenhouse, in which it is possible to maintain optimal temperature conditions and humidity levels, there is a high chance of resuscitating the plant. To do this you need to do the following:
- line the bottom of the greenhouse with expanded clay;
- lay steamed sphagnum moss on it;
- A leaf rosette is placed in the ground.
To grow roots up to 4-5 centimeters, it is necessary to maintain humidity in the greenhouse at least 75-95% and temperature within +23°C, +27°C. The plant should be well lit for at least 12-14 hours a day. If all conditions are met, the chances of recovery are at least 80%.
During maintenance, the greenhouse must be ventilated at night and watered as the substrate dries. If there is no greenhouse, then you can use improvised means, for example:
- cuttings of large bottles;
- confectionery boxes.
The main thing is to create a microclimate inside it in which the plant will recover and develop faster.
How to grow without a greenhouse?
For this purpose, special preparations are used as bait, which provide the plant with the necessary amount of nutrients due to the absorption capacity of the leaves. Before planting, the soil is slightly moistened.
To avoid damaging the plant, it is best to carry out the procedure in the morning or evening to avoid exposure to sunlight and not cause a chemical burn to the plant. It is necessary to prevent bait from getting on the buds and flowers.
How to grow by planting in a substrate?
A substrate is a mixture of various components that is necessary to create a comfortable habitat for the flower, as close to natural as possible. Orchids typically grow on trees, absorbing moisture and nutrients from the bark. Therefore, it is necessary to make a mixture that will be light, environmentally friendly and have good drainage characteristics that cannot be obtained in ordinary soil.
The following components are used to prepare the mixture:
- tree bark;
- sphagnum moss;
- ash;
- fern roots.
These components are basic and can be supplemented if necessary:
- coconut fiber;
- dry leaves;
- peat.
In some cases, expanded clay is added for better drainage characteristics.
The flower is thoroughly cleaned of damaged and rotten roots and planted in a prepared pot. After this, you need to carefully monitor the humidity level of the substrate so that it is always slightly moist. There is no need to water the plant regularly so that the water does not stagnate at the bottom of the pot, otherwise the rotting process will resume.
The temperature in the room with the plant should be between 23-25 degrees. If the temperature drops below 20°C, the growth of roots will slow down, and the process of reproduction of microbes and bacteria will noticeably accelerate.
How to put in water to form a root system?
How to grow roots in water:
- If the plant is rootless, then to grow new organs, some gardeners recommend placing it in a container of water. In practice, it is not always possible to save a plant with a severely damaged root system, so for a greater supply of nutrients it is recommended to add a teaspoon of sugar syrup or liquid honey per liter of liquid.
- Another way to root:
- place the plant above water;
- all rot is thoroughly cleaned, the cut area is treated with activated charcoal or charcoal, and left to dry for 8-10 hours in a well-lit room, but without direct exposure to sunlight;
- after which the plant is placed in a glass vessel filled with filtered or boiled water so that the neck does not touch the water, but is located at a distance of 2-3 centimeters from it.
During resuscitation, you must be prepared for the plant to lose most of its turgor, but this is normal, since this is necessary to compensate for the distribution of nutrients and restore the root mass.
From the video you will learn how to revive an orchid without roots in water:
How to stimulate organ growth in a baby?
How to grow roots for a baby:
- We prepare an aqueous solution with a growth stimulator, where we place the plant cleaned of old substrate and rot.
- Dissolve a tablet of activated charcoal or charcoal in a bowl of boiled water, heated to 23-25°C.
- We place the orchid in a basin, where further restoration of the root system will take place.
All this time it is necessary to maintain good air circulation and high humidity in the room. If some amount of water has evaporated from the container, it must be replenished to a sufficient level. Only preheated water should be added so that there is no temperature difference.
How to speed up the process?
All the described methods of resuscitating phalaenopsis take quite a lot of time; to stimulate this process you can:
- Wipe the leaves and mix a solution of succinic acid into the water at the rate of 4 tablets per liter of water.
- Dilute one ampoule of vitamins B1, B6 and B12 in a liter of water and lower the part of the orchid from which the roots will grow into the solution, leaving it overnight.
- Feed the plant daily with glucose, sugar or honey.
- Feed with iron chelate every 2-3 days, and fertilizers containing potassium and phosphorus - once every 20 days.
It is necessary to alternate feedings, otherwise you may not notice that some of them are ineffective and the plant will die.
Roots up position
The essence of the method:
- Dissolve activated carbon in water (1 tablet per 1 liter)
- Fill the container one-third full with the resulting solution.
- Place the orchid in the container, top down, immersing half the leaf in water.
- Irrigate the base (the place where roots are expected) with a spray bottle daily.
- After the formation of root primordia, transplant into moss in a normal position.
Why do roots dry out and rot?
Keeping a flower healthy is much easier than looking for ways to grow roots like an orchid. So, if the orchid root has been damaged, it is worth studying the reasons in order to prevent such problems from occurring in the future.
The main causes of rotting and drying of roots:
- Incorrect watering. In order for the orchid to receive the amount of water it needs, you need to let the roots dry out from time to time. Excessive moisture can cause rot.
- Excessively dense soil. In such conditions, the roots do not receive enough oxygen. Often this is what leads to their drying out.
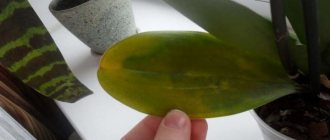
- Fungi and parasites. They can be easily identified by the appearance of yellow spots on the leaves of the plant, or by noticing the insects with your own eyes.
- Insufficient lighting. Roots need sunlight to absorb water. Problems with this point often arise in winter or in the off-season, when there is less sun and you need to resort to artificial lighting.
- Too much fertilizer. In this regard, it is better for the orchid to receive less feeding than more. Excess fertilizers lead to burns of the rhizome. This makes it difficult for the plant to absorb moisture, which can lead to rotting of the rhizome.
Basic root extension methods
The normal habitat of an orchid is the hot tropics, where the most comfortable natural conditions are created for the plant. Failure to comply with the temperature regime, insufficient humidity and incorrectly selected soil can cause the death of a flower or its protracted illness.
Phalaenopsis orchid
There are several proven methods that will help save a plant at home.
To decide on the method and understand how to grow roots in an orchid, you need to carefully analyze the condition of the plant and evaluate the scope of work. Among the variety of methods, you will definitely find a suitable one, and the flower will begin to delight you with its beauty again.
Closed system
The main and often used method, which involves completely immersing the root system in water. This method can be used only if the cause of root death was not excessive soil moisture.
- Warm clean water is poured into the vessel.
- The base of the flower is immersed in the liquid.
- The container is placed in a well-lit place, but hidden from direct sunlight.
The water needs to be changed once every 7 days, and added as the vessel becomes dry and the roots are exposed.
Important! It is worth carefully monitoring the condition of the roots, since excess moisture can cause rotting and the orchid will not produce new shoots.
Teplichka
To revive the roots of a plant, it is necessary to create suitable conditions for it. If it is not possible to provide a separate greenhouse for the orchid, you can resort to simulating a greenhouse. For these purposes, a cut plastic container of 5 or 10 liters or an aquarium will do.
The whole point of this method is to create optimal conditions for the flower.
Two layers are laid out in the vessel. The first layer is expanded clay, the second is sphagnum. Only after this is the orchid placed.
Important! The roots of the flower should be completely buried in the moss.
The structure is placed in a place with sufficient lighting, but protected from direct rays. A glass of water is placed inside to maintain optimal humidity. In winter, the greenhouse should be ventilated once a day for 10-15 minutes, and in summer it should be left open all night.
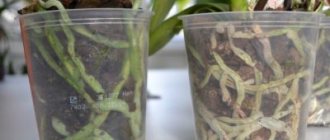
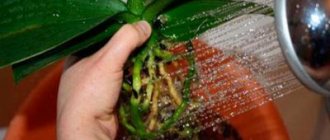
Upside down
The method involves immersing not the roots of the plant, but its leaves in water.
The required amount of water is poured into the container. The optimal amount of liquid depends on the size of the vessel and the length of the orchid leaves. Ideally, water should cover one third of the entire length of the sheet.
With this method, the roots remain in the air and are sprayed daily from a spray bottle.
Picture 4. The roots of the plant must be sprayed daily.
Young shoots appear in about a month.
Advice! Before placing the plant in water, you need to add several tablets of activated carbon.
Above the water
Another technique that will help with the formation of roots is placing them above the water. The plant is placed in a vessel with water with the root system down. It is important that the orchid does not touch the liquid. The top of the container must be closed. Once a day, the orchid must be taken out and soaked in sweetened water for 60 minutes.
After the specified time has passed, the roots must be dried and placed above water again.
Aerial roots
When the plant cannot be cured, the air method, called “drying” by gardeners, will help.
In order for the plant to produce new shoots, you need to alternate water and air. The orchid is placed in a vessel with water, where it spends the whole daylight hours. At night, the roots should be removed from the liquid and placed above the water. You must repeat the steps daily until the problem is resolved.
Important! As soon as the plant shows new roots, it must be planted in soft nutrient soil.
On tree bark
With the right approach and following all recommendations, you will be able to see results in just a few weeks.
- Treat the bark with fungicides (a substance that inhibits the development of fungus) and pour into a suitable container.
- Prepare the plant. Remove all non-viable parts of the root system and leave only healthy ones.
- Plant the orchid in a container so that the flower growth zone is in contact with the bark.
- Spray the bark with plain water from a spray bottle.
Bark for growing orchid roots
The first results will appear within 3-4 weeks, but only if the optimal temperature is maintained - at least 24 degrees, and humidity - at least 50%.
Additional Information! To increase the humidity level directly around the flower, place a glass of water nearby, which is filled as needed.
In the moss
Sphagnum moss has antiseptic properties and retains moisture well, so this method is the fastest way to revive an orchid.
- Place the moss in a container suitable for placing the orchid (if the sphagnum is dry, it should first be sprayed with water).
- Root the plant into the prepared moss. It is necessary to secure the orchid tightly enough so that it does not bend or wobble.
Root germination will occur in 3-7 weeks, after which the flower must be transplanted into nutrient soil.
Other methods
If none of the described methods are suitable, you can turn to other methods. All of them have proven results, but are selected individually for each specific case.
In the substrate
This method is suitable for plants with small root shoots (2-3 cm). A mixture of expanded clay, sphagnum and bark is used as a substrate. Expanded clay in this case is used as a drainage layer.
- place the substrate tightly in the container;
- secure the plant tightly in the composition and place it in a lighted place;
- Throughout the entire growing period, you should monitor soil moisture and avoid oversaturating the substrate with water.
The formation of a new root system with this approach will take from 1 to 2 months.
Signs of a healthy and diseased root system
Before you think about how to grow roots in an orchid, you need to understand what is happening to the plant now and what condition the roots are in. To do this, you need to understand how healthy roots differ from diseased ones.
In a healthy state, the root system of a flower has the following characteristics:
- meatiness and density;
- smooth, non-sticky surface without unevenness or roughness;
- green color, and if the roots are dry, also a silvery-white coating (the shade of the roots may vary depending on what kind of soil and fertilizer you use).
Please note: A proven way to determine the condition of the roots is to remove the phalaenopsis from the pot and immerse the root system in water for several hours. After this procedure, the roots must meet all the above characteristics. If their condition is different, they are dead and can be safely removed.
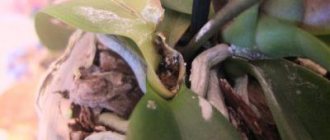
Diseased roots are darker in color, even brown. It also happens that they acquire a yellow tint. The easiest way to tell the difference is by touch - the affected root system will be slimy and sticky.
Nuances and features of development after resuscitation
Everyone is interested in the question of how long it can take to revive a trunk. I would like to immediately warn you that this is a protracted process; complete recovery takes from 6 to 12 months.
Rubbing the leaves with an aqueous solution containing growth accelerators will help speed up rehabilitation. The procedure can be performed a couple of times a week.
After successful resuscitation, special attention should be paid to eliminating the root causes that led to the disease. An important point will be regular watering, maintaining temperature conditions and maintaining the required humidity in the room.
An important point will be regular watering, maintaining temperature conditions and maintaining the required humidity in the room.