Why do orchids need lighting?
The length of daylight hours plays a key role in the proper development of orchids and their ability to bloom regularly.
Read more about lighting here.
Backlighting is used to extend daylight hours on window sills.
What does sufficient illumination mean? Each plant has its own. For orchids, the optimal indicator is in the range from 10 thousand to 30 thousand lux .
This indicator depends on the area where orchids grow:
- for orchids growing in open areas , 30 thousand lux of daylight is required;
- for those growing in partial shade - at the level of 15 thousand lux .
In our latitudes, the intensity of lighting on the street:
- in summer reaches 50 thousand -100 thousand lux,
- in autumn does not exceed 30 thousand lux,
- in winter it is at a level of about 5 thousand lux.
If the orchid is located at a distance of more than 1 m from the window , then we should no longer talk about lighting, but about light culture .
In the back of the room, lamps act as the main source of light and are responsible for the full development cycle of orchids.
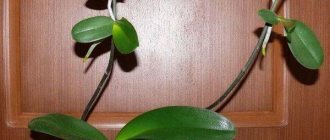
There are situations when an orchid is brought home with long, fleshy leaves , and after several months the new leaves grow shorter and more rounded.
The fact is that the light intensity has changed (there is more light than before) and the orchid no longer needs to grow long leaves to catch more light. This is a normal reaction!
This also happen in the same window . In winter and autumn it is a little dark, the leaves grow longer , and in summer and spring there is more light, so the length of the leaves is shortened and the shape changes.
Orchid care after
Young and tender plants (babies) are more demanding to care for:
- temperature should be from +17 to +24 degrees.
- Watering. Keep the soil moist, but not excessively. Air humidity is within 50–70%. The first watering should be carried out only on days 3–5, so that the plant has time to adapt to its new habitat.
- Lighting. Seedlings do not tolerate direct sunlight well, so at first you need to slightly shade them from the sun. For further maintenance, use diffused light.
- Fertilizer. Start fertilizing in half the dose with the appearance of the first leaf or with the development of young roots (clearly visible in transparent pots). This means that the plant has taken root and is growing.
Read the general article for basic rules for plant care.
Light spectrum
short blue and long red light waves take part in the process of photosynthesis green light remain unclaimed .
This is due to the characteristics of pigments that do not absorb light that matches their color.
Chlorophyll appears green because it reflects the green part of the spectrum.
Chlorophyll consists of two parts:
- chlorophyll A;
- chlorophyll B.
From the entire spectrum of solar radiation, chlorophyll absorbs red light (with a wavelength of 640 - 700 nm) and blue light (with a wavelength of 410 - 450 nm).
Chlorophyll A converts energy. It is active in red and blue waves.
Chlorophyll B is solely responsible for collecting and absorbing sunlight.
In natural daylight, chlorophyll B absorbs blue light throughout the day. Most of them are absorbed in the middle of the day.
red waves mainly in the morning and evening hours, and practically does not absorb in the middle of the day.
Under low light , plants increase the chlorophyll B/chlorophyll A ratio, synthesizing more molecules of the former than the latter. This increases the productivity of photosynthesis.
Dendrobium propagation
When propagating Dendrobiums, several different methods are used. Let's look at them in order.
Cuttings
Let us draw your attention to the fact that this method is more applicable for the propagation of deciduous species (for example, Dendrobiums Parisha and Noble). When planning to transplant an adult plant, separate the old pseudobulbs from the mother bush. Divide these pseudobulbs into cuttings about 10 cm long so that each cutting has two to three internodes. Treat the sections with garden varnish or crushed activated carbon. Note that sections on the mother plant must also be processed. And you don’t need to water it for several days for the wounds to heal. Let's return to our cuttings. For better rooting, stick them into damp sphagnum moss, and place the entire structure in a prepared greenhouse (for example, a container with a lid or a plastic bag with a zipper). No more than two cuttings can be rooted in each greenhouse. Place the greenhouses in a bright, warm place. The rooting temperature should be maintained within 22 – 26 degrees. Direct sunlight is undesirable. Ventilate daily. After two to three weeks, wait for the first sprouts and roots to appear. After another week, you can transplant the cuttings into their own pots with orchid substrate. Young Dendrobiums obtained in this way will bloom only after a couple of years, not earlier.
Dividing an adult bush into parts
If there is a need to transplant an adult orchid into a new pot, think - maybe it’s time to take the opportunity and divide the bush into several parts. This is the easiest and most affordable way to propagate Dendrobiums.
This may be interesting: Reproduction of Phalaenopsis orchids at home
This is done as follows. Take the bush out of the old pot. They clean, as far as possible, its root system from the substrate, trying to carefully untangle the roots. For propagation, parts of the bush are used, which contain three components: a rear pseudobulb, a mature pseudobulb with leaves and a young bud (growth point). Find a suitable link that contains at least three shoots. Using a sharp, clean instrument, cut the rhizome - the rhizome. Roots that are too long and damaged, severely tangled parts are cut off. All sections are powdered with crushed coal. They are allowed to dry a little in the shade for a couple of hours, and then they are planted in a suitable size pot with soil for orchids. Watered.
For better rooting, we recommend placing the flower pot in a large transparent plastic bag to create a greenhouse effect for a couple of weeks. Maintain the temperature around 22 degrees, the light is bright and diffused. If new shoots appear, calmly place the orchid in its place and care for it as you would an adult plant.
Reproduction by children
Aerial shoots growing on the stem in the axils of the leaves are sometimes called Dendrobium babies. (Shoots from the bottom of the flower are not babies.) To propagate an orchid, separate such a baby when young leaves and roots appear on it, the length of which is about 5 cm. Place the baby in a pot with a sterile moist substrate under the film. Maintain the temperature at 22 - 26 degrees. If necessary, moisten the substrate using a fine spray bottle with warm boiled water. When the shoot actively begins to grow, remove the film, place the pot in the prepared place and begin to care for the new member of your flower collection according to the usual rules for orchids.
Light duration for orchids
You need to focus on the length of natural daylight.
The total duration of daylight for orchids is no less than 10 and no more than 14 hours a day.
The length of daylight hours should be increased by illuminating the orchids in the morning and evening hours.
The lamps can be turned on all day long if it is cloudy outside or there is not enough light in the room.
Important! Orchids should not at night . Disruption of biorhythm will negatively affect the life of plants, even to the point of their death.
How quickly will the orchid recover and what to do next?
After restoration work, the orchid will not begin to come to life immediately. For some, the plant returns to normal in a month, for others in a year. If resuscitation was carried out in the fall or spring, the chances of quickly putting the orchid in order become greater.
If the plant begins to look better and new roots have appeared on it, feeding should be stopped. Usually the new root system develops quickly; after the roots reach a length of 5 centimeters, the phalaenopsis can be transplanted into a pot.
Important! Watering after resuscitation measures should be moderate, the substrate should have time to dry out.
The flower should be secured in a new pot so that the roots do not break. For this, sticks are used to which the plant is tied.
Will regular white lamps work?
The main condition is that the lamp should not heat up.
If the lamp emits heat, the leaves will heat up, this can lead to burns . Even if the leaves are slightly warm, this is unacceptable .
To provide a bright and comfortable winter for unpretentious orchids, you can use ordinary light-emitting diode (LED) lamps or fluorescent tubes of the following markings:
- LB (luminescent, white);
- LD (luminescent, daylight);
- LDC (luminescent, daytime color, with improved color rendering).
Spectrum is important when lighting is very low. If there is plenty of light to spare, then the spectrum does not play a special role .
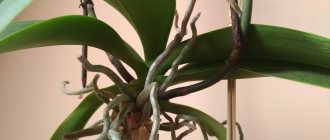
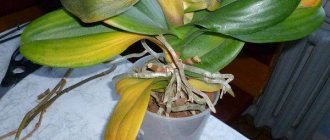
Drying of aerial roots
The appearance of aerial roots in phalaenopsis is an indicator of flower health .
Their drying out is fraught with rotting of the root system in the substrate, which over time can lead to the death of the entire plant or its long resuscitation.
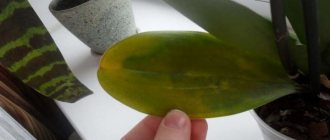
The first manifestations are noticed on the condition of the leaves . They may fade, turn yellow or change color.
This condition of the aerial roots also affects flowering.
The plant may not only not produce flowering intensity and insufficient flower size, but simply drop flowers .
This happens especially often among beginners who have no experience in properly caring for orchids.
Orchid roots can be revived by high-quality watering of the flower.
And the aerial roots, which the orchid needs to obtain moisture from the air, generally frighten them.
If the external condition of the orchid is not very deplorable, then it can be revived with high-quality watering . That is, provide the root system with the necessary water composition without over-wetting it.
If the condition is of concern, then it is necessary to engage in more complex resuscitation , which includes the following preliminary measures:
- Tool preparation . It is desirable that it be sharp and well disinfected: scissors, a knife or pruning shears;
- Removing (if the root system is dried out this will not be difficult) a flower from a pot .
Trimming
an inexperienced gardener can hardly determine that the roots have died . Their viability is checked by immersion in water .
If in 20-30 minutes. their condition and appearance remain unchanged , then you can trim them without regret.
Disinfection of sections
After trimming, they are allowed to dry a little, and then it is necessary to disinfect the cut areas .
Finely crushed activated carbon or cinnamon are best suited for this procedure.
You can treat the cut areas with brilliant green , but experts do not recommend doing this.
Zelenka dries out intraradicular vessels.
Planting in a new substrate
Whatever the condition of the root system after pruning, it must be given time to dry thoroughly .
If you had to completely remove the roots, then first the orchid is planted in sphagnum moss, which is periodically sprayed until more or less strong roots appear, and only then it is planted in a new substrate prepared according to all the rules.
Important! Phalaenopsis has a high degree of vitality. Even cutting off the entire root part with proper resuscitation does not lead to its death.
The right choice of phytolamps for orchids
If you want to achieve winter flowering from demanding light-loving orchid species, you need special lamps - phytolamps.
They use red and blue light waves to influence growth and flowering.
Lamps with a blue spectrum stimulate vegetative growth of plants, and lamps with a red spectrum stimulate flowering .
Light from only blue or only red lamps is not enough , since such illumination still lacks a significant part of the spectral composition of light.
Growing orchids only under red light results in
- the formation of longer leaves and sprouts;
- plant tissues thin , which can lead to deformation (curvature under the weight of its own weight);
- the duration of flowering and the number of flowers on one peduncle increases, and the frequency of formation of peduncles increases significantly.
When using only blue lamps
- orchid leaves acquire a rich green color;
- grow thicker (fleshy), but compact;
- It is not uncommon for many side shoots to form.
To properly illuminate orchids, use bicolor lamps with red and blue light sources.
Combined EED lamps T8 and T5 have proven themselves well, with a ratio of red and blue sources of 8:1 or 5:1.
For light culture of orchids, the best solution may be a combination of red-blue and ordinary white fluorescent lamps with a warm glow (models LB, LD, LDC with a power of 36 W or a little more).
Features of Dendrobium transplantation
Dendrobiums are transplanted no more often than once every two to four years, since they do not like this procedure. You need a good reason for this, such as:
- pieces of bark in the substrate turned into dust;
- the root system has filled the entire planting container, displacing the substrate, and now it is clearly not enough to support the plant;
- roots stick out above the surface of the substrate;
- due to the tightness of the pot, the flower stopped growing;
- a coating of salty soil appeared on the roots.
This may be interesting: Cattleya Orchid - natural varieties and hybrid varieties
Dendrobium should be replanted in the spring, when the plant is just emerging from dormancy and is preparing for active growth. We do not recommend replanting during flowering. But, if there is a suspicion of rotting of the root system, there is no need to wait for favorable conditions, urgently start replanting.
Soil for replanting
A special substrate for Dendrobium is prepared or purchased, different from the substrate for other indoor flowers. It is more loose, lightweight, moisture-permeable and breathable. It consists of large pieces (1-3 cm) of pine bark (2 hours), large expanded clay (1 hour), charcoal (1 hour). Sometimes, pieces of sphagnum moss are added here. But not much, so that excess moisture does not cause rotting of the roots. The substrate performs more of a function of fixing the roots than feeding the flower. Expanded clay and coal accumulate moisture during watering, and then gradually release it to the bark. Coal is also needed to prevent fungal diseases and fight mold that may appear in pieces of pine bark. If you prepare the substrate yourself, take the time to disinfect all components of the soil mixture. Boil the bark a couple of times, then dry it well. If you buy a ready-made substrate for epiphytic or orchids, you will not go wrong.
Pot for Dendrobium
Prepare a ceramic or plastic pot for transplanting Dendrobium, slightly larger than the root ball. Not necessarily transparent - these are needed only for Phalaenopsis. Dendrobiums in transparent pots have roots that overheat. Be sure to lay a good drainage layer at the bottom of the pot from the largest pieces of bark or expanded clay.
Dendrobium orchid transplant process
Now proceed to transplanting the plant itself.
Remove it from the pot. Free the roots from the substrate and inspect them. Trim those that are damaged, rotten or too long. Sprinkle the cuts with crushed coal. Let them dry a little. After this, place the bush in a new pot on a layer of drainage. Cover the roots with substrate so that there are no voids between the roots. Water it. It is advisable that two to three cm from the top of the pot to the base of the rosette remain free. Then, as the aerial roots grow, there will be room in the pot to add substrate. A large specimen of the Dendrobium orchid with fleshy, heavy leaves needs to be strengthened in the substrate. During replanting, we recommend installing a support in the pot and immediately tying the flower to it so that it does not wobble.
After transplantation, it will take a couple of weeks until the flower regains its strength. At this time he needs help. Place the pot in a bright, warm place with high humidity, but in partial shade. If the interference in the root system of the plant was noticeable, we recommend placing the transplanted plant in a large plastic bag to create a greenhouse effect - it will be easier for Dendrobium to recover. For a couple of weeks. Look into the bag and ventilate it if necessary. If the flower looks strong and cheerful, take it out of the bag and put it in its rightful place - let it grow with renewed vigor.
Types of lamps by light spectrum
- Bicolor.
Red (660 nm) and blue (450 nm) colors of the spectrum are mixed. An option favorable for mature plants that are illuminated mainly by natural light.
- Multispectral.
A combination of red, blue and warm white colors provides suitable lighting for plants with dense foliage and flowering plants.
- Full spectrum (Full Spectrum).
Suitable for growing plants without sunlight. The only negative is that the lamps irritate the eyes and are recommended for installation in non-residential premises.
To compensate for the adverse effects on vision, Fullx2 models are available. They feature the addition of white light, but are more expensive than Full Spectrum bulbs. These lamps are recommended for illuminating plants in living rooms.
Disadvantages of phytolamps :
- unpleasant glow for the eyes;
- high price;
- short service life - only 1 year.
How to determine the cause and solve the problem
How to revive an orchid that has almost no leaves left? Often problems with leaves begin from the roots, which stop supplying parts of the plant with a sufficient amount of moisture. If the orchid has not received moisture for a long time, the substrate dries out, which means that you need to urgently moisten the roots by lowering them with water for 10 minutes, and spray the leaves with water.
If there is waterlogging of the roots, you should act differently.
- After you notice a problem with the leaves, remove the plant from the pot and inspect the roots. Living roots, after being immersed in water, acquire a greenish tint and become hard. If they have not acquired the desired color, they should be trimmed with scissors. To form a new root system, you can use the “Kornevin” product.
- After treatment, the leaves are sprayed, the orchid itself is transferred to a container with a transparent closing top. An aquarium covered with plastic film is well suited for this purpose. It will be easier to cure a plant in a makeshift greenhouse. The greenhouse should be located in a warm place with sufficient light supply so that the leaves can carry out photosynthesis. An important condition is to ventilate the room every 2 days and periodically spray the foliage.
- How to save an orchid? A good effect is achieved by foliar feeding once every couple of weeks. For this purpose, a special fertilizer is taken, which is diluted in a concentration 10 times less than root feeding. The resulting solution should be sprayed on the orchid. It is important to ensure that the moss is constantly moist. After 2 months, the plant is transplanted onto the bark. The orchid will fully recover in a year.
Lamp power and color temperature
Total power:
- for LED lamps of all LEDs 100-120 W per 1 square meter;
- for fluorescent lamps (T8, T5 (high power)) 180 W per 1 square meter.
The color temperature of lamps is expressed in Kelvin (K).
It is from this that we can determine the predominant light spectrum:
- 1500 – 3000 K
Lamps with these values are usually dark orange or dark red in color. Stimulates plant flowering
- 3000 – 3700 K
The lamps are yellow or neutral in color. They stimulate photosynthesis throughout all phases of plant growth.
- 3700 – 4000 K
The lamps have a warm and neutral color. Stimulate growth.
- 4000 K
Most lamps with this value are neutral white. Stimulates normal plant growth.
- 4000 – 5000 K
These lamps emit a light blue color. Stimulates the growth of leaves and stems of plants.
- 5000 – 8000 K
Lamps with this emission spectrum have a dark blue color and improve the development of leaves and stems of plants.
To illuminate orchids, it is better to use a glow temperature of about 3000 K.
The best option is to combine half the lamps with a temperature of 3000 K and half with 8000-10000 K (6500 K will also work).
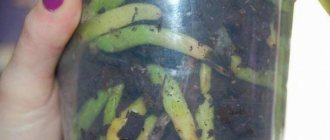
Growing roots in expanded clay.
By analogy with the previous method, only expanded clay is used instead of moss. The difference is in watering - in this case we use only bottom watering, or so-called wet heels. This is explained by the hygroscopicity of expanded clay - it conducts moisture well. An important condition for any resuscitation measures is the absence of low temperatures. In the method using expanded clay, this is the main condition, since it conducts not only moisture well, but also cold, which is unacceptable for a weakened plant. I use this method in test mode, which I talk about on Instagram. There is a result, we will see further in the following publications. What is noteworthy is that after restoring the root system with sphagnum or expanded clay, adaptation to life in the substrate will be insignificant. In the first case, you can always leave the orchid and continue to grow like this; secondly, you can simply gradually add bark, increasing its amount over time.
Distance from lamp to orchid
The lamps should be at a distance of 30-50 cm from the orchid leaves.
The optimal distance is:
- 30 cm from the leaves of the plant to the lamp for light-loving plants;
- shade-loving lamps .
It all depends on the power of the lamp itself.
A lamp that is bright for our eyes may be weak for an orchid. And the weak one for our perception is the most suitable for an orchid.
Important! the incidence of rays from the side as the approach of night, and the processes of morphogenesis, which are responsible for preparing the flower for the dark time of day, are activated.
How to save a flower with rotten roots
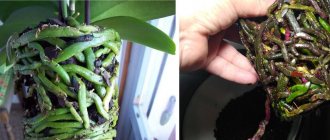
If the leaves look limp, lifeless, and watering does not promote recovery, you should be wary. If you detect rotting at an early stage, it will be faster to revive the orchid at home. With the right approach, you can revive an orchid even without leaves.
First, inspect the condition inside the pot. If the roots of an orchid are yellow, do not think about what to do, but remove them. This is the first sign of the onset of rot. All rotten and dry roots are cut off.
On a note!
If only 2-3 roots have been removed, then apart from replanting in fresh soil and proper care, nothing else is required. The plant will recover quickly.
But if the entire root system or most of it is removed, then emergency restoration begins.
Rescue methods
You can revive an orchid if all the roots have rotted. They don’t throw it away, but try to save it by growing new ones. They use one of three resuscitation methods to help grow roots in an orchid:
- we restore using a window-type greenhouse;
- by transplanting into a traditional substrate;
- resuscitation with alternating placement in water and drying.
Before restoration begins, the condition of the flower and the degree of infection of the roots are assessed. If a flower has lost about 60% of its roots, then it can really be saved in 1-2 months. If there are no roots at all, recovery may take about a year.
The choice of recovery method depends on:
- from the general state of culture;
- on the volume of roots located at the base of the rosette;
- on the condition of the leaves.
Also, the choice of restoration method is influenced by the conditions organized by the owner. It is more advisable to revive if all the roots of an orchid have rotted in greenhouse conditions.
How to properly restore in greenhouse conditions
It will be faster to save an orchid at home if you have a greenhouse for the window, where they create specially high humidity (70-100%) and temperature (22-28 degrees). At the same time, they provide light for 12-14 hours. If the values are lower or higher, the roots will not develop, but pathogenic bacteria and fungal spores will actively multiply.
Resuscitation of an orchid without roots is carried out as follows.
- The first layer is drainage (expanded clay).
- Sphagnum is distributed on top. It is pre-cleaned and steamed.
- The substrate is slightly moistened and the flower is placed in it.
The flower will have to remain in the shelter until the orchid's roots grow to 3-5 cm. To speed it up, growth is regularly stimulated. The substrate is moistened as required, and the greenhouse is ventilated.
On a note!
It is more advisable to perform care at night, so that the soil and air inside are saturated with carbon dioxide. It is this component that contributes to the fastest formation of growing roots; they will grow faster.
How to save without a greenhouse
You may be interested in: How to care for orchids in a pot after purchase Why the leaves of an orchid wither and how to save it Features of the care and propagation of the Dendrobium Nobile orchid
If you don’t have a greenhouse at home, it’s still possible to save an orchid without roots. Perform resuscitation of orchids in water. The diseased flower is treated and placed in a glass container. Every morning it is partially filled with water. The water used is pre-filtered or boiled. Pour enough water so that only the lower part of the roots comes into contact with it. The leaves should not get wet. The plant stays in water for 6 hours. The flower is left until the morning, during which time it will dry out.
To make the revival process go faster, they use a little trick. For each liter add 1 tsp. honey or sugar syrup. When regularly moistening the substrate, you can additionally add:
- iron-based products;
- monthly growth stimulator;
- complex fertilizer solution for orchids.
If some of the roots have died, they are saved by transferring them to fresh soil. Rotten roots are removed, and the sections are disinfected with chalk or activated carbon. For planting, take a pot with a diameter of 6-8 cm. The orchid is provided with a temperature of 20-25 degrees with a lighting duration of 12 hours.
On a note!
It is important not to lower your temperature at night. Instead of traditional watering, the option of irrigation over the soil surface is used. You can place the pot in a container with liquid for 30 minutes, then drain off the excess and send the orchid to its permanent place.
Mistakes when organizing orchid lighting
Common mistakes:
- Wrong choice of lamp light spectrum.
With an abundance of red rays, the orchid will bloom profusely, but the peduncle will be thin and can be easily damaged.
Under the influence of blue spectrum rays, the flower will grow strong and strong, but you may not wait for flowering.
- Too much light.
Excessively long daylight hours are not good for the orchid. In summer the plant can cope with the load, but in winter it may wither.
- Insufficiently intense light.
The orchid will be lethargic, the leaves will darken and take on a bluish tint. This is how a lack of ultraviolet radiation manifests itself.
Growing roots using sphagnum moss
Also a fairly common method. Unlike the previous option, the orchid is immediately placed in a pot, where moss serves as the substrate. It is believed that it has bactericidal properties, but for this it must be alive and green. Otherwise, it is guaranteed to rot, since moss as a substrate in its pure form is very moisture-intensive. In my experience, this method is good if there are already roots on the orchid’s neck, but for some reason they are pupated, that is, they are not active and are in dormant mode. Watering strictly from a spray bottle, slightly wetting the top layer of sphagnum, without touching the orchid.