How to tell if an orchid's roots have rotted
Rotting of underground and aerial roots is a common disease of domestic plants due to improper care or damage by harmful insects. This process begins, most often, in winter, when daylight hours decrease and temperatures drop.
If the damage is not very advanced, it can be treated. To understand whether a flower is sick or not, it is necessary to distinguish healthy roots from those susceptible to rotting. There are several principles for recognizing them.
By external signs
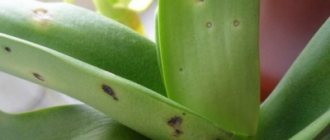
The first way is to determine by general appearance and touch.
Healthy (left) and diseased (right) orchid roots
The root system of the orchid should be:
- dense consistency;
- silvery in color in the normal state and green when moistened (chloroplasts, the main participants in photosynthesis, begin to show through), in old plants - yellow or simply brown;
- smooth and elastic.
If putrefactive processes have begun, the following signs appear:
- dark color, almost black;
- liquid, mucus;
- mold;
- putrid odor;
- filamentous form.
Experienced method
The viability of the roots is determined not only by external signs; you can also remove the plant from the pot, immerse it in water and leave for 3 hours. Healthy roots will be nourished, acquire elasticity and richness; if the shoots are still sluggish and pale, then they are infected.
What is a bay?
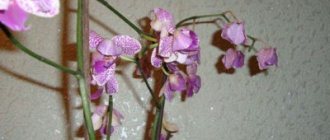
Often, amateur gardeners, when watering a plant using the “immersion” method, forget to remove it from the water container in time. The soil becomes oversaturated with water, which can threaten the death of the orchid. Such excessive flooding is recognized by wrinkled leaves (read here what to do if orchid leaves have lost turgor and wrinkled). If this happens at the flowering stage, the blooming flowers and buds fall off (you can learn more about why the orchid’s flowers fade and buds fall off here). These are only external manifestations. Under current conditions, the root system begins to rot due to unconsumed moisture. If the flower is not saved in time, it may die.
Orchid resuscitation options
It is important to detect diseases at an early stage, in which case it will be easier to revive the flower.
First you need to determine the level of decay. Based on this, choose a method for bringing the orchid back to life.
Minor part damaged
If only some small areas of the roots are affected by the disease and new shoots are formed, the method of changing the regime is used:
- The orchid is removed from the pot and carefully freed from the soil by washing.
- The affected areas are identified, removed, and the sections are treated with coal or fungicides, Kornevin.
- Allow to dry, as a rule, this takes 3 hours.
- Place the plant in a small pot (6-7 cm) with a substrate consisting of moss and expanded clay, and create conditions that differ from the previous placement. Place in a more illuminated place or provide illumination, lengthening the daylight hours (at least 12 hours). The temperature regime is also increased (+22…+25 °C).
- Moisten as the soil dries. You can do this by immersing the container with the plant in water for half an hour, making sure that the top layer is wet, but the water does not remain at the bottom.
Severe damage
When a large part rots, a method of growing orchid roots in greenhouse conditions is used.
The initial stage of rehabilitation is the same as in the first case:
- The plant is removed from the pot, the rotten roots are cut off, very carefully. The remaining affected areas can undo all efforts, causing a new wave of rot.
- Afterwards, the cuts are treated with fungicides or coal. If mold is detected, the flower is placed in a weak solution of potassium permanganate for 20 minutes.
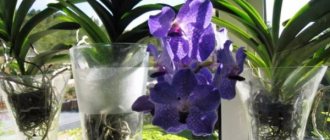
- Then the flower is placed on a special vessel with a convex bottom, soft filtered water is poured into it so that the rosette of leaves does not touch it, and the lower part is immersed in it. Sugar syrup or honey is often added to the water, and the plant itself is treated with a growth stimulant - Kornevin.
- After 6-7 hours, the plant is released and dried.
- The method itself consists of creating a closed space for the diseased flower, where accumulated carbon dioxide stimulates chloroplasts to form new cells. At the same time, they provide a comfortable temperature of +25 °C and a constant humidity of at least 70%. Such conditions can be created using any glass container. The greenhouse is ventilated periodically. Water in doses.
- Be sure to provide the orchid with good lighting for at least 12-14 hours a day.
- Once a month, feed with fertilizers (Epin, honey solution).
What to do if the plant is overwatered?
If the purchased plant was overwatered before purchase, or this mistake was made during the process of caring for the orchid, the waterlogged flower is urgently reanimated - replanted . At the same time, attention is paid to every detail.
- The orchid is carefully (without pulling out) released from the container.
- The soil is removed from the root system with pinpoint precision, rinsed with water and inspected.
- If there are rotten roots, they are carefully trimmed (you can find out what the normal color of a healthy root system should be and why it changes here).
- The sections are treated with charcoal powder or ground cinnamon to avoid infection and fungal damage.
- The flower is left alone for a day so that the roots and neck dry out.
The pot is prepared in advance and treated with soapy water.
Further actions:
- The prepared substrate is poured into the bottom of the container for the flower.
- The root system is immersed in the soil so that it is free in the container.
- The remaining soil is scattered on the sides.
Important! The rhizomes are not compacted. The neck and part of the root system should remain visible.
The substrate is not watered after transplantation. It is sufficiently hydrated.
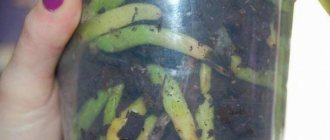
What to do if an orchid that has been flooded has virtually nothing left of its roots? It can be saved by creating a small greenhouse. Water is poured into a plastic container and the flower is fixed so that the small roots do not come into contact with the surface of the water. The rhizomes are sprayed several times a day. Liquid must be added periodically to the required level.
When the root shoots reach a length of up to 6 cm, they are transplanted into a pot filled with a special substrate for orchids.
Read more about how to save an orchid without roots, and from this article you will learn how to revive a flower if the root system and leaves are missing.
The reanimated plant will bloom again only after 2 years.
We invite you to watch a video about saving a waterlogged orchid:
Time frame for orchid revival and actions after resuscitation
The recovery period for a plant can last from a month to a year, even if everything is done correctly.
The best time to resuscitate a flower is spring or autumn. In winter, the chances of salvation are much less.
When the external characteristics of the orchid improve, when the leaves turn green and new aerial roots begin to grow, fertilization is stopped and watering is reduced.
Compliance with the rules of care is not a very labor-intensive process, especially if it is an unpretentious Phalaenopsis orchid; you just need to monitor the plant more closely in order to take corrective actions in time.
When is a greenhouse needed?
A greenhouse for an orchid is needed in rooms with high humidity levels. Frequent drafts and cold are also enemies of fragile plants. Since phalaenopsis comes from tropical forests, you need to take care of the availability of identical conditions for the existence of the flower. The plant will delight you with bright inflorescences, provided that you place it in a greenhouse, greenhouse or orchidarium.
It is difficult for the orchid to cope with the conditions we are accustomed to in apartments. For this reason, gardeners create a suitable microclimate for them. You may wonder why build a greenhouse if you can put a flower on the windowsill and enjoy regular flowering. In most cases, phalaenopsis gets used to the conditions of city apartments, but you may receive a plant without roots. This flower needs urgent resuscitation and further stay in the greenhouse.
External signs indicating that the plant is flooded
In nature, tropical plants are found in environments where the relative humidity averages 70%. This is caused by :
- Frequent rains;
- And elevated temperatures.
Under natural conditions, an orchid consumes a sufficient amount of moisture.
However, in such conditions they develop well . That is, frequent watering is not as dangerous as stagnation of moisture at the roots. Water gradually displaces air from the velamen of the roots and the orchid begins to suffocate.
Then a gradual death of root cells occurs, microorganisms add problems, and the process of rotting begins. All this is accompanied by gradual oppression of the plant.
But since the storage organs of orchids are leaves or pseudobulbs , problems with the roots at the top will not appear immediately. This means that fairly decent-looking leaves are not a sign that the plant is healthy.
In advanced cases, the death of the root system is accompanied by loss of foliage turgor or pseudobulbs. Then the leaves wrinkle, turn yellow and fall off.
Ultimately the flower dies.
How to speed up the process?
All the described methods of resuscitating phalaenopsis take quite a lot of time; to stimulate this process you can:
- Wipe the leaves and mix a solution of succinic acid into the water at the rate of 4 tablets per liter of water.
- Dilute one ampoule of vitamins B1, B6 and B12 in a liter of water and lower the part of the orchid from which the roots will grow into the solution, leaving it overnight.
- Feed the plant daily with glucose, sugar or honey.
- Feed with iron chelate every 2-3 days, and fertilizers containing potassium and phosphorus - once every 20 days.
It is necessary to alternate feedings, otherwise you may not notice that some of them are ineffective and the plant will die.
Restoration with minimal preservation of roots
If it was possible to preserve 2-3 healthy roots about 3 cm long, the plant is planted in a small container filled with the usual substrate for this type of orchid.
The prepared plant is fixed in the substrate in a vertical position.
During the recovery period, carefully monitor the condition of the substrate, in no case allowing waterlogging . If desired, use mineral fertilizers and root formation stimulants, but with great caution, reducing the recommended dosage by 2-3 times.
Instructions for proper hydration
An orchid is always watered when it needs it, without being guided by a schedule!
What determines the watering time:
- type of orchid;
- microclimate;
- moisture capacity of the substrate;
- planting method;
- pot size;
- the condition of the plant itself.
Owners of phalaenopsis, cymbidium, and paphiopedilum orchids should be aware of the appearance of perspiration on the walls of the pot. Those who grow vanda without a substrate need to organize daily spraying of the roots.
And those growing Cattleya, Odontoglossum, Ondicium, Dendrobium should water the orchid only after the soil has completely dried. Typically, the frequency of watering varies from 2 to 3 times a week. But this is not a rule for setting a schedule.
You only need to use settled water at room temperature! There should be no watering from the tap (including the so-called “hot shower” method), otherwise the plant will simply die.
Methods for watering orchids:
- Immersion. The pot with the orchid is placed in a basin with pre-filtered/boiled water. It is necessary to immerse slowly so as not to damage the root system. As soon as the substrate is well saturated, the orchid must be removed and placed in another container to drain excess moisture. By getting rid of excess water, returning the flower to its usual place.
- Using a watering can with a thin spout. Here it is important to control the pressure, directing it to the inside of the pot.
It is important to completely saturate the substrate. As soon as moisture begins to seep into the pan, stop watering and drain the excess liquid. Do not allow liquid to come into contact with growing points or the inside of leaves. - Spraying the roots. Used when growing orchids without substrate. Water is applied to the roots using a spray bottle until their color turns deep green.
- Under the summer shower. The rarely used practice of placing an orchid pot outside the window. So the conditions for the flower are to some extent closer to natural tropical ones. Cannot be used frequently.
Mistakes when watering:
- using “hard” tap water, settled, but not filtered or boiled;
- adding oxalic acid to water;
- regular watering with rain or melt water.
We recommend watching a video about when and how to water orchids correctly:
Preparing for recovery
To begin with, the damaged orchid should be properly prepared for rooting.
- Carefully remove the plant from the container.
- Remove old substrate.
- Thoroughly rinse the remaining rhizomes with warm running water;
- Place on a napkin and let dry for 2-3 hours at room temperature.
- Use a sharp tool to remove areas of dead tissue.
- Treat wounds with an antiseptic.
- Dry the plant again to tighten the cut areas.
- Dip the lower part for 20 minutes in a solution of succinic acid or “Kornevin”.
Important! The success of an enterprise directly depends on compliance with antiseptic rules. Trimming and cleaning of affected areas is performed with a sterile instrument. All wounds and injuries must be disinfected.
Tip #1 . Alcohol-containing preparations are not suitable for disinfecting orchids, since they leave deep chemical burns in the tissues of an already weakened plant. It is better to treat the wound surface with powdered activated carbon, cinnamon, and turmeric. As a last resort, you can use fungicidal preparations such as Maxim. Secateurs, scissors, and a knife can be heated over a fire, doused with boiling water, and disinfected with potassium permanganate or peroxide.
The degree of surgical intervention depends on the general condition of the orchid:
| Vegetative part | State | Recommendations |
| Roots | Blackened, weeping, shriveled, brittle | Cut to healthy tissue |
| Firm, fleshy, light green or white | Do not delete | |
| Sheet plates | Blackened, with signs of rotting | Remove areas of decay, preserving healthy tissue if possible |
| Yellowed, wrinkled, fading, drying out | Leave | |
| Peduncles | At any stage of development | Remove along with the buds (it is acceptable to leave the lower third to secure the plant in the container) |
Further actions depend on the degree of damage to the rhizome and the general condition of the orchid.
How to revive an orchid when it overflows
The only correct way to save it is to replace the substrate and transplant the plant into a new pot, since when the roots rot, pathogenic microorganisms develop in the soil. Experienced flower growers give advice on how to do it right:
- Rule: Remove an orchid from an old pot carefully, as its roots are very fragile. You can cut the old planting container into several parts so as not to injure the root system.
- Rule 2: Fresh substrate should be treated to prevent the spread of pests or diseases. To do this, you can put the soil in the oven and set the temperature to 700-800. Warm up for a quarter of an hour. Another way is to pour boiling water over the substrate 3 times.
What to make a greenhouse from
You can make a home greenhouse with your own hands from the following materials:
- plastic bottle;
- plastic boxes;
- polycarbonate boxes;
- glass container;
- frame with film;
- plastic bag.
In order to build a canopy from a bottle, prepare a large bottle with a capacity of 6 or 10 liters. If the flower is small, a two-liter container will do. The bottom is cut off from the bottle and the flower is covered with this design. For reliability, you can secure the phalaenopsis with threads, tights or twigs.
A greenhouse made of plastic boxes is suitable if you have several orchids. Secure them inside the box and close it with a lid. The greenhouse is ready.
A polycarbonate greenhouse can be made from a ready-made box. If you have the material itself, make such a box. The advantages of this material are light transmission, lightness, thermal insulation, and strength. In addition, polycarbonate is easy to cut, so it will not be difficult for you to make a canopy out of it, having previously thought through the shape and parameters.
You can cover the flower with a glass container. An aquarium, terrarium or large jar is suitable for this. Many gardeners equip such covers with lighting.
You can build a frame over the pot. To do this you will need solid wire. From it you need to make a skeleton onto which the film is stretched. This design is good because it can be easily disassembled if necessary.
If for some reason you cannot use one of the above methods, the pot can be placed in a transparent bag. In fact, this option is no worse than others. The only negative is the unaesthetic appearance.