What kind of method is this?
Definition
Cuttings are a fairly simple method of artificial vegetative propagation using a cutting separated from the mother specimen.
By choosing this method of propagation, gardeners preserve all the varietal biological properties of the plant.
What parts can be used?
Orchids are propagated by dividing the bush, by children or by cuttings.
Is it possible to propagate an orchid from leaves? It is impossible, because the leaves of this plant do not have growing points. The cuttings of an orchid can be its tip or peduncle , which is cut into pieces for propagation.
The shoots must be divided into parts. Each part should be approximately 10 -15 cm in size. It is imperative that each part has 2-3 buds. Each part should have its bud as low as possible.
How to propagate an orchid at home: methods
There are several ways in which you can propagate an orchid:
- Seeds
- Cuttings
- Children
- Dividing the root
In some countries, such as Thailand, you can find flasks with ready-made seedlings that look like decorative decorations for your home. Similar products can be purchased at a flower shop. In this case, practically nothing needs to be done. It is enough to remove the seedlings from the flask and root them. Which also requires some skill and patience. If you don’t have such children, but can boast of a recently acquired plant that is blooming, we recommend waiting a little.
It is best to start propagation in the spring from a ready-made adult bush. You can get a new plant by dividing the roots or by bulbs. You can also use root or stem babies, but they appear only in conditions where the room is very hot and has high humidity. We do not recommend cutting off the roots of children, because in this case both plants suffer: young and adult. The best option is to divide the bush, as well as the children that form on the stems.
Orchid flowers
Step-by-step instruction
Propagation of orchids by cuttings at home occurs in this way.
How to cut off a peduncle correctly?
The peduncle must be cut off as close to the base as possible.
To do this, you can use a sharp knife, scalpel or razor blade. Before carrying out the procedure, it is imperative to disinfect with alcohol or an antiseptic.- The resulting shoot should be divided into parts. Each part should be approximately 10 -15 cm in size. It is imperative that each part has 2-3 buds. Each part should have its bud as low as possible.
- Processing the cutting and the cutting site on the parent orchid.
- After cutting, be sure to treat all edges and cuts with activated carbon or brilliant green. This will prevent infection through the damaged area.
Greenhouse environment preparation
To create greenhouse conditions you will need a plastic container with a lid, a bag or a plastic bottle.
You can also choose a pot for planting, but it is more difficult to create greenhouse conditions in it. It is necessary to make holes in the selected container for ventilation .
Whatever dish you choose, be sure to cover it with film, a plastic lid or glass. Otherwise, it is impossible to provide the required level of humidity. Consistently high humidity is required for proper formation of the root system.
Planting in a greenhouse
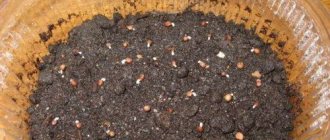
You should definitely put sphagnum moss at the bottom of the container. Its main positive properties are its bactericidal effect and the ability to retain large amounts of moisture. The moss should be slightly moistened. Cuttings need to be laid on the surface of the moss .
It is necessary to position it so that the axillary bud is directed upward.
There is no need to cover or bury the cuttings. You can spray the substrate with a special biostimulant solution, so the root system will develop more intensively. The biostimulant is diluted in the ratio of 1 tablet per 1.5 liters of water.
Caring for a seedling
The container with cuttings must be placed in a room where the temperature is not lower than 25 degrees. After planting, it is recommended to take care of the shoots . Periodically you need to moisten the substrate. You should use a spray bottle to water approximately once every 3 to 4 days.
You only need to water with water at room temperature.
It is also worth taking care of lighting. The shoots should be well lit. But you should not expose them to direct sunlight. Otherwise, the temperature in the greenhouse will be higher than normal. If there is not enough light, you can use additional lighting with fluorescent lamps.
With proper care, roots and 2–3 young leaves may appear on the cuttings within a month.
Moving to the potty
After the roots and leaves appear on the cutting, you should think about transplanting it into a separate pot. Not the entire cutting is used for planting, but the baby emerging from the bud . The young plant needs to be transplanted into a new substrate. You can buy it in the store or prepare it yourself.
Just mix pine bark, charcoal, sphagnum moss. For drainage, small expanded clay or pebbles are needed. Before mixing, it is necessary to boil and dry the pine bark. The bark particles must be approximately 8 - 10 mm in size.
It is recommended to soak sphagnum moss in a solution of potassium permanganate before use . Small expanded clay is sent for heat treatment.
- You need to choose a plastic and transparent pot.
- It is necessary to make holes in it to ensure free access of air. It also needs to be disinfected.
- Drainage is placed at the bottom of the pot.
- After this, the baby should be placed in the middle of the pot.
- Next, sprinkle it with a mixture of pine bark and charcoal. And lay sphagnum moss on top.
- The resulting substrate should be sprayed with water at room temperature from a spray bottle.
- Place the pot in a bright place and water it once every 3 days.
We wrote in more detail about the propagation of orchids through a peduncle in another article.
Orchid propagation at home: tips
General tips:
- An orchid can only be propagated if it has been in full bloom for more than 2 years. This is when the plant is considered healthy, mature and suitable for propagation. Otherwise, you will not get results, or worse, you may ruin the main plant.
- There are also defined standards in which stimulation must be carried out. Rooting work is best done in February.
- In this case, you need to plant a flower that has bloomed directly on the western or eastern side, where there is not much light.
- You also need to shade the leaves and not allow sunlight to reach the flowers. During the day, the temperature should be at 28 degrees; the temperature at night can be reduced to at least 18 degrees.
- In this case, watering is reduced to a minimum, fertilizing is not applied until you receive a bud. You will have to spend about a month and a half waking up the sleeping kidney.
- As soon as you see that the plant has appeared, you need to move the flower to the shade. Because it is impossible for the baby to be exposed to direct sunlight. Now you can fully water the plant and add bait that will feed the plant with useful substances.
- Remember that the process of germination and growing a baby is quite long. It will take you about six months to get a full-fledged baby that can be transplanted to a new place. It is in six months that approximately 3 leaves and roots 3 cm long appear.
- Now all you have to do is carefully separate the plant from the main one, that is, the mother one, and replant it in a pot.
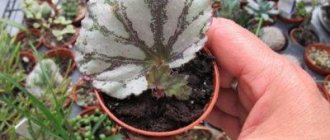
Orchid flowers
Despite the apparent difficulties, growing and propagating orchids is simple, provided you follow the instructions and follow all the rules and recommendations. Do not forget to regularly water and feed young plants, as well as rooted cuttings.
Photo
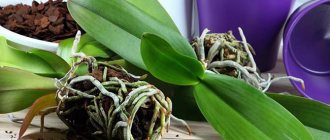
Below you can see photos of the orchid and its cuttings:
Material for cuttings
You can propagate an orchid in different ways: by children, seeds, cuttings. However, cuttings are the easiest way. However, this method is not suitable for all varieties of orchids. Types of orchids that are propagated by cuttings are similar in one thing: the absence of pseudobulbs. Also, in plants of this species, only one point at the top serves as the basis for the growth of a new stem. For cuttings, planting material must be taken from different parts of the plant. These are side shoots or faded flower stalks. Note that orchids can be propagated by cuttings only when the plant is ready for this procedure. First of all, it must bloom, after which it is carefully examined to find those arrows on which the flowers have already faded.
Further care
For further growth and rapid development of the orchid, optimal conditions should be created.
- Lighting . The plant must be kept in a bright room for at least 12 hours. It is better to choose a window on the east or southeast side.
- Temperature . The optimal temperature in summer is 18-25 degrees. In winter – 12-15 degrees.
- Watering .
It is recommended to water when it is noticeable that the substrate is drying out. In spring and summer, watering is carried out 1-2 times a week. In winter, watering is reduced to 2 times a month. An interesting way to determine watering is to water when the roots lighten. - Fertilizer .
It is necessary to feed approximately 2 weeks after planting the plant. Special complex fertilizers enriched with microelements and minerals are suitable for feeding. The dosage of fertilizer must be reduced by 3-4 times. To accelerate the growth of orchids, it is recommended to use fertilizers with a high nitrogen content. - Humidity . Indoor air humidity should be 60-70%.
The orchid is a rather capricious plant, so anyone who plans to grow it at home should be prepared for basic care requirements. If you provide the flower with comfortable conditions, it will delight you with its beautiful peduncle and pleasant aroma for a long time.
If you decide to start breeding orchids and don’t know how to do it, we suggest reading about the breeding features of the dendrobium species. Our experts will give useful advice on methods of reproduction, including by roots and children.
Possible problems after separation from the mother plant
Often, when propagating this capricious plant, the following problems may arise:
- There are no shoots for a long time, the buds do not wake up. When observing this situation, you should resort to the help of phytohormones or growth stimulants.
- Rotting of the cuttings. This outcome can be caused by excessive watering or lack of soil treatment with fungicides or a solution of potassium permanganate before planting.
Important! It is harmful for an orchid if drops of water fall on its leaves, stems and flowers. This leads to unaesthetic spots appearing on the plant. Therefore, watering and spraying should be carried out carefully, not allowing the ground organs of the flower to come into contact with water.
Favorable conditions
Important! Follow these simple rules when propagating orchids at home:
- make sure that your orchid is fully formed and has 4 or more leaves;
- consider the condition of the roots and proceed with the propagation procedure only if the roots are healthy;
- wait for the orchid to bloom;
- remember that the favored period is the end of winter, the beginning of spring, the summer period until July;
- the kidney must be healthy.
Soil preparation
After the planting material has been selected, it is necessary to take care of the substrate in which the new plant will need to be placed. Typically, for young orchids, the soil mixture is prepared from crushed conifer bark, peeled moss, coconut substrate, peat chips and charcoal. Half of the mixture should be tree bark.
Of course, you can buy ready-made soil in a specialized store, just make sure that the seller is honest and choose a substrate only from a trusted manufacturer. Since low-quality components can often be added to the soil mixture, the presence of which can negatively affect the health of a young and still fragile plant.
How to choose the right orchid when buying
What to look for when purchasing to avoid problems with orchids:
- the roots should be green (if the bark is wet) or silver-gray (if the bark is dry) in color, the growing ones should be bright green or with a red tint along the edges;
- the leaves and roots should be free of insects, plaque, punctures, stains, mold, and wrinkled areas;
- it is best to buy a blooming orchid (then you will be sure that it matches the variety);
- It is advisable to choose an orchid with a large number of buds, this indicates that the plant is just beginning to bloom, and accordingly, you will admire its flowering longer;
- see if the plant is tightly fixed in the flowerpot. Phalaenopsis should not fall out of the pot, because its roots have a peculiarity, specific to orchids, of growing to anything that serves as a fulcrum;
- If you buy a plant in the cold season, be sure to take care of good packaging; you need to purchase a thermal package in advance or ask the seller about the availability of one.
Orchid doesn't bloom
In order not to worry about the flowering of an orchid, even at the time of purchase you need to clarify what kind of variety it is and what its flowering period is. The fact is that different types of flowers bloom at different times. But it happens that the expected flowering does not occur, while the green mass continues to grow. The main reasons for the lack of buds are the following: sudden changes in temperature; improper watering; violation of rest mode; lack of light.
The lack of light is indicated by the color of the leaves: they become bright green, whereas their natural color is light green. If the leaves turn yellow, this indicates an excess amount of ultraviolet radiation, that is, excess lighting. Control measures: the flower should be placed in a more illuminated place or removed to partial shade.
Another common problem in the absence of flowering is root disease. It's difficult to define. Sometimes, even when the roots rot, the orchid continues to bloom. But if it has not bloomed for a long time, and everything is fine with the lighting, you should check the root system. Most often, it begins to rot due to excessive watering. In this case, replanting the plant and removing damaged parts of the rhizome will help. Periodic replanting is, in principle, beneficial for its development.
With proper and proper care, you will get a large family of exotic beauty that you can gift to your loved ones.
Propagation by seeds
Reproduction of the orchid family at home from seeds is a very difficult and not always successful undertaking. Orchid seeds are dusty and lack nutrients, so a special medium must be prepared for them. To propagate orchids by seeds, you need to prepare tools.
These could be:
- Glassware or test tubes. Height – 15 centimeters, width – 1.5 centimeters.
- Traffic jams. Should be as dense as possible. The success of reproduction depends on this.
Important! Before starting the reproduction procedure, it is necessary to thoroughly sterilize the instruments. This is done with a 2% soda solution.
The nutrient medium is selected in a specialized store or in a laboratory, but it can also be created at home.
Compound:
- Agar-agar - about 4 g;
- Distilled water - 200 g;
- Calcium nitrate - 200 mg;
- Ammonium sulfate - 125 mg;
- Potassium phosphate - 0.6 mg;
- Magnesium sulfate - 0.6 mg;
- Iron sulfate - 0.025 g;
- Manganese sulfate - 0.0075 g;
- Sucrose - 5 gr.
To successfully breed a flower, all components must be chemically pure and purchased at a chemical store. Sterility for seed germination is the most important factor.
Before sowing, the seeds are sterilized:
- Do this with a chlorine solution for 10 minutes,
- Ultraviolet.
- Potassium permanganate. Planting material is sent to a 1% solution.
- Hydrogen peroxide for 10 minutes.
Sow seeds immediately after sterilization at a rapid pace. Agar-agar is added to the test tubes and placed over boiling water, after which the seeds are placed there with a disinfected pipette. Proper care involves maintaining a constant temperature from +18 °C to +24 °C and long daylight hours.
After about a week, changes will begin to occur in the seedlings. Inflorescences form in the form of small green balls, then suction hairs appear, and then young leaves.
After about a year, the formed sprouts can be strengthened on the ground without the risk of death.
Important! Before propagating an orchid by seeds, you need to think carefully about whether it is worth it, because this method is best suited for laboratories.
Peculiarities of reproduction of different species
Since there are a sufficient number of varieties of orchids, they need to be bred in accordance with the characteristics of each species.
Dendrobium nobile
To propagate this subspecies, you will need a pseudobulb that has not yet bloomed and is without leaves. It is cut off at the root and divided into parts, each of which should have 1-2 dormant buds.
Vanilla
The vanilla orchid variety is a vine. More often it is propagated by cuttings, choosing a shoot with more than 3 nodes. Immediately after disinfection, the shoots are placed in moist soil, preferably containing sand.
Ludisia
This species does not have a clear dormant period, so reproduction can be done at any time of the year.
Stem propagation
Also called procreation by children. Some types of orchids, such as dendrobium, grow side shoots, otherwise called shoots. Essentially, these are new plants that can be grown separately and successfully produce healthy and beautiful orchids.
In order to increase the number of side shoots, gardeners use fertilizers, such as sets from the main triad (potassium-phosphorus-nitrogen) in combination with amino acids and minerals.
Important! When fertilizing a flower, carefully, in order to grow a baby, you need to monitor the concentration of the solution and the frequency of watering, because with improper care, even a healthy plant can be destroyed.
Stages of stem propagation:
- As soon as the side shoots have their own roots, they are cut off and strengthened on temporary soil or in a plastic bag with moss.
- If the roots are not formed, then the young shoot can be cut off with part of the mother bulb, which will give it the opportunity to feed until its own roots appear.
Important! After transplanting to permanent soil, a full-fledged plant will form in a few years, so do not worry if the flower grows slowly and in no case should it be over-watered.
There are other ways to propagate orchids.
Advantages and disadvantages of the method
Propagating orchids by cuttings has several advantages:
- If the procedure is correctly performed, the gardener receives a plant that has inherited the qualities of the mother flower.
- Breeding is profitable because material for Reproduction is always available.
Disadvantages: the difficulty of caring for cuttings in the process of awakening dormant buds. Not all cut parts of the flower shoot take root. Most of the harvested material is susceptible to rotting, so propagation requires a large number of harvested cuttings.
Advantages of propagating orchids from cuttings
Proper watering of orchids
Watering plays a key role in caring for seedlings. It is important not to over-moisten the soil, as this can cause root rot. Immediately after planting the sprouts in the ground, the seedlings are thoroughly sprayed, and further watering will be required no earlier than a few days later, when the substrate becomes dry and the pot is light. Watering containers with seedlings is carried out in the same way as with adult plants, that is, by immersing the pots in water.
Rot damage to orchids
A separate broad category in this list are various types of rot. The list of possible symptoms is very wide and depends on local conditions, air humidity, watering intensity and room temperature. Let us list the most common and pronounced cases:
- brown rot;
- black rot;
- root rot;
- gray rot;
- fusarium rot.