Nowadays, such exquisite flowers as orchids cause delight and a lot of pleasant impressions among people . Many people want to grow these flowers in their apartment and therefore the question of planting material always arises.
Most often, orchids are propagated by children or cuttings, but for sympodial orchids there is another, not so popular, but very effective method, such as propagating orchids from root pieces.
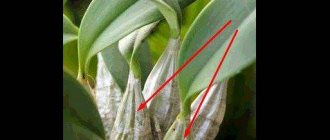
Monopodial species of orchids (phalaenopsis, vandas, etc.) cannot be grown from the root, because their roots do not have the necessary structures for the growth of green mass of the plant. If, in addition to the root, a piece of the trunk with a living growth point is preserved, then there is a chance for the orchid to grow new roots and leaves.
If your sympodial orchid is without leaves, but has healthy roots, then this method is right for you. Later in the article we will tell you in detail how to grow such an orchid from a root.
What is cutting?
Cuttings mean the division of a peduncle into several component parts, any of which, under specific conditions, can form a baby.
It is necessary to reduce the flower arrow at a time when it has completely faded. The length of the cuttings may vary. It is important to create the right environment for the cuttings. Initially, the scale that covers the dormant bud is removed from the section of the peduncle.
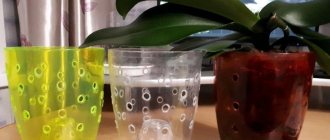
Then the shoot share is placed in a mini-greenhouse filled with wet sphagnum. The top of the greenhouse should be covered with a lid or colorless film. Rooting petioles is allowed in:
- cut plastic bottles;
- containers;
- zip bags;
- cake boxes.
Important! Rooting must be carried out at a temperature of at least +25° C during the daytime and +18° C at night, otherwise the dormant bud will not come to life. Suitable humidity in the greenhouse is 70%. The greenhouse must be ventilated every day and the plant must be irrigated to maintain moisture.
The required daylight hours at the moment are 14 hours. If there is little natural light, you should create a backlight. With proper care, after 2-3 weeks, new orchid plants will begin to rise from dormant buds
The greenhouse must be ventilated and irrigated every day to maintain moisture. The required daylight hours at the moment are 14 hours. If there is little natural light, you should create a backlight. With proper care, after 2-3 weeks, new orchid plants will begin to rise from dormant buds.
Further actions
The first step is to ensure the required duration of daylight hours. For orchids this is about 10–12 hours daily. The best option is diffused lighting so that enough light falls on the plant, but direct sunlight does not burn the tender young growth.
Temperature changes and drafts must be completely excluded. Temperatures should be maintained between 22–24 °C. If the room is cool, then take care of an impromptu small greenhouse. The main thing is not to overdo it with hydration. Although the flower appeared in the tropics, it is extremely sensitive to waterlogging. It is recommended to replace watering with spraying. The water should be clean, filtered, slightly warm.
Drought is also unfavorable, so it is better to focus on the condition of the soil. If the top layer has dried out, you can water it. If you are afraid of overfilling, then place a tray under the pot and pour into it. In this case, the orchid itself will take the required amount of moisture. It is better to consult with specialists about fertilizing. Young plants cannot be fed; they take everything they need from the substrate. But in the future, feeding will definitely be needed.
Growing an orchid from a root will take a lot of time, but will help you not only save money, but also feel like an experienced gardener.
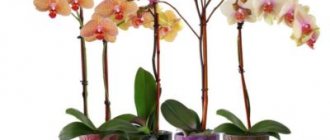
Orchids are sophisticated, delicate, exquisite and impeccably beautiful flowers that you can admire for hours. Given the variety of species, you want to have as many varieties of plants as possible at home to create your own mini-garden.
Of course, some gardeners in this case try to acquire more and more specimens, while others do everything possible to find out how to grow an orchid from a root, having the opportunity to grow flowers themselves.
This is a wise decision, because gardeners who have been growing plants for years must know not only how to care for them, but also how to propagate them at home. It must be said that manipulation is carried out not only by dividing the root, but also by cuttings and seeds. True, in the first case, you can wait for years for escapes, but you won’t get it. As for seed propagation, this is a very complex and labor-intensive process that even experienced breeders and biologists do not deal with.
The most realistic way to grow a flower is from the roots. You can, of course, try other methods, but they will not be touched upon in this article, because it is most realistic to propagate an orchid in exactly the manner presented.
Further care
So, to the question “Is it possible to grow an orchid from a root?” we responded positively. Now we need to consider how to care for this plant in the future.
In fact, when you have already made sure that the flower has taken root and taken root, there is no point in additional manipulations. The care required is the same as for full-fledged adult specimens.
You must provide the flower with a light regime (daylight hours last about 8 hours), a temperature regime (the optimal temperature is 16–24 degrees), and a watering regime
The latter is extremely important, since these flowers do not like to be over-watered (the roots begin to rot), but when the substrate dries out this can lead to negative consequences
So you need to carefully monitor the condition of the soil, and it is better to pour water into a tray so that the flower itself takes as much moisture as it needs. And do not forget about the fertilizing that the flower needs for optimal growth and abundant flowering.
Rooting technology
Soil mixture, soil composition
When choosing a soil mixture for growing root orchids, you should proceed from the fact that it should not differ from the soil in which adult specimens grow. When planting, you do not need to use ordinary soil; it is unsuitable for good growth and development of the flower.
You should purchase soil specially prepared for growing orchids . Only then will your flower grow in conditions as close to comfortable as possible.
The soil mixture must meet all requirements; it must contain small pieces of pine bark, peat and coconut fiber.
Preparation
The parts of the root intended for planting should be planted in pots filled with a special soil mixture. One root is placed in each separate pot. Problems with rooting, as a rule, do not arise. Planted cuttings do not require abundant watering . Until new roots and leaves appear, it is better to limit yourself to spraying twice a day.
Important! When you see the appearance of new roots or leaves, this will mean that the rooting process is proceeding as normal and everything is in order with the young plant. There is no need to perform any additional actions. After a certain time, these babies will turn into fragrant flowers.
Rules of care
So, we have already understood that growing a sympodial orchid from a root is not difficult, you just need to perform all the steps consistently and carefully. Now we need to understand what measures need to be taken for better survival.
There is nothing supernatural here either. Having made sure that the flower has taken root and taken root, it needs to be cared for like an adult plant . First of all, this concerns light, irrigation and temperature regimes.
The length of daylight should be about 8-12 hours , and the temperature in the room where the flower grows is set in the range of 16-24 degrees above zero.
There should be at least 8 hours of daylight.
Particular care must be taken when watering the plant. Orchids cannot tolerate waterlogging; this causes their roots to rot. However, a dry substrate will also inevitably lead to a negative result.
The condition of the soil in the pot requires constant monitoring, and it is best to pour water heated to 30 degrees into a tray and give the flower the opportunity to take from it as much water as it needs for normal life.
We should also not forget about fertilizing , thanks to which the flower will be able to grow and develop normally, as well as bloom profusely.
How long will it take for a new sprout to appear?
If all of the above steps are carried out properly, part of the root will become a normal plant and begin flowering before the end of the season.
The root system is often divided this way at the time of transplantation, if the roots barely fit in the pots and the emerging pseudobulbs begin to protrude from the substrate.
An old pseudobulb that has flowered can be separated and planted separately. To do this, it is placed on the surface of the substrate, without being buried. After a short period of time, young shoots with their roots will hatch from the buds at the base of the pseudobulb. They are separated and placed in pots.
Orchid species such as oncidiums and cymbidiums reproduce more easily than others using this method.
How to activate a dormant kidney
To provoke the appearance of roots on a leaf with a meristem, gardeners advise using one of several methods:
Using activated carbon and root former. After cutting, the leaf is dried for 8-10 hours. In the place where future roots appear, the leaf is smeared with “Kornevin”. After this, place the shoot in a glass with 1 crushed tablet of activated carbon. The neck of the sprout should be in water at a depth of 1 cm.
Using a substrate and a mini-greenhouse. A drainage layer (5-10 cm) is placed in a plastic container. Wet sphagnum moss is placed on top of the expanded clay. The drainage is filled with hot water. The sheet is laid on moss (no deepening is required). The mini-greenhouse is covered with film and ventilated daily.
With succinic acid. In 1 tbsp. Dissolve 1 tablet of succinic acid in warm water. You need to wipe the orchid leaf with this composition every day. The solution should be changed to a new one every day. When the first roots appear, the leaf is slightly deepened into water with the addition of succinic acid (1 tablet per 1 liter of liquid).
During the period of preparation for planting, you need to carefully ensure that no traces of rot or mold appear on the sprout.
Is it possible to propagate an orchid from the root?
Orchid plants reproduce by roots only if they grow with pseudobulbs and grow wide .
In this case, the old plant can be divided into several young ones. An orchid such as Phalaenopsis reproduces using roots only in two cases:
- If it dies and only the root system remains, and with its help the grower can get 1-2 shoots.
- Rejuvenation of an old bush , when the top is cut off for further rooting, and the stump is left for propagation.
Suitable types of orchids
The following types of orchid plants easily reproduce with the help of roots:
- Cymbidium;
- Cattleya;
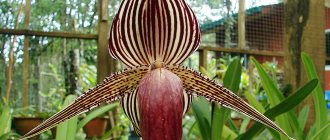
- Paphiopedilum.
Cymbidium and its roots.
IMPORTANT ! When starting to reproduce, you need to pay close attention to this, without missing a single recommended point.
What kind of sprouts does Phalaenopsis have?
The orchid forms young shoots on peduncles, stems and roots. The reasons for their formation and developmental features are different.
Basal
On the root system, shoots are formed from dormant buds. A new shoot appears from the root, which eventually turns into a pseudobulb. A leaf mass subsequently appears on it, and the shoot becomes an exact “copy of the mother.”
On stems and trunk
A peculiarity of children grown on a trunk is the absence of roots. The shoot feeds from the mother plant; after separation from it, it is not always able to exist independently. If the grower does not take any action, over time there will be two plants in the pot. Gradually, the old part dies off, the shoot continues to develop and turns into an adult specimen.
For your information! Some experts argue that the appearance of such sprouts is a consequence of improper care of the plant. In this case, the flower, dying, tries to continue the race. However, practice shows that the offspring on the trunk and stem form a completely healthy plant. Most often this happens when the stem is injured or the growing point is damaged.
On the peduncle
The baby on the peduncles is formed from a waiting bud. As a rule, there are 2-3 buds on each arrow. But directly on the flower arrow, the baby develops from only one. The next ones can wait their turn; they begin to grow after the separation of the first one.
Is it possible to use the air method?
The orchid reproduces by aerial roots or aerial shoots.
Not all orchids can reproduce using air outlets, but only their sympodial species (including the dendrobium orchid, the reproduction features of which you can find here). Such layerings have pseudobulbs (thickening of the stem). There are dormant buds inside them. In order to awaken such a bud, you need to carefully bend the stem with the pseudobulb. After which it is removed, although the presence of a leaf is not necessary, and placed on a prepared, moistened layer of sphagnum in a pot. For moss to germinate, special conditions are required.
- First, a greenhouse is created for the plant, and it is covered with a plastic cup.
- Secondly, additional lighting will be needed.
Aftercare
After transplanting parts of the orchid into separate pots, you need to take care of proper care.
- Soil for replanting, as mentioned above, must be purchased at a specialized store. In this case, the gardener will not have to worry about choosing the right soil.
- At first, you will not need to feed the flower. In addition, it may even be contraindicated.
- For weakened roots that are just gaining strength, care should be the most thorough. The light on the orchid pot should fall diffusely.
- The room should be warm, the optimal temperature is +22 - 25 degrees.
- After planting in a pot, the young plant is kept under film for 30 days.
There are several ways to propagate orchids, including cuttings and babies. However, the simplest and safest of them is propagation through a peduncle.
Despite the fact that there are several types of orchid propagation, the vegetative method is used most often. It is also called asexual reproduction. The peculiarity of root division is that the flowers are genetically equal to the mother plant. If you strictly follow all the rules of care, then you can eventually get your own indoor garden consisting of orchids using this method of propagation.
How does an orchid reproduce?
A baby has appeared on an orchid, you need another copy of your favorite orchid, you want to please a friend with a gorgeous indoor flower - all these cases come down to one thing - there is a desire to find out whether it is possible to get a new plant at home.
Orchids can be propagated in two ways:
- generative (seeds);
- vegetative (green parts of the plant).
Temperamental beauties whose sophisticated sophistication will take your breath away
In the first case, the result may differ from the mother specimen. In the second, with vegetative propagation, an exact copy of the plant is obtained.
Few people dare to start breeding a plant without first collecting enough information about how an orchid reproduces. After all, it is better to immediately use suitable methods than to test yet another piece of knowledge and conduct a test on your own flowers.
When and how to propagate orchids
The main condition is the condition of the orchid. She must be old enough and guaranteed to be healthy. How to choose the most suitable time for propagating an orchid at home, since winter is a period of relative rest for the plant, while summer is a time of increased growth of vegetative organs? The most acceptable time remains - spring.
The period after flowering is considered optimal, but not immediately; it is necessary to allow the plant to gather its strength. The survival rate of plants directly depends on compliance with these conditions.
Note! The best period is considered to be when the moon is in its waxing phase. This is strong advice from experienced orchidists.
What to do if they don't grow?
If the grower needs a baby, but Phalaenopsis is in no hurry to grow it, stimulation will be required. The flower needs to create certain conditions.
The appearance of a shoot can be influenced by two factors:
- Ideal conditions of maintenance and care.
- An extreme situation in which a culture “falls into panic” and seeks to grow its continuation.
Carefully! Modeling extreme conditions is a risky method. Events may develop in such a way that an adult plant dies, but does not sprout
Experienced flower growers advise using this method when the crop already needs resuscitation.
To stimulate the development of the process, the following conditions must be provided:
- stable temperature in the range of 20-28 degrees;
- air humidity - 80-85%;
- intense lighting (12-13 hours);
- watering and drying the substrate for 2 days.
Features of formation
When ideal conditions are created, additional buds are formed, which are dormant at an early stage. If, when ideal conditions are created, they are in no hurry to wake up, additional efforts are made to form:
- Using tweezers or a toothpick, remove the covering scale from the bud.
- Lubricate the green bump that appears with cytokinin paste. Every day, lightly spray the treated areas with water from a spray bottle.
- After 7-10 days, a shoot begins to develop in place of the bud. For the entire period of its formation, the temperature in the room is maintained at 27-28 degrees, humidity - 85-90%.
- As soon as the first roots appear, they are covered with damp sphagnum moss and wrapped in film.
Important! One of the main conditions for the rapid growth of babies from a dormant bud is regular feeding. The predominant substance in fertilizers is nitrogen
Reproduction of orchids in nature
According to the method of growth, orchids are divided into three varieties:
- Saprophytes;
- Epiphytes;
- Terrestrial species.
Saprophytes
This is a type of orchid that grows underground and has no chlorophyll. Saprophytic orchids are diverse. A distinctive feature is the lack of greenery. The structure includes a peduncle with scales, a flower, a powerful root consisting of a single base, which nourishes the plant with nutrients and moisture.
Epiphytes
This is the most common group of orchids. Their natural habitat is tropical forest trees and rocks. Their optimal development is due to high humidity and temperature. A distinctive feature of this group is the possibility of the plant existing without soil thanks to its aerial root system. Through the root system, the plant feeds on all the necessary substances and moisture, which the roots take from the environment (rain, dew, fog).
For your information! Only epiphytes are suitable for home cultivation. The conditions of care depend on their features and characteristics, the main of which is regular moistening of the flower and maintaining high humidity in the room.
Terrestrial species
These orchids grow on the ground and are more familiar to the European part of the earth, as they resemble an ordinary flower with roots, a stem and a peduncle.
The terrestrial species of orchids is considered a perennial; it tolerates winter quite well in the form of root cones that form underground in the root system. In the spring they produce new shoots, and the orchid begins to grow, develop and bloom.
Thus, many types of orchids are divided into three main types. Each of them has its own distinctive features, thanks to which they adapt to different conditions.
In the wild, orchids reproduce on their own by seed. Beautiful exotic flowers with a light aroma attract insects that pollinate the plant. After pollination, seeds are formed in the buds, which, falling from the peduncle, begin to germinate on their own. Leaves are formed from it first, then shoots and other parts.
Sometimes a seed can lie for several years and still sprout later. Orchids can also reproduce on their peduncles or roots.
Aerial roots
Main role
In orchid plants, this section of its structure performs the main functions:
- They supply the flower with nutrients obtained from the surrounding air;
- With their help, the flower is attached in its natural environment to tree trunks or stones;
- Fully participate in photosynthesis.
When they die, the flower begins to devour its leaves to grow new roots.
Aerial roots are very important for the existence of orchids.
When do they appear?
Aerial roots appear in a plant due to improper care for the following reasons:
- in summer, at high temperatures and high humidity, they begin to grow and crawl out of the container where the flower is planted;
- with excessive watering, the lower part of the plant experiences difficulties, and in order not to die, the flower grows aerial;
- when there is a lack of water, the flower looks for it on the surface, trying to survive;
- if the substrate is too dense, the root mass is starved from lack of oxygen and aerial roots grow from the stem.
IMPORTANT! There is no need to fight with aerial roots, you just need to find the mistake in care and correct it.
Planting process
The treated parts are planted in separate small containers with a special substrate. Ordinary soil will not work; you need a complex, balanced substrate for growing orchids. In ordinary soil, the plant will not grow and develop. The soil for orchids has an acidity level suitable for exotics and is balanced in the presence of minerals and trace elements necessary for growth and development.
The soil must contain: crushed pine bark, peat and coconut fiber. The soil should not be compacted; it should allow moisture to pass through well and allow air penetration. Don't forget about the drainage layer too. The container for planting should be transparent and with holes for drainage.
After planting, experienced gardeners recommend spraying the seedling several times, otherwise it will not produce the first real strong roots and leaves. Once these appear, no additional actions will be needed; it is only important to provide proper care and optimal conditions for development.
Which orchid variety is suitable for growing at home?
There are about 20,000 varieties of orchids in the world. This beauty cannot be called an unpretentious houseplant, since in our climate you can try to breed about a dozen species, and all the rest can only survive in greenhouses.
Phalaenopsis is an optimal variety for home growing, as the flower comes in the most incredible colors and remains in bloom for a long time.
If you decide to try other varieties of orchids, pay attention to the following options:
- Dendrobium blooms for about a month and requires relative coolness.
- Cattleya prefers warmth, but not heat. Its flowers can reach about 20 cm in diameter.
- Zygopetalum is a flower with fragrant beautiful inflorescences of 2-3 shades. He cannot stand the scorching rays of the sun.
- Vanda has a strengthened root system and loves shade. The inflorescences are large, and as they increase in size, they become brighter.
All these types of orchids are a little more “complicated” than phalaenopsis, so it is better for beginners to practice with them
Features of the structure of an orchid
An orchid is an exotic and very beautiful plant that can decorate any corner of an apartment or landscape design.
Before you decide to purchase this flower, you need to know its structure in order to understand and know the basic rules for caring for it and how to reproduce it. A flower consists of a root, a stem or trunk, leaves and the bud itself.
Root
The structure of the root depends on the specific type of orchid. But in all cases the root is intended to:
- fastening the orchid to the soil, trees, rocks in its natural habitat.
- participation in photosynthesis;
- nutrition of nutrients and water consumption.
Certain types of orchids, for example, phalaenopsis, have an aerial root system, i.e. They grow not in the ground, but above the ground.
Stem
The stem of an orchid can be of two types according to its growth method:
- Monopodial - has one growth point and grows upward;
- Sympodial - they choose a horizontal direction in their growth.
Foliage
They differ in various shapes, colors and structures, which depend on the place of growth and the variety of orchid. If the flower grows in the shade, then the leaves will be weak and thin, if in a sunny place - dense, thick, fleshy. In the natural environment, the leaves of an orchid can grow up to 1 m long. With the help of leaves, the orchid adapts to the dry period, accumulating moisture in them and absorbing it so as not to dry out.
Flower
The flower is the most beautiful and structurally complex part of the plant. The petals of a bud are modified sepals (sepalia), which vary in color, shape, and size depending on the type of orchid. The side petals are called petals. In the center of the bud there is a lip or labellum - a part of the plant that is unique to orchids. It performs the function of pollination.
Thus, the orchid has a rather complex and unique structure, which distinguishes it from other plant species. By clearly understanding how it works, you can build proper care that will preserve the plant and give it favorable conditions for development.
Features for some species
Cymbidium
This terrestrial epiphyte is replanted every 3 or 4 years. The procedure for propagation and planting is carried out immediately after flowering. One of the important conditions for reproduction is the presence of at least 6 pseudobulbs in Cymbidium. The plant is divided into sectors of 3-4 pseudobulbs with leaves and roots, dead roots are removed and planted in a new container with prepared soil mixture.
Cumbria
Cambria, like many orchids, has a negative attitude towards transplants. Planned replanting is carried out every 2-3 years, depending on the condition of the substrate.
Reproduction is carried out by bulbs. In this case, the bulbs are carefully separated from each other, trying not to damage the roots. If the roots are damaged, they must be treated with crushed activated carbon or cinnamon.
For good stability and rooting they should:
- Attach to the support stick;
- And do not water for a week.
Cattleya
The transplantation and propagation procedure is based on the same principles as for other species when dividing a bush. It is better to carry out this procedure during the period of planned replanting once every 2-3 years, during the period when active root growth begins:
- The plant is removed from the container;
- Soaked;
- Clears;
- And processed;
- Then the rhizome is divided so that each part has at least 3 bulbs;
- And after processing and drying, it is planted in a container prepared in advance.
Wanda
If in nature Vandas can reproduce not only vegetatively, but also by seeds, then under home conditions seed propagation is impossible. Transplantation is carried out in the same way as most orchids, once every 2-4 years.
The most effective method for planting Vanda is considered to be the separation of children, or, as they also say, basal rosettes, from the mother plant. Of course, it is best to perform this procedure during a planned transplant:
- Using a sharp, disinfected instrument, the baby is separated from the “mother”;
- The cut areas are treated with crushed activated carbon or cinnamon (ground);
- The babies are placed in small containers with a substrate of bark, charcoal and sphagnum moss;
- A support is installed for the vertical position of the children in the container and a greenhouse effect is created (mini greenhouse);
- Ventilation and removal of condensate are carried out daily;
- Periodically, as necessary, the mulch layer of moss is sprayed;
- Once the roots grow and the young plants become stable, the greenhouse is removed.
Dendrobium
Reproduction of Dendrobium even in a natural environment does not cause difficulties. Therefore, there are many ways to reproduce it. Under natural conditions, it is capable of reproducing from broken small fragments if it lands in a fertile place.
At home, it is best to plant it using vegetative methods.
Children
The baby, very similar to a small copy of the adult plant, emerges from a bud formed at the very base of the stem. This serves as a signal to produce offspring. There is an opinion that after several such cycles of breeding offspring, the mother plant begins to die off. You can see the baby in the photo, we will tell you step by step when to separate her from her mother.
Baby on the dendrobium.
As soon as roots of 3-5 cm in size appear on the baby, it can be separated with a piece of the trunk and placed in the substrate, then creating a small mini-greenhouse.
Advice! Experienced gardeners recommend planting simply in sphagnum moss.
Dividing the bush
An adult, sufficiently expanded Dendrobium orchid can be divided, thereby obtaining several copies. Moreover, such specimens will be adult plants.
The division process comes down to:
- Removing the main bush;
- Cleaning and processing of the root part.
The plots are made in such a way that each has at least 2 stems and young shoots. Do not forget to treat the cut sites to avoid infection.
Cuttings
It is possible to plant this type of orchid with stem fragments that have several internodes. These fragments should be laid on damp sphagnum or sand. Having created a greenhouse effect, good lighting, temperature, wait for the babies to appear.
Then the children are seated in a permanent place of growth. Many gardeners use transplantation using the cutting method.
Difficulties and problems
It is important that in the room where the orchid is located, comfortable light and thermal conditions are maintained, otherwise it will die. If the room is cool or the air is too dry, then you need to build a small greenhouse.
In this case, you must follow the rules:
- Do not feed the planted sprout; it must take root.
- If the original part of the flower is often sick, then it is better to refuse propagation, otherwise it will die.
A novice gardener may not be able to plant an orchid the first time. But there is no need to despair. It is better to reconsider the conditions that were created for the process; perhaps one of them was not met.
Planting an orchid at home is not as difficult as many may think. Accuracy and attentiveness are all you need to successfully divide a plant.
Growing a new plant from old roots
The most simplified vegetative method of propagating orchids is to grow new bushes on old roots. The essence of the method is to divide the root. This method is practiced for older plants that are quite large and overgrown.
The plant is slowly lifted above the pot, shaking a little, freeing the roots from soil particles. Using a sharpened knife, divide the rhizome into parts, leaving 2 pseudobulbs on each, or better if there are 3 of them.
To prevent disease, the sections are powdered with cinnamon or fine coal. Each part of the root is planted in a separate pot filled with a suitable substrate. The pots should be watered moderately, or better yet, sprayed twice a day until full leaves and roots appear. With their appearance, you can be sure that the plant has taken root.
Reproduction by division of roots.
Methodology
Orchids that have a sympodial growth form can be propagated by division. This is a simple method, it is practiced in relation to plants that have two or more growth points, from which sprouts and then pseudobulbs are then formed. The number of pseudobulbs directly affects the success of rhizome division. This is how they reproduce:
- lelia;
- miltonia;
- cymbidium;
- odontoglossum;
- dendrobium;
- oncidium;
- Cattleya.
Attention! There is no need to divide the rhizome into too small parts, otherwise you will have to wait a long time until a full-fledged plant grows.
What plants is this method for?
When an orchid loses its leaves and its stems wither, many people unknowingly get rid of the flower. However, there is no need to rush. If your pet's roots are healthy, they can be used as a planting base for a new flower. Of course, this method does not apply to all types of orchids, but only to those that have several pseudobulbs.
Cymbidium, cattleya, and paphiopedilum are propagated vegetatively. The root system of these species allows it to be divided so that several pseudobulbs remain on each part: it is best to cut off part of the root so that at least three remain on it. It is also important to take into account the age of the plant - it should not be young, preferably large and overgrown.
The division of younger plants may also be described in specialized literature. But in this case, the flower must be at least 5 years old. You can also propagate plants that have grown and sent out “babies”.
Ways to save a plant that has rotted
If the rhizome is completely rotten, there are several proven ways to grow it.
Grow in a greenhouse
This option is suitable if the phalaenopsis has at least a few healthy root shoots left. You must first lay expanded clay on the bottom of the container, then moss. All this is abundantly moisturized. The orchid is placed on the finished substrate and covered with film. In this state, ideal parameters of temperature and air humidity will be created, due to which the roots will begin to actively grow.
Soaking and drying
To implement this method you will need the following items:
- transparent container (choose a size so that the orchid fits completely into it);
- water (you need to take settled or boiled water);
- "Kornevin";
- sugar (can be replaced with honey).
Rooting algorithm:
- pour a small amount of water with Kornevin and sugar into the container;
- place the phalaenopsis in the water so that the plant is no more than 1 cm deep in the aquatic environment;
- After 5–6 hours, drain the water and dry the culture completely.
Repeat the procedure daily until the roots begin to grow.
Reconstitute in water
To grow roots, the orchid is placed in water. But for this, the plant must first be prepared as follows:
- remove the crop from the flowerpot;
- clean well of soil residues;
- rinse the root system under running water;
- remove all affected parts with a sharp knife (it is treated with a disinfectant in advance);
- treat the cut areas with crushed coal or ash (if they are not available, use cinnamon);
- dry for several hours on a paper towel.
Then the phalaenopsis is placed in settled water (a root growth stimulator or sugar can also be added to it).
Above the water
An ideal option for those plants that are left completely without rhizomes.
In addition, after transplantation, phalaenopsis quickly takes root and takes root.
To build up the root system, take a transparent container with settled water. Lower the orchid with its foliage down so that the leaves are half in the water. Place a crushed activated carbon tablet into the water. Spray the upper part of the phalaenopsis with settled water every day.
Fast with fertilizers
The extension method is suitable for weak and sick phalaenopsis. The option promotes not only the growth of new roots, but also the restoration of the entire plant. Succinic acid or a vitamin cocktail are good for extensions.
The vitamin cocktail is prepared according to the following algorithm:
- vitamin B1 - 2 ml (1 ampoule);
- vitamin C (ascorbic acid) - 1 tablet;
- warm water (no more than 35 degrees, otherwise vitamin B1 will be destroyed) - 1 liter.
Spray the entire plant with the prepared solution, making sure to wipe the leaf blades. Also, phalaenopsis is dipped into the solution every day (5-7 minutes is enough).
Read about other feeding methods used for phalaenopsis roots here.
On moss
In this case, greenhouse conditions must be created for the orchid. An old aquarium, plastic container or bottle will do. Expanded clay is placed at the bottom of the container as drainage, then sphagnum moss is placed, which is moistened with the Kornevin solution. Place the plant on top and cover the container. The moss should be moist throughout the growing process, but water should not drip from it.
In the substrate
Suitable only for those phalaenopsis that have at least two roots of at least 2-3 cm each left. Place the plant in an orchid substrate and do not water it for the first three days. After this time, pour with succinic acid, and after drying with the Kornevin solution. Wipe the sheet plate with a solution of succinic acid throughout the entire time.
On a piece of bark
The purchased bark is pre-soaked for two days. Soak the base of the phalaenopsis for a few minutes in a growth stimulator, and then attach it to the bark (using thread or rubber band).
Place the bark in dry moss at an angle. Keep the bark moist at all times. If it is dry, remove the plant and soak it in water again. Thanks to this method, roots will appear after three months.
Orchid: care and propagation at home
How to water an orchid: in a pot and at home
The most common types of orchids are:
- phalaenopsis;
- dendrobiums;
- Oicidium;
- Cattleyas.
The first ones are the most unpretentious and most popular. Maybe that’s why novice orchidists pay more attention to them.
Translation of the name from Latin - “butterfly-like”
Almost all orchids love diffused, not bright sunlight. But some species, on the contrary, do not really need it and feel great even away from the window.
For your information! Orchids grow on every continent except Antarctica.
It should be remembered that if they need fresh air, orchids still do not like drafts.
Watering and fertilizing
One sentence cannot tell you how to water orchids. In the beginning, you should know that different types have their own characteristics in relation to moisture.
Important! Improper watering is one of the main mistakes leading to the death of an orchid.
Phalaenopsis, for example, always loves a moist substrate. Some types of terrestrial orchids prefer to dry out for several months.
The need for watering is determined by the following criteria:
- the inner walls of the pot are dry;
- the color of the roots visible through the walls of the pot brightens (should be juicy green);
- the weight of the pot becomes significantly lighter;
- leaves lose turgor.
For the main types of orchids, 2-3 waterings per week are sufficient in the summer. In winter, water no more than 2 times a month. It is recommended to water orchids in the morning.
Watering is carried out around the perimeter of the pot, trying not to get on the base of the leaves. If it gets there, you should either carefully dry it or make sure that the moisture evaporates. Stagnation of even a small amount of water in a leaf rosette leads to very rapid rotting of the soft tissues of the orchid.
Important! The ideal water for irrigation is rain or melt water. Water should not be collected from rooftops, industrial areas or cities.
The main rule when watering is not to overdo it: it is better not to top up than to overfill. The temperature of the water used must be no lower than 25 °C and no higher than 35 °C.
There is also watering by immersion in a container with prepared water. The plant is kept in it for up to 30 minutes. Then remove and allow excess water to drain.
Does an orchid need feeding? Yes, it does, like all plants that have been in the same substrate for a long time.
At this stage, amateur activities are not encouraged. Orchids do not tolerate excess fertilizer. They should be purchased in specialized stores and diluted strictly in accordance with the instructions. Fertilizing is carried out during watering. It is better to reduce the concentration than indicated by the manufacturer.
Important! Do not use fertilizers intended for other plants.
It is important not to cause harm. Excess fertilizer reduces the orchid's immunity. In the summer, two feedings are enough.
Humidity and temperature
The orchid is a tropical flower that requires high humidity. This is achieved by increasing the humidity in the room to 60-70% using household humidifiers.
At home, you can simply place small containers of water. Group planting works well; orchids are placed among other plants; the microclimate inside a kind of oasis has a beneficial effect on orchids.
Although, in fact, there are many ways to increase air humidity, it is important to find the most appropriate one in any particular case.
The room temperature should be no lower than 22 °C, no higher than 32 °C.
Many orchids can be encouraged to bloom by adjusting humidity and temperature. In winter it is lowered to 16 °C. The higher the temperature, the higher the humidity should be.
Lighting
The main factor for orchid flowering is lighting. The amount of daylight directly affects flowering. Its duration should be at least 12 hours. The necessary additional illumination is carried out with special lamps, which can be bought at a flower shop. They are economical and not expensive.
Lighting
As mentioned above, the orchid loves diffused light. Direct sunlight, especially in summer, causes burns on the leaves. With too much light, the leaves become spotted and turn yellow. With a deficiency, on the contrary, they become dark. The east or west side is most suitable.
By providing appropriate care for the flowers, they obtain healthy planting material, ready for transplanting and further propagation. Propagating orchids is a very exciting activity and a real opportunity, by putting the above tips into practice, to feel like the creator of a beautiful orchid garden. This small practical guide will help you get rid of possible failures, and most importantly, avoid mistakes.
How to save an orchid that has rotted:
Roots
It is very important to start the resuscitation process as early as possible, this will increase the chances of saving the orchid. In order to choose the optimal restoration method, it is necessary to carefully examine the roots and determine the extent of their damage:
- Green color indicates a young root system; they will be elastic and dense;
- The main sign of the onset of rotting is the darkening of the roots, the appearance of mucus or moisture on them when pressed.
If there are rotten areas, they must be:
- Remove thoroughly to stop the process of spreading to healthy roots;
- Then the remains should be sprinkled with activated carbon or cinnamon;
- After the remaining roots have completely dried in the air, it is recommended to treat them with special fungicidal agents.
Important! In order to increase the chances of root restoration, it is recommended to feed them with mineral fertilizers.
There are several main ways to resuscitate an orchid:
Using a home version of a greenhouse. To do this, use a special container, which can be made from an ordinary plastic bottle. Expanded clay is placed on the bottom and the dried and disinfected substrate is filled in. Next, the orchid is placed there and the following conditions are observed: Temperature within 22-28C; Humidity not less than 70%; Lighting for 12-14 hours a day. Such criteria must be observed until new roots of about 3 cm appear. The duration of plant revival depends on the degree of damage to the root system. Most often, after 2 weeks in such conditions, you can see signs of new roots. If they grow up to 5 cm, then the orchid is transplanted into a regular pot and the usual care is continued;
If the roots of a flower are completely rotten, you can restore them by placing the orchid in a container of water
It is very important that the leaves remain completely dry. Keep the plant in water for at least 6 hours a day
To speed up the process of nucleation of new roots, you can add a little honey or sugar to the container with the liquid.
The duration of resuscitation depends on how damaged the roots were. In some cases, recovery is possible in a month, while in others it takes more than a year.
Therefore, it is very important to be patient and fulfill all the necessary conditions to save your favorite orchid.
Advice! In a flowering orchid, it is first necessary to determine the degree of damage to the root system. Then choose the resuscitation method that suits you: a mini-greenhouse or placing it in a container of water.
Above ground parts
In this case it is necessary:
- Remove all rotten areas;
- Dry the orchid well;
- Treat with antiseptic and fungicide.
If most of the roots remain unaffected, then it is recommended to simply transplant the flower into another pot.
In this case, you need to use a fresh substrate, which has previously been well dried and treated with disinfectant solutions. It is also necessary to provide the following mandatory conditions of detention:
- Temperature up to 25C;
- Humidity not less than 70%;
- And bright light for at least 12 hours a day.
It is important to remember that you need to avoid excessive nighttime changes in temperature and humidity. This will allow the orchid to recover faster and throw out new roots.
Watering is carried out when the substrate is completely dry. This is best done by immersing the pot in a container of water for a short time. After 7-30 days, you can observe the appearance of the rudiments of new roots.
Options for propagating an orchid at home
Today, there are a lot of people who are not just passionate about orchids, but true fans of these unique plants. The ranks of hobbyists are constantly growing, and information about propagating orchids at home is very popular and relevant. The basics of this interesting activity are of course the same, but some nuances, personal observations and advice will certainly not be superfluous.
How to propagate an orchid by division
How to propagate aloe: examples by cuttings and other methods
An adult phalaenopsis, which has 6-8 full leaves, can be divided into two parts and get two plants. This is done with a sharp, disinfected pruner. The top of the plant with several leaves and aerial roots is carefully cut off, and the cut site is disinfected.
For your information! Hydrogen peroxide is excellent for disinfecting cuts. Just a drop on the cut.
The delenka is planted in a new pot. The lower, remaining part should have at least 2-3 leaves. The fresh cut is also powdered with charcoal.
The way to propagate orchids is by dividing an adult plant
After several months, new babies emerge from the lateral buds. They are planted in soil that contains:
- small (no more than 1 cm) fractions of pine bark;
- pieces of sphagnum moss (fresh or dried);
- perlite or pieces of charcoal.
The easiest way to propagate cattleya and oncidium at home is by dividing the bush into parts. Each of them must have 2-3 pseudobulbs. This operation is good to perform during transplantation. If the divisions are weakened, you should more strictly monitor humidity and temperature.
Cuttings
Even novice orchid growers can take cuttings.
The peduncle that has finished flowering is separated from the mother plant at the base. It is divided into parts 3-4 cm long. The cuttings are cut so that in the middle of each there is a dormant bud. Both cuts on the cutting are treated with charcoal (charcoal or activated) or hydrogen peroxide.
Note! Instruments used for propagation work must be sterilized. This can be done with alcohol or hydrogen peroxide.
Prepared cuttings are placed in moist sphagnum moss and covered with film or glass, forming a kind of mini-greenhouse. At a humidity of 60% and a temperature of 25-28 °C, the cuttings germinate successfully.
This is what a cutting with a baby growing on it looks like
If you place a peduncle with buds treated with hormonal paste in a bottle and add a little water, put it in a warm place, you can get a whole greenhouse.
Planting small plants is done in small pots.
Children
Growing them is not at all difficult, but you need not only patience: you can simply wait for babies to appear on an adult phalaenopsis, or you can stimulate their appearance.
This is what kids look like
This operation is not complicated, and is done using cytokinin paste. It is used to lubricate dormant buds on the peduncle. The thin but tightly fitting scale from the bud should be carefully removed (using tweezers) and the paste applied. Then the treated area is covered with damp sphagnum moss.
Right on the peduncle, a shelter for the baby is made from a plastic bag - a mini-greenhouse. The bag is tied on both sides and the plant is placed in a warm place until the bud sprouts.
If the baby has formed on its own on an uncut peduncle, it is grown until a pair of leaves and roots appear. Then carefully cut off using a sharp pruner. The separation area is treated with charcoal or cinnamon and left to dry.
All four stages of work to stimulate the kidney are clearly shown
However, this method does not always help to get a new plant; often another peduncle appears from the awakened bud. Interestingly, this seemingly failure never stops orchid lovers. With enviable persistence, they continue to work in this direction and achieve the desired results.
Some species of dendrobium reproduce by layering. The shoot without leaves, but with a bud, is packed into a cocoon - a greenhouse. Compliance with the temperature regime and the required humidity, plus patience ultimately gives a positive result - the awakened bud gives rise to a new plant.
Caring for baby orchids
It is necessary to care for young plants very carefully. The planted baby needs to be rooted. It is placed in a small greenhouse, where the required temperature and humidity are maintained.
The roots that have appeared and grown to a length of 5 cm are a signal that the baby can be planted in a pot as an independent plant. In this case, ordinary, universal soil is used. But at first it is recommended to use growth stimulants or fertilizers. Then the plant will be strong and healthy.
Important! Is there no way to organize ventilation of the mini-greenhouse? Then it's easier to give it up. High humidity without ventilation is a good environment for bacterial and fungal infections.
You can place pots with babies in a high tray and install additional lighting. The temperature should be maintained at 24 °C.
Such small orchids should be watered more often, this is due to the small size of the pot.
Seeds
To answer the question of whether an orchid can be propagated by seeds, you need to familiarize yourself with the morphological characteristics of the plant. An orchid can bloom for several months. The fruit (dry capsule) of orchids consists of several valves, which open when dry.
And now about the main thing: orchid seeds are very small, they look more like dust. One seed capsule alone can contain more than 4 million seeds. In this regard, orchids are rightfully considered leaders among flowering plants in terms of productivity. But, without infection of the seeds with a mycorrhizal fungus, they do not germinate.
For your information! Orchids are grown from seeds in the industrial sector in specialized biological laboratories.
Under sterile conditions, the seeds are placed in test tubes with a nutrient medium. Germination occurs subject to the required humidity and temperature conditions. The process is labor-intensive and slow. It sometimes takes up to 4 years to obtain an adult orchid. The method is practically impossible to implement at home.
Aerial roots
Reproduction by aerial roots is possible provided they are present in addition to the roots and stump. It happens that for some reason the orchid sheds its leaves, and an unsightly stump remains, which many throw away. There's no need to rush. You can try to use the remaining part as planting material, to revive the orchid from the remaining roots. To do this, a stump with roots is planted in a pot of soil.
Note! The trunk should not be dry. If it is dry, then even green healthy roots will not be able to help in producing a baby.
The pot should be suitable for the size of the remaining roots. Don’t forget about drainage; it can be created from expanded clay or large pieces of bark. The soil is filled with fresh soil, there is no need to invent anything, ordinary universal soil (for orchids) will do.
Selecting a suitable specimen for breeding
The roots of the flower must be healthy and have several pseudobulbs on each root chosen for propagation. The more pseudobulbs there are, the more successful the division will be. Orchid aerial roots are also suitable for propagation .
Juveniles are lush green, while adults become silvery. For propagation, you need to take a formed, strong root - this is the one that has a sufficient amount of vitality for propagation. In this case, the health of the flower will also be an important aspect. Sympodial orchid species that have a thickened stem with dormant buds are suitable for these methods.
An orchid needs to be propagated in the spring - it is at this time of year that the flower wakes up and begins its active growth phase. The plant accumulates many useful substances and will tolerate division much more calmly. You cannot divide an orchid during the flowering period , and after it drops its flowers, the peduncle should be removed before propagation (can an orchid be propagated through a peduncle?). This is done with a sharp, disinfected knife, after which the cut area is sprinkled with charcoal.