The indoor violet, also known as uzambar violet, is a flowering herbaceous plant that came to windowsills from East Africa.
There, a delicate flower grows in mountainous areas near waterfalls and reproduces by self-sowing.
But in indoor conditions, propagation of violets will require the participation of a grower.
Reproduction at home
There are several simple ways to propagate violets, which have long been used by gardeners. They are simple and very effective, vegetative propagation methods are especially popular:
- cuttings;
- children;
- dividing the bush.
The choice of a specific technique depends on the time of year and age of the mother specimen, its varietal characteristics . However, if the goal is to obtain a large number of young specimens, they resort to the generative method - sowing seeds.
Reproduction methods
There are several ways to propagate violets. Each of them has its own characteristics and rules .
How to propagate violet leaves at home?
This is the most popular breeding method, it is simple and relatively easy. The main thing is to have a lot of patience and do the work carefully, without haste .
Important! It is better to take a leaf for propagation from the middle row.
Main stages:
- choose the appropriate leaf;
- root it in soil or water ;
- separate the children;
- replant young rosettes.
Leaves should only be cut with a well-sharpened knife or blade, previously disinfected ( cut angle – 45⁰ ). The length of the petiole remaining after separation should be approximately 3 cm.
There are two ways to grow a violet from a leaf - in water or in the ground.
Rooting in water step by step:
- Take a suitable container: any glass jar will do .
- Pour warm water into the middle.
- Immerse the violet leaf 1 cm, securing it with a paper sheet.
- It is important to control the water level to avoid drying out the cut.
- The container with planting material should be protected from strong temperature changes and drafts.
- After two weeks, the first roots should appear, and when their length is 1 cm, the plant can be transplanted into the ground .
How to root a leaf into the soil:
- First you need to choose a flowerpot in which the flower will grow (volume no more than 100 ml).
- Fill one third of the container with expanded clay or crushed polystyrene foam, cover with pre- prepared soil .
- Moisten the leaf in the Fitosporin solution so that the future plant is protected from fungal diseases, and for prevention, pour the same solution into the hole.
- the violet leaf 1.5 cm into the ground .
- Just as in the first method, place the container with the seedling in a bright and warm place, avoid drafts.
- Cover the plant with plastic or a large jar to maintain humidity .
This video shows how to quickly and easily root many violet leaves at once.
Reproduction by leaf fragment
This is a very convenient method that many housewives use. The plate should be cut exclusively with a sharp knife or blade . This must be done so that at least one vein remains on each fragment.
It is best to use the top part of the planting material , but you can also root the side and bottom elements.
Important! When violets are propagated by fragments of leaves, many more children will appear than with any other method.
After the sheet is divided into fragments, it must be left for some time at room temperature. This is necessary so that the sections have time to dry .
Before planting, each “wound” must be treated with crushed activated carbon. Planting material should be planted in such a way that each leaf is in close contact with the soil.
After the elements are in the substrate, you will need to make a mini greenhouse from polyethylene . You can also cover the planting material with a glass jar.
Watering should be done as needed. If everything is done correctly, the first shoots will be visible within a few weeks .
This video shows how to propagate a violet using a fragment of a leaf.
Reproduction by peduncles and stepsons
Another popular method used by flower growers. Those rosettes that form in the axils of violets need to be separated and rooted according to the same principle as leaves . Over time, they are transplanted along with the soil into large pots. This procedure is carried out when the young rosettes grow.
To propagate by flower stalks, you need to separate a part with a clean, sharp knife (do not take the buds) and plant it in sphagnum soil. For quick rooting, it is recommended to install a mini-greenhouse. Wait until the peduncle has developed well and transplant the young plant into the ground.
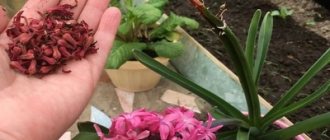
Propagation by seeds
This is the most difficult method, which requires special skills and time . This method is often used by those who are interested in breeding and whose goal is to obtain their own previously non-existent variety of violet.
In order to obtain high-quality seeds, you should select a parent pair from plants that do not have diseases, always bloom profusely and have a symmetrical rosette . After this, pollinate the pistils with the collected hard violet pollen.
Advice! To increase the likelihood of seed pods forming on a plant, pollinate more than one flower on a peduncle.
In a month the grains should appear. Seeds are collected when the boxes turn yellow and dry well. The collected planting material should be kept at room temperature for some time.
Planting grains and caring for them:
- put perlite in the selected container;
- pour substrate mixed with sand ;
- distribute violet seeds evenly on the surface of the soil;
- The grains should be watered with a spray bottle;
- Cover the top of the container with glass and take care of lighting with fluorescent lamps ;
- Once the sprouts reach 0.5 cm in diameter, carefully transplant them into cups with soil mixture.
Important! The container containing the sown grains should be ventilated daily for 10-15 minutes.
For beginners, it is best to propagate violets using leaves. The seed method will take quite a long time and will not always give the desired result.
The importance of transplantation during the first time after planting
Transplanting is an important part of growing violets. If the procedure is carried out correctly, the plant will always be healthy and will delight you with abundant flowering .
All the nuances of transplanting violets:
- Violets should be replanted at intervals of 6 to 9 months.
- For an adult plant, you need to take a container with a diameter of 10 to 15 cm. Be sure to make small holes in each flowerpot.
- Fill the container with expanded clay, and cover it with a thin layer of sand on top. Then add soil mixture.
- To transplant an adult plant, you should use the “transfer” method. If the bush has damaged roots, they must be removed and the sections sprinkled with crushed activated carbon .
- The violet must be buried to the root collar. The soil on top should be well leveled and compacted slightly.
Water the transplanted violet generously. Within two weeks, your flower will only get used to the new conditions. During this period, you need to take special care of it : make sure that the temperature is above 24℃, if necessary, arrange a greenhouse around the seedling.
General rules
To get healthy offspring, you should adhere to a number of important agrotechnical rules.
They concern not only the timing of reproduction, but also the creation of a favorable microclimate for the parent specimen and young violets . Therefore, in order to get an idea of how to propagate violets, you need to find out the main rules for caring for the plant.
What time of year is it best to propagate Saintpaulias?
Thanks to artificial lighting, cultivation of Saintpaulias is possible throughout the year.
But the optimal timing still occurs in spring and summer , when violets receive sufficient heat and light and are actively vegetating. In the fall, they are already preparing for a period of rest - rooting may not be successful.
Humidity level
Violet does well indoors. But the air should not be too dry. If the humidity is below 50-60%, it will be much more difficult to successfully propagate the flower.
Temperature
Intensive root formation occurs at a temperature of 26-28 °C. When the temperature drops below 20 °C, photosynthesis processes slow down, rooting occurs much more slowly, and the development of the vegetative mass is delayed.
Watering violets through a wick
Watering violets through a wick
Most novice gardeners make the same mistake when growing violets. They water it the same way as other houseplants. As a rule, with such watering, some of the moisture inevitably falls on the leaves and stems, and as a result, pathogenic bacteria begin to multiply intensively there, which provoke rotting. In view of this, it will be better if you water the violets through the wick.
For such watering, you will need to stretch a piece of fabric or rope into the hole in the bottom at the stage of planting the flower. One end of it should reach approximately half of the pot, and the other should have a length that would allow it to reach life-giving moisture from the very bottom of the container with water. So, after the wick is pulled into the pot, it will need to be placed in a container with water so that the bottom does not touch the liquid, but at the same time almost the entire wick is lowered into it.
If you do everything correctly, then you will no longer have to monitor whether the soil in the flower pot is drying out. If necessary, the plant itself will take the amount of moisture it needs, thereby ensuring that the soil in the pot has ideal humidity.
Which plants to choose
Propagation material is taken from violets of any age. However, for a young mother specimen such a procedure will be painful, while for older specimens there is already a small supply of nutrients for successful rooting. It is better to choose plants aged 2-3 years.
If the bush is old with a powerful root system, it can be propagated by dividing the bush. In addition, such specimens may already have formed lateral rosettes, which are also suitable for producing new plants.
You should avoid using young Saintpaulias as a mother plant , giving them the opportunity to build up root and vegetative masses and accumulate maximum vitality.
What soil to choose for young Uzambara violet
For successful growth, violets require a light and loose soil mixture with excellent breathability. The best option is a substrate based on high-moor peat with the addition of perlite, vermiculite or polystyrene foam.
As an alternative, take sphagnum moss or peat tablets; violet roots also develop very well in them . Peat tablets must be soaked before use as indicated in the instructions.
Pot or glass? What is better and how to correctly determine the right size
To root cuttings or parts of the stem, use cups with a diameter of 5-6 cm. There should be drainage holes at the bottom to drain excess water. It is permissible to use plastic cups and yogurt containers, making holes in them yourself.
When dividing a bush, take a container with a slightly larger diameter than the root system of the planting material.
If you use a container that is too large, the soil that has not been developed by the roots will begin to sour, become compacted, and will no longer allow air to pass through to the underground part of the violet.
In what cases are greenhouses and moss needed?
To stimulate rooting, greenhouses are used, regardless of the chosen propagation method. Their installation makes it possible to create an optimal microclimate for the development of the root system of young flowers.
Moss also speeds up the root formation process by maintaining a high level of soil moisture . In this case, there is no danger that the soil mixture will sour.
Note! Not all varieties of violets reproduce in this way. For example, “Raisin” and “Chimera” violets may not retain their varietal characteristics. And the varieties of violets “Dance of Galaxies” and “Ice Rose” will most likely be preserved.
Do leaves always give roots?
No, sometimes they rot without ever taking root.
100%
Always, 100% of leaves give roots
0%
I constantly struggle with leaves, roots appear on 2-3 out of 10
0%
Voted: 4
Rooting cuttings
If the leaf was severely damaged during transportation, you can root violet cuttings without a leaf blade or with a small fragment of it. There are no difficulties with this method: gardeners often specifically cut off excess leaves if they are large or have a wavy edge.
When planting a cutting without a leaf blade, it is important to correctly determine which side of the stem should be in the ground. The base of the petiole is always thicker and smoother, rounded. Where there was a leaf blade, there may be lateral growths, giving the petiole a concave shape. This part should be at the top, above the soil.
Planting and care are carried out according to general rules, using any of the methods described. Constantly moisten the substrate so that its surface does not dry out.
How to stimulate and speed up rooting
Two main techniques to speed up root formation still have the right to exist today. The first method involves the use of special drugs - growth stimulants . They are used to treat the cut site (in the case of propagation by leaf) or the roots of the division (in the case of propagation by dividing the bush).
The second way is to organize a mini-greenhouse . It is used as a film with a frame or a cut plastic bottle. Due to high humidity and temperature, root formation accelerates.
Recently, agrofibre has become popular; it can also be used to create a greenhouse environment. The canvas is much more durable than film, it is more durable.
How to use cytokinin paste when propagating Saintpaulia
The product is used to produce babies from cuttings. The paste is applied with a needle into a scratch made on the petiole near the surface of the earth in a glass. Literally after 10-14 days, intensive formation of children begins , which must be placed in a timely manner.
Possible diseases and pests
Violets are quite often exposed to negative influences from the outside; they can be affected by insect pests or any diseases.
The most common problems:
| Problem | Signs | Fighting methods |
| Powdery mildew | The most dangerous disease that affects violets, the source of the disease is fungal spores. It appears as a white coating that affects the foliage and stem. | The problem must be dealt with using chemical solutions and mixtures, such as Topaz, Benlat, Fundazol. |
| Rust | Saintpaulia leaves become covered with a characteristic rusty coating, which under unfavorable conditions (excessive soil and air moisture) spreads further. | The treatment method is to provide the plant with optimal conditions for existence, that is, reducing the frequency of watering and moving the pot with the plant to a drier room. |
| Thrips | Pests that suck nutrients from violets. A sign of thrips damage to violets is the appearance of white spots on the outside of the leaves. | At the initial stage of damage, the flower needs to be transplanted into new soil and the affected areas removed. The remaining parts of the plant are treated with disinfecting solutions. After 10 days, spraying is repeated. |
| Chervetsy | The main sign of insect infestation is the presence of a fluffy white covering of the root system, spreading to the foliage. Brown spots appear on the leaf blades and they begin to fade. | Transplantation into new soil, disinfection of the root system and root rosettes with antiseptic drugs. Scale insects are not susceptible to spraying, so pesticides are added to the soil when watering. 10 days after transplantation, the disinfection procedure must be repeated, and after another 10 days the third (last) procedure is performed. |
How to care for older children
Aftercare is quite simple. It comes down to simple steps:
- Watering - abundant moisture is required only for the first time. Then they make sure that the earthen ball does not dry out. The optimal method of watering is bottom (from a tray). The main thing is to prevent drops from getting on the leaves.
- Feeding - during the active growing season, feed with liquid complex fertilizers for flowering crops in half the dosage. Frequency of use: every decade.
- Protection from diseases and pests - violets have strong immunity. It is important not to over-moisten the soil, which can lead to the development of gray rot. The roots begin to rot, and over time the violet dies. Dry air is also dangerous, causing spider mites to colonize shoots. To combat the latter, insecticidal preparations are used.
- Transplantation - young plants are transplanted into slightly larger containers every spring to ensure lush flowering.
Planting directly into the ground
Violet leaves can be rooted directly in the soil without first sprouting the roots in water. To do this, you will need small containers or plastic cups with holes in the bottom. Pieces of expanded clay or polystyrene must be placed in the pots to prevent rotting of the roots. Violets are known to be very capricious plants. The drainage layer should not exceed two centimeters. Soil is poured on top and the leaf is planted in the soil at an angle of 45 degrees. Gently press down the soil near the cutting with your fingers so that the cutting does not fall. If necessary, you can use a support.
The top of the planted leaf must be covered with a glass jar to create a greenhouse. The plant must be ventilated periodically. As the soil dries, it needs to be moistened. It is very important not to overwater the violets, but at the same time not to allow them to dry out. At the rooting stage, the cuttings are very fragile and capricious. Do not place plants in a sunny place as they may die. As soon as the bushes reach three centimeters, they can be transplanted into separate pots. As a rule, it takes 1.5 to 2 months for a leaf to root. Six months after planting, you can expect the first flowering.
Is it possible to grow Saintpaulias on a windowsill?
At home, violets are grown on windowsills. For the successful growth and development of young violets, it is enough to provide a good level of lighting: in winter, containers are placed near windows with a southern orientation, and in other periods - eastern or western .
To prevent young violets from being hot or cold, they are placed in mini-greenhouses where a stable temperature and humidity regime is maintained. The windows near the flower are not opened for ventilation to avoid drafts.
After successful rooting, the greenhouse is removed, and apartment conditions are suitable for adult plants (humidity - 50%, temperature - 22 °C).
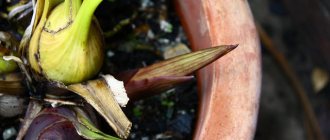
How to propagate a violet with a peduncle
As soon as the peduncle grows to its maximum height and its buds bloom, the flowers are carefully cut off. The peduncle itself is cut off as close as possible to the point of its growth from the rosette. There should be a fork with 2-3 green leaves left. The lower end is immersed in soil for violets and must be covered with a transparent cap on top, leaving in a warm place (20-22 ° C). Water the pot with a pipette very rarely and carefully, since waterlogging is detrimental to the peduncle and its roots. Rooting takes 2-3 months.
What methods to use for varietal Saintpaulias
The seed propagation method is not only a labor-intensive process: even after successful artificial pollination, the formation of seed pods and the collection of seed material, the method will not give the expected results when growing varietal flowers. The resulting seedlings do not retain the varietal characteristics of the parent specimen.
This can be avoided by using vegetative techniques. Any method is suitable, from cuttings, propagation by rosettes and to dividing the bush. The exception is the chimera violet. In this case, the apical propagation method is used.
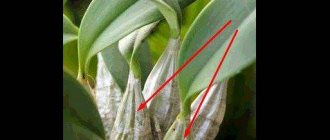
Rooting the peduncle
Varietal violets (chimeras) are difficult to propagate by leaf cuttings, since they do not retain the characteristics of the variety during traditional breeding. It is possible to increase the number of plants with the desired properties by using flower arrows for cutting cuttings.
You need to choose recently flowered arrows with 1-2 open cups (to make sure that the variety is the one you need). This stem has miniature leaves at the base of each branch. The flower arrow is divided into several parts, each of which will have 2 such leaves.
The stem above the stipules must be cut off so that a stump of no more than 2-3 mm remains. A 1.5 cm long leg is left at the bottom. It is not necessary to make an oblique cut.
Pollinate the prepared cuttings from peduncles with activated carbon powder and plant them in moist, light soil, deepening almost to the stipules. Place the containers in the greenhouse and monitor the soil moisture. The babies will appear in about 1 month.
The necessary characteristics are inherited only by young rosettes, which will begin to grow in the axils of the stipules. Those that appear from the lower cut can retain their properties only in 50% of cases, so they are most often broken out as they grow, giving the upper plants the opportunity to develop.
You need to add a little soil to the base of these sprouts so that they can take root on their own. After this, the larger rosette is carefully separated and planted, and the remaining one can continue to grow in the same container.
Advice from experienced flower growers
Propagation of violets is a painstaking but fascinating process. If you follow all the rules, the florist can easily preserve the varietal qualities, receiving many young, lushly blooming violets.
Are you looking for an answer to the question why violets don’t bloom? Perhaps they are affected by some kind of disease or pests are bothering them.