Comparison with other methods
The main part of orchids are epiphytes, which in the wild are attached to tree trunks and do not require any soil. Advantages of growing soilless:
- ideal aeration of roots and access to them is ensured;
- frequent transplants are excluded;
- reduced risk of root diseases;
- an exotic look that emphasizes developmental features.
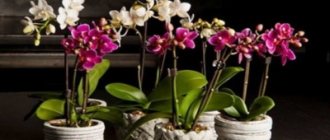
An orchid growing on a decorative driftwood will attract attention and become a spectacular accent of the interior.
The block method makes orchids more dependent on proper care.
Which one is suitable for growing?
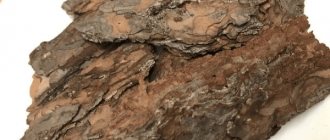
An orchid block is a piece of suitable material that is strong enough and resistant to rotting and deterioration.
Traditionally used:
- the bark of a cork tree, white acacia, oak, pine, or, in extreme cases, spruce;
- tree fern roots, vine;
- Styrofoam.
The size of the block is selected taking into account the volume, growth rate of the orchid and root mass, and the distance between shoots.
- A large base is required for specimens from dense families where there will be many peduncles.
- Small pieces of bark are ideal for young orchids.
The block is chosen to be whole, stable, without fragile parts or cracks , minimum thickness - 4 cm. Be sure to evaluate the risk of a possible shortage of material for the plant or the difficulty of development. The soilless method assumes that the orchid will remain growing on a support for many years.
We invite you to watch a video about the types of blocks for orchids:
Step-by-step instructions on how to plant a plant with your own hands
After determining the permanent location of the block, holes are made in its upper part to secure a hook or wire. Further:
- Sphagnum moss is first placed on the block.
- An orchid is placed on top. Very carefully straighten the roots so that they are freely located on the surface, cover with another layer of moss. If the flower is placed with its leaves facing down, then drops of water will not collect at the growing point.
- Secure with insulated soft wire, fishing line, synthetic thread. Do not squeeze or wrap a lot of wire. The orchid itself will gradually firmly grasp the support, and the fastening serves for general support and maintaining the given direction.
- For additional moisture retention, you can cover it with coconut fiber, pieces of tree bark or fern.
- Well watered.
Before planting, it is recommended to dry the orchid a little to make the roots more flexible.
Pruning phalaenopsis orchids at home
The end of the flowering period is indicated by the loss of elasticity and brightness of the buds and the beginning of the drying of the peduncle. But there's no need to cut it yet.
Phalaenopsis with a green and fresh peduncle is capable of re-producing buds and blooming in rare cases.
The appearance of new buds may surprise you in the axils of an old peduncle, or at the base of a leaf rosette.
I cut off the peduncle after it has completely dried. After pruning and at the time of flowering, the support holding the peduncle is not pulled out.
The peduncle is cut off during the dormant period, the entire dry part, above the first dormant bud (see photo).
If the peduncle is completely dry, it is cut off almost to the root. The cut area is sprinkled with activated carbon. The orchid forms a new shoot.
How to care for a plant?
Although the block planting method is as close as possible to the conditions of the wild, it brings even more trouble than the traditional one. Nuances of care:
- air humidity of at least 80% is required;
- the room temperature and lighting are the same for each species, regardless of the type of planting;
- during the growing season, they try to increase the influx of light, but protect from direct rays of the sun;
- sprayed and watered once every two days, but always guided by the condition of the plant, the roots were not over-moistened.
You cannot move a block with an orchid from place to place . This will negatively affect growth and flowering.
Phalaenopsis - home care
Lighting: The flower prefers plenty of diffused light. East or west side windows are better suited. On the south side, it needs shading at lunchtime, otherwise dark spots and burns from direct sunlight will appear on the leaves and flowers. It needs additional artificial lighting only if it is located on the north side; in all other cases, this species tolerates wintering well with natural light. During the flowering period, it does not really like frequent turns of the pot, or changes in habitat.
Temperature: Heat-loving plant and tolerates temperatures up to 30 degrees. Comfortable, considered to be 20-25 degrees in summer; in winter it is slightly lowered to 16-20 degrees, but not lower than 15. At high levels and low humidity, flowering does not occur.
Humidity: Under natural conditions, phalaenopsis grows in the tropics, where high constant humidity is not lower than 80%. Even during a period of drought, due to temperature changes at night, a large amount of dew is formed, which the epiphyte feeds on through the roots.
At home, it is necessary to create a climate close to natural. When air humidity is low, place humidifiers or a decorative fountain nearby. You can place the pot on a tray with wet pebbles, expanded clay, or moss.
Spray the plant only with soft water (distilled) slightly above room temperature. But during flowering, drops of dew should not fall on the flower, otherwise it will lose its decorative effect. Spray early in the morning or evening.
During the heating season, the orchid should not be heated by the radiator.
Soil: For all types of orchids, a special mixture of substrate is used. Regular soil will not work for flowering plants. As a rule, they use store-bought ones for orchids.
The composition of the soil for epiphytic plants, in particular phalaenopsis, includes: pine bark (4 parts), sphagnum moss (2 parts), peat (1 part), polystyrene foam (1 part), charcoal (1 part), perlite (1 hour).
The lower the air humidity in the room, the more moss is needed to retain moisture. Often, the roots are covered with moss on top of the pot to prevent the soil from drying out.
Choose a transparent pot. There is a misconception that roots need light, but no, they will grow just fine in clay pots. But it is better for the gardener to control the condition of the root system and their color through a transparent pot, reduce or add watering if necessary, and also replant in time.
The size of the pot must correspond to the volume of the root system, it must fit tightly. Phalaenopsis will not grow in containers that are too spacious.
Watering: During the growing season and flowering, moderate but active watering is necessary. The soil must be kept moist at all times. As soon as the top layer dries, the procedure is repeated. Usually watering occurs 3-4 times a week. At the moment of the onset of dormancy, watering is gradually reduced by 3 times, bringing it to 1 time per week, while the soil remains dry for 2-3 days, and only then watering is carried out.
Water must be used soft or purchased. You can take a rainy one, the water temperature is 3-4 degrees higher than the habitat. Ordinary tap water contains a lot of salt and lime, which is detrimental to the orchid; the tips of the leaves appear dark and often fall off. You can completely immerse the pot in water for 1 minute, but drain all excess water from the pan. If a yellow coating appears on the surface, add a few drops of lemon to the water.
Transfer:
- First, if it is a plastic pot, carefully cut it, carefully pull out the entire root system from the clay pot and soak it in a basin of warm water for 10-15 minutes.
- They clear away old soil and cut off all dry and rotten roots.
- At the bottom of the pot we place a layer of expanded clay, or large pieces of bark, as drainage from rotting roots.
- 1/3 of the part is filled with fresh substrate, then the root system is placed.
- We fill the space to the top with soil, but the base should not be deep in the soil, otherwise it will begin to rot after watering. Aerial roots should remain on the surface.
- At low humidity, place a layer of moss on top and water everything generously.
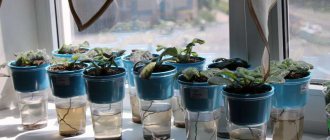
Reproduction: This process occurs in two ways: by buds and decks (young shoots).
Kidneys. It is necessary to find a dormant bud and cut the top layer with a sharp knife at the moment of awakening, then remove the scales, there will be a bud under it.
For active growth, it is necessary to treat it with a stimulant.
In a month, babies with leaves will appear. After another 30-40 days, roots form.
Humidity must be maintained at 70-80% and temperature at 23-25 degrees. As soon as the roots get stronger and grow a little, they are cut off along with part of the orchid and transplanted separately into the substrate. The cut site is treated with activated carbon.
During the first 2 years, all the flowers on a young flower are plucked, allowing the root system to strengthen.
By shoots. Side shoots (babies) are formed on the peduncle and the base of the rosette. It is necessary to wait for the roots to appear and separate them from the main phyleonopsis, then plant them in a separate pot.
Fertilizing: Use fertilizers only for orchids (epiphytes), purchased from specialized stores. Any other feeding will destroy the flower.
As a rule, during the period of active growth, fertilizer is applied 2 times a month; when phalaenopsis is at rest, it should be noted that it does not always occur in the winter months, fertilizing is reduced to 1 time, sometimes not added at all. The concentration is taken 2-3 times less than the indicators indicated on the packaging. Excessive fertilization has a negative effect on the orchid. After purchase, regardless of the period, do not add any additional growth stimulants for 2-3 months.
Possible problems and difficulties
The plant is very dependent on the experience of the grower, as well as on the individual ability to adapt. Possible difficulties:
- If the orchid previously grew in a pot, it will experience stress from the air flow. A sudden change from a cramped, humid space to a drier climate often leads to the death of some of the roots. There is no need to be afraid of this, as new ones will soon appear, well adapted to the open environment.
- Maintaining constant high air humidity is the main problem of block planting. The roots will dry out much faster; frequent spraying is required.
- It is difficult to find a place in the room that meets all the parameters of a comfortable environment for a flower: constant temperature without drafts, diffuse lighting.
Experienced flower growers recommend making an impromptu mini-greenhouse. The flower is covered with it during the day to maintain stable humidity and warmth.
An orchid on a block is a good idea for decorating the interior and saving space on window sills and stands. The material for the base is chosen to be durable and large enough so that replanting is not required for many years. But this method forces you to pay special and frequent attention to the condition of the plant and the preservation of the necessary conditions.
By the way
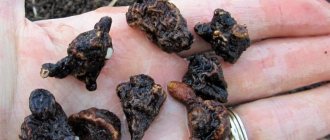
Most orchids have stems that are thickened or swollen, which may look like a spindle, or a spherical growth, etc. They have a funny name - bulbs, because they look like bulbs, but the botanically correct name is tuberidia, or pseudobulbs (aboveground tubers).
The bulbs store moisture and nutrients during the growth period, so these orchids are able to tolerate a very long dry period, which can last several months.
Interestingly, if a leafless bulb remains, it can lie in dry conditions for several months, gradually shrinking. But as soon as high humidity is created, growth buds wake up and the bulb begins to grow roots and a new shoot.