Author:
Natalia
Category: Garden plants Published: February 09, 2019Added: January 23, 2020
Many calla lily lovers do not even suspect that its characteristic elegant snow-white or brightly colored “bags” are not flowers at all, but... special leaf-spreads that wrap the yellow ears of the inflorescences. Calla blooms inconspicuously, but very fragrant! We will reveal more secrets of the exotic beauty in our article.
- What to do if calla lilies do not sprout for a long time after planting?
- Why does calla lily begin to “cry”?
- Is it worth planting callas near large bushes and trees?
- Why can calla lilies lose color?
- How to get calla lilies to bloom earlier in the garden?
Let's figure it out together.
Planting and caring for callas
- Planting: tubers are planted in early May.
- Flowering: from June to early October.
- Excavation: in September.
- Storage: in an earthen coma in a dry room at a temperature of 5-7 ˚C.
- Lighting: bright light in the morning, light partial shade in the afternoon.
- Soil: well-drained, fertile, pH slightly acidic to acidic.
- Watering: moderate but regular, abundant in dry seasons.
- Fertilizers: Fertilizers are applied to the soil only during planting.
- Reproduction: vegetative, depending on the type - by tubers or dividing the bush. Seed propagation is ineffective and unreliable.
- Pests: aphids, thrips, mole crickets, beetles and wireworms.
- Diseases: rhizoctonia, root rot, penicillosis, pythium, Erwinia group of bacteria.
- Properties: the plant contains poisonous alkaloids. The juice, if it comes into contact with the skin, causes irritation, and if it enters the body, it causes vomiting, numbness and convulsions.
Seed preparation
During long-term storage, seeds may lose their viability. The best way out would be to buy fresh seed from a specialty store. For more active development, seeds can be placed in a growth stimulator.
If you wish, you can prepare seeds at home. To do this, you will need to leave the seeds on the calla after the flowering period so that they ripen, then they must be carefully cut and dried, and then the seeds must be removed.
It must be borne in mind that the peduncle is left only if the seeds of the plant are needed. Otherwise, this will lead to a weakening of the root system. Planting material must be sown immediately after drying.
Calla flowers - features
Growing callas, like any other plant, requires following the rules of agricultural technology, but the main feature of these flowers is that they are grown both as garden callas - in courtyards, and in apartments, in pots, like indoor callas. But there are still general rules for growing and caring for callas, no matter where they grow:
- callas require shallow planting, that is, the rhizomes are barely covered with soil to avoid rotting;
- What laymen call a calla flower is actually the covering leaf or spathe that wraps the spadix of the inflorescence. In fact, calla flowers are small and inconspicuous, although very fragrant;
- after planting, calla lilies do not sprout until they have formed their root system, so do not be nervous if there are no sprouts for a month;
- When digging up tubers, be careful: they are easily damaged;
- calla is a living barometer: droplets of water appear on its cover and the tips of its leaves before the rain, like tears;
- A pot for calla lilies, especially Ethiopian, is preferably porous so that excess moisture can evaporate. In addition, Ethiopian calla loves privacy and does not tolerate neighbors in its own pot;
- each calla flower blooms for about a month;
- From time to time, the top layer in the calla pot should be carefully removed, trying not to damage the roots, and replaced with fresh nutrient substrate.
Propagation using seeds
If you want to use the seed method of propagating calla lilies, then you need to know that it is painstaking:
- Before planting the seeds of this plant, they are soaked. For this purpose, cotton pads or paper napkins are most often used, between which the seeds of an indoor flower are placed.
- Next, the material is wetted with ordinary water. The seeds in this form must be placed in a warm place for three days.
- After the seeds are pierced, they need to be planted in a container. In this case, they must be sprinkled with a thin layer of soil.
- After the emergence of seedlings, the strongest of them are left in the pot, and the rest are pulled out in the simplest way.
- A month after the sprouts appear, they are picked and planted in separate bowls.
- If the planting is dense, they can be grown until the end of spring without thinning.
In May, callas are planted in a permanent place. In this case, it is necessary to plant one plant per pot. If it is too long, then a distance of 40 centimeters is maintained between individual indoor flowers. Caring for the seedlings of this plant is carried out in exactly the same way as with any other method of propagation.
Propagation of this plant by seeds is a fairly lengthy, but not difficult, process.
If you like to care for house plants and have the patience, then you can easily use this method, especially since feces have a high percentage of similarity.
Growing garden calla lilies
Callas decorate the garden so much with their majestic flowers that many gardeners are happy to grow them on their farms. The clearings where calla lilies grow look like an Arabic ornamental painting: the rhizomes annually produce young leaves, and elegant arrow-peduncles rise among them...
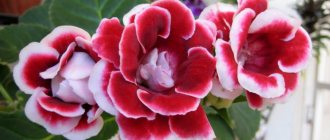
In the photo: Purple callas
Callas prefer open, spacious areas and fertile soils, but it is advisable to shade them during the hottest hours of the day: in the scorching sun, the leaves wither, burn and dry out, so it is important that bushes or trees grow nearby, which will provide the callas with saving shade in the afternoon. The soil must be acidic or at least slightly acidic; good drainage is required, because stagnation of water in the roots is detrimental to the plant.
The optimal composition of soil for calla lilies is: earth, sand, peat and leaf humus in equal proportions.
Description and varieties
Calla lilies are often confused with calla lily, but these are completely different plants. If you want to grow this flower at home, the choice of varieties is not too wide. For this purpose, flower growers use Ethiopian calla lilies, “Elliota” and “Remani”. They differ in appearance.
Ethiopian calla is represented by such varieties as “Green Goddess” and “Childsiana”. They boast long leaves of rich emerald green that shoot upward. The flowers themselves are very large and white.
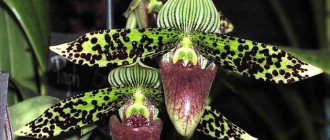
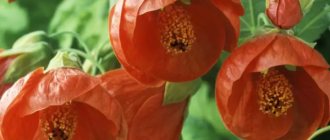
“Elliot” also does not leave connoisseurs indifferent. Its highlight is its very large, up to 15 centimeters, orange-yellow flowers. The leaves are bright, with small specks.
Most often, flower growers purchase calla lilies "Remani" . It has much smaller flowers of various shades. Pink ones are very common among them. There are also red, purple and even black flowers.
Planting callas and caring for the garden
Planting callas in spring
Garden callas are planted in early May. Pre-planting material is kept for half an hour in a solution of potassium permanganate, then carefully examined and, if necessary, rotten areas are cut out to healthy tissue, and the wounds are lubricated with brilliant green. Complex mineral fertilizer is added to the soil at the site at the rate of 30-40 g per 1 m², and the site is dug up. Then the tubers are immersed in prepared holes to a depth of 5-10 cm at a distance of 30-40 cm from each other (depending on the size of the bulb), buried, and the planting site is well watered.
How to grow cannas in the garden - with showy flowers and leaves
Calla lilies, if you remember, have a peculiarity: they do not sprout until they form an underground part, so if you are lucky, you will see sprouts in about two weeks, and if you are not very lucky, then in a month. Don't despair and don't try to dig a hole and see what stage the process is at. Do not water the calla lilies for the first two weeks: watering after planting is sufficient.
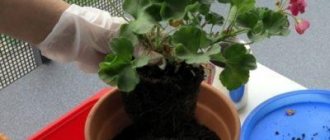
In the photo: Preparing calla bulbs for planting
There is a way to prepare calla lilies for planting in open ground: at the end of March or beginning of April, plant calla lilies in small pots to a depth of 2-3 cm in special soil for seedlings or in soil calcined for forty minutes in the oven. Water 1-2 times a week, and a week before transplanting into the ground, begin to briefly open the window to harden the plant. Calla lilies are transplanted into open ground together with a lump of earth.
Planting callas in autumn
Calla lilies are not planted in the fall.
Caring for calla lilies
How to care for calla lilies? It turns out to be very simple. Watering the calla lily followed by loosening is all that is needed for its normal growth. Plants should be watered moderately but regularly, increasing the amount of water during watering in hot, dry summers.
After each watering, lightly loosen the soil around the plants.
If you added complex fertilizers to the soil during planting, then you will not need further fertilizing of the callas, sometimes only, if the soil in the area with callas is not acidic enough, water it with water acidified with citric acid or vinegar.
Conditions for plant development
For better development of crops, a microclimate close to natural is organized. When growing calla lilies from seeds at home, you need to take into account the components of successful flower development: light, temperature, moisture and soil fertility.
Illumination
Calla is a light-loving crop, but does not like direct rays. The daylight hours of a flowering plant should be 10-12 hours, and after flowering - 8-10 hours. In autumn and winter additional lighting is necessary. Lack of light leads to elongation of leaf petioles and absence of flowers. The situation can be corrected by placing the pot on the western and eastern window sills in the hot summer, and on the southern windowsills in the winter.
Humidity
The culture originally grew in tropical swamps, so it needs high humidity. In this regard, a high tray under the pot, filled to 5 cm in the warm season, will help; in the cold season it is better to omit this procedure. You need to care for the leaves by wiping with a damp cloth.
Watering is moderate, once a week, but in hot weather and during the formation of inflorescences, plants need abundant and frequent moisture every 1-2 days. When the soil is dry, the crop fades, dries out and goes dormant.
Temperature
Should be consistently within 18-23°C. Temperatures below or above coupled with high humidity can trigger the development of parasites and pathogens. You also need to ventilate the room carefully, avoiding drafts.
Feeding
The plant is fed once a year, but for constant flowering, special fertilizers for corm flowers are applied every 2-3 weeks. In the spring, callas need nitrogen supplements, and during flowering they need phosphorus and potassium. The amount of fertilizing also depends on the light level - the lower it is, the more the crop needs nutrition. The main thing is not to overfeed, as evidenced by the depressed state and changes in appearance.
Calla at home
Forcing home calla lilies
Homemade calla lilies are grown at a temperature of 22-25 ºC in the summer, and in winter – at a temperature not lower than 14 ºC. The place for the plant should be well lit, but shaded from direct afternoon sunlight and protected from drafts. The soil for home calla lilies should have an acidity of approximately ph 6-6; it would be a good idea to add sphagnum moss or peat with sawdust to the nutrient soil. The tuber for forcing calla lilies should be about 6 cm in diameter, it is planted with the convex side down in a container with a diameter of at least 25 cm, the planting depth is 5 cm. After planting the tuber, the soil must be spilled with a fungicide solution.
Sowing
Before sowing calla lilies, you need to germinate the seeds. To do this, they are placed in warm water for 6 hours. Adding a growth stimulator will not be superfluous. After this, the planting material is placed in a damp towel or gauze, covered with it and sent into a warm place for about a week. When the towel begins to dry out, you will need to re-moisten it.
Seeds are planted as follows. Small holes are made in the previously prepared soil, about 3 centimeters deep. The soil is watered, seeds are placed in it and carefully sprinkled on top. If clay pots are used, the number of seeds in each should be from 3 to 5, this will guarantee the emergence of seedlings.
You can also put the seeds on top, without digging them into the ground, lightly press them into the soil. Then moisten, cover with polyethylene and put in a room where the temperature does not exceed 20 degrees.
Callas after flowering
There are differences in caring for tuberous callas and rhizomatous callas. For Ethiopian calla, rhizomatous, the dormant period begins in the very heat - at this time growth slows down, then stops, the calla turns yellow... At this time, watering should be reduced, and the plant should be taken to the balcony or garden in a well-lit place where drops will not reach it rain. In the first half of July, the plant is taken out of the pot, all old leaves and shoots are removed and transplanted into a pot with a new nutrient mixture, placed in a bright place and they begin to water and feed the calla, preparing it for the next flowering. This is the cycle of rhizomatous potted calla lilies.
Garden calla lilies remain on the site until autumn; in September, the rhizomes are dug up and stored with a ball of earth in a cool, dry room with moderate, infrequent watering.
In the photo: Calla in a pot
After flowering, tuberous calla lilies gradually turn green and droop, the leaves turn yellow and dry. Garden tuberous callas are carefully dug up in the third decade of September, trying not to damage the tubers, freed from the soil, washed and kept for a couple of weeks at a temperature of 5-10 ºC, waiting for the beneficial nutrients to pass from the leaves to the tubers. After this, dead leaves are easily removed.
Propagation of flowers from bulbs
Most often, this plant is grown using bulbs. For this:
- It is necessary to choose only high-quality sprouts that are characterized by the presence of the strongest possible root system.
- They must initially be placed in a pot and covered with a small amount of soil.
- The soil layer should not exceed 5 centimeters.
- If the plant is planted in winter, then it must be provided with a temperature of 8-14 degrees.
- When transplanting calla lilies in the summer, ensure the temperature indoors or outdoors is 22-25 degrees.
In order to provide the plant with early flowering and the richness of the shade of the blanket that encircles the plant, it must be placed on a windowsill characterized by a large amount of light. At the same time, at night the temperature should be +16 degrees. If this plant is planted in winter, then it is necessary to provide it with additional lighting to extend daylight hours to 10-11 hours.
After planting an indoor flower, it needs to be provided with appropriate care:
- Calla needs to be provided with moderate and frequent watering. In this case, they are guided by the moisture level of the earthen coma. It should always be moderately moist.
- This plant needs to be fed twice a month. For this purpose, liquid fertilizers in the form of water-soluble fertilizers for indoor flowers are most often used.
When growing calla lilies from bulbs, they are transplanted in the summer. To do this, the indoor flower is dug out of the pot, old shoots and leaves are removed from it. Next, you need to transplant this plant into a new pot.
To perform propagation, it is necessary to separate its offspring as carefully as possible before transplanting an indoor flower. It is planted in a separate pot. Transplantation of this plant and its propagation is carried out in winter. When calla lilies are propagated by offspring or mother bushes, they are separated from the bush in the spring.
Propagating this plant in a variety of ways is a fairly simple procedure. To do this, it is necessary to correctly select the pot and material for replanting.
Storing callas in winter
In our latitudes, callas are not left in the ground for the winter. When the leaves die, they are removed, the tubers are washed well, kept for 30 minutes in a solution of potassium permanganate, washed again and placed in a dark, dry place to dry, then the tubers are stored, packed in paper bags, at a temperature of 5-7 ºC: in a city apartment for this Vegetable drawers in the refrigerator are suitable.
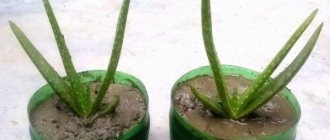
In the photo: calla tubers
The rhizomes of the Ethiopian calla lily, if you do not have the opportunity to keep it in a cool room after digging it up, are slightly dried and, after cutting off the leaves, stored in the same way as the tubers.
Don’t forget to check weekly how the tubers and rhizomes of calla lilies are feeling: whether they have begun to dry out and wrinkle from too warm a temperature or, conversely, to rot from high humidity.
If you grew calla lilies in a pot, then during the dormant period you can not remove them from the pot, but simply take them out onto a cool veranda or loggia. If you, without giving your beauty a couple of months to rest, continue to water and in every possible way provoke further growth, you can deplete the calla and it will not bloom.
Choosing a pot and soil
The pot plays a fairly important role in growing indoor flowers. If you are growing Ethiopian calla lilies, then you need to select a container that is large in size. If you use a small pot, in this case the calla lilies will not bloom. If you apply fertilizer in a small container, you will only achieve growth of the green part of the plant.
To plant one flower, select a container with a diameter of more than 20 centimeters.
When choosing soil for growing indoor plants, you should give preference to porous structures. This allows you to most effectively remove excess moisture from the pot and ensure normal breathing for the plant. In order for the plant to constantly grow, it is necessary to select the correct soil mixture. For this purpose, a special mixture is most often used, which includes garden soil, rotted manure, and sand. In this case, it is necessary to ensure the acidity of the soil.
With the correct selection of container and soil for calla lilies, its full flowering is ensured. This process also greatly facilitates the work of the gardener in the process of growing calla lilies.
Types and varieties of calla lilies
There are only eight species of calla lilies in the genus, but only three are grown in culture, and they also served as material for breeders to develop different varieties:
Ethiopian calla (Calla aethiopica)
These are tall white callas (peduncles up to a meter or more in height), the underground part is a rhizome, and not a bulb, like other species. Ethiopian kala is moisture-loving; it does not shed its large, shiny green leaves even during the dormant period. The most popular varieties:
- Nicolai - peduncle length - up to one and a half meters, leaves are dark green, arrow-shaped, long petioles. The blanket is green below and outside, diameter 8-12 cm;
- Pearl is a low-growing variety, up to half a meter in height, suitable for growing in pots;
- Schone Zweibruckerin – peduncle length up to 1 m, leaves are heart-shaped, light, the bottom of the spathe is dark green, the diameter of the upper part is 10-15 cm;
- Green Goddess – majestic green calla lilies of rare beauty, reaching a height of 90cm.
In the photo: Ethiopian calla (Calla aethiopica)
In the photo: Ethiopian calla (Calla aethiopica)
Calla rehmannii
This is a low calla lily (up to 70 cm in height) with a pink cover (lilac-burgundy or red-pink) and narrow green leaves. The underground part of the plant is a tuber, similar to that of begonia or gloxinia. In autumn it loses its leaves and requires rest in winter. Popular varieties:
- Chameleon - a low calla lily, grown both in a pot and in the garden, a blanket of peach color with golden tints;
- Evening – satin black and purple calla;
- Indian summer - red calla, with a garnet hue.
In the photo: Calla rehmannii
In the photo: Calla rehmannii
Requirements for indoor calla lilies
In order to ensure full growth and development of plants, it is necessary to grow it in the most favorable conditions.
Kala needs optimal:
- Lighting
- Temperature
- Humidity
- Polivé
Growing this plant in a pot is quite simple. But this plant is grown in a warm climate, so it needs to ensure optimal room temperature. If the air temperature in the room does not exceed +8 degrees, this may negatively affect its development. When growing calla lilies in winter, they are transferred to a room that is characterized by the presence of appropriate heating devices. It is best to grow this plant at temperatures from +20 to +25 degrees.
Kala is a fairly light-demanding plant.
is a fairly heat-loving indoor flower. If you choose the right place to grow calla lilies, this will be the key to success. If there is diffused sunlight or partial shade, you can provide fairly favorable conditions for growing calla lilies. This plant is characterized by the correct formation of flower stalks only if the daylight hours last for 12 hours. This is a very important condition for growing an indoor flower. After the indoor plant has finished blooming, it will need to be provided with 8 hours of daylight.
Kala is a moisture-loving plant. That is why it is necessary to regularly water the indoor flower. If the kala blooms, then it needs to be provided with abundant watering. During the calla lily's dormant period, it is provided with moderate watering. When growing this plant, it is necessary to ensure that the room has a high level of humidity.
Fertilizer
Plants are fertilized during growth and flowering. The plant responds very well to feeding with superphosphate twice a month. You can also use complex fertilizers for flowering plants. During the dormant period, you should not feed the flower.
Before flowering, you should not overuse fertilizers with nitrogen , so that the intensive growth of green foliage does not suppress the formation of buds. After the flower stalks appear, calla lilies can be fertilized with urea. During flowering, organic feeding with an infusion of eggshells is recommended.
It is useful to alternate root feeding with leaf spraying. It is important to ensure that drops do not fall on the flowers.
Calla - flower of death
Sometimes you can hear that calla lilies are the flower of death. Where did this statement come from?
One reason is that in European countries there is a custom of bringing white flowers to funerals. And often these are calla lilies. This plant can also sometimes be found on the graves of the deceased. However, other white flowers are also brought to funerals, such as lilies, roses, carnations or chrysanthemums.
Some argue that calla lilies do not look like real flowers, but rather like wax figures. Their yellow cob resembles a candle, and their white bract resembles a funeral shroud. However, such statements are purely subjective opinions, not supported by substantiated facts.
Today, almost no one remembers that calla is the flower of death . This myth has not been confirmed. Nowadays they give kalydas for various holidays and are used to create bouquets, including bridal bouquets! These are universal flowers that can be given to both women and men.
Calla is a very beautiful, graceful flower that exudes a subtle, pleasant aroma. It helps improve immunity, eliminate stress and depression. Gives vigor and improves mood!
Preparing tubers for planting
Regardless of whether you have your own calla lilies or purchased ones, before planting them in a pot for germination, the bulbs must be prepared.
Pay attention to the calla bulbs with babies. If the babies appeared only last year, there is no need to separate them from the main tuber. Plant it just like that.
First, inspect each tuber and discard those that are shriveled, rotten, or very moldy. Cut off the rotten areas and clean off the mold with an old toothbrush. Remove old roots.
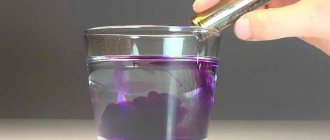
After this, calla lily tubers must be pickled in a solution of Fitosporin or any Fungicide (Maxim summer resident, Fundazol, etc.). Today, stores sell fungicides that are designed specifically for soaking bulbs and other planting material. For example, a drug from Augustine.
You can etch potassium permanganate in a pink solution, but, according to experienced gardeners, it is not very effective.
You can read how to soak bulbs in Fitosporin in our article at the link. It describes how to dilute the paste or powder for soaking the seeds. Since tubers and seeds are planting material, the dressing principle is the same.
If you choose a fungicide, read the instructions carefully and do everything strictly according to it.
Attention! While the tubers are dry, the mold on top of them may not be visible. After removing them from the solution, inspect them again and, if necessary, clean them with a toothbrush dipped in fungicide.
We recommend preparing ash or crushed activated carbon tablets. They will be needed to sprinkle the cuts after removing the rotten area.