Representatives of the orchid family are magnificent flowers that delight with their bloom, beauty and variety for a long time. With proper care, the plant grows healthy and beautiful, but sooner or later any gardener will want more such flowers in his greenhouse, garden or room. The orchid reproduces with the help of humans.
To do this, they resort to breeding orchids at home. In this article we will talk about how orchids reproduce at home.
Before breeding orchids and in order to replant exotic beauties, you need to pay attention to the size and level of development of the flower, since the reproduction process is stressful for the orchid. You need to approach transplantation and breeding carefully and very carefully .
So, how to propagate an orchid at home? This will be discussed further.
Vegetative propagation
For this type of orchid propagation, the period of early spring is best suited, when the dormant time is coming to an end and the flower gains energy for active growth and division.
Important! We must not forget that each species of orchid has its own life cycle and the end of dormancy does not always occur in spring. This is closely monitored and the frequency of the home beauty’s cycles is recorded.
Vegetative propagation of orchids is the most common type of division of the represented family. It is the division of an orchid into several parts, which then form sprouts, which over time turn into bulbs, and with proper care they take root.
When dividing a flower, you need to take into account the number of young pseudobulbs and try to ensure that at least 3 pieces are present on each separated part.
Tools:
- Knife;
- Scissors.
Important! Tools must be disinfected so as not to infect the orchid with an infectious or fungal disease.
Division process:
- The flower is carefully removed from the pot and cleaned of any soil that may have stuck to the roots.
- The dried root system is cut off and the sections are rubbed with charcoal.
- The orchid is divided in such a way that 2-3 bulbs remain on each part, and the sections are also rubbed with charcoal.
- The finished parts are strengthened in a pre-prepared transition substrate. It can be a drainage layer covered with wet moss on top. A plant with old bulbs should not be replanted in regular soil, as this may harm its development.
Important! If room conditions during transplantation are far from ideal, then at first you can organize a greenhouse for the transplanted parts.
To create suitable conditions for growth, the transplanted parts are often sprayed and the moisture is carefully wiped from the inflorescences to avoid rotting.
What you need to know about orchid propagation
In nature, orchids grow on trees. However, it cannot be called a completely parasitic plant. The flower receives most of its nutrients from the humid atmosphere of tropical forests. Almost the entire root system is located on the surface of the tree. It plays the role of tentacles that hold the orchid by the branch. The aerial roots are covered with a darkish film, but it perfectly allows moisture to pass through and has an absorbent effect.
Important! Orchid roots are tenacious, but very fragile.
Leaves are involved in the active absorption of nutrients and moisture. Because of this feature, the flower can be watered by root and foliar methods. The culture has 3 phases of its life cycle: active growth, flowering period and dormant time.
Any gardener can understand how an orchid flower reproduces, but it is more difficult to determine under what conditions this happens. To achieve success, it is first important to learn the following rules:
- The best time for reproduction is considered to be spring or the active growth phase. After flowering, the crop makes it possible to obtain new seedlings. During flowering, you should not touch it.
- A tropical plant needs to create conditions close to natural nature. Air humidity is provided from 50 to 80%. The optimal temperature is +28°C.
- Propagation material is obtained from plants older than 2 years. The flower should be strong, without signs of disease.
A sick orchid cannot be used for propagation. The only exception is the case when it is not possible to cure the mother bush.
Propagation by cuttings
Orchids are also propagated at home by cuttings. This type of propagation is suitable for multipodial orchids and is distinguished by the fact that first of all, the stem with aerial roots that are well formed is cut. It's easy to separate. To do this, use sterile scissors and rub the sections with charcoal.
You can care for them in several ways:
- The cuttings are placed on a previously prepared layer of moss placed on drainage.
- Planted in a lump of earth.
In both cases, the cuttings are cared for as if they were adult plants, providing them with good humidity and the correct temperature conditions.
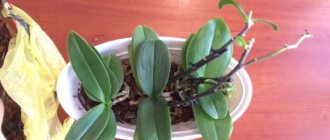
After some time, young shoots should appear on the cuts, but you should not immediately plant them on a permanent substrate, since you need to wait until they take root and they reach a length of 3-5 centimeters.
Care after propagation by cuttings often includes treatment with cytokinin paste, as it is an excellent stimulator of growth and metabolism in young orchid buds. If applied correctly and dosages are followed, after 5-7 days new shoots will begin to appear. Then propagation by cuttings of an indoor orchid can be considered successful.
Important! If the temperature and humidity after separation by cuttings seem insufficient, then greenhouse conditions are created for the young cuttings in which the growth parameters will be optimal.
Propagating an orchid at home using cuttings is one of the easiest ways.
How to grow an orchid from a peduncle
There are three ways to propagate orchids by children obtained from a peduncle:
- without separating the peduncle from the rosette;
- on a cut peduncle;
- using cuttings from a cut peduncle.
The success of the procedure depends on how long ago the orchid bloomed. For propagation, you should use a peduncle that completed its flowering no later than 3 months ago. Naturally, it should be alive, green, and not dried out. In addition, for epiphytes that have only recently been acquired, propagation by peduncles is not very suitable. Such flowers must undergo acclimatization to new conditions and nutrition.
Growing a baby without separation from the mother plant
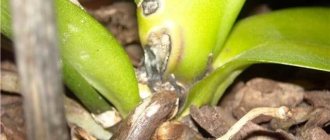
In order for a bud to wake up on a peduncle instead of a bud, it is important to create suitable conditions for this. These are increased air humidity and heat. You can get a greenhouse effect by wrapping the peduncle in places where dormant buds are visible with sphagnum and film. Spraying the orchid with Heteroauxin will provide good stimulation.
There is another method: you should specially shorten the peduncle, 1.5 cm away from the bud, and remove the integumentary scales from it. Then treat the sections with a hormonal drug, for example, cytokinin paste, and wrap them in a bag.
Germinating babies on a peduncle in a vase
After the last bud fades, cut off the peduncle and place it in a vase. Add 0.5 tablets of succinic acid and activated carbon to the water. Then put the plastic bag completely over the vase and place it in a sunny place. Change the water in the vase twice a week, and ventilate the greenhouse itself. When the children grow their roots, separate them.
Instead of a vase, it is convenient to use a plastic bottle, and when the baby grows up, simply cut the container and take it out.
Peduncle cuttings
The method is quite easy and is almost no different from cuttings from plants. Only instead of a shoot, a cut peduncle is used. It should be cut into cuttings up to 4 cm long so that there is one dormant bud closer to the lower cut. Treat the sections with activated carbon.
It is better to root cuttings in a special substrate for orchids, but of a fine fraction. Spray it with a solution containing a growth stimulator. Lay the cuttings horizontally, do not fill them on top, and cover the container itself with glass or place it in a bag. The wig should be well lit during the day (12 hours minimum). When a pair of leaves have formed on the children, they can be replanted.
Stem propagation
Also called procreation by children. Some types of orchids, such as dendrobium, grow side shoots, otherwise called shoots. Essentially, these are new plants that can be grown separately and successfully produce healthy and beautiful orchids.
In order to increase the number of side shoots, gardeners use fertilizers, such as sets from the main triad (potassium-phosphorus-nitrogen) in combination with amino acids and minerals.
Important! When fertilizing a flower, carefully, in order to grow a baby, you need to monitor the concentration of the solution and the frequency of watering, because with improper care, even a healthy plant can be destroyed.
Stages of stem propagation:
- As soon as the side shoots have their own roots, they are cut off and strengthened on temporary soil or in a plastic bag with moss.
- If the roots are not formed, then the young shoot can be cut off with part of the mother bulb, which will give it the opportunity to feed until its own roots appear.
Important! After transplanting to permanent soil, a full-fledged plant will form in a few years, so do not worry if the flower grows slowly and in no case should it be over-watered.
There are other ways to propagate orchids.
When is the best time to propagate an orchid?
It is best to begin the propagation procedure one to two months after flowering has completed. The same time is also suitable for replanting a flower, since at this time the crop enters a period of vegetative dormancy and you can easily divide the bush or cut the required number of cuttings.
Unlike transplantation, which, if necessary, can be carried out with a flowering crop (for example, if pests have settled on the plant), it is better to postpone propagation until spring so that the adult plant does not experience stress from the procedure.
Propagation by seeds
Reproduction of the orchid family at home from seeds is a very difficult and not always successful undertaking. Orchid seeds are dusty and lack nutrients, so a special medium must be prepared for them. To propagate orchids by seeds, you need to prepare tools.
These could be:
- Glassware or test tubes. Height – 15 centimeters, width – 1.5 centimeters.
- Traffic jams. Should be as dense as possible. The success of reproduction depends on this.
Important! Before starting the reproduction procedure, it is necessary to thoroughly sterilize the instruments. This is done with a 2% soda solution.
The nutrient medium is selected in a specialized store or in a laboratory, but it can also be created at home.
Compound:
- Agar-agar - about 4 g;
- Distilled water - 200 g;
- Calcium nitrate - 200 mg;
- Ammonium sulfate - 125 mg;
- Potassium phosphate - 0.6 mg;
- Magnesium sulfate - 0.6 mg;
- Iron sulfate - 0.025 g;
- Manganese sulfate - 0.0075 g;
- Sucrose - 5 gr.
To successfully breed a flower, all components must be chemically pure and purchased at a chemical store. Sterility for seed germination is the most important factor.
Before sowing, the seeds are sterilized:
- Do this with a chlorine solution for 10 minutes,
- Ultraviolet.
- Potassium permanganate. Planting material is sent to a 1% solution.
- Hydrogen peroxide for 10 minutes.
Sow seeds immediately after sterilization at a rapid pace. Agar-agar is added to the test tubes and placed over boiling water, after which the seeds are placed there with a disinfected pipette. Proper care involves maintaining a constant temperature from +18 °C to +24 °C and long daylight hours.
After about a week, changes will begin to occur in the seedlings. Inflorescences form in the form of small green balls, then suction hairs appear, and then young leaves.
After about a year, the formed sprouts can be strengthened on the ground without the risk of death.
Important! Before propagating an orchid by seeds, you need to think carefully about whether it is worth it, because this method is best suited for laboratories.
Vegetatively or from seeds?
If orchids are grown in ordinary “home” or “apartment” conditions, the only available options for producing offspring will almost always be vegetative propagation methods.
Growing from seeds (even with sufficient experience) for orchids is considered extremely difficult. These are unique plants that require the creation of a sterile growing medium, carefully controlled conditions and special devices. An ordinary florist cannot afford such “games”. If you have a strong desire and resources, you can try to buy ready-made seedlings.
It should be borne in mind that all the luxurious and unpretentious hybrids that we have on our shelves are plants that do not retain their characteristics when propagated by seeds. But species orchids and rare varieties that are grown from seeds require difficult care and special conditions.
Reproduction by peduncles
Experienced gardeners propagate orchids from a peduncle. This is a complex procedure that requires special attention.
Before propagating an orchid with a peduncle, make sure that flowering has ended, then the peduncle is cut off right at the base and divided so that at least one young bud is planted on each separated part. Then, the moss is placed in a pre-prepared container, preferably made of plastic, and a new peduncle is placed horizontally on it. The kidney should be on top and under no circumstances should it look down.
Important! For successful growth, the temporary pot is covered with cellophane film to create greenhouse conditions. Watering is carried out approximately once every 5 days.
Temperature conditions are maintained around +25 °C.
Breeding orchids in this way is a good solution when it is possible to strictly maintain the regime. In this article we talked about how to propagate an orchid at home and whether it is possible to propagate an orchid in several ways.
Reproduction of orchids in nature
When it comes to orchids, we usually mean indoor-adapted species:
- phalaenopsis;
- dendrobium;
- Cumbria;
- vandas;
- Miltonia.
In nature, there are more than 20 thousand species of this beauty. Before you deal with home flower propagation, it is worth understanding how this mechanism works in nature.
Orchids are divided into two large groups:
- sympodial;
- monopodial.
The former have many growing points and reproduce well by dividing the bush. In any case, such flowers require regular planting, since the pot becomes too small for them.
Flowers of the second type are propagated by “babies”. This procedure can present certain difficulties for the grower, since it requires the creation of favorable conditions for the formation of the baby.
Interesting! Common to all orchids is the seed reproduction mechanism.
Exactly the same mechanisms apply to indoor plants.
Tips and tricks
Experienced gardeners who have been growing orchids for a long time give the following recommendations:
- For good survival of cuttings, moist soil is necessary until 2-3 leaf nodes appear.
- After roots grow 5 cm long, the sprouts are planted in new pots.
- When propagating, apical cuttings are often used.
- For the formation and appearance of flower buds, the plant needs to be stressed in the form of artificial drought or a sharp change in temperature.
- Tilling orchids of the sympodial type are easiest to propagate by separating a rosette with roots.
- When propagating, it is very important to maintain the sterility of the necessary equipment and planting material.
Raising children
The baby orchid is a natural clone of the mother plant. It is, in fact, a small formed orchid that has a stem, roots and leaves, and in some cases produces a small peduncle. But it happens that after flowering ends it is necessary to stimulate the forcing of shoots. How to successfully grow a baby orchid from a peduncle? The following methods are used for this:
- The difference between day and night temperatures. The night temperature is set at 18–20, and the daytime temperature is 28–30 degrees. Moreover, they provide high air humidity by spraying and placing baths with pebbles filled with water. Daylight hours are extended to 12 hours due to artificial lighting.
- Sunbathing. For one hour a day in early spring, the orchid is exposed to direct sunlight. Care must be taken to ensure that the leaves do not turn a dark purple hue. In this case, the procedure is canceled.
- Artificial drought. The plant is not watered for two weeks, but protected from direct sunlight. The roots become gray-silver in color; after waiting another two days, the soil is moistened. Thanks to the resulting stress, the plant becomes active and produces shoots.
- Feeding with fertilizer containing a high dose of nitrogen. The method poses some risk, and the orchid sometimes dies from an excess of nitrogen fertilizer. Therefore, use it with caution.
Further care
If you have successfully propagated an orchid and received a sufficient amount of planting material, it is important to provide the seedlings with optimal care. Fortunately, young plants require the same care as adult plants, with the exception of fertilizing. It makes no sense to apply additional fertilizers before the first flowering, since all the necessary nutrients are contained in the substrate.
Proper watering
Watering plays a key role in caring for seedlings. It is important not to over-moisten the soil, as this can cause root rot. Immediately after planting the sprouts in the ground, the seedlings are thoroughly sprayed, and further watering will be required no earlier than a few days later, when the substrate becomes dry and the pot is light. Watering containers with seedlings is carried out in the same way as with adult plants, that is, by immersing the pots in water.
The video shows the main stages of simple propagation of an orchid by cuttings.