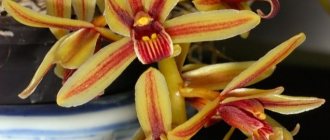
This flower is called the most romantic bulbous plant. It looks like a fairy-tale butterfly that accidentally sat down on a green stem and decided to bask a little in the warm rays of the sun. This amazing flower is called iris. We decided to tell garden flower lovers about it today. Let's consider one of the types of this magnificent flower - the Dutch bulbous iris: planting and care. Iris (translated from Latin) means rainbow. In Russia, lovers of these flowers affectionately call them “killer whales” or “cockerels.” Since ancient times, essential oil has been extracted from the rhizomes of this flower, which had a pleasant aroma and was used in cosmetology and cooking.
Mostly irises are planted along garden paths and along the edges of flower beds, but we advise you not to get hung up on stereotypes, give free rein to your imagination
The iris differs from any other garden crop in its rich color. One of the types of these wonderful flowers - the Dutch iris - perfectly tolerates proximity to other inhabitants of the flowerbed, without requiring individual care.
Here is an example of creating a simple flower bed with iris: 1 - Purple Voice hyacinth; 2 — tulip Flashpoint; 3 - Narcissus New Baby; 4 — iris reticulata Cantab; 5 - Scylla Siberian Alba
What you need to know about Dutch irises
Dutch iris is a small-bulbous plant, that is, it reproduces using small bulbs.
Tip: Bulbs should be purchased in specialized stores, in packs of 3-5 pieces. The color of the material should be golden and free from dark spots, mold and soft areas.
- These flowers are very sensitive to excess moisture. In their homeland, the bulbs, after flowering, remain in dry soil all summer. In our country, on the contrary, there are often rainy seasons and wet soils. If you do not take action, the iris bulb may rot in the ground.
- Irises are dug up immediately after flowering.
- These flowers have a fairly short growing season. They bloom early and stop flowering in the second half of May or the very beginning of the summer season.
- Irises love dry and bright places.
Landing Features
To get started, watch the landing video:
Irises are intended for growing in borders and flower beds that are located in well-lit, open areas.
It is better not to delay planting iris bulbs. If ordinary bulbous flowers can be planted at the end of September, then Dutch irises require planting at the beginning of August. Such early planting for wintering is necessary, since the bulbs of these plants do not tolerate autumn cold snaps in September - early October.
It is better to plant irises in front of the house, along paths and in open flower beds, so that the flowers are always “in front of your eyes” and delight their owners.
Planting irises in a bulb basket
First, let's look at the method of planting bulbous irises in a special basket.
A basket for bulbs looks like this (its cost, as a rule, does not exceed 50 rubles). We put our basket on the ground and use a shovel or other tools to circle it
We remove the turf along the contour we made. Moreover, we should get a hole 12 - 14 centimeters deep
It is advisable to add fertilizers, for example superphosphate, to the bottom of our pit. Then set up a basket and fill it with soil mixed with compost. Now we plant our bulbs
We carefully cover our bulbs with soil and wait for these beautiful flowers to emerge
How to grow at home?
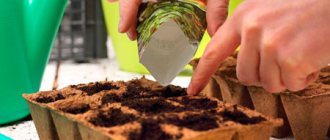
To successfully grow flowers at home, it is better to buy bulbs or seedlings, since germination from seeds is a longer process. When choosing planting material, you need to carefully examine it. The seedling should be free of stains, mucus and damage. It should be dense, green, with petals.
Don't buy just one flower. For planting, it is better to take several different varieties, then the composition will look more colorful. Therefore, you should immediately prepare oblong boxes that can accommodate a small home garden.
After the bulbs are purchased, they need to be dried a little. If there are suspicious spots on them, you can try to cut them off and treat the areas with brilliant green or activated carbon. You should also take care of the soil. Irises love fibrous soil that allows moisture and air to pass through well. You can use a mixture of turf soil and peat in equal proportions (although some gardeners prefer to add a little more peat than soil). Alternatively, you can purchase a ready-made substrate for bulbous plants. But you should not apply organic fertilizers, as the plant may begin to hurt. It is more correct to use phosphorus or nitrogen fertilizers.
Once the planting material and container have been selected, you can begin planting flowers:
- First you need to check the pot for drainage holes. If you don’t have them, which is quite rare, you can make them yourself.
- After this, drainage should be poured onto the bottom of the container. You can use small pebbles or expanded clay.
- Next, the substrate is poured almost to the very top of the pot and watered.
- After this, small holes are made. The distance between the holes is calculated based on the type of flowers. The larger the plant, the greater the distance.
- Then the iris seedlings must be placed in the holes so that the root collar remains outside.
After planting, the flower is watered with settled water and placed in a convenient place where there will be enough sunlight, but not direct, otherwise the plant may suffer. Now it is necessary to create optimal conditions for the normal growth of irises:
- There should be enough lighting, as irises love light. During the growth period, lighting should be moderate, but during the flowering stage you can expose the flower to direct sunlight.
- Temperature. It is advisable that it does not exceed +16 degrees. But it is difficult to achieve such a regime in an apartment. Therefore, if there is a veranda or glassed-in balcony, it is better to place flowers there. It is especially important to maintain this temperature during the flowering period.
- Watering should be moderate. The first time after planting, the flower can be watered once a week. When it grows, it is worth watering as the soil dries out. But during the flowering period it is necessary to water more often - 2-3 times a week. After the irises fade, you need to reduce watering.
- Feeding. The first time you need to fertilize a flower is 10 days after planting in a pot. Feeding is introduced once a week and so on for a month. Only when the flower begins to form buds can you fertilize again. It is necessary to feed until the flowers and yellow leaves fall off.
- Humidity. Iris prefers dryness, so there is no need to adjust the air humidity in the room for it. And the flower does not require spraying.
If flowers were planted in pots in the fall, the plant will bloom in winter or early spring. In order not to be upset that the flower did not take root, it is better to choose dwarf varieties for planting at home, as they are more adapted to room temperature. Immediately after flowering, the peduncles are cut off, and the cut points are treated with activated charcoal or charcoal.
If you have any questions, we recommend watching a video that shows how to plant irises in a pot.
Is it possible to grow irises from seeds?
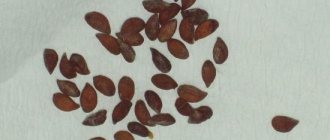
Irises are perennial plants that can be grown by seed, but for this you need to select certain varieties. The seed of a crop, which is collected independently at home, does not always retain its species characteristics. The fact is that different flowers growing nearby cross-pollinate each other. To preserve the varieties, it is necessary to plant different types of iris at a certain distance.
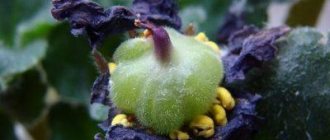
The seed material ripens for a fairly long period, but the triangular boxes can open very quickly, which can cause grains to spill out. To preserve the seeds for planting, each box is tied with a piece of gauze and awaited for complete ripening.
Important! Experts recommend propagating only species-specific irises using seed material.
Iris can be propagated by seed in autumn or spring. It must be remembered that this activity is not an easy one, since the grains of the crop have a number of features, namely, for their germination, stratification must be carried out.
Video: Iris seeds
Autumn is the time to plant bulbs
First of all, we suggest you watch a video on the topic:
Planting features depend on the variety. In temperate climates, iridodictiums, Turkish and Caucasian, as well as their hybrids, take root well and tolerate winter. We choose a dry, open place and dig shallow holes - up to 7 cm. We fill the bulbs so that the soil does not adhere tightly to them, and it is better to add a little sand to its composition. To protect plants from fungal diseases, we pre-treat purchased bulbs with Fundazol or Benlat. In the summer, after the stem and leaves die, we separate the small daughter bulbs, which are necessary for further reproduction.
Landing
Choosing a landing site
For bulbous irises, choose open and sunny areas. Before planting, care must be taken to ensure that the plants are not harmed by strong winds and sudden temperature changes. The soil should be light, well-drained, and rich in nutrients. Soils with a slightly alkaline and neutral reaction are suitable for iridodictiums neutral or slightly acidic soil for xyphiums junos naturally grow on rocky clay areas and light loams are preferable for them.
Plants like cool springs, dry hot summers and snowy winters. Prolonged summer rains, winter thaws, like any prolonged moisture, can provoke illness.
Selection of planting material in the store
Planting material should be purchased only from reliable and trusted stores and garden centers.
For planting, choose smooth bulbs without damage. The color of healthy bulbs should be golden, light brown with a greenish tint. Until planting, they are stored, protected from direct sunlight.
Preparing and processing bulbs before planting
To protect the bulbs from possible infection by fungi, they are treated before planting with fungicides or a 1% solution of potassium permanganate. Then the planting material is inspected and the detached rudimentary leaves are removed.
When is it better to plant - spring or autumn?
Planting bulbous irises
In the Middle Zone, iridodictiums are planted in the fall - in September or early October . The bulbs are buried 7-10 cm into the soil; shallower planting will contribute to the formation of many children at the expense of flowering. The bulbs are placed at a distance of 10 cm from each other. You can put a small amount of mineral fertilizer under each one.
Xyphiums are planted in the spring - in late April-early May, in the southern regions - in March-April . The soil should warm up to 10°C by the time of planting.
Bulbs of winter-hardy hybrids can be planted in the fall so that the plants bloom earlier next spring. The deadline for autumn planting in the middle zone is the second half of October . Earlier planting is undesirable, since xyphium can germinate before winter and die from frost.
The planting depth depends on the size of the bulb; it is equal to their double height - 10-15 cm. The planting norm for large bulbs and broad-leaved xyphiums is 15 pcs. per 1 m², for small bulbs and narrow-leaved varieties - 20-30 pcs. per 1 m².
Iris bulbs from the Juno are planted in late August-mid-September to a depth of 5-8 cm every 15-20 cm. When planting, you need to take care of large roots so as not to damage the renewal buds.
Watering
Caring for bulbous irises
Moisture accumulates in the scales of the bulbs, in dense leaves and peduncles, so the plants are watered moderately, only in dry weather in the absence of rain. Moisture should not be allowed to stagnate around. After watering and drying, the soil is loosened, preventing it from compacting.
Feeding
Irises are fed for the first time . Use nitrogen fertilizers - urea, azofoska or mineral complexes, for example, Kemira. They are scattered over the remaining snow in a small handful around each bush.
During budding, bulbous irises need potassium-phosphorus fertilizers (there should be more potassium in the composition). It is recommended to use water-soluble fertilizers with microelements.
Organic fertilizers - compost, humus are applied in the fall, and fresh manure for bulbous irises is contraindicated at any time of the year, even in the form of solutions.
Disease and pest control
Iridodictiums are affected by a fungal infection - ink spot disease. It actively appears on bulbs during rainy seasons.
Prevention of the disease is compliance with crop rotation. The ideal option would be to change the planting site annually.
For Xyphiums, the main disease is bacterial or wet rot. The fungus lives and multiplies in the soil and on plant debris. Signs of infection are yellowing and drying of leaves. The above-ground part begins to rot, and an unpleasant odor appears. If the infection is severe, the yellow foliage falls to the ground and the plant dies.
In cold and humid weather, xyphiums can be damaged by dry rot, when a dark coating forms on the roots, they rot and dry out.
When planting is dense, there are weeds, or there is a lack of potassium and phosphorus, the leaves of irises become covered with dark spots.
For fungal diseases, fungicides are used: Topsin-M, Vitaros, etc. Diseased irises are dug up and destroyed.
Bulbous irises are very rarely damaged by pests. In exceptional cases, the bulbs are eaten by onion hoverfly larvae, and the bottom is damaged by the onion root mite. For prevention, before planting, the bulbs are treated with Karbofos solution.
Trimming
The leaves of bulbous irises completely die off after flowering, and a time of rest begins. Stems with faded flowers are cut off, and leaves are trimmed without waiting for complete yellowing and drying.
Shelter for the winter
Winter-hardy varieties in the south do without shelter; pruning is enough for them. In the Middle Zone, irises are sprinkled with peat, spruce branches, dry leaves or straw for protection. Topping should not be carried out too early, optimally in the fall before the onset of frost.
Bulb storage
Iridodictiums, junos, as well as English and Dutch xyphium hybrids can grow in one place for 5-6 years. The bulbs of Spanish xyphium hybrids are more capricious, they do not tolerate low temperatures and fluctuations in humidity, so they are dug up in the central zone every year after flowering, this has a positive effect not only on preservation, but also on flowering .
The bulbs are dug up in June-July, when the leaves turn yellow and dry out not completely, but by about a third. By this time, the bulbs ripen and do not crumble when digging the nest.
Planting material is dried for 2 weeks with good ventilation at a temperature of 25-30°C. After this, the bulbs are cleaned, they are separated from the bottom well and without damage and sorted by size. Until planting, the bulbs are stored in a dry place, protected from direct sunlight at a temperature of 18-20°C.
Plant pruning.
Pruning irises after flowering is considered an important procedure. It is needed for the beautiful appearance of plants, and for preserving its strength (not wasted on the formation of seeds).
Correct cutting:
- It is carried out after the irises have flowered.
- Dry flowers are cut off along with the green receptacle.
- The stems can also be cut off completely, but do not remove the leaves!
- In the spring, we remove last year's old dry leaves.
- You can do everything with your hands, or you can do it with scissors.
Spring care for irises is as follows:
- Remove shelters after frost ends.
- We feed either immediately or as the buds appear.
- In the spring we carry out disease prevention.
Homemade irises
How to grow irises at home? This question is also relevant. Dwarf varieties of irises are very suitable for home breeding. And the rules for growing them are:
- Need more sunny color, especially when flowering.
- They need a temperature of no more than 20 degrees.
- You can water once a week, and when flowering - 3 times a week.
- The air needs dry air.
- Feed after a couple of weeks from planting, when buds set and after flowering.
Subtleties when growing.
There are about 800 varieties of iris, some of which are distributed throughout the world. There are rhizomatous and bulbous varieties, Dutch are only bulbous, and bearded and Siberian are rhizomatous varieties.
Siberian.
The hardiest of irises. The name says it all - it can be cultivated all the way to Siberia. They need:
- Abundance of warmth and light. This is especially true in the northern regions.
- The soil is neutral or slightly acidic, without excess moisture.
- At the beginning of spring and when the buds set, fertilizing is required.
- Cutting off old leaves and faded flowers.
- When planting irises in Siberia, the depth of their planting in the ground is at least 7 cm.
Ensiform or Japanese irises.
They are also considered unpretentious, although heat-loving, species. Agricultural technology for planting:
- Lots of sunshine.
- 2-3 single feedings per season. Both mineral and organic preparations are suitable.
- In the middle or northern regions of Russia, shelter for the winter is mandatory.
- Pruning is recommended in autumn.
- During planting, we deepen the roots by 6 cm or no less. Then they won't die in winter.
Mesh.
Bulbous varieties. Recommended planting in early autumn. The landing procedure is standard. Care features:
- The soil needs to be light, nutritious and permeable.
- You need plenty of sunlight.
- When watering, stagnation of water is not recommended. Abundant watering will be good only in drought; when buds set, the soil needs to be moist.
- We fertilize with minerals and compost.
Dutch.
These are varieties with medium-sized bulbs. It is better to plant by the end of summer; autumn colds have a bad effect on them. What you need from care:
- Abundance of light.
- Water only during a long drought, otherwise they may die (if the soil is wet all the time).
- We definitely dig it up for the winter.
Swamp.
This type is ideal for decorative ponds in summer cottages. In this regard, he has his own characteristics in care. It is planted at the end of summer - beginning of autumn. But he prefers areas that are heavily moist and even swampy. The marsh type of iris is practically the wild iris.
Care:
- Sunlight in abundance.
- Very wet soil.
- Wind protection.
- Loves feeding, especially in the fall before winter.
- Cutting leaves in autumn.
- He is not afraid of frost, so shelter for the winter is irrelevant.
Bearded.
The most popular and beautiful of the entire iris family. They are best planted in mid-summer. The area for them must be chosen dry and moisture-permeable; they do not like moisture very much. The soil is slightly acidic or alkaline. He does not like heavy and clay soils.
Care:
- We water only in severe drought.
- Loves the light very much.
- At the end of the season, cut off the old leaves.
- Shelter for the winter; it is a must for vigorous growers.
Fertilizing three times a season - in the spring with nitrogen, during buds and in the fall - with potassium and phosphorus preparations; bearded irises will also be grateful for humus and compost.
Germanic.
In terms of care they are very similar to bearded ones; our German gardeners also greatly respect them. It can be planted from spring until autumn. They require neutral/slightly acidic soil and always permeable. Watering - only during drought, fertilizing - three times a season. It can also be planted in pots.
Short.
They are also called border/dwarf species. These are miniature bearded irises. They range in height from 20 to 40 cm, not higher. They are very easy to care for and look very decent in mixed borders or along borders.
Care:
Plant them in a sunny place; the soil needs to be slightly acidic/neutral and nutritious, without moisture stagnation.
- When planting, we do not deepen the roots too much.
- Three times a year - feeding.
- Thin-leaved species.
- A simple and tenacious crop, they are not afraid of frost or drought. Care is as follows:
- Watering - only during drought.
- We plant from spring to autumn.
- Feeding is a standard scheme.
- Needs excess sunlight.
If you were given freshly cut irises or you collected the bouquet yourself at the dacha, here are a few recommendations to make it last longer in a vase at home:
- Place the vase in a cool place.
- Change the water there every day.
- Spray.
- Rinse the vase periodically with hot water.
- Keep the vase away from heat sources.
Do I need to dig up irises for the winter: how and when
If you have planted bulbous irises, but do not know which species they belong to, it is better to dig up the bulbs and store them in the house or in a cool room. All Dutch varieties require long, warm summers, which is a little difficult for our climate. It is quite possible to extend the growing season; to do this, it is enough to start germinating the bulbs 3-5 weeks before planting, and in the fall install a temporary shelter over the bushes. Only with the onset of cold weather should you dig up bulbous iris for the winter. This simple but very effective method allows each bulb to form a flower bud. Despite best efforts, some varieties may refuse to bloom the following season. They should be relegated to container plants. The containers can be placed in a warm, illuminated place much earlier, moved to the garden in the summer, and with the onset of cold weather left in a warm room where they can complete their development cycle.
It is impossible to say the exact time when bulbous irises need to be dug up. It all depends on climatic features and specific weather conditions. In very warm climates, this procedure can be abandoned altogether; it is enough to cover the plants well in case of a snowless winter. In other situations, you need to focus on the soil temperature. When the temperature reaches 5-7 degrees Celsius, you can dig up the iris bulbs and lay them out for drying. If there are green leaves left on the bushes, it is strictly forbidden to cut them off, just like living roots, they must dry out on their own.
Some rhizomatous varieties do not have high winter hardiness, but their flowering is mesmerizing. You can grow them in harsh climates if you dig up the irises for the winter and put them in storage.
Japanese, Siberian and Louisiana irises are more moisture-loving than other types. It is better to leave them to overwinter in ordinary flower pots or any other suitable container. In the fall, after the plants are dug up, the roots are shortened, then slightly dried, then planted. In spring, it is enough to transfer the irises to open ground.
Flower propagation
Propagating irises is not difficult. This happens in open ground, and can be done in several ways.
Seeds
Propagation of irises by seeds is quite acceptable. But, it can only be used to obtain wild species or for breeding work to obtain new varieties of plants. Cultivated varietal irises with this type of propagation lose their special characteristics.
If planting with seeds is carried out in the fall, then after spending the winter in the ground, they are stratified naturally, and in the spring they produce beautiful, friendly shoots .
When planting in spring, it is necessary to carry out stratification under artificial conditions. To do this, the seeds need to be soaked and mixed with coarse sand treated with potassium permanganate. The mixture is placed in the refrigerator for several weeks. After this, you can sow irises. Stratification is an imitation of natural wintering conditions, which promotes better germination and germination of seeds.
Dividing the bush
Before dividing the bush, the plants need to be watered well . After this, they are carefully dug up and pulled out of the soil. The rhizomes are washed and dried. Then they are divided into parts with a sharp knife, each of which must have at least one annual link.
The prepared planting material is disinfected with a solution of potassium permanganate and dried again, possibly in the sun. The leaves and roots are trimmed; it is enough to leave up to ten centimeters of their length.
Seedlings prepared by this method can be stored in a dry room for up to half a month.
Caring for irises
Rhizomatous irises require minimal care. At first, weeds are pulled out by hand, since the root system of flowers is located at the very surface of the soil. You also need to loosen it carefully. When bearded irises grow, weeding and loosening will no longer be necessary.
Bulbous species require more care. In autumn, yellow leaves and those with brown spots must be removed. In exotic species, leaves are cut to half their length. At the end of autumn, heat-loving varieties are covered. In early spring, hurry to remove the “blanket”.
Withered flowers are always removed by cutting off the peduncle as close to the rhizome as possible.
Faded flowers need to be removed
Watering
In dry summers, water blooming irises in the evening , making sure that water does not get on the flowers.
Caring for irises
In windy places, tall irises are tied up: the flower stalks can break under the weight of the flowers.
Feeding
Protection from pests and diseases
- You can spray irises against pests once every 2 weeks (if necessary). Treatments are most effective 6 weeks before flowering. Usually this is not necessary; pests are not the main enemy of irises.
- If rot appears on the rhizomes, it must be cleaned out to healthy tissue, then treated with a special solution. Then the rhizome is dried all day in the open air, turning over occasionally. The soil from the place where the iris grew is removed.
Disease and pest control
Diseased plants are recognized by spots on the leaves, wilting, and a small number of buds. Fungal infections can be controlled by using fungicidal solutions. Plants should be treated for diseases three times with an interval of 7-10 days. Among the drugs that will be effective are “Fundazol”, “Fitosporin-M”, “Quadris”.
If bacteria have infected the root system of irises, it is better to dig up the plant and examine the bulb. Damaged areas are cut off with a sharp knife, and the bulbs are washed in a concentrated solution of potassium permanganate. The sun's rays work well against bacteria.
It is necessary to rake the soil around the stem and leave it under the influence of ultraviolet radiation for several days.
Caterpillars of cutworm butterflies attack the leaves of irises. Voracious larvae can leave plants without leaves and flower stalks. The drug "Granozan" helps save irises from butterflies. Thrips accumulate in the leaf axils, causing enormous damage to ornamental crops. They are fought with the help of treatment with Karbofos. In rainy summers, slugs plague flower plantings. To protect against them, you should sprinkle the soil between the rows with superphosphate or wood ash.
Difficulties in growing
In order to fully answer the question of how to properly grow irises, it is still necessary to provide some information. Any plant can be affected by parasites or diseases, and irises are no exception. There are unsuitable growing conditions, which provoke the occurrence of certain problems.
Possible diseases.
Irises can be affected by both viral and fungal infections. Indeed, there are different diseases of irises. But fighting them will allow the plant to remain healthy. Here we will tell you how you can fight them and what they are like in general.
Mosaic - it is carried by aphids.
It appears as characteristic stripes and spots on the foliage. A cure for mosaic has not yet been found, so it is worth focusing on prevention, which includes the following measures:
- Immediate removal of infected plants.
- Proper agricultural technology and pest control with Confidorm or Actellik, etc.
Bacterial rot.
Appears as spots on brown leaves. It may appear in the spring, immediately after wintering. The affected areas are immediately removed, and the leaves are treated with potassium permanganate. If you notice the disease late and it has already progressed, it is easier to immediately remove the entire plant and spray the soil with antibacterial compounds.
This disease occurs under the following conditions:
- Dense landing.
- The soil is too wet.
- The roots froze over the winter.
- The plant lacks phosphorus and calcium in the soil.
Gray rot.
It affects either the roots or leaves and stems. Stagnant water in the soil contributes greatly to this. Good drainage in the area is the key to preventing gray rot. But this does not apply to marsh irises. Also, do not allow a deficiency of potassium and phosphorus in the soil, this can also cause disease. Gray mold is treated with fungicides, but plants that are severely affected by the disease are best destroyed immediately.
Pests - insects
The most common of them are:
- slugs
- iris fly.
- thrips.
- scoops.
- mole crickets.
The iris fly or flower fly is very similar to an ordinary fly. She infects the iris buds with diseases, she simply feeds on them. The buds then rot; to prevent this, you need to treat the budding buds as a preventive measure with Aktara or Aktellik.
Cutworms are a dangerous pest, they eat away at the base of the flower and then it turns yellow, even to the point of death, and even provokes bacteriosis. Karbofos is a reliable method of fighting armyworms.
Slugs not only eat leaves, but also spread bacterial rot. The soil must be treated with superphosphate, and the slugs themselves must be collected manually. Weeding also gives good preventive results.
The mole cricket is a common insect in the south of our country, and it is not at all uncommon in the middle zone. It damages both the roots and bulbs of irises, causing irreparable damage to the flowers. You can fight it with crushed shells sprinkled with sunflower oil, or you can also pour a soap solution into the mole cricket’s holes. Plant marigolds nearby, they are great at repelling this pest.
Thrips are small but very dangerous insects. If they colonize the leaves of irises, they will dry out and turn yellow. Then the thrips will move onto the buds and as a result they will not open. Karbofos and laundry soap help. You can also use insecticides - Actellik, Aktara.
Other problems
Sometimes it happens:
- The leaves are wrinkled - bad weather conditions, it will go away on its own with time.
- Scanty or sluggish flowering - little sunny color or very acidic soil.
- Stopping flowering - the soil is depleted, the buds are frozen, pests are frozen, the roots are overgrown, there is little moisture during drought.
- Yellow/brown spots on the foliage - heavy rainfall or frequent watering. It is better to cut off such leaves immediately.
- Prevention - in the spring or a month or two before flowering, treat irises with fungicides.
IRISES NEED GOOD CARE AFTER PLANTING IN OPEN GROUND
All irises (except Japanese) are quite drought-resistant. They accumulate moisture in the roots and therefore can do without it for a long time. But the soil around them should always be moist and loose. During the flowering period, water more often. It is recommended to water in the evening, making sure that drops of water do not fall on the flowers and leaves.
Irises are fed three times per season: in the spring, the plants are given nitrogen nutrition (urea solution or infusion of cow dung in a ratio of 1:10). In summer they give nitrogen-potassium fertilizers, and in autumn - potassium-phosphorus fertilizers.
After flowering ends, all dried leaves and flowers are carefully trimmed. Bearded miniature and medium-sized ones, as well as Siberian irises, do not cover for the winter. The rest are mulched with dry leaves and covered with spruce branches.
Outdoor care
Planting and care in open ground involves not only the correct choice of time for planting and soil preparation. Once the plants are established, they should be cared for during flowering. In early varieties, the first flowers form in May, and in late varieties - in June.
First of all, bulbous irises need feeding and protection from pests. Watering is no less important for flowers. Naturally, during the rainy season, irises are watered less often. It is necessary to carry out irrigation more actively in dry years, and water the plants in the evenings.
Feeding
It is necessary to choose the right time for fertilizing. In the spring, this is done after the snow has melted and the top layer of soil has completely dried out.
For fertilizing, you can use ready-made solutions and dry universal mixtures, for example, “Reasil” or “Good Power”. To do this, you need to spread the amount of fertilizer recommended by the instructions on the top layer of soil, after which it needs to be loosened. However, care must be taken to ensure that the roots are not damaged during this operation.
As a possible course of feeding for hybrid irises not in the first year of flowering, we can propose the following scheme, consisting of three main stages:
- nitrogen, potassium, phosphorus (2:3:1) - in the spring on dry soil;
- the composition is similar, but here the ratio (3:3:1) is observed - at the moment of bud formation;
- potassium, phosphorus (1:1) – one month after the start of flowering.
If during care you fertilize in a timely manner and in the right doses, then in the spring the Dutch irises will demonstrate all their attractiveness, rapid growth and long-lasting flowering. The gardener should pay special attention to the moment when the flowers form flower buds. If you feed the irises at this stage of life, then next year the flowers will delight the gardener with lush, full-fledged flowering.
You need to be especially careful when using nitrogen. An excess of this element often causes “fatification” - a process in which leaves grow vigorously, as a result of which the plant does not have the strength to bloom.
Protection from pests and diseases
Despite the short flowering period, the cultivation of bulbous irises is accompanied by protective measures. To prevent the appearance of uninvited parasites, plants should be routinely sprayed every two weeks.
It is necessary to start from the period when the leaves reach a length of 10 cm. Usually they use “Malathion” (helps against herbivorous mites) or universal pesticides. When buds begin to appear, treatment is stopped.
The most common disease in irises is a disease of the roots and bulbs - bacteriosis, which causes rotting of individual parts. The plant is dug up, diseased parts are removed, washed in potassium permanganate and transplanted to another place.
How to identify disease in bearded irises? Usually a healthy plant has a bunch of 7-9 leaves, while a sick plant can have no more than 5. There is a problem with the formation of flower buds. For treatment, the plant is dug up, cleaned of rot and insects, and treated with an antiseptic. If irises are affected by thrips, the natural waxy coating on the leaves is disrupted.
Prevention consists of proper preparation of the bulbs for the next year - removing the old stem along with leaves, peduncles and flowers, in which harmful insects may remain.
Preparing for winter
With the arrival of autumn, the leaves that have turned yellow and were affected by brown spots must be cut off; the green leaves can be left - they will become a natural protection for the tubers from the cold. With the onset of the first cold weather, it is better to cover those varieties that do not tolerate frost well with fallen leaves or cut parts of other plants, for example, chrysanthemums. When spring comes, the leaves are removed.
Reproduction in Siberia and the Moscow region
Irises are able to grow in different climatic conditions. You just need to choose suitable varieties that do well in the Moscow region or in Siberia. Such irises should be unpretentious and hardy.
The Siberian group of beardless irises is perfectly adapted to grow in cold climates. Varieties: Hubbard, Queen Show, Teal Velvet. Among the bearded representatives: Ruby Morn, White Moth, Hang Glider and others.
Zoned varieties of iris are suitable for the Moscow region. Among the bearded varieties, the following are suitable: Snow Waltz, Lilac Glory, Yasnaya Polyana and others. Of the Japanese representatives of the Iris family, it is better to grow those varieties that were bred in Russia.
Siberian irises reproduce well by dividing the rhizome. A part of a one-year-old rhizome (2-2.5 cm), on which there are 3-4 sprouts, is used. The plant will take root well and overwinter, but will bloom only the next year.
It is better to propagate Siberian irises in early spring or late August. In the Moscow region, irises are also propagated mainly by vegetative methods. You can divide bushes in the southern Moscow regions for 3-4 years, and in the northern ones (for example, Sergiev Posad) - for 4-5 years. You can plant cuttings in early spring, summer, early autumn.
The world of irises is very diverse. A wide selection of varieties allows you to grow iris and admire their beauty even in cold Siberia.