Calla zantedeschia (calla zantedeschia) is a perennial with arrow-shaped large leaves, a tuberous rhizome and an inflorescence in the form of a cob, shrouded in a blanket - a covering leaf. The blanket protects the flower and at the same time attracts pollinating insects.
The plant is highly decorative - rich green foliage effectively sets off the graceful flowers. There are varieties with light specks on the leaves, and the variety of colors of the inflorescences can surprise anyone - in addition to the classic white ones, there are pink, yellow, purple callas, with and without a border. Interspecific hybrids have an orange and cream cover, and breeders have transformed the pink tones into purple and carmine.
Origin of calla lilies
Calla lilies came to Europe from the tropical regions of South Africa, where they grow wild in swampy meadows, along the banks of lakes or rivers and reach very large sizes.
Flowers can be divided into 2 groups:
- white, the origin of which is established from the Ethiopian calla lily, voluminous bushes grow up to 1.5 m in height;
- colored, of various bright colors, bred from the pink-red variety Remani and the yellow-golden calla Eliott. The height of their bush is approximately 0.5 m.
How to grow calla lilies from a bulb at home
Tuberous hybrid callas of various varieties can be grown as indoor flowers in pots and as garden flowers . Graceful calla lilies flowers framed by lush greenery are a wonderful decoration in the house and in the flower bed. The feces will bloom for at least a month, and the bright greenery will remain until autumn, but then the tuber of the plant goes dormant until spring.
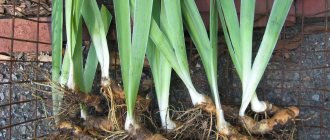
Tuberous calla lilies should not be confused with rhizomatous white or Ethiopian calla lilies . White callas come from Africa, where they grow along the banks of rivers and reservoirs, preferring damp areas, so this species has its own requirements when growing.
Tuberous calla lilies are basically hybrid plants created from two species - Eliot's calla lilies and Remenni's calla lilies . Varieties of calla lilies can have leaves of a single green color or with white speckles, as well as their flowers, or rather the bracts have different colors - yellow, pink, lilac, violet with the iridescence of several shades. Every year, the selection of calla lilies is replenished with new flower color options.
Types and varieties
All calla flowers, regardless of the variety, look unusual in appearance: on the arrow, 50 to 80 cm long, there is a yellow peduncle, similar to a candle, it is enveloped by only one funnel-shaped petal, which is called a veil. Very small inflorescences are located on the peduncle and emit a very subtle sweet aroma (growing in open ground).
The first group is rhizomatous ; their root system has neither nodules nor bulbs. White Ethiopians are very moisture-loving; they do not shed their large glossy leaves even during the dormant period, so the plant always remains decorative. They have high lighting requirements during active growth and the dormant period.
Their most common varieties are:
- Green goddess - up to 90 cm high, giving green bedspreads of unparalleled beauty;
- Pearls - bushes up to 0.5 m high;
- Nikolai - tall, with dark leaves, the cover is green below, gradually turning into white.
Plants of the second group are bulbous .
Green goddess
Black and purple
Chameleon Indian summer
Black-eyed beauty
Vermeer
From the Remani calla series, the varieties that are most in demand are:
- Evening - with a satin bedspread of an unusually beautiful black and purple color;
- Chameleon - low bushes, peach-colored cover with golden tints;
- Indian summer - these calla lilies have a garnet red cover.
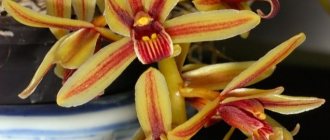
The most popular varieties from the Eliott calla series (these varieties have spotted leaves):
- Black-eyed beauty is a cream-colored flower with a slight lemon tint;
- Vermeer - has a slightly corrugated cover, white with streaks on the outside and red-lilac with a transition to dark purple inside.
7sotok.by
The content of the article:
1.Description of calla
- Features of the plant.
2.Planting callas in open ground.
- Planting material.
- Place and soil.
- Planting pattern and features.
- Neighborhood with other plants.
3.Care for callas.
- Watering.
- Feeding.
- Soil care.
- Trimming.
- Care after flowering and preparation for winter.
4. Diseases and pests of calla lilies.
5.Storage of calla tubers.
6.Methods of reproduction of calla lilies.
- Seeds.
- Tubers.
- Dividing the bush.
7. Popular varieties of calla lilies.
Garden callas are popular crops in floriculture, which many call solemn and majestic. They are often used in marriage ceremonies and are considered wedding flowers. Delicate and delightful representatives of the flora can grow indoors and outdoors. Even an ordinary flower lover with little experience can grow these spectacular plants. To do this, it is enough to master basic knowledge about planting rules, basic care and show maximum attention and care.
Description.
Calla lily, as calla lilies are sometimes popularly called, belongs to perennials from the Araceae family and in natural conditions feels excellent in the marshlands of South Africa, on the coasts of water bodies. The plant consists of a segmented root system with long and powerful roots (up to one meter in length), very large light or dark green leaf plates with a smooth glossy surface, smooth edges and pointed apex, single inflorescences on long peduncles with an elongated stamen and one large petal - a blanket in the form of a bag. Depending on the type and variety, the height of the crops starts from twenty-five to thirty centimeters and can reach one to one and a half meters. Due to such diversity in height and color, calla lilies are in demand in the design art of decorating various areas in the garden and in household areas. They fit perfectly into various plant compositions, look impressive in the foreground and background, in the center and along the edge of the flower garden, in single plantings.
Features of the plant:
1.Small flowers, collected in an inflorescence - a spadix, have a unique pleasant aroma;
2. You will have to wait thirty and sometimes forty days for the emergence of seedlings after planting; sprouts will appear only after the root part has formed;
3. Droplets of water that periodically appear on the leaves and flowers warn of possible precipitation in the form of rain;
4.The flowering period lasts throughout the summer, and each flower pleases with its beauty for about one month.
Planting in open ground.
Planting material.
You can plant regular or sprouted tubers in open ground. If you take tubers without prior germination, this will affect the beginning of flowering. You will have to wait much longer for the first flower stalks. Therefore, planting material purchased or prepared in the fall is first sorted out, only the healthiest and most undamaged medium-sized specimens are left, they are treated with disinfecting solutions and planting work begins. Tubers with signs of rotting or drying out varieties are not recommended for use.
Place and soil.
When choosing a permanent growing location, it is worth considering that in an open sunny area without a hint of shade, there will be few flower stalks, and the foliage will develop very actively and look bright, in rich green shades. Light shading in the first or second half of the day will lead to more lush and full flowering and a large number of inflorescences. You can choose open areas near a pool or artificial pond as a golden mean.
The main requirement for the composition of the soil is that it must be acidic. The optimal composition of the soil on the site is leaf and turf soil, peat and coarse sand. Two weeks before the planting process, fertilizers (mineral complex) are applied to the soil - about forty grams per meter of land area.
Planting pattern and features.
Favorable time for planting is the first half of May. The distance between the planting holes is thirty centimeters, the depth of each of them is no more than ten centimeters. Each tuber is placed in a hole, sprinkled with soil and moistened generously. There is no need to water for ten days after planting.
Reference! You cannot press the tubers into the ground; this will lead to their damage and lack of growth in the future.
Neighborhood with other plants.
Callas love freedom, so they will oppress short-growing companions in the flower garden, and they themselves will not feel comfortable near tall crops. Plants with a large root system are generally not recommended to be planted near calla lilies. Their powerful roots will interfere with the full growth and development of each other and, as a result, someone will have to retreat, possibly die. Neighborhood with other crops is acceptable at a distance of at least sixty to eighty centimeters.
Care.
The basis for proper care of callas is: sufficient light and heat, timely supply of moisture and fertilizers, weeding and loosening of the soil.
Watering:
This is surprising, but the water-loving flower absolutely cannot tolerate excess water. It should be watered moderately and regularly; the soil should not dry out. Excess moisture will lead to root rot and death of the bush. You don’t have to water the plants at all until the sprouts appear. The exception is dry and very hot days with high air temperatures. The frequency of watering in the future is two or three times a week. Spraying is not recommended.
Since callas love acidic soil, it is recommended to water them twice a year with acidified water. To do this, dissolve a tablespoon of citric acid in a liter of warm water and add the prepared solution to a bucket of irrigation water.
Feeding:
On fertile soils that are fed with complex mineral fertilizers before planting, additional nutrition is not required for flowers. In other cases, every two to three weeks the crops are fed with special fertilizers for bulbous plants. You can take the liquid “Good Power” or the dry “Gumi-Omi” and apply it strictly according to the instructions.
Soil care:
To keep the soil between the plantings light and loose, it is recommended to plant earthworms in it. This natural process for them will eliminate additional loosening, and the plant’s roots will receive a sufficient amount of oxygen. If this is not possible, then you will need to loosen and weed the soil after each watering.
Important! To prevent weeds from interfering with the development and growth of flowering crops, you need to get rid of them at a distance of one meter from each calla lily.
Trimming:
To maintain decorativeness and stimulate further growth, it is recommended to trim the flower stalks immediately after flowering.
Care after flowering and preparation for winter:
When the long flowering period has come to an end, the plants continue to live and develop, and watering should be continued. But their volumes are significantly reduced and gradually reduced to zero. Around the end of September, the plants, along with the above-ground part, are carefully removed from the ground, the tubers are shaken off and left in a cool room with a temperature of five to ten degrees until the leaves and shoots completely die off. When all the nutrients are transferred to the tubers (within about two weeks), the above-ground part is cut off, and the tubers are dried and sent for storage.
Diseases and Pests.
The high resistance of flowers to diseases and pests prevents them from having such problems. The exception is rotting of tubers, which can occur if the irrigation regime is violated. In this case, the plants are treated with fungicides and the volume of watering and their frequency are reduced.
Storage of tubers.
You can store tubers in several ways:
1. An ordinary household refrigerator, in a cardboard box or paper bag, on a shelf or in a drawer for vegetables and fruits;
2. In the refrigerator (in a box), but covering the planting material with moss;
3. Individual paper bags in a basement or cellar at a temperature of five to twelve degrees;
4. Small tubers can be planted in pots with a light substrate and left in the cellar until spring.
Reproduction methods.
By seeds:
This method is considered ineffective due to the low germination of seed material. Most often it is used in breeding work or as an experiment at home.
The seeds are soaked in any biostimulant or potassium permanganate solution for three to four hours, washed and laid out on a plate covered with a natural damp cloth. The seeds are covered from above with the same damp material. For a week, the seeds are kept in such conditions in a warm room, the fabric is periodically moistened, not allowing it to dry out completely. The germinated seeds are planted in boxes with a soil mixture and seedlings are grown.
Tubers:
Tubers are planted immediately in open ground in early June or germinated before planting in a flower garden in pots on a windowsill. Germination begins approximately at the end of March - beginning of April at a temperature of twenty to twenty-two degrees.
Dividing the bush:
For propagation by dividing the bush, only those species and varieties that have a tree-like root part are suitable. When dug up in the fall, such bushes are divided and the divisions are planted in large flower pots. Until spring, they are kept in conditions of high humidity and moderate temperature (no more than fifteen degrees), watered as needed. In May, plants can be transferred to open ground.
Popular varieties of Calla.
Chameleon.
A tuberous compact variety with orange-yellow bracts that changes color depending on the amount of sunlight and the angle of refraction of the rays.
Pearl.
A short, very fragrant variety (no more than fifty centimeters) with white inflorescences for indoor growing.
Amethyst.
An incredibly beautiful and very fragrant variety with a blanket of purple and lilac shades and emerald foliage.
Nikolai.
A rhizomatous variety with a one and a half meter peduncle, arrow-shaped green foliage and a white bract of large diameter.
Black-Eyed Beauty.
A delicate, fragrant variety with black stamens, creamy lemon bracts and spotted leaves.
Evening.
A tuberous variety with inky black flowers with a smooth satiny surface and a delicate aroma.
Sunshine.
An unpretentious variety with a pleasant vanilla aroma, lush green foliage and yellow flowers with a waxy surface.
Vermeer.
A low-growing variety characterized by lilac-white wavy bracts. Used for open flower beds and indoors, winter gardens and balconies, for arranging bouquets and decorating festive halls.
Indian Summer.
A variety with bright shades of a flower blanket, combining garnet, red and ruby colors.
Cantor.
A luxurious variety used for garden landscaping and for cutting. It differs from others in its burgundy-black bracts and large leaf blades with small splashes of white.
Calla lilies on a plot near the house are an endless aesthetic pleasure, a worthy decoration and a reason for pride, and also a symbol of family happiness and prosperity, good luck and success. These ceremonial flowers will always evoke only positive emotions and charge everyone around with positive energy.
Ensuring proper fit and care
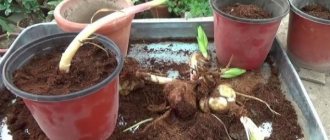
Flower growers who already have their own planting material and dig it up for the winter, take out the tubers after winter storage and carefully examine whether they are healthy. A disinfection procedure is required - soaking the tubers in a manganese solution for several hours.
Next, they are planted in containers slightly larger than the tuber size. It is not recommended to place them immediately in pots that are too large; in this case, all their growth energy will be directed to the development of the root system.
Calla lilies like soil that is sour or slightly acidic; the following composition would be best suited for them:
- sand – 1 part;
- peat – 1 part;
- leaf soil - 1 part;
- turf soil - 2 parts.
It wouldn’t hurt to add a little superphosphate and complex microfertilizers to the soil you prepare yourself.
Having placed the treated tubers in the prepared soil, place the containers in a bright place, start watering after a week, make sure that the soil is always moistened, but you should not get carried away with excessive watering. In 15–20 days the buds will wake up and begin to grow. With the appearance of leaves, you need to water abundantly (taking into account good drainage).
You should try to ensure the daytime temperature is within 20–23°C, and the night temperature is 15–18°C.
If the flowers have been stored and transplanted into new flowerpots, they should be brought into a warm, bright room in early or mid-March and started to be watered, thus interrupting the dormant period. Flowers need to be accustomed to sunlight gradually.
During the growing season, callas require a lot of diffused sunlight. It is better to protect the plant from direct rays. The ideal place for it would be a windowsill, where the sun hits only in the afternoon.
Watering for growth and flowering requires moderate but regular watering. In hot, dry summers, the volume of watering will need to be increased. The large leaves of the flower evaporate a lot of moisture, and daily spraying will only benefit them. It is important to prevent water from getting on the bedspread.
Considering the origin of white callas, they are provided with abundant watering. And yet, water stagnation should not be allowed.
If fertilizer was not added to the hole before planting, during the growing season the flower can be fertilized 1 or 2 times a week with complex fertilizers for flowers.
The fertilization period should be stopped after flowering, at which time watering is significantly reduced.
Peculiarities
For long and abundant flowering, calla should rest for 2 months a year. The rest of the time is spent growing and flowering. The dormant period for plants occurs at different times, especially when kept in an apartment.
To organize a dormant period for the plant, it needs to be watered less often after flowering, and then almost stop watering . The leaves of the plant turn yellow and dry out, and it goes into a dormant state. Some gardeners do not stop watering and fertilizing after flowering has ended. This way it is possible to achieve a second flowering in the season, but after this a period of rest is already necessary for the plant.
Their dry leaves are cut off and the pot is removed to a cooler and darker place. After the rest is over, they are transplanted to new land. Now it is important to properly awaken the plant so that it begins to grow intensively and blooms soon.
Experienced gardeners recommend waiting until the plant wakes up on its own , and immediately after transplanting, water it well with water acidified with lemon juice. For 0.5 liters of warm water you need a few drops of lemon juice. As a rule, new leaves appear within 1-2 weeks.
Purchased planting material
For those who have just decided to get this exquisite flower, planting material can be purchased in flower shops from the end of February.
Calla lilies tubers
When purchasing tubers, it is important to pay attention to appearance:
- The density, elasticity and freshness of the root (reminiscent of young potatoes) will indicate their healthy condition Purchased in this condition, they will throw out an arrow - a peduncle - in the year of planting. It is better not to purchase wrinkled, limp tubers;
- The larger the tuber , the more arrows it will produce. The best sizes to buy are over 7 cm in diameter.
After you bring the tubers home, they should be laid out in a cool place for a couple of weeks until the dormant period ends. In the middle - end of March, the dormant period is interrupted, the tubers are planted in pots for seedlings.
The flower must be planted correctly, the tubercle on the tuber should be located at the top.
When is the right time to replant calla lilies?
The first transplant can be carried out when the seedlings are well rooted. Plants are transplanted into larger pots.
Flowers grow quickly, so after each flowering calla lilies must be replanted, separating new shoots from the rhizomes and the formed nodules from the tubers. If this is not done, very soon the plant will not have enough air and nutrition, the leaves and flowers will become smaller, the calla will become weak and susceptible to disease.
Each time you need to replant it into a larger pot, preparing a special slightly acidic, well-fertilized mixture.
A flower purchased as a seedling in a store should be immediately transplanted into a larger pot, having prepared suitable soil for it.
How to transplant calla lilies at home?
The first transplant should be done only after the seedlings have strengthened. A tall and wide pot is suitable for this. Sand drainage is placed at its bottom and filled with nutritious soil. After this, you need to make holes in the soil into which the sprouts and roots are placed.
During this operation, it is advisable to treat the roots of the seedlings with a biogrowth stimulator. But this must be done very carefully in order to avoid harming the fragile flower sprouts. After transplantation, the plant is carefully watered with distilled water.
If the calla lily was purchased in a store, it should be immediately transplanted into a larger pot at home. The most optimal soil for this flower is slightly acidic soil. You can make it yourself using leafy soil, peat, and a small amount of sand. It is best to replant adult plants in late autumn, in November.
How is it possible for a flower to reproduce?
At home, the reproduction process is vegetative, that is, rhizomatous species reproduce by dividing the roots of the mother bush; in tuberous plants, young nodules are separated from the main tuber.
Reproduction by dividing the bush
When replanting a root in the fall after flowering, you need to separate part of the rhizome with the offspring from it and place it in a container with a nutrient mixture for rooting.
After this, transplant it into a separate pot with soil; there is no need to water it for the first week after transplantation, then you need to provide watering that does not allow the soil to dry out, and in the spring it can already be planted as an independent plant.
Reproduction by dividing the bush
Propagation by tubers
You can determine by the tuber whether it is ready for division: first, the small nodules are tightly attached to the mother bush. As the plant develops, the children develop isthmuses.
As they mature, the isthmuses become thinner and break off easily; only at such maturity can the bush be propagated and the separated parts grown as independent ones. If children are separated forcibly, by cutting them off, rotting may begin at this place.
Common mistakes gardeners make
Every gardener, when growing calla lilies, expects long-term flowering from it. But there are times when the plant does not bloom and its leaves turn yellow and dry.
Why doesn't calla lilies produce flower stalks?
Poor short flowering or its absence is associated with many factors:
- frequent rearrangement of the pot;
- too big a pot;
- poor lighting;
- non-compliance with the rest period;
- a large number of daughter bulbs;
- irregular fertilizing with phosphorus-potassium fertilizers.
Calla lilies' leaves turn yellow and dry out
Yellowing and drying of foliage occurs due to improper care. This may be due to the following points:
- improper watering;
- hypothermia of the soil;
- diseases and pests;
- low air humidity;
- lack of micronutrients.
Caring for calla lilies at home does not take much time and effort. By following simple growing rules, the plant will acquire healthy greenery and will bloom for a long period. Blooming calla lilies will become an indispensable addition to any interior, and when grown in open ground, garden calla lilies will harmoniously fit into a rock garden or flower garden.
What diseases are calla lilies susceptible to?
When the air temperature rises, inexperienced gardeners sometimes over-water the flowers; from such care they suffer from wet rot of the rhizomes or bulbs , and the bases of the leaves also get affected. The disease can quickly spread to neighboring callas, so the affected plant should be removed without delay. In order not to breed wet rot, it is necessary to regulate the air temperature and watering.
The plant may suffer from gray rot if the planting material has been infected. Before planting, preventive disinfection must be carried out.
Brown rot affects the flower when heavy watering is carried out with enhanced nitrogen fertilizers. When the disease appears, watering must be stopped, the layer of wet soil around the bush must be removed and covered with dry soil.
Pest protection
Spider mite
If unnaturally twisted leaves are noticed on the plant, and the flower is covered with a sticky coating, aphids have begun to attack the calla lily . If they are detected, you will need to treat them with a chemical preparation against aphids, or try to fight them using one of the traditional methods: spray or thoroughly wash the leaves with a solution of laundry soap.
Calla lilies also like to be attacked by spider mites , which can only be detected after tiny yellow spots or dried areas of leaf plates are noticed on the leaves. To prevent mites from appearing on flowers, calla lilies must be doused with water during dry periods. If a mite has already appeared, treat the plant with Fitoverm or Vertimek.
Fertilizers, pests and diseases
During flowering, the plant needs feeding with solutions of organic and phosphorus fertilizers. More nitrogen fertilizer is required during growth. There is another important point that should be taken into account - the less light and heat the plant receives, the less fertilizer needs to be added to the soil.
Often tuberous callas suffer from aphids and spider mites . At the same time, the flower begins to turn yellow, the leaves curl and die. The insectoacaricide Fitoverm will help revive the plant. The drug is of the third class of danger, therefore suitable for treating indoor plants.
Bacterial rot, which sometimes affects the plant, is very difficult to treat. Measures to counteract this disease are mainly preventive - systematic treatment of tubers for the purpose of disinfection. What to do if rot has already affected the plant? It is necessary to remove damaged stems, bulbs and roots, then treat the flower with an antibacterial drug and replant it in fresh soil.
Some useful tips
- Callas begin to produce leaves only after their underground part has formed - in healthy tubers, the first foliage appears two to three weeks after planting; in weak plants, you will have to wait a month or more for the leaves to appear. You should be patient so as not to tear the hole in order to spy on the development process;
- With the appearance of young greenery, it is important to start spraying the plant, otherwise the edges of the leaves will dry out and the plant will lose its high aesthetics;
- When replanting, you need to dig up the tubers very carefully, otherwise they can be easily damaged.