Spathiphyllum, popularly called “women’s happiness,” is a representative of perennial evergreen plants of the Araceae family. It is devoid of stems. The oval-lanceolate leaves grow directly from the rhizome, reaching an average height of 30 centimeters. It is given special beauty by the flowers gathered into a cob, surrounded by a snow-white “blanket”. In the wild, it is found in swampy forest areas, in flooded areas of meadows, and along the banks of reservoirs. There are many types of spathiphyllum that are widely used as indoor plants. The flower does not require special care, but does not tolerate drought and stagnant moisture; it thrives in moisture-intensive and nutritious soil. In nature, it grows in slightly acidic soil made from charcoal, rotten branches, compost, and fallen leaves. The question of choosing the right soil for spathiphyllum usually arises during replanting. If the soil is chosen incorrectly, it will begin to hurt and may even die.
Who is the causative agent of the disease
The disease is caused by a ubiquitous fungus. The causative agent monilinia fructigena is ubiquitous. Apple trees growing in temperate and warm climates are equally affected by it. The fungus monilinia fructigena damages apples, pears and stone fruits. The pathogen monilinia mali is highly specialized. It infects only one type of plant; only apple and pear trees are affected. This type of infection is common in the southern regions and gardens of the Far East. The life cycle of the fungus monilinia fructigena consists of 2 stages, and that of monilinia mali - of 3.
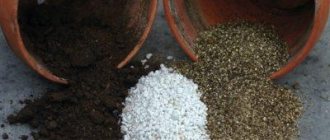
Soil for spathiphyllum: composition
Guide to growing garden strawberries: planting in open ground and caring for a good harvest
The soil for spathiphyllum should be nutritious and loose. The flower removes many useful substances from the ground; adding them with each watering or simply increasing the intensity of fertilizing is not always convenient - this complicates care. For replanting, it is better to immediately use fertile components when preparing the substrate with your own hands, or enrich purchased soil with them.
Loosening elements
They have low nutritional value, but significantly improve aeration, some increase moisture capacity, others - water permeability. Some components shift the acidity of the earth in one direction or another. Increase:
- acidic peat – strong;
- pine litter – average;
- bark, sphagnum - unimportant.
Shift to a neutral reaction by diluting the soil:
- perlite;
- expanded clay;
- Red brick;
- coconut fiber;
- sand.
Pine bark
It improves the conductivity of water and air, contains a tiny amount of nutrients, and has a slightly higher acidity. It is better to choose bark with a fraction of 1-3 cm in the store - they sell it already disinfected.
Perlite
This material is free-flowing, lightweight, chemically inert, and is not contaminated by pathogens. It is an inflated volcanic rock. Used in almost all soils for indoor flowers.
Sphagnum
Peat moss with high moisture holding capacity and antiseptic properties makes the soil loose. It is not suitable as a soil base for planting spathiphyllum, but as one of the components it is very useful.
Expanded clay
It is produced by firing clay and comes in different fractions. Large ones are used as drainage, small ones are used to prepare flower soil. Lightweight porous material that absorbs or releases moisture as needed.
Coarse sand
Chemically inert material, increases the conductivity and looseness of the soil, does not allow moisture to stagnate in the pot. In indoor floriculture, fractions from 2 to 5 mm are used. Smaller ones stick the soil together and make maintenance more difficult.
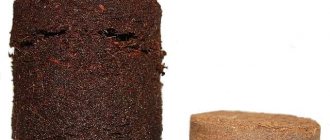
High peat
It has an acidic reaction with a pH of 2.5-3.6 and a fibrous structure. It is in the initial stage of decomposition, moisture-intensive, and contains almost no nutrients.
Coniferous land
Thanks to the air structure and the inclusion of needles that have begun to decompose, it significantly increases the permeability of the soil. It is rarely sold in stores; it will take 3-5 years to prepare it yourself; if it is dug up in a pine forest, it needs to be disinfected. pH level 4.5-5.5
Coconut fiber
Pure organic material, chemically neutral, composed of approximately 30% short fibers and 70% coconut palm nut dust. Decomposes extremely slowly and is not prone to caking or settling. It retains its loose structure in any conditions. Increases volume 8-10 times when soaked.
Coco soil is a mixture of peat and coconut fiber. Both materials can be used as a base for flower soil.
Nutritional Components
The prepared soil usually contains enough fertilizer to replant the spathiphyllum and not need to fertilize it for 1-2 months. Those who like to make mixtures on their own should take care of the nutrition of the plant.
garden soil
It has high fertility, but can be quite dense. The soil is taken only from clean fallow where no herbicide treatment was carried out in the previous season. It must be clean, free of earthworms, insects, and weed roots.
Humus (rotted manure)
Waste from cattle or horses. Increases the nutritional value of the soil and promotes the growth of green mass. Completely rotted litter or rolled humus that has matured for several years is used, the acidity is about 8. It is disinfected before use.
Sod land
It is harvested from meadows and pastures overgrown with cereals or legumes. It has low fertility, passes well, but does not retain water.
Leaf ground
It is rotted litter with an airy structure, slightly acidic reaction and high nutritional value. Harvested under maple, fruit trees, hazel or linden. It is impossible to take soil under crops whose leaves contain tannins.
Drainage
Plant roots need to breathe; excessive watering displaces oxygen from the soil, compacts it and creates conditions for the development of putrefactive bacteria. The moisture stagnates, the earth turns into mud, and when it dries out it becomes hard. To ensure the outflow of liquid, between the substrate and the bottom of the container there must be a layer of porous material that freely allows water to pass through. This is especially important for anthurium.
For potted plants, drainage is a chance to survive indoors. It is placed at the bottom of containers and can be used:
- Styrofoam;
- pebbles;
- crushed stone;
- gravel;
- crushed red brick;
- broken clay pots;
- expanded clay
When growing anthurium, only the last 3 components are suitable. The rest may contain unwanted substances, and the foam is too light and the pot will tip over.
Expanded clay is a porous material obtained by firing clay or shale. It is used in construction or as drainage for indoor plants. Flower shops sell bags with a capacity of 0.5 liters or more, filled with reddish pellets of various sizes.
Stages of spathiphyllum transplantation
- Land preparation. It is correct to buy soil for transplanting spathiphyllum at home in a specialized store. So the composition and concentration of nutrients will correspond to the requirements of the plant. If it is not possible to buy ready-made soil for spathiphyllum, then you can prepare it yourself. You need to replant in slightly acidic soil. It is made up of turf soil, leaf soil, peat, and coarse river sand. It is also recommended to add additives to the soil in the form of charcoal, brick chips, and superphosphate.
- 20 aroid indoor plants with photos, names, varieties
Preparing a pot or flowerpot. The choice of container for transplanting spathiphyllum at home depends on the size of the old pot. If you plan to leave the plant intact without planting the children, then you should take a pot two to three sizes larger than the previous one. When planting, you will need additional containers for new plants. When choosing what material the new container will be made of, you should give preference to natural clay. A drainage layer of expanded clay (2 cm) must be placed on the bottom of the new pot.
- Preparing the plant for transplantation. On the day of the planned transplant at home, the pot with spathiphyllum is well watered so that the soil becomes moist. This will make it easier to remove the plant from the pot and, if necessary, divide the rhizomes. Use a garden spatula to walk along the edge of the old pot, digging up the roots. The plant, along with the earthen lump, is pulled out of the container. The roots of an adult plant tightly entwine the entire soil. It is at this stage that spathiphyllum blooms. The root system must be gently cleaned of drainage and old soil. If the plant has flower stalks, then it is worth cutting them off with pruning shears so that it can use all its strength to take root in the new pot. Dried and wilted leaves are carefully removed or, if yielding, torn off.
- Rhizome division. Several rosettes can be separated from the entire mass of plants. This is the easiest way to propagate spathiphyllum at home. If it has not been replanted for a long time, then there may be a lot of young plants in the pot. When separating the children, the main task is to preserve the powerful rhizome behind each rosette of leaves. After dividing, you should inspect the roots. Rotten and too long ones are cut off.
- Planting spathiphyllum. To transplant spathiphyllum according to the rules at home, you need to follow simple tips. You need to replant carefully. Prepared soil is poured onto the expanded clay laid at the bottom of the pot or cache-pot up to half the volume. Spathiphyllum is placed in the middle of the pot and the root system is distributed over the surface. Next, add the substrate to the desired level. The plant should not be deepened into the soil, even if the root buds do not reach it. After some time, they will reach the ground and strengthen the flower even better. When the soil is poured, it should be compacted a little so that the plant does not sway and sits tightly in the ground. Then the spathiphyllum plantings are watered abundantly to eliminate voids in the soil. If at the end of watering a depression is formed, then it is necessary to add more soil and repeat the procedure of compacting and watering. After all manipulations, the leaves are sprayed to wash away dust and dirt.
- Caring for a transplanted plant. In the first month in a new pot, spathiphyllum is very demanding on humidity. Many gardeners even recommend setting up a mini-greenhouse for it. This is quite easy to do. You can place the plant along with the pots in a plastic bag and the greenhouse is ready. Spathiphyllum leaves need frequent spraying from a spray bottle. Spraying is best done early in the morning and at dusk and preferably twice a day. The soil should not be allowed to dry out, so it should be watered as soon as the top layer of soil dries out a little. To speed up root formation, the plant can be watered once with “Kornevin” or another preparation that stimulates root formation. You can also use root or foliar feeding with special fertilizers. It should be remembered that the plant will not bloom until the root system completely entwines the pot from the inside.
Proper transplantation of spathiphyllum and care at home after it will help the plant to recover and grow its root system in a short time. A healthy plant will delight with lush flowering and beautiful succulent foliage.
If you buy ready-made soil
Stores sell soil intended for spathiphyllum. To make the flower feel as comfortable as possible, vermiculite, brick chips or coarse river sand are added to the prepared soil for looseness. Mixing ratio: nine parts soil to one part loose additive of your choice.
You can buy a universal substrate or for aroids, it will also work. The universal one contains a minimum set of useful minerals, so after replanting the pet is monitored and regularly fed with fertilizers. Feeding is carried out once every two weeks during the warm season; in winter - once a month. Superphosphate, which is added in small quantities, makes the soil more nutritious.
The best fertilizers for spathiphyllum are organic ones, for example, bird droppings. If it is not possible to purchase them, you can get by with mineral ones. At home, you can use what you have on hand for feeding: water from cooked pasta, sugar water, or water from the aquarium after replacing it.
Disinfecting the land before planting or transplanting spathiphyllum
Soil acidity
When compiling their own soil mixture, gardeners often resort to using garden or forest soil, which contains a huge number of pathogenic microorganisms, bacteria and insect pests. And sometimes you can open a package of ready-made primer and discover that it also needs disinfection.
In the fight against the destruction of harmful bacteria and fungal diseases, the drugs Fitosporin, Gamair and Alarin have proven themselves to be excellent. Their use will make the composition comfortable for “female happiness.”
Thermal treatment of the soil is also carried out. There are two main methods - baking in the oven and freezing.
In the first case, the soil is poured onto a baking sheet, the layer is leveled and placed in the oven, where it is kept for 15-20 minutes at a temperature of 120 degrees. To freeze the substrate, leave it on the balcony for several days in winter. The latter method is considered less effective, since some insects and fungal spores are able to overwinter in the soil.
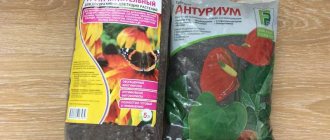
Obvious advantages of the Original Anthurium Primer Ultra Effect+:
- Ratio: PRICE-QUALITY-VOLUME
- Ideal conditions for plant growth and development
- Optimal content of macro- and microelements in the substrate
- Stable structure, resistant to caking and clumping of soil
- The unique composition of the ready-made soil UltraEffect+ is suitable for demanding exotic plants that require a substrate with high breathability and optimal moisture holding capacity.
- Stimulates the development of a healthy root system and abundant, long-lasting flowering
- Properly selected substrate components prevent root rot and maintain optimal pH
- Creates the best conditions for the rehabilitation of plants with damaged root systems
- We have developed a special soil composition and selected the ideal size of components in the required quantity
- 100% natural ingredients are used in the production of soil
Soil selection
Before planting a crop, you should choose the right soil for it. To do this, you can buy a ready-made composition or make it yourself.
Requirements
Spathiphyllum loves nutritious soil, which will ensure its full development.
Nutritious
It is important that the soil contains sufficient nutrients. This will ensure normal development of the plant
Loose
The culture needs loose soil, which provides air access to the root system of the plant.
Homemade or from the store
Ready soil is sold in garden stores
It is important that it is intended specifically for spathiphyllum. It is also permissible to use primer for Aroids. If you can’t find it, you should use a substrate for flowering plants
Ready-made mixtures have an almost ideal composition. However, it is considered not loose enough. To eliminate this deficiency, special substances are introduced into the soil - crumbs, sand, vermiculite
If you cannot find it, you should use a substrate for flowering plants. Ready-made mixtures have an almost ideal composition. However, it is considered not loose enough. To eliminate this deficiency, special substances are introduced into the soil - crumbs, sand, vermiculite.
How to properly prepare a suitable substrate
To plant a shoot or replant an adult plant, you will need nutritious soil. There are several options for preparing it.
Second
It is also possible to obtain a nutritional composition by mixing deciduous and turf soil, peat and sand in a ratio of 1:1:2.
Third
It is recommended to prepare the soil by mixing humus, peat, sand, crushed bark and leaf humus.
What nuances should be taken into account
It is enough to add only loosening components to the finished substrate. The soil that you make yourself is not heavy. However, it is worth considering certain features. For the normal development of spathiphyllum, all necessary additives should be added to the soil.
Good drainage is important
What should be the correct drainage?
It is worth making holes in the plant pot. In this case, you should buy drainage in a store or make it yourself. The store sells oval or round expanded clay, packaged in bags. To independently prepare a drainage layer, use brick, pebbles, and stones. They should be washed and doused with boiling water.
Ready mixes
Today you can buy many ready-made mixtures for Aroids. They are sold in specialized garden stores.
Vermion
This soil is intended for spathiphyllum. It contains a lot of organic matter and nitrogen. The product also contains potassium and phosphorus.
Biomaster
The composition is intended for Aroid plants. The composition contains only natural ingredients. The soil is characterized by an optimal ratio of nutrients.
Agrosver
The product is intended for spathiphyllum. It does not require additional sterilization. The substrate is completely ready for use.
Improvement of purchased land
Ready-made mixtures are considered quite heavy. To make them lighter, it is worth adding perlite, vermiculite, coarse sand or crushed brick to the composition. This increases the breathability of the soil.
If the soil is chosen incorrectly, the plant begins to turn yellow, the leaves dry out, and the roots suffer. There is also a risk of delayed flowering. When flowers appear, they are small in size and dim in color.
Purchased or “homemade” soil?
Specialized garden stores sell soil designed specifically for growing spathiphyllum. This option is preferable when the gardener does not plan to prepare the soil himself. A universal substrate for the Araceae family could be a good solution. It is acceptable to use soil for any flowering indoor plants. It is not recommended to use purchased mixtures in the form in which they are purchased. Loosening material should be added to the soil. It can be vermiculite, brick chips, perlite, sand. Its amount should be approximately ten percent of the total soil composition. Otherwise, the earth may turn out to be too “heavy”. The store-bought mixture needs some modification. This is the reason that many amateur gardeners prefer to prepare the soil themselves. There are several options for preparing a nutrient substrate for growing spathiphyllum. They differ slightly from each other, which allows you to select a composition whose components are available to the grower.
How to choose a ready-made substrate
It is best to purchase a ready-made substrate at a gardening store rather than rack your brains over the question of what soil is needed for spathiphyllum and how to make it yourself.
Nowadays, it is not so difficult to find special soil for the flower of female happiness in stores. One of the suitable options is Vermion soil mixture. If you cannot find soil for spathiphyllum, a soil mixture for tropical plants or aroid crops is suitable. If you don’t find such soil mixtures, you can buy a universal soil, but you will have to carefully study the composition before purchasing and add additional ingredients.
It is better to choose a substrate whose packaging says that it is for spathiphyllum
What kind of soil is needed for spathiphyllum:
- Universal primer for the aroid family Seliger-Agro. The acidity level of this substrate is within 5-6. The composition includes river sand, peat, expanded clay, large-pored baking powder and a complex of mineral fertilizers specially selected for this group of plants.
- Another good substrate is BioMaster. The composition includes moss, biosoil, sand and charcoal.
- The substrate from Eco Sad is also suitable for planting the flower of female happiness. It consists of sand, moss, turf soil, peat, vermicompost, charcoal, agroperlite. All ingredients are laid in layers. You can mix them at your discretion.
Important! Universal soil mixtures usually have a high level of acidity and are too heavy for aroid crops. But purchased soil mixtures are not always suitable for plants. After transplantation, the first time you need to monitor the flower
And if it looks bad, you need to change the soil
After transplantation, the first time you need to monitor the flower. And if it looks bad, you need to change the soil
But purchased soil mixtures are not always suitable for plants. After transplantation, the first time you need to monitor the flower. And if it looks bad, you need to change the soil.
What can be added to purchased soil to improve it?
If you can’t find a soil with a suitable composition, you will have to buy a universal soil mixture and add other ingredients to it to improve it.
Before planting, sand, wood ash, coconut shavings, crushed tree bark or perlite are added to the universal soil for spathiphyllum.
Types of store-bought mixtures
Today, ready-made soil mixtures for Aroids are not a rare commodity. You can purchase it in specialized garden stores and flower shops. These products have approximately the same composition, but different manufacturers and, accordingly, prices.
- "Vermion" soil for spathiphyllum. The composition contains large quantities of organic components, nitrogen, as well as balanced levels of potassium and phosphorus. Suitable for all representatives of the Araceae family. The volume of soil in the bag is 2.5 liters, the price is 40 rubles.
- “Biomaster” for aroid plant species is a soil mixture made exclusively from natural, natural ingredients. Manufacturer – Russia. It is characterized by an optimal ratio of minerals for the full development of spathiphyllum. The composition includes sphagnum moss, which protects the roots of the plant from rotting. Volume 2 l, cost 54 rubles.
- "Agrosver" soil for spathiphyllum. The product is completely ready for use and does not require additional sterilization. The amount of soil mixture is designed for a pot with a capacity of up to 2 liters. The cost is about 30 rubles.
What soil to plant in: pros and cons of purchased soil
Whether to buy ready-made soil or make it yourself is up to everyone to decide for themselves. But for any chosen option there are positive/negative sides. The positive aspects of the finished substrate include:
- Saving time for preparing the substrate. Especially if you still need to get the ingredients for home cooking, this takes even more time. It is enough to add sand or perlite to the purchased one, then mix.
- The components and the level of acidity are written on the packaging of the purchased product. When preparing it yourself, you can only guess about the real acidity.
- The season of the year is not always suitable for preparing homemade soil, but purchased soil is always available.
- Lower percentage of pests with purchased substrate. When performed at home, this probability increases.
Negative aspects of soil “from the store”:
- The high cost of purchased substrate, especially if you need to replant more than three plants at once.
- Inconsistency with the declared composition and characteristics on the packaging. After transplanting into such soil, the plant may die or become sick. When preparing it yourself, you always know what composition the flower is being transplanted into.
- It is not always possible to buy exactly the composition that is required. Therefore, what is available is acquired. Therefore, the plant requires regular monitoring and systematic additional feeding.
Important! You can use a universal primer if the store does not have any other primer that is more suitable in composition.
Scientific experiments
Laboratory experiments on animals were carried out, which successfully confirmed the data known to the people for centuries. The animals were injected subcutaneously with an infusion of prolomnik. The contraceptive effect was observed for 6 months, after which completely healthy offspring were obtained. Those. The use of the herb did not cause any harm to future children. It seems that it is no coincidence that the plant aroused the interest of scientists. Research has confirmed a number of data from traditional medicine. It is now known that this special and beneficial plant contains saponins, which have important properties. Ingestion causes miscarriage, so it is contraindicated in pregnant women. At the same time, it is successfully used as a contraceptive. The interest of scientists in P. northern arose quite recently, when its study confirmed some data from traditional medicine.
Diseases and pests
Aphids, whiteflies and spider mites are the three main enemies of all indoor aroids, regardless of their type. And you need to fight them only by combining two methods:
- correction of care, restoration of the optimal living environment;
- use of insecticides or biological products.
But with aroids, you need to monitor not only the aerial parts: not only tuberous, but also any types of aroids are extremely vulnerable to nematodes. Even Dieffenbachia or Monstera cannot boast of the ability to remain decorative when the soil is contaminated, let alone Alocasia, which can die in a couple of weeks.
You need to carefully and constantly monitor the soil, its condition and quality. The best prevention is disinfection of the substrate before planting.
And do not forget about mosaic viruses, common to all aroids: the affected plants must be destroyed, the fight is useless.
Plants are resistant to insect damage. Among the most dangerous is the mealybug, which is attached to the bottom of the leaf blade. The drug Actellik is used to control the pest.
To destroy scale insects, which rarely infect aroids, you can use the drug Fitoverm.
We invite you to familiarize yourself with the Budenovka tomato variety: description and photo
Often, plants can become infected with fungi or viruses that enter with the substrate. In this case, it is recommended to transplant the flower into new soil, which has previously been disinfected. After removing the plant from the old soil, its root system must be thoroughly cleaned of soil and disinfected in a weak solution of potassium permanganate.
Problems when choosing the wrong soil
If the substrate for transplantation is not chosen correctly or the spathiphyllum has not been transplanted for a long time, it gets sick, does not bloom, does not grow, and does not feel comfortable. The most common problems, we list them.
Lack of flowering with active leaf growth. Soil deficiency of phosphorus and potassium, excess nitrogen. The solution is to fertilize the flowering plants with fertilizers.
Spathiphyllum is withering. There are two main reasons: the first is a dense substrate that does not allow water to sink to the bottom of the flowerpot. It is urgently necessary to replant it or lower it into a basin of water so that the lower layer of soil is saturated with moisture.;
Root rotting. Moisture is visible on the surface, but the roots are unable to absorb it due to disease. The solution is replanting with pruning of rotten roots. To do this, carefully remove the spathiphyllum from the flowerpot, rinse the roots with water, cut off the rotten ones, dry them, and treat them with crushed activated carbon. Dry for a couple of hours, transplant into a new correct substrate with activated carbon without watering. Water after a day or two. Add Kornevin (growth stimulant) to watering.
Black spots on leaves. The reason is excess fertilizer in the soil, too high acidity. Need an urgent transplant.
Yellowing of leaves with green veins. The development of chlorosis due to a lack of microelements in the soil. The solution is universal fertilizer and spraying with iron chelate. Needs to be replanted in new balanced soil.
By yellowing or blackening of leaves, lethargy or lack of flowering, spathiphyllum sends signals to its owners that there are problems. Weakened and unkempt “happiness” is easy prey for parasites and diseases. Daily water procedures with spraying serve as excellent prevention against pests.
Important! Regular replanting (once every two to three years) with well-chosen soil will relieve spathiphylium from a number of unpleasant problems.
The second stage is soil preparation
The substrate for anthuriums should be very loose, breathable and always contain large pieces of pine bark. Many gardeners prepare the soil for planting themselves. You can use “universal soil.” It is quite loose and already contains a complex of micro and macroelements necessary for plants at the time of planting or transplanting.
and some Sphagnum moss. In case you suddenly forgot to water your flower, sphagnum will help it and retain moisture.
To make it loose, add a little river sand to the finished substrate, Perlite and Vermiculite, and mix it all thoroughly.
It’s quite easy to check whether you have a loose mixture; when watering, the water should quickly penetrate down. You cannot add chalk, lime and wood ash to the nutrient soil for anthuriums. Plants do not like this and begin to wither. For very busy gardeners, there is an easy way to buy a ready-made substrate. Especially for aroids, and anthurium belongs specifically to this species, the substrate component “Gardens of Aurica” “Aroids” is suitable.
It consists of turf soil, sand, pine bark and needles, sphagnum and vermicompost. In addition, you can purchase soil for “Azaleas” and “Heathers”; its composition is most suitable for planting anthuriums. We can recommend a mixture of ready-made soils “Azalea”, “Begonia”, “Señoria” in equal parts with the addition of a small amount of pine bark.
Let's start the transplant
We take “Flower, expanded clay drainage”. This is a natural material necessary for growing indoor flowers. It promotes optimal moisture distribution and maintaining a comfortable water-air regime. Ensures the circulation of nutrients, prevents water stagnation, and thereby promotes the harmonious development of the root system.
You can also use gravel or pieces of a broken pottery pot. The size of the drainage should be approximately twice as large as the diameter of the holes in the pot. We place a drainage layer of 1-5 cm at the bottom of the pot, depending on the size of the container, and pour the prepared substrate on top.
In the case of transplanting a young plant, it is quite easy to pull it out. But if you are replanting an already mature plant, then the roots may crawl out of the holes in the pot, then you need to be careful. It is recommended to trim the protruding roots, since it is unlikely to be possible to pull them out without damaging them, but if you overdo it, you can damage the entire root. Perform pruning with a knife or scissors, after moistening the tool in an alcohol solution.
When dividing a bush, a problem may arise in that the roots of the plants are strongly intertwined and it is impossible to separate them without damaging them. In this case, the roots of the plant can be soaked in warm water. After some time, the excess soil will leave the roots, and the remaining soil can be easily removed by yourself. The roots of the anthurium will be exposed, and you can easily untangle them.
If the anthurium roots are clean and there are no signs of rotting, then no additional processing is required. If the tips of the root turn black, and this is the process of decay. The reasons for which may be different: improper care, overwatering, and possibly exposure to pests. It is necessary to cut off the rotten areas of the roots with a sterile instrument and soak the roots for a short time in the “Fitosparin” solution. It is intended for the treatment and prevention of root rot and promotes root growth. Then, carefully place the anthurium in the pot, distribute the roots on the surface of the soil and sprinkle with earth. If the soil is moist enough, watering may not be necessary.
If there are flowers on the anthurium, it is better to remove them so that the plant does not waste nutrients on them. Of course, if you are not tasked with obtaining seeds. Organic and mineral fertilizers should be added to the soil no earlier than two weeks after transplanting. The transfer is complete. Now we place the pot in a bright place, but avoid direct sunlight and drafts.
Transplantation process
Young plants up to three years old require annual replanting; starting from the age of three, spathiphyllum needs to be replanted every two to four years. The procedure itself is not complicated and takes little time.
We place drainage at the bottom of the pot: pebbles, polystyrene foam, expanded clay or walnut shells. The layer should be two to three centimeters or one third of the container. Next, fill two-thirds of the volume with soil. We take out the spathiphyllum using the transshipment method and inspect the roots for damaged ones. The normal color of the roots is white. If there is no rot and there is no need to separate the “babies”, then in the same form we place it in the prepared container. If there are rotten roots, they need to be cut off, treated with activated carbon and allowed to dry for an hour or two. Then continue replanting by adding a little coal to the soil.
Important! It is convenient and safe for the root system to dip the pot in water before replanting and let the old soil liquefy until it becomes muddy. After this, rinse the roots and let them drain for a couple of minutes. Not a single root will be harmed.
We place the pet exactly in the center of the new house, straightening the roots, and add soil to strengthen it. Leave about a centimeter to the edge of the pot. The root collar should not be completely covered! This significantly affects further flowering. We water it thoroughly so that the water reaches the bottom of the pot and ends up in the pan. Add more and compact the soil a little on top. We pour out the excess moisture and place the flower in its place. For irrigation, only settled, room temperature water is used.
To provide him with maximum comfort, it is recommended to set up a mini-greenhouse: put a bag on the potty for a month. A humid environment that is comfortable for him will help him adapt and settle in faster. With this method, it is important to periodically open it and ventilate it, otherwise there will be no benefit from the procedure. You can spray it daily and place it on damp stones. The pot should be placed in a dark place.
You can move it to its usual place after a month or a month and a half, ensuring that the light is diffused and returning to the standard humidity level. Spathiphyllum does not like constant rearrangements and reacts to them sharply: with scant flowering, pale leaves, and shredding of leaves. It should not be placed near electrical appliances or in drafty areas. The chosen place for it should be one, seriously and for a long time.
Important! If it is necessary to replant a flower during flowering, it is recommended to cut off the peduncles at the base. This procedure will allow it to recover faster after replanting without wasting energy on flowering.
If during replanting it is necessary to separate the young growth from the main root, this must be done as carefully as possible, without damaging the roots. It is advisable to transplant the babies into a transparent container to observe the growth of the root system. Plastic cups will also work. We carry out replanting as standard: drainage - one third, soil - two thirds. Be sure to drill holes in the bottom of the containers so that excess water can drain out! When the kids fill the cups as much as possible with the root system, we transplant them into full-sized pots.
How to choose a purchased mixture?
Ready-made mixtures are sold in flower shops, gardening departments, and on the market. There is a special soil for spathiphyllum. But it is also suitable for araceae, the family of which the flower belongs to.
However, it is worth considering that the mixture is not suitable for anthurium. It is also of the aroid family, but prefers low-lying peat. And all other related flowers love the mount. Such peat becomes compacted over time, which is detrimental to the root system of spathiphyllum.
Ready-made soils from different manufacturers vary in price and composition:
- There are completely natural soils, using natural components, for example, Russian-made “Biomaster” for aroids. Price per package of 2 kg from 50 rubles. It contains sphagnum moss.
- From cheap mixtures "Agrosver" for spathiphyllum. It is completely ready for planting and transplanting. The components are sterilized. For a package of 2 kg from 30 rubles.
- More expensive "Vermion" for aroids. It contains a lot of nitrogen, organic matter, potassium and phosphorus. Price per package of 2.5 kg from 40 rubles.
When choosing soil you need to focus on:
- to customer reviews;
- description of the composition (a bona fide manufacturer indicates all the components of the soil);
- what plants is it intended for?
- tips for use.
What problems does an incorrectly selected substrate cause?
Coming from South American forests, spathiphyllum is an unpretentious indoor plant. However, like many other flowers, it has its own nuances in growing. Both excessive watering and drought are contraindicated for it. If the plant is not planted in soil with moderate humidity, various pests may appear on the leaves, yellow and dark spots will appear. A lump of earth that does not have sufficient looseness will not allow the roots to breathe. Even proper watering will not avoid problems. Therefore, the choice of soil must be approached with all responsibility. When the leaves become stained or become a “residence” for pests, the problem lies precisely in the incorrectly selected substrate. To prevent this from happening, you need to immediately take the right soil.
How to make your own substrate?
If you want to prepare the soil yourself, you need to stock up on ingredients. This is especially convenient for those who have their own plot. Beginning flower growers will also cope with the task. The main thing is to disinfect all components. Warm it up, treat it with an ultraviolet lamp, and pour boiling water over it.
What components do you need to take:
- compost or humus 1 part;
- turf soil from the garden, 2 parts;
- sand 1 part;
- peat 1 part;
- charcoal 0.5 parts;
- brick chips or pebbles 0.5 parts;
- sphagnum 0.25 parts.
Step-by-step instructions for preparing the mixture:
- Prepare a pot with holes in the bottom. The diameter depends on the size of the plant. Select in such a way that the roots fit freely. And from them there was another 2-3 cm to the walls of the pot.
- Place pebbles or other drainage on the bottom. Layer about 2 cm.
- Mix the remaining ingredients and set aside in another bowl.
- First place the plant in the pot, on the bottom layer. Then take soil from another container and fill the free space.
- The topmost layer will again be drainage.
How to prepare the soil mixture for spathiphyllum?
There are three main soils used for growing “female happiness”:
- It is obtained from a mixture of leaves, peat, sand, charcoal, and humus. All components are taken in equal quantities.
- The soil is prepared from turf and leaf soil, as well as peat and coarse sand, taken in a ratio of 1:1/2:1/2:1. Sand can be replaced with clay brick chips.
- Take two parts of peat and humus, one part each of uncrushed leaf humus and sand, to which charcoal, crushed bark, and brick chips are first added.
Any additives added to the sand should be one tenth of the total soil volume. This allows you to obtain a mixture with high aeration and moisture capacity. The acidity of such soil, where sand is mixed with additives, is between 5 and 5.5 pH.