general characteristics
Clivias are native to Africa, where they live in full or partial shade as subtropical forest plants. They can be found growing on rotting logs and other organic materials.
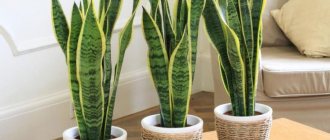
Although Clivias are slow growing, they eventually become quite large for a houseplant. They can take a decade to mature and fill a large container. The strong, dark green leaves curve beautifully over each other.
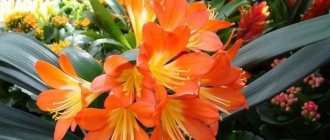
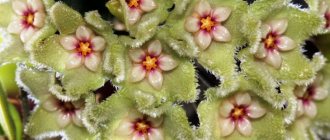
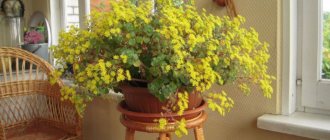
A photo of Clivia during the flowering period will help you convince yourself of the beauty of the spectacular flowers. The buds range in size from 2 to 7 cm. They bloom for about four weeks, since the weather is warm, flowering usually begins from February to April.
Flowering is followed by an active growing season when they need warmth, indirect sunlight and moderate watering. They appreciate feeding during growth.
After the warm season, Clivias require six to eight weeks of rest. Once warmer temperatures begin, you can begin regular maintenance and enjoy their flower show.
Propagation of clivia by side shoots
This method of propagating a blooming beauty is the most reliable and simplest. In a pot with an adult plant, over time you can find small sprouts on the sides. These are the “babies” that should be removed from the mother part of the flower when they already have four strong leaves.
The process of planting side shoots must be carried out by adhering to simple but mandatory rules:
- each shoot should have 3-4 leaves;
- the plant can be disturbed only after the end of its flowering period for the current year;
- the “babies” should be separated carefully, taking care to preserve the integrity of the roots of the mother flower system and young shoots;
- accidentally injured roots should be covered with a layer of wood ash in the areas of damage.
The shoots are planted in personal pots 7 cm in diameter. For an adult flower, a small pot is also used. The root system of clivia loves close quarters . With this condition of the roots, the leaves of the flower grow fleshier and richer green.
The first two days after planting, the plant is not watered and kept warm at 20-25 degrees. Then moderate watering is gradually resumed. Young plants will bloom for the first time in 2-3 years.
Light requirements
Clivias are naturally adapted to living in full or partial shade outdoors. They can survive in dimmer conditions, but they need good light to bloom.
Although these flowering plants require little care at home, direct sunlight will scorch them quickly, so proper lighting is important for good clivia care. “Tan” appears in the form of brown spots on foliage and spoiled flowers.
The north or east side of the house is generally ideal indoors, but they do well in any sunny location as long as they are protected from direct sunlight. Container plants are moved outside during the warmer months, but remember that they require shade.
Reviews from flower growers
My flower calmly tolerates all changes, although I read that he does not like to be moved. I water like everyone else - once a week in winter, twice a week in summer. I try not to overfill. Universal fertilizer. Periodically you need to wipe the leaves from dust. Not only because the plant looks ugly, but also because it is harmful for it. You can sometimes spray, but this is not important. My mother and I have clivias that live for 5-6 years, mine has been blooming for 3 years, but for some reason it still hasn’t for her. This is a mystery to us.
Bastet
https://citykey.net/review/kliviya-krasivyy-komnatnyy-tsvetok
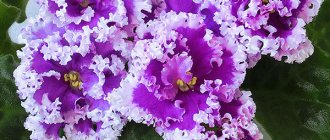
...Clivia is an almost problem-free flower! Clivia can bloom with yellow-white, bright orange or red flowers, somewhat reminiscent of bells. And these flowers are not single, but are in inflorescences, often there are about thirty flowers at once! Extraordinary beauty! This plant does not require moisture, only sometimes I spray its leaves and wipe them to remove dust. But when clivia blooms, it is better not to move or rotate the pot with it at all. And replanting should only be done when the roots are visible from the drainage holes below.
Murmur
https://spasibovsem.ru/responses/tsvetok-s-krotkim-nravom.html
Hello, my dear flower lovers! The other day my orange beauty Clivia blossomed. She is so bright and sunny! Twice a year it pleases me with its flowering. She “lives” on the balcony. Only in the hot summer months do I bring it into the room and place it on the windowsill.
irulchik
https://myfl.ru/category/nazvanie-rasteniya/kliviya-0
They gave me this flower for my birthday (7 years ago). I generally love flowers, but this one immediately sank into my soul, thanks to its stunning flowers. Over the years, I have independently determined how to properly care for him, since there are some subtleties in this. So, tips for caring for clivia: 1) It likes watering only when the soil dries out... 2) When a peduncle appears, it is advisable to water it a couple of times with warm water (about +40 +50 degrees) - this will help the peduncle grow higher and rise above sheets. 3) After it flowers, wait 2-3 weeks and cut off the peduncle - this is important!!! - replant the flower. Take it out of the pot, cut off the roots a little (I cut it with a knife)... If you do this, I guarantee that your flower will bloom for the second time in a year! 4) Location - east window only. On other sides of the world it grows worse and may not bloom at all. Flowering, by the way, lasts almost 20–25 days. For me - once every six months. And he also gives children. Definitely recommend!
vergo
https://irecommend.ru/content/moe-oranzhevoe-chudo-0
How to water
Clivia loves evenly moist soil during the growing season, but does not tolerate waterlogging.
To know how to water a flower, make it a rule: let the top 50% of the soil dry before thoroughly soaking it. Outdoor plants can be watered by hand if the top few inches of soil are dry. As they mature, they become more drought tolerant.
The fleshy roots of Clivia rot easily in damp conditions. Also avoid getting water on the crown. Orange or pale green spots on the leaves may be a sign of overwatering.
When the Clivia plant goes dormant during the cooler months, reduce watering.
Propagation of clivia by seeds (video)
Watering clivia should be moderate so that the soil has time to dry out well. If water collects in the pan during watering, it must be drained to avoid root rotting. You should not spray the flower. But when the leaves become covered with dust, they are carefully washed with a soft, damp sponge.
Clivia is fed every two weeks from the moment it is in the pot. For this purpose, use organic and mineral fertilizers for indoor leafy plants, strictly observing the dosages indicated on the packaging.
The resting period of Clivia lasts from September to November. During this period of time, the flower is placed in a cool place and watering is completely stopped. In this case, the leaves may turn yellow and fall off, which is a natural process of overwintering the plant.
Soil requirements
Fast-draining soil is essential for good care of indoor Clivia flowers. Regular commercial soil is too heavy - you need an airy environment that will keep the roots from becoming waterlogged.
If you use peat moss, add aeration materials such as perlite or coarse sand. Consider your area: A little extra peat or other water-retaining material is fine for hot, dry areas, but not for cooler, wetter climates. Stay away from compact fine particles.
When the environment dries out quickly, it prefers organic material in its soil. Compost and leaf mold are excellent. They tolerate a wide pH range from 6.1 to 7.8 pH, but prefer mildly acidic. Note that bark or peat may acidify the soil as it decomposes.
Earth mixture - substrate
The plant loves acidified soil; it should be loose, not hard. A balanced composition of soil consisting of sand, turf and a leaf complex is suitable for this indoor flower.
The mixture must be calcined to destroy harmful insects and to avoid disease-contaminated substrate.
It is not recommended to treat the substrate with chemicals, because When they get into the ground, beneficial additives are also killed. Young plants need to prepare the soil easier; this is achieved with a higher concentration of sand or perlite.
A drainage layer must be present in each pot.
It is important for the normal functioning of the body.
Clivia loves loose soil
Temperature Requirements
Clivia has a comfortable range of 16°C to 24°C throughout the growing season. They don't mind heat, but prefer cooler temperatures when cared for indoors.
Nap is the time when Clivia becomes more “choosy.” Without a rest period to reset the flowering cycle, the plant will remain evergreen but will not bloom the following year.
How to fertilize Clivia plants
Once your Clivia has flowered, they will do well when fed monthly with a ½ water soluble mixture or a 20-20-20 strength throughout the growing season. Both synthetic and organic fertilizers will work, but apply dry granules or powder away from the base of the plant to avoid nutrient toxicity.
Stop fertilizing completely when the weather turns cool in the fall and wait until the dormant period is over. When grown outdoors at home, they can be fed once every two months until the end of the growing season.
The only exception to these rules is fertilizing just after flowering begins: a moderate boost of ½ strength with a high potassium formula as the plant emerges from dormancy can produce good results. But don't overdo it.
After this early feeding, wait until flowering has finished before resuming normal fertilization during the warmer months.
Flower named after a woman
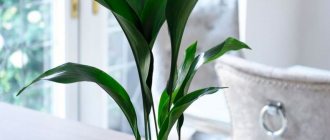
Clivia is a stemless indoor evergreen plant with long, dark green leaves. The false stem is formed from basal leaves tightly covering each other. Homemade clivias reach a height of about half a meter, the flowers of the plant are collected in umbrella-shaped inflorescences with a diameter of about 20 cm. Flowering lasts about a month.
In nature, clivia grows up to a meter in height.
The name of plants of this genus was given by botanist John Lindley. The flower was named in honor of Duchess Charlotte Clive, the governess of the future Queen Victoria, who was fond of floriculture. And one of the varieties of clivia was called Clivia Gardena, named after Major Robert Garden, who in the mid-19th century discovered a new species and brought it to Europe.
Clivia belongs to the amaryllis family. Under natural conditions, it grows in the humid subtropical forests of South Africa.
In its homeland, clivia is often used for medicinal purposes. However, you should be extremely careful at home: the sap of the plant is poisonous. You should not use it for self-medication.
Amateur flower growers often confuse clivia and wallot. Both plants belong to the same family and have similar leaf and flower shapes.
Table: clivia and wallota - how to distinguish them?
| Sign | Distinctive features | |
| Clivia | Vallota | |
| Root system | There is no bulb as such, instead there is a white and thick, fleshy rhizome. | The bulb is elongated-ovoid in shape with a massive neck. |
| Leaves |
|
|
| Flowers |
|
|
| Juice | If the leaf is damaged, yellow-orange juice flows from the wound. | Deprived of this feature. |
In general, keeping clivia at home does not cause much trouble. But it is worth knowing about the most comfortable conditions for it in order to provide the plant with maximum decorativeness.
Humidity
Clivia is one of the few tropical plants that do not require high humidity. They thrive in arid environments as long as temperatures remain within their preferred range. They never like a stuffy, heated room. If their leaves look limp, they can be moistened with a gentle sponge.
Bloom
Clivias rest after months of growth and will bloom the following season when they emerge from dormancy.
Flowering can occur any time from late winter to early summer. Older specimens tend to bud earlier, but timing may vary.
Benefits and harms
The ornamental plant Clivia miniata, native to South Africa, brings warmth into the home.
A flower with funnel-shaped buds of an orange-red hue on a long peduncle decorates any room due to its exotic appearance.
negative effects of Clivia miniata have been identified: the decorative element does not harm people prone to allergies.
Here's what to do before the flowering period
Move the houseplant to a well-lit area indoors before the first frost. Gradually reduce watering. In the plant's natural habitat, it rains during the warmer months - it waits to dry out during the cooler months.
Give the plant six to eight weeks of cool temperatures. The daytime temperature should be between 10-13°C and colder at night, but do not let it freeze.
After the rest cycle, move the plant to a warmer location with temperatures around 16-18°C and carefully begin regular watering. In a few weeks, budding should appear.
Rotate the container as the stem grows and the buds mature. Flowers seek light and bend strongly towards it.
Spent flowers develop into cherry-sized seed pods that slowly turn red or yellow over several months. The seeds will be fertile if they are pollinated. Some gardeners leave decorative berries; others prefer to trim the stem at the base to conserve plant energy - it's up to you.
The process of growing clivia from seeds
This method of propagation is popular among breeders. To get clivia seeds, you should not remove the shoot after flowering. Wait until berries with seeds appear in place of the flowers.
To obtain complete seed material, the plant will have to be artificially pollinated.
When the berries become soft, you can start extracting seeds. You can get about six grains from one box.
Attention! Seeds for propagation are suitable only from plants older than 8 years.
Seed material is not stored for a long time, so the seeds should be removed from the berries immediately before planting. If there is no time yet to start propagating clivia, store the berries by cutting them along with the stems so that they do not dry out.
Germination usually begins in October. The extracted grains are laid out on the surface of the soil, maintaining an interval of 1–2 cm. A small amount of substrate is sprinkled on top.
There is no need to wait for quick shoots and worry about their absence. The first sprouts should emerge from the ground no earlier than in a month or even later. After the formation of one or two leaves, the seedlings can be transplanted into separate small pots. Their diameter should not exceed 7 cm.
It is important! For faster germination of seeds, they can be placed in a dampened napkin, making sure that it does not dry out. After pipping, immediately send to separate pots.
In a new place, small clivias should grow throughout the year. During this time, 4–6 leaves should form on the plants. After this, transplantation into a larger container of 9–10 cm is required. The roots should be handled very carefully, as they are quite fragile. It is advisable to transfer the plant along with the earthen lump so as not to disturb anything.
In the second year of life, clivias should add about 6 leaves. At this time, the seedlings are transplanted into pots with a diameter of 13 cm. In the third year of life, it is necessary to give the pets a rest period of 2 months.
In September, stop watering and lower the air temperature by moving it to a cool room. It is possible that after returning the pot of clivia to a warm room, the plant will throw out the peduncle. During the third year, the green friend will acquire two more pairs of leaves.
If flowering does not happen in the 3rd year of life, it’s okay. There is no need to replant a four-year-old tree, and a dormant period should be organized. At the same time, keep it cool without watering until the arrow appears. Only after this should the plant be returned to its usual place in anticipation of flowering.
Trimming
The only pruning that Clivia needs is to remove dying leaves and flowers. You may see ragged leaves after the dormant period, but maintenance is best done during the growing season after flowering has finished.
Trim the falling foliage at the base with sterile scissors. Flowering stems may remain for over a year while their pods develop, or may be removed after flowering.
Seed propagation of plants
To propagate a plant by seeds, the easiest way is to purchase them in a specialized store. If you want to get seeds with your own labor, flowering clivia must be artificially cross-pollinated. To do this, use a thin watercolor brush to take pollen from one flower and carefully place it on the pistil of another flower. Thus, in a blooming clivia umbrella, which has about 60 flowers, half of them will be pollinated, and half will remain a source of pollination.
If the process is successful, then berries will form at the end of flowering. At first they will be light green, and as they ripen they will darken to a brownish hue. Each ripe berry contains 4-5 seeds. This method of propagating clivia gives a guarantee of 1/3 of all flowering specimens received.
How to propagate
There are several ways to propagate Clivias, including root division, offsets, and seeds.
The main problem with reproduction is their slow maturation. Offset plants grow faster, but still take several seasons to see flowers.
Here are the standard distribution methods:
Offsets - Allow shoots to grow to maturity. Just let them grow in the parent container until you are ready to transplant. Young shoots without roots can be planted in soil to grow them.
Root separation. Over time, the plant will outgrow the container and will need to be divided. It may be messy, but the roots are surprisingly resilient. Usually divided every three years. Divide the roots into groups so that each has leaves and several roots adjacent to it. Place in a well-drained mixture and care for them as usual.
Seeds – It’s not hard to grow from seeds, it’s just slow. Allow the pods to dry on the stem: this will take about eight months. When ready, remove the fleshy coating from the pods. Wear gloves to avoid skin irritation.
Place the growing medium in a warm place. The seeds rot easily, so press them into the mixture rather than bury them. Keep the soil moist but not wet.
When germination occurs, a thick root appears that can push the seeds out of the soil. Make a hole with a stick and replant so the seeds remain on a (slightly) damp surface. Give the seedlings bright light and transplant as soon as they have a few true leaves.
Clivia transplant and subsequent care at home
- The pot with the plant must be placed in water so that the ball of soil is well saturated, this will make it easier to remove the clivia from the pot.
- Next, use a knife to separate the clivia. The knife must be taken with the reverse side, not the sharp side.
- Draw around the perimeter of the pot. The soil should move away from the pot.
- In order to separate the roots, they need to be washed with water.
- The roots must be carefully separated from each other to avoid injury.
- After separating the clivias from each other, it is necessary to let the roots dry, since wet ones cannot be planted.
- During transplantation, you can separate the children for reproduction (you can learn about the secrets and subtleties of clivia reproduction here). Cover the breakage areas with activated carbon.
- When planting, you need to lay out expanded clay on the bottom of the pot, add dry manure and some soil.
- Then you need to place the plant in the pot, holding it, add soil.
- After this, the pot needs to be shaken so that all the roots are enveloped in earth; there should be no air.
- Be sure to cut off the peduncle.
- No need to water. You can moisten the leaves.
We recommend watching a video about clivia transplantation:
Planting Tips
Describing the flower, we can say that the plant is picky about drafts. Over-watering, over-fertilizing or over-potting can prevent flowering.
- Preserving the root system of Clivia helps them bloom better.
- Adjust watering frequency according to temperature. Allow the soil to dry more thoroughly in cooler conditions.
- If you place potted Clivias plants outside during the warmer months, place them under a shelter.
- Buying Clivias without flowers makes it difficult to determine their shade, but the color of the stem gives clues. Purple hues indicate that the plant has orange flowers. Specimens with yellow flowers usually have green stems.
Pests and diseases
Clivia is most often favored by scale insects and mealybugs. In case of non-critical damage, pests are easily removed with a soap solution or treatment with insecticidal preparations (Actellik).
The most common disease is gray rot, which is caused by keeping the root system in a pot too spacious or too cramped. A replantation is required, this time with a complete revision of the root system and a complete replacement of the soil. There is no guarantee that the plant will withstand such a transplant, but otherwise its death is inevitable.
Toxicity
Clivias contain lycorine, which is quite poisonous to dogs and cats; ingestion can cause weeks of diarrhea or even death. The seeds and berries are the most toxic.
Although the plant is not as dangerous to humans, you should still wear gloves when handling it to avoid skin and eye irritation.
Instructions
- Start the process 4-5 hours after watering.
- Prepare bedding for the plant; you can use a piece of oilcloth or newspaper flooring.
- Pour the soil from the bag into a basin; make sure you have a scoop in advance for pouring soil into the pot. It is unacceptable to use sharp equipment, as this can damage the roots.
- Wear rubber gloves to protect your hands.
- Carefully remove the roots from the pot. Perhaps this is the most important and tense moment of the entire event.
- If the plant is at least two years old and no more than eight years old, then clean the roots from the soil by washing with water at room temperature.
- Carefully examine the root for affected areas.
- If there are diseased and rotten parts of the root system, you need to carefully cut off these areas and treat the cut areas.
For processing, you should crush regular charcoal or pharmacy activated charcoal. Sprinkle the resulting powder onto the damaged areas. It is unacceptable to use hookah charcoal or charcoal tablets to light resinous incense, as they contain additives to facilitate combustion that can cause serious harm to the plant. - Pour the drainage mixture into the new pot. The thickness of the layer should be about a quarter of the total volume.
- Make a soil cushion of new soil five to seven centimeters thick.
- Place the clivia exactly in the center of the vessel.
- Carefully fill the voids with soil along the contour around the root system.
- Three centimeters of soil are poured on top. It is important not to bury the root neck; it should be left above the soil layer; if the plant is planted this way, the lower leaves will rot. That is, the roots are completely protected by the soil, and the neck remains above the ground level.
- Transshipment is done according to the same principle, only a smaller layer of soil is poured, and only small gaps, 3-5 cm wide, have to be filled at the edges. To free the root-braided lump from excess soil, the plant is carefully rolled over the table and only then placed in a new container.
- After transshipment or transplantation, the clivia is placed in a place with reduced lighting for a day or even a couple of days. Then the flower is returned to its original place. Usually, after some time, the development of the plant is activated, it significantly increases.
Attention! When working with young flowers, the risk of damaging the roots increases, since during this period they are still very brittle and fragile. Even a light touch can break the integrity.