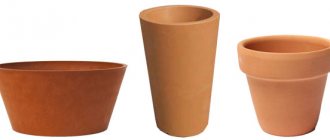
Other elements of the drainage system
In addition to the layer of bulk materials, the drainage system should also include:
- drainage holes of the container itself;
- loosening additives to the substrate, which give it a light, loose texture, prevent the soil from becoming excessively compacted.
They function in the same system and are equally important to ensure optimal conditions. When growing hydroponically, drainage completely replaces the growing substrate; in fact, the entire technology is drainage.
But even in hydroponics, the drainage holes of the container do not lose their importance, because even with an ideal drainage layer, insufficient outflow of water from the container itself will negate all efforts.
Pots and various flowerpots, no matter how attractive and stylish they are, must have at least one drainage hole. But usually the optimal size and number of holes are selected for each plant and each container individually
In plastic or polymer pots it is easy to make holes yourself, but when purchasing ceramic and terracotta pots you need to evaluate the drainage capabilities of the pots more carefully. Any container for indoor plants requires drainage holes that will allow water to drain freely, will not become clogged with soil and roots, but will also prevent the substrate and drainage fragments from falling out of the pot.
The minimum dimensions for holes for water drainage are from 0.5 cm. Holes larger than 1 cm must be covered with a mesh. But choosing the quantity is more difficult: for tall containers you need 5 evenly distributed holes, which will allow the soil to dry out evenly in the lower part, and for wide and low pots one large hole is enough. For orchids and other epiphytes, “leaky” pots are chosen, with numerous holes in the bottom and walls.
Make holes in the bottom of the pot to allow water to drain. purple sprout Lay out the required drainage layer. purple sproutFill the remaining volume of the pot with soil. purple sprout
How does a self-watering pot work?
Top 10 colors for containers, or what to plant in pots to make it beautiful all summer
The auto-watering system for pots, which I have been successfully using for a long time in home gardening, uses the natural hygroscopic properties of the soil and does not require electricity. (The homemade balcony containers I talked about earlier work on the same principle.)
Of course, you can buy a pot with automatic watering in a store, but, in my opinion, it is much more interesting to make it yourself. Moreover, the task of turning any plastic pot into a self-watering one is ridiculously simple and can be solved in two steps that even a child can do. Here's what to do:
- Place the pot on top of another container that will serve as a water reservoir;
- Connect the pot to the reservoir using a wick, through which water will naturally flow from the bottom up and be absorbed into the soil in the required quantity - just as it happens in nature.
Schematically it looks like this:
Please note: the water in such a pot never comes into direct contact with the soil, but is transferred exclusively through the wick. This design is good because it completely prevents waterlogging of the soil and associated problems (waterlogging/acidification, etc.) and thus provides the plant with healthier growing conditions
All that is required of the grower is to fill the reservoir with water a couple of times a week and be sure to make sure that the water level is below the bottom of the pot inserted into the reservoir.
In addition to automatic watering, I highly recommend equipping your regular plastic pots with another proven and useful upgrade that will make your plants grow not just well, but perfectly. And in this regard, a few words about clay and plastic - the materials from which pots are most often made.
Terms of use
Before planting a flower, it is necessary to prepare the drainage and soil. The drainage should be placed at the bottom of the container. Immediately after planting, do not pour water into the tank. The flower is watered from above several times to uniformly sift the soil, as well as to adapt the roots to the new soil. It should be taken into account that if the root system is not developed, then it is advisable to water the plant from above for up to 3 months, and then you can use automatic watering.
Water must be poured into the reservoir tube, which protrudes above the wall of the flowerpot, until the max mark on the float. From this period, the substrate gradually draws water through the hole in the bottom of the container. You can control the liquid level thanks to a float that lowers when it decreases. The speed at which this happens is determined by several factors:
- size of the tank;
- moisture needs of the plant;
- level of branching of the root system;
- air temperature, humidity, lighting;
- time of year.
Water will rarely need to be poured. For classic flowers planted in a regular pot, this activity must be performed once every 2 weeks. Moisture-loving plants need watering every 10 days. But there are pots where the water supply can not be replenished for 8-10 weeks.
If the float drops to the min mark, this means that the liquid has run out. But don't rush to fill it up again. The soil remains wet for some time, so you need to wait for it to dry. This period is determined by the size of the pot, lighting, and time of year.
To determine how dry the soil is, you need to take out the float and look at its lower part. If it is wet or dripping water, you cannot add water yet. When it is dry, you need to take a stick and stick it deeper into the ground near the roots. When the stick is wet, the soil is wet, and when it is wet, it is considered partially dry. And if it is dry, then you can fill it with water.
Thus, a pot with an automatic watering system is very convenient. If you use such a pot, you need to apply fertilizing only after 2 months. You need to add fertilizer to the water and then pour everything into the tank. Following simple rules will allow you to grow beautiful and healthy indoor flowers.
Do-it-yourself automatic watering of flowers
Rare flowers or what colors can you find in orchids?
You can organize automatic watering for plants on the balcony yourself. There are many options for creating systems from scrap materials.
Drip irrigation
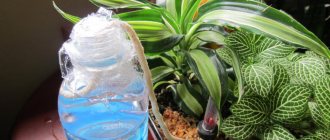
To create drip irrigation, you will need a small plastic bottle with a lid. Punch several holes in the lid in advance using a thick needle or awl. Fill the bottle with water and cover the neck with several layers of gauze or mesh. Screw the lid on tightly. Turn the container upside down and place it directly into the pot on the soil.
The number and thickness of holes is determined individually. It is better to try the method in advance in order to know for sure which holes will be optimal for watering a particular plant variety.
Wick watering
Also called the passive irrigation method. To set up the system, you will need a container for water and improvised wicks, which can be laces, ropes or threads of various diameters.
Place one end of the wick in a container of water and secure the other end in the pot with a peg. Water will be absorbed by the material and enter the soil thanks to the physical laws of pressure difference
Please note that the higher the water container is located, the faster the water will seep into the soil, so before leaving, conduct several experiments and select the optimal watering
Automatic watering from a medical dropper
The method is quite simple and common. To organize watering, you will need medical dropper systems with needles and jars of medicines, such as saline. As an alternative, you can use a regular plastic bottle. You will also need a tripod or thick wire to make it.
Action plan:
- Prepare containers and fill them with water.
- Build a tripod with a hook.
- Place a needle on one end of the system tube and pierce the lid of the container.
- Insert the other end of the dropper without a needle into the soil.
- Adjust the watering intensity using the slider on the tube.
- Hang the bottle on a tripod and leave it in that position until you return.
In this way, you can provide watering for the plant for up to two weeks.
Granulated clay or hydrogel
Special substances such as hydrogel or granular clay are good for uniformly moistening the soil in the pot. They are characterized by rapid absorption of water and its gradual, uniform release. Instructions for use:
- Prepare the substrate by filling the hydrogel granules with water in a separate container.
- Once they have swollen to the desired size, about 8 to 12 hours, pour a small layer into the empty pot.
- Place the flower along with the earthen ball on top of the layer.
- Sprinkle the soil with another layer of granules.
- Add water little by little as the balls dry.
When using this method, do not overfill the hydrogel granules, but only moisten them a little.
Capillary mats
Similar devices are sold in stores for gardeners and flower growers. The mat is made of a material that absorbs moisture well, and is covered with a protective film on top to prevent evaporation. To moisten the soil in pots during your absence, buy a capillary mat in advance and prepare 2 trays: one for water, the second with holes for installing pots. Similar containers can also be purchased in the store along with a capillary mat.
Procedure:
- Fill the prepared pan with water.
- Place the tray with the holes on the first one and cover the surface with a drip mat.
- Place the pots where the holes are located.
The material will take moisture from the pan and moisten the soil in the pots. In this case, the flowers will take as much water from the mat as they need for normal life. The device is inexpensive and does not require special skills to organize watering. The material can also be cut into strips and used as wick cords.
Cones and jars
For short-term watering, you can use special pedunculated pears, which are sold in gardening stores. There are a lot of design and color options, so you can choose a container that suits your interior. The device works quite simply. Pour water into the pear and place it in the pot. When the soil dries, dry air will flow through the stem and push out the liquid. Before using the method, it is worth testing it in practice, as some gardeners complain about excessive soil moisture.
How to organize it yourself?
Let's look at several options for making a homemade system.
Drip
Drip irrigation at home can be organized using medical droppers . It is enough to fill the dropper with water, place the hose in the pot with the plant and adjust the water flow.
Instead of a dropper container, you can use a plastic bottle suspended above the flower. This design will allow you to irrigate several pots at once. Read about drip watering of indoor flowers in this article.
Hydrogel
A completely new and efficient automatic watering system. They are helium balls that first absorb and then release moisture into the soil. 2 g of such gel can absorb up to 0.5 liters of water.
Before use, you need to know what root system each house plant has. If it is superficial, then the balls should be placed directly on the surface of the soil and watered abundantly. If the system is deeply buried, helium balls need to be buried to a depth of 3-4 cm.
Before use and the owner's absence for a long time, the balls must be soaked in water for 5-7 hours, and only then placed in pots.
Using a wick
The automatic watering system using a wick is quite simple. It will require:
- water container - it is selected taking into account the number of pots;
- a narrow piece of fabric or fabric cord - it is better to take a synthetic one, as it does not rot.
Next you need:
- Fill the container with water and place the wick.
- Place the container on a slight elevation. Pre-moisten the prepared wick.
- Place one end of the wick in a vessel with water, and the other in a pot with a plant.
For better moisture, it is better to twist the end of the wick around the trunk of the plant.
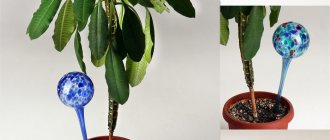
Using flasks
The flask for automatic watering is a hollow glass ball with a long tip for fixation in the soil . To water one plant during the day, you will need 1 flask with a capacity of 200 ml.
The flask must be filled with water and inserted with the neck into the soil. Irrigation occurs due to drying of the soil. As soon as the soil dries out, water from the flask moistens it again.
Instead of flasks, you can use a regular plastic bottle with a dispenser peg. The system requires:
- plastic bottle with a capacity of up to 1.5 l;
- plastic dispenser peg.
Next you need:
- Fill the bottle with water.
- Screw the peg onto the neck of the bottle.
- Insert the dispenser peg into the ground.
The bottle will moisten the soil in the same way as a factory flask. The dispenser can be adjusted to the desired flow rate.
Capillary mats
Capillary mats are a piece of felt placed in a tray with sides and covered with plastic film with holes. The mat is filled with water, and after impregnation, a pot with a plant is placed on it. You can make such a mat yourself.
For this you will need:
- pallet - you can use a deep bowl for one pot, a construction pallet for paint, a wooden box;
- thick terry towel;
- plastic film or dark colored bag.
Next you need:
- Place a towel on the bottom of the tray. If a wooden box is used, its bottom must be lined with plastic film.
- Punch many small holes in a dark plastic bag. You can roll the film several times and make a hole with an awl.
- Fill the tray with water until the towel is completely saturated.
- Cover the towel with film with holes.
- Place pots of plants on top of the mat.
This system will allow you to moisten the soil as it dries out. The main thing is to periodically remove the towel, rinse it and put it back. If you do not monitor the condition of the system, the towel may become moldy.
The video will tell you about capillary mats for watering indoor flowers:
Self-irrigating pots
A self-irrigating pot consists of 2 containers inserted into each other. A plant grows in one pot, and the outer one is filled with water. To make it yourself you will need: a container with a diameter 1-2 cm larger than the diameter of the planting pot.
Next you need:
- make several holes in the pot with soil, the holes are made near the bottom or on it;
- Pour water into the external tank; it is enough to fill it 3-5 cm;
- cover the bottom of the pot with felt fabric - the fabric is placed on the bottom with a margin of 3-5 cm on the walls of the vessel;
- insert the pot with soil into a container of water.
Irrigation is carried out due to uniform drying of the soil. Water consumption depends on the size of the holes in the container with soil and the speed of its drying. To ensure temperature balance, the water tank must be wrapped in a towel or cloth.
Ceramic cones
This product is a cone with a container for water. The container is filled with water, and the sharp part of the cone itself is inserted into the ground. To ensure an uninterrupted supply of water, the cone is equipped with a hose that draws water from an additional source at an elevation.
To make such a system yourself, you will need an empty tube of construction silicone:
- Remove the cap from the tube.
- Clean and rinse the tube to remove remaining silicone.
- Insert the sharp part into the ground.
- Pour water into the tube.
To ensure that the system is always filled with water, you need to connect the hose from the dropper to the tube. One end of the hose is lowered into the tube, and the other end into an additional water container. For example, a plastic bottle suspended over a pot.
From plastic bottles
This type of watering involves supplying water from a bottle inserted directly into the pot. The system will require:
- plastic bottle;
- dispenser tip.
Next you need:
- Fill the bottle with water.
- Screw the dispenser onto the neck.
- Insert the dispenser with the narrow end into the ground.
- Make a small hole in the bottom of the bottle.
A similar system can be assembled without a dispenser. You just need to make holes in the bottle cap and bury the bottle neck down. Watering will be carried out as the soil dries.
The video will show you how to make a drip watering system for indoor flowers from a plastic bottle:
With microcontroller
This system is more complex and will require knowledge in the field of radio engineering. To create automatic watering you will need:
- Microcontroller "Attiny13A". Can be purchased at a radio equipment store. Approximate cost 150 rubles.
- Soil moisture sensor. Cost 350 rubles.
- Bread board. Cost from 100 rubles.
- Relay. A relay is needed for the pump.
- Copper wires, cross section 1.5-2.5 mm.
- Pump.
- 12 volt power supply.
- Irrigation hoses.
- Several adapters for connecting hoses.
- Water container.
power unit
Connects as follows:
- power supply from a 220 volt household network is connected through the “L” and “N” terminals;
- 12 volt output via terminals “V+” and “CON”.
It is necessary to mark the + wire or use a red wire. Connect the wires from the power supply outputs to the mounting terminal block and output 2 from each terminal.
Controller
Connection process:
On the controller connector, connect the red wire to the “5 Volt” terminal.- Gray wire with terminal “A1”.
- Connect the + blue wire from the power supply to the “GND” connector on the controller.
- Connect another + wire from the power supply to the “VIN” connector
- Connect the red wire of the controller to the “5V” terminal on the board itself.
Humidity sensor module
Connection is carried out in the following order:
- connect the red wire from terminal + on the controller to one output of the humidity sensor module;
- connect the second contact of the sensor module to the “GND” terminal on the controller;
- connect the sensor to the module using the terminal block.
Relay
Connects as follows:
- + from the power supply connect to the “NC” contact.
- A negative wire from the power supply with a “no” contact.
- Connect the relay contacts to the controller through its own connector: “VCC” with the red wire, “GND” with the yellow wire, “INN” with the brown wire.
The entire circuit must be assembled on a printed circuit board without using a soldering iron. Next you need to connect the pump.
This is done as follows:
- the brown wire from the relay connects to any contact on the pump;
- Connect the negative wire from the power supply to the second wire of the pump.
Next, you need to connect the water constipation and water supply tubes to the pump.
The system works as follows:
- The inlet from the pump is placed in a container of water.
- The system is connected to a 220 Volt household network.
- The moisture sensor is inserted into the soil.
- The outlet tube from the pump is placed in the plant pot.
- When the humidity level reaches less than 70%, the relay will turn on the controller, which in turn will turn on the pump.
- Watering will take place.
The duration of watering is set by the controller settings. They are set only through the programmer. You can order the controller firmware immediately upon purchase.
How does it work?
Which plants are suitable for wet soil?
Nevertheless, pots with automatic watering are quite popular, if only because they allow you to save energy on the most labor-intensive manipulation. Other components of caring for indoor plants are much simpler. For beginners who do not yet have proper experience as gardeners, automatic watering is also valuable because it smooths out many mistakes. The principle of operation of a flowerpot with such a function is technically quite clear. Automatic watering is carried out using the capillary method. The law of communicating vessels, described even in school textbooks, can be safely illustrated with such devices.
There are designs where the tank is made in the shape of a cone. This reservoir is inserted into the pot and then connected to the tube. The tube itself rises above the surface and is equipped with an indicator showing how much water is left. In another embodiment, one container is inserted into another. The reservoir located on the side actually also serves as a channel.
There are also collapsible devices. A dividing barrier, an indicator tube and a container are inserted into this type of pot. All three parts are sold separately. The assembly is carried out by the flower growers themselves immediately before planting. Such pots sometimes allow a combination of bottom watering with moistening the sides of the earthen ball. A float tube is used as an indicator, which marks the lowest and highest levels.
Some suppliers, along with “plumbing” components, also add a special mixture for drainage to the product package. This composition is designed for a rational supply of water in a dosed mode. However, in most cases, traditional drainage is still used. Moisture is absorbed into the substrate due to the capillary effect. The water rises slowly, but evenly.
As a result, exactly as much water is supplied as the plant needs. Of course, within the capacity of the tank. The risk that the substrate will dry out excessively or be unreasonably wet is minimized. Damage to plants in the absence of hosts due to changes in air temperature is eliminated. It is worth considering that when transplanting an adult plant into a container with automatic watering, its diameter cannot be increased compared to the previous container.
If a competent system with automatic watering is used, flower owners are almost completely freed from worrying about such issues as:
- maintaining liquid temperature;
- watering strictly at the root (without getting water on the foliage or shoots);
- prevention of diseases caused by improper hydration;
- the need to drain liquid from the trays;
- meticulous control over the amount of water and the speed of drying of the substrate.
What is important is that “smart” flowerpots even allow you to provide individual conditions for each specific type of plant. The grower's level of experience becomes less important
It is possible to cultivate even the most unstable flowers without spending a lot of extra effort.
Lechuza
German flowerpots are equipped with an automatic watering function. The containers are made of high quality plastic. They have a special irrigation system. The automatic watering system is capable of ensuring full growth of flowers.
Lechuza self-watering pots allow you to evenly and promptly moisten the soil and root system during the absence of the owners for a long period. The product has a sophisticated and versatile design, so it will fit perfectly into different designs. Due to the variety of colors, textures and coatings, many gardeners choose just such designs.
Flowerpots are made from high-quality plastic that is resistant to shocks and falls. Caring for flowers with Lechuza pots will be convenient. The products combine affordable cost, decorative properties and a moisturizing system.
Advantages and disadvantages
The problem with flowers left during the holidays cannot be solved necessarily with the help of automatic watering - there will almost always be people (good friends or neighbors) who will agree to briefly take on the responsibility of caring for the abandoned plants. Accordingly, it is worth assessing all the advantages and disadvantages of such a mechanism in order to understand whether it is better than people, and if so, in what ways. Let's start with the good.
Automatic watering is a mechanism that has no other worries; it should not refuse its owner. Previously, going on vacation, a business trip, or just to visit could become a certain problem, because not every person has friends who live nearby and like to tinker with plants. Thanks to simple technology, you don’t even have to look for them - automatic watering will replace all those who do not want or cannot help you.
If you are already fascinated by the idea of buying an automatic watering system, we hasten to inform you that everything looks interesting, but not as rosy as it might seem. Potential risks may seem exaggerated, but they are always present, so it is possible that in some situations a person is still better than even the most “smart” mechanism.
- Alas, automatic watering is just a mechanism, and any mechanism tends to break sooner or later. Any type of unit leaves a chance that it will not work - those in which water evaporates may end up in too cool conditions, and electric ones may end up without mains power or even burn out. A person, of course, can also be temporarily incapacitated, but this usually happens less frequently.
- With all the “smart” technologies, automatic watering still depends to a certain extent on human intervention. Firstly, it does not work endlessly - sooner or later it will run out of water, and then it will be of no use. Secondly, at best, it can be set up for regular irrigation, but the device itself, unlike a person, cannot respond to changing circumstances. So, with a sharp increase in air temperature, a person would think to intensify watering, and vice versa, but home automatic watering systems are not yet capable of this.
- A primitive self-watering system, assembled with your own hands, is often not a worthy solution for at least a few days of absence, and the purchase of an expensive industrial model, especially if there are quite a lot of flowers, can cost a pretty penny. If you don’t go out very often, then often it will be easier to thank your grandmother-neighbor than to introduce technology in your own home.
Principles of operation of flowerpots with automatic watering
If previously automatic watering was perceived as a luxurious “toy”, today pots equipped with automatic systems for regulating substrate humidity are slowly turning into one of the basic options for the full care of green pets. And whatever you call such containers - just pots with automatic watering, automatic flowerpots, smart pots - this does not change their simplicity from a technical point of view. An improved version of conventional containers solves the biggest problem and the most important task of proper houseplant care, and does it in the easiest way.
Automatic watering from a technical and technological point of view is a very simple device. In fact, this is a system of subsoil, capillary irrigation. Such pots work on the principle of communicating vessels, one of which contains water reserves, and the second is intended for planting the plants themselves. In fact, it is a double plant pot equipped with a special reservoir or a pot in which a separating barrier is installed.
Smart flowerpots can vary in design. Some pots have a cone-shaped water container, installed in the pot and connected to a tube with an indicator protruding above the surface of the pot. Others are made in the form of two vessels located one inside the other with or without a side reservoir-channel for replenishing water. Still others are collapsible structures: a special barrier-separator, an indicator tube and a reservoir for filling the lower part of the pot with water are inserted into the pot (they are supplied separately in disassembled form and are installed independently before planting the plant). At the same time, pots with automatic watering can provide for both bottom watering and water infiltration not only from below, but also from the sides of the earthen clod. The indicator is a “float” tube with marks of the maximum and minimum water levels, which are easy to navigate.
Image of a plant pot with an automatic watering system. lechuza
Some manufacturers, along with containers and collapsible systems for automatic watering, consisting of a special barrier for the pot, a filling reservoir and an indicator tube, also provide a special drainage mixture that ensures optimal water supply and dosing. But most automatic watering systems in pots work with the most common drainage, which is usually used for indoor plants - gravel, vermiculite, expanded clay, etc.
Saturation of the substrate with moisture occurs at the capillary level; water rises into the soil from the reservoir slowly and gradually, and most importantly, evenly. From the inner container, water penetrates into the substrate as it dries, depending on the rate at which the plant consumes moisture.
A double pot with a water reservoir, from which the plant itself actually consumes as much moisture as it needs, ensures very effective, balanced hydration of the substrate. Since the moistening process is regulated by the degree of moisture consumption and the plant’s needs for it, the risk of complete drying out of the substrate or, conversely, excessive moisture and stagnation of water, acidification of the soil is completely eliminated. And you can simply not be afraid of any mistakes, miscalculations, negligence, or the influence of temporary factors. The plants will not be harmed even in your absence, if the air temperature changes sharply, etc.
Pots with automatic watering system. lechuza
The only nuance in the operation of pots with automatic watering, which can be considered a disadvantage, is that the system begins to work only when the earthen ball is sufficiently filled with the root system, the roots of the plant reach the drainage layer and, accordingly, can “pull” water from the reservoir. If you plant indoor plants with a small root system in such a container, filling most of it with “empty” soil, you will have to wait until the root system develops and begins to “pull” moisture at the capillary level.
In the case of young plants planted in large pots, you will have to wait about 2-3 months after transplantation. All this time, pots with automatic watering are used as usual and watering is carried out using the classical method. Therefore, it is advisable to use smart pots for adult plants and not to increase the diameter of the container too much compared to the previous one. But there are also models with smart watering systems that work from the moment of planting (always check this parameter when purchasing).
On a note
When purchasing a smart pot to fill, you should choose soil that drains easily. Too dense soil can cause the plant to become waterlogged.
It is also worth paying attention to the size of the pot and the plant you are going to plant in it. Too much volume for a small flower can result in the plant simply not reaching the water. The opposite situation will lead to the same effect - because the plant is too large, it will not have enough moisture and the automatic watering system will lose its meaning. Therefore, when choosing a pot for a plant, keep in mind that the best option would be if the roots of the flower reach the level of the wick connecting the tank to the soil medium.
Save and share - it will come in handy!
Plant preparation
Before organizing automatic watering, properly prepare the plants. To ensure that indoor flowers have enough automatic watering:
- Try to reduce the amount of evaporation from the soil. To do this, place the pots in a less lit place. The less light falls on the leaves and stems, the slower the plant will develop and, consequently, consume moisture.
- Check in advance to see if the plants have any pests or diseases, and, if necessary, treat the flower.
- Do not fertilize the soil at least 2 weeks before departure.
- Remove dried flowers, leaves and buds. This way the plant will spend less energy and nutrients.
- To maintain maximum humidity around the flowers, place the pots as close to each other as possible or place them in a large container with moistened expanded clay.
- Water the soil thoroughly before leaving. You can also use the method of immersing an earthen clod in water, depending on the variety.
- For compact species, you can organize a greenhouse by covering the pot with a plastic bag or bottle.
What are smart pots?
A smart flower pot is a sophisticated IoT device that helps you care for your plants. It measures such important indicators as the amount of sunlight that falls on the flower, how much water it needs, and so on. Plus, the Smart Pot gives you recommendations on what to do to grow healthier plants. With wireless connectivity and smartphone apps, it can tell you exactly how your plants are doing and send you notifications to help you garden.
Several options for arranging do-it-yourself automatic watering systems
The simplest option is with a bottle.
The easiest way to make it is from plastic, but you can use any other bottle. If the bottle is plastic, it is advisable to cut off the bottom in order to freely fill it with liquid in the future.
Next, closer to the lid or in the lid itself, you need to make small holes for the outflow of water and fill it a little with soil (about 3-5 cm), depending on the size of the pot. Bury this bottle into the pot to a depth of about 5 cm and fill it with water.
Be sure to pre-water the soil itself so that it is saturated and all the watering liquid is not used up immediately.
Purchased automatic watering
In order to facilitate the process of creating optimal conditions for house plants, you can use special devices that are sold in gardening stores.
Hydrogel or granular clay
The original polymer absorbs a large amount of moisture - a ball weighing 2 g holds from 200 to 500 ml of water. When it gets into dry soil, the stored material begins to give away.
Hydrogel for indoor plants is available in the form of transparent or matte colored granules. Recently, hydrogel capsules have been developed that contain special fertilizers, providing the “green pet” with nutrients.
- If you plant a plant in soil with dry granules and water it thoroughly, the material will absorb excess moisture and then slowly release it back.
- You can place the ball in a small hole in a flowerpot with an already growing flower and water it. The process will start instantly. Therefore, you should carry out the procedure just before departure.
- Before releasing, soak the capsule for 7-8 hours, and then pour the granules on top of the soil mixture and cover with moss.
The cost of the package depends on the number of balls in it - from 1 to 20 dollars. Granulated clay is made from natural ingredients, but works on a similar principle.
Capillary mats
They provide excellent automatic watering for home flowers and future seedlings. The device is made of a substance that is capable of transferring liquid by capillary pressure: the mat is spread on a horizontal surface, and pots with a drained bottom are placed on it.
One end of the “mat” should be in constant contact with the liquid. A bowl placed one level below is suitable for this.
This type of automatic watering for flowers with your own hands has a big advantage - many plants can be placed on one mat. Significant disadvantages include the high probability of rotting of the roots, which are constantly in a humid environment.
This option is completely unsuitable for such fastidious flowers as cyclamen, or representatives of the orchid family - the plant will die. Bulbous plants will also not be able to receive liquid due to the fact that moisture reaches the lower roots, which they do not have.
Microdroplet system
It is often used for organizing home watering, although it is classified as industrial. There are several options.
They differ in the type of nutrition, method of collecting and supplying water, and the number of plants served. Some expensive units have timers and displays with fine-tuned operation, so you can water your home greenhouse completely automatically.
Multifunctional models with adjustable soil moisture intensity are popular. The cost depends on the capabilities of the system and the country of manufacture.
Ceramic cone
A simple device with easy operation. More suitable for compact plants. Sold with or without a container, but with universal threads for installing one.
The porous ceramic material gradually moistens the soil, preventing it from drying out and destroying the flower. It is installed closer to the side of the pot and away from the rhizome so that it does not rot.
Functional flowerpot
This option is relevant for those who like to see living plants in their home, but are unable to pay enough attention to them.
A unique system of its kind works on the principle of communicating vessels: one contains water, and the other contains a plant. All that is required from the owner of such a device is to add liquid to a special connector in a timely manner.
Using a flower pot with an automatic watering function, you can create an ideal environment for ferns, capricious orchids, cacti that do not like moisture, and other indoor plants. The advantages include: protection of roots from rotting, aesthetically attractive appearance, the ability to not worry about the well-being of the plant for a long period.
Before you finally decide on a specific system, it is recommended to test its functionality on one, the most picky plant. Let the flowers delight you with delightful colors, bright green foliage, clean air in the house and a healthy long period of life.
Lechuza product quality
Self-watering pots “Lechuza” are containers from a popular German manufacturer. They are distinguished not only by their aesthetic design and functionality, but also by their high-tech production. To create its flowerpots and flowerpots with automatic watering, Lechuza uses only the best plastic. It is environmentally friendly, and therefore has a slightly porous structure and its physical properties resemble ceramic material. Nevertheless, it is the plastic base that makes the Lechuza self-watering pots truly durable, strong, practical, durable and wear-resistant.
The peculiarity of the flower pots of the German brand Lechuza is as follows:
- Mobility. The containers are easy to move because they have rollers or additional planting pots. Lightweight plastic material also does not create problems in moving a flowerpot or flowerpot.
- Lechuza self-watering pots are manufactured in accordance with all German standards. This approach ensures their long and high-quality operation.
- Thanks to a modern system, an innovative pot with automatic watering is able to supply water to home, garden and office plants for a long period of time - from 2 weeks to 3 months. The duration of automatic watering depends on the volume and size of the container used.
- The device of a flowerpot with automatic watering consists of several components that ensure its uninterrupted operation: an internal pot for the plant; drainage insert to obtain a water reservoir; mineral substrate for the development and nutrition of plants; water supply channel for filling water and fertilizing; water level indicator in the form of a float to monitor the residual volume; drain plug for using pots outdoors.
Purpose
The product appeared in Denmark, and then became in demand throughout the world. Self-watering pots allow you to grow indoor flowers without much effort. Using this design, you can grow any plants at home.
The self-watering pot is designed so that for 2 weeks you won’t need to remember about watering your house plants. In addition, with such a system, the risk of overwatering the soil and root system is eliminated. Flowers are nourished by the amount of moisture they require.
How to use self-watering pots
Flowerpots with automatic watering are becoming increasingly popular among the so-called “smart flowerpots”, which simplify plant care. Modern manufacturers strive to create qualitatively new products for the easiest and most convenient care of all types of plants.
With Santino pots, the root system of the plant is always protected from rotting, the drainage system collects excess water when watering and then feeds the root system of your any plant in a dosed manner, as needed, optimal growth occurs due to the fact that the roots are provided with air circulation. As a rule, the drainage system is drainage granules (gravel, expanded clay) - this is an inorganic substrate that can retain up to 40% of the volume of water and provide aeration of the roots.
Many people ask: How to use a self-watering pot? The answer is very simple! Just like with any other pot or flowerpot. Draining excess water from Santino self-watering pots is not difficult, since all Santino pots have a double body; you just need to remove the inside of the body along with the plant and soil. If your model of self-watering pot requires a special drainage cartridge, then before use you must remove the protective film.
Automatic watering system for Arte pot:
- Evenly distribute drainage granules (gravel, expanded clay) over the entire surface of the bottom of the functional insert of the Arte pot.
- Apply a sufficient layer of growing medium (soil) on top of the drainage layer. Place the plant in the pot and carefully add the required amount of plant substrate, gradually compacting it.
Automatic watering system for Asti pot:
- Evenly distribute drainage granules (gravel, expanded clay) over the entire surface of the bottom of the functional insert of the Asti pot.
- Apply a sufficient layer of growing medium (soil) on top of the drainage layer. Place the plant in the pot and carefully add the required amount of plant substrate, gradually compacting it.
- The water level indicator built into the body of the flowerpot will allow you to control the volume of water without unnecessary manipulation.
Automatic watering system for Latina pot, Latina Box:
- All pots in the Latina series already have a built-in drainage cartridge containing the innovative Ceramopon drainage granules; you just need to remove the protective film from the drainage cartridge.
- Apply a sufficient layer of growing medium (soil) on top of the drainage cartridge. Place the plant in the pot and carefully add the required amount of plant substrate, gradually compacting it.
- The built-in water level indicator will allow you to control the volume of water by watering through a special filler element in the body.
Automatic watering system for Deco pot:
- Evenly distribute drainage granules (gravel, expanded clay) over the entire surface of the bottom of the functional insert of the Arte pot.
- Apply a sufficient layer of growing medium (soil) on top of the drainage layer. Place the plant in the pot and carefully add the required amount of plant substrate, gradually compacting it.
Calipso pot self-watering wick system:
- If you have a lot of moisture-loving plants, the wick method of watering will be the best solution. Add a layer of plant substrate so that the wick is not pressed to the bottom of the pot (as shown in the video).
- The method is based on the capillary properties of a wick (a thin cord made of nylon, nylon or other well-wettable material). The higher the surface tension forces that arise at the boundary separating the liquid and solid phases, the better the capillary suction of the wick. As a result, it conducts water well. One end of the wick is lowered into the water, the other is brought out into a pot with a planted plant.
How to make drip irrigation with your own hands
This is a simple and inexpensive method that will allow you to leave plants for a long time. To build it you will need empty plastic bottles with caps.
Several holes are made in the lid. Pour water into a bottle, screw on the cap and stick it into the ground next to the plant, cap down.
The holes should be made in such a way that the water flows out quietly and does not flow out in a trickle. The size of the bottle is selected based on how large the flower needs to be watered and how long the plants are left unattended.
For a small pot, a half-liter bottle will be enough, but for large pots it is better to take a container of 2 or more liters.
Wick system
An easy-to-use and well-known watering system that involves the use of a large container of water and homemade wicks. They can be any thread, twine, bandage, laces . One end is fixed in the pot with a wooden peg, the other is lowered into the water.
If you are often away from home, you can install a wick while planting the plant by threading it through the hole in the bottom of the pot . Only in this case should you use a synthetic cord for an improvised wick.
Before launching such an irrigation system, it needs to be tested - water must flow into the ground at the required speed. Adjustment is simple; just position the water container correctly relative to the pot with plants.
Hydrogel, granular clay, beads
Automatic watering works well with hydrogel or clay granules , which can be purchased at flower shops and soaked in water. This material not only perfectly absorbs large amounts of moisture, but also releases it to plants when necessary.
To arrange this type of irrigation you need:
- take a pot slightly larger in volume than the one it was in;
- pour clay or hydrogel onto the bottom;
- carefully pull out the earthen lump with the roots of the flower, trying to prevent it from falling apart;
- place in a pre-prepared pot;
- fill the void from the sides with hydrogel and cover the soil with plastic film.
It is enough to water the plant well or place the flowerpot in water for a while, and your flower will receive life-giving moisture for a long time.
Droppers
Another effective way to set up automatic watering for indoor plants with your own hands is to use medical droppers. For each pot, take 1 dropper.
Manufacturing technology:
- cut off the needles, fasten the droppers to the required length, hang a weight on the ends;
- fill the bucket with water and lower the weighted ends into them;
- Place the free end in the pot and open the regulator to the desired state.
Important! You need to choose a method for automatic watering of indoor plants before leaving and test it for performance.
Colorful cones
These original products were invented in our country - water is poured into colored cones, then they are connected to a special stem, which is subsequently stuck into the ground next to the plant.
The advantages of this watering method are as follows:
- original and practical solution;
- aesthetically attractive appearance;
- no need to build complex structures.
Capillary mats
These are a kind of mats made of hygroscopic material that can be bought at any flower shop. One edge of this mat is lowered into the water, and flowers are placed on the second.
Advice! It is better to buy capillary mats complete with trays - there are 2 of them, flowers are placed in one, and water is poured into the other. Using this method, you can leave the plants unattended for 2 weeks.
Model rating
It is problematic to make an adequate rating of automatic watering models for indoor plants. Here, existing models often do not shine with fame, even if they are found in every home, and new designs appear every year, and each consumer needs something special, and not some average option that suits most other buyers. For this reason, we will not give away places, and we will not even claim that our automatic waterers from the list are definitely the best. These are just good samples of products that can be useful to every amateur gardener.
Idea M 2150 is a pear-shaped polypropylene analogue of a ceramic cone. For a large-scale home plantation, this solution is far from ideal, but for a single plant, and even if the owner is away for a short time, it is definitely the most profitable given its cost.