I want to see the orchid bloom longer after purchase. And if she is the only one of the orchids, you will strive to increase their number. Notice also envious glances acquaintances and friends. They wouldn't mind having such beauty.
Is there a branch of it? So you begin to master the basics of reproduction . Simply distributing seeds or bulbs will not work. Most species are more difficult to propagate. But it is possible.
In nature, for many centuries they reproduced on their own.
And they continued their lineage. Some even have their own enticements :
- Aroma;
- Nectar;
- Color and structure. In some orchids, the color and shape copy the female insects.
But not everyone could survive. And civilization helped some to cease to exist. Previously, they were evidence of wealth and luxury . Now there is enough information about them. Yes, and more accessible. Many new species have been developed. There is a whole industry of their cultivation and sale.
Many amateur gardeners propagate orchids at home.
A huge number of hybrids have been specially bred for home use. They are propagated at home. Not only in greenhouses. Successfully. True, not all.
It is not difficult to choose the appropriate breeding (planting) time for the species. The end of flowering of most orchids also marks their preparation for a new flowering. Orchid flower as a fruit for fruit plants. This is also their main method of reproduction . A necessary and next stage towards new growth. Maybe with a little rest (rest period). At the end of spring.
Important! With sick plants, it is necessary to delay propagation until recovery.
Take all this into account. And select techniques, methods and time for a specific species (plant). Let's learn more about how to propagate an orchid at home.
General rules of care
- Young plants need to be planted in suitable containers and with proper care: First, lay expanded clay drainage;
- Select the composition of the substrate as in your parents. You can add a small part from the mother plant.
- Especially temperature (not lower than 25 degrees) and high humidity (70-80%);
Let's find out below: if the orchid has faded, what to do with the arrow?
- If the peduncle is green and the orchid does not dry it out, then we leave such a peduncle without trimming, because flowering may still continue from its dormant buds.
- If the orchid begins to dry out the peduncle, then the dried parts are cut off as they dry and the sections are disinfected and covered with wax to avoid water getting inside and rotting.
How to divide?
There are several ways to plant orchids, each of which has its own nuances and distinctive features.
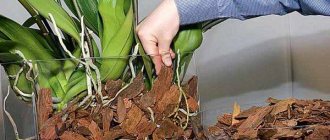
Dividing the bush
This method of planting an orchid is suitable only for its sympodial species, which are characterized by the presence of several growth points, which allows the plant to be divided into parts. Moreover, only an adult flower, at least two years old, can be planted by dividing the bush. The procedure for planting an orchid using bush division is as follows:
- remove the flower from the pot and place in a container with warm water to soak for 30 minutes;
- carefully clean the roots from any remaining soil;
- conduct a careful inspection of all parts of the plant to detect possible signs of disease, rot or damage, as well as dead fragments;
- remove all damaged areas with a sharp, disinfected instrument, and treat the sections with activated carbon powder;
- divide the plant along with the root system into parts so that at least three pseudobulbs remain on each of them;
- be sure to treat the cut areas with crushed activated carbon;
- place the divided orchid to dry for 2-3 hours;
- transplant each part of the plant into a separate pot with new soil.
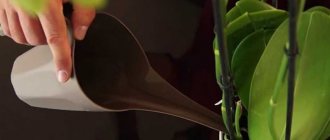
A planted orchid cannot be watered for the first 2-3 days, then watering can be carried out as usual.
If traces of lesions are found on the roots of a flower during the planting procedure, it is necessary to place it in an insecticide solution for half an hour before dividing.
From the video you will learn about dividing an orchid bush:
Bulbs
This method of planting orchids becomes possible when the plants form bulbs on their own roots. This happens when the pot is too small for normal flower growth. At the same time, each formed bulb becomes overgrown with its own roots, and the common root system literally crawls out.
- The orchid should be removed from the pot, the usual steps should be taken to remove any remaining substrate, and the plant should be inspected to determine the degree of its health.
- After this, use a prepared tool to separate the required number of bulbs with regrown roots and treat all sections with crushed activated carbon.
- Then plant the bulbs in a new substrate.
You need to take only bulbs that have roots, otherwise they will not survive.
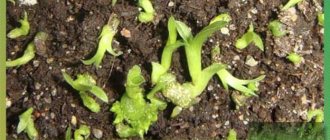
Seating for children
This is one of the easiest ways to plant an orchid. Children are small plants that are formed from the buds of the mother specimen, located, depending on the orchid variety, in:
- leaf axils;
- on the trunk;
- peduncles;
- roots
The children are born independently and are double leaves with rudiments of roots. They are ready to be separated and transplanted when their roots reach a length of 3-4 cm.
The children need to be separated together with a part of the adult plant - 1 cm is taken from it for pruning on each side of the shoot. It is necessary to use a well-disinfected instrument, and immediately treat the cut areas with powdered activated carbon. After this, the babies are soaked in warm water for 15-20 minutes and transplanted into a transparent pot with a prepared substrate in the usual way, similar to planting an adult orchid.
Sometimes it is recommended to place the cut baby for 15-20 minutes in a growth stimulator diluted in water to strengthen and accelerate the development of the root system.
- At first, the young shoot requires high humidity, to ensure which you need to build a small greenhouse using plastic film, a plastic bottle or glass jar.
- You can water the baby only on the third day after planting.
- It is recommended to keep a young plant in greenhouse conditions for a year and only then replant and care for it like an adult flower.
If an orchid does not produce babies for a long time, you can stimulate it by carefully picking up a scale on a peduncle bud and treating it with cytokinin paste.
From the video you will learn how to separate the baby phalaenopsis orchids from the flower stalk:
Cuttings
The method of planting orchids using cuttings is suitable, mainly for fast-growing types of orchids, for example, Vanda or Dendrobium. In these varieties of orchids, roots often form not only in the substrate, but also in the upper part of the plant. These shoots can be cut by separating the tops with young roots from them.
Cut a cutting 6-10 cm long with a sterile instrument, being careful not to damage the delicate roots. The cut sites are treated with an antiseptic and immediately planted in a pot with the prepared substrate.
Cuttings from an orchid can be carried out only after it has completely bloomed.
By shoots
This method of planting orchids at home is considered the most difficult and time-consuming. Typically used for fast-growing and monopodial orchid species. Sometimes it is used for sympodial orchids, but the result is worse. In essence, it is a complicated cutting.
Planting of shoots at home is carried out as follows:
- Using a sharp sterile instrument, cut the side shoots of the plant into cuttings 6-10 cm long, with the obligatory presence of about 2-3 dormant buds on each part.
- Treat the cut areas with an antiseptic and leave to dry for five hours.
- Place the chopped shoots horizontally in a nutrient substrate (for example, damp sphagnum moss) and leave until roots appear.
- Plant the shoots in new soil for rooting, placing them vertically and providing the necessary care.
You can divide into cuttings not only the side shoots, but also the faded peduncle. A significant difference here will be maintaining the length of one segment at least 10-15 cm.
In all cases, the diseased plant is unsuitable for replanting, since there is a high probability of infection of young shoots. You should evaluate the condition of the roots and leaves of the flower and try to cure it. If the mother plant can no longer be saved, it is worth trying to plant its young parts.
You will learn how to plant an orchid with cuttings from the video:
Basic mistakes
How to properly grow an orchid at home without making mistakes? When starting the breeding process, we hope for a positive result. But there are also failures :
- Only healthy plants without diseases can produce a good new bush . And we often try to save the sick;
- All cuts must be made with a clean tool. And sterilize;
- An optimal regime must be created for transplanted plants.
Features for different varieties
Different types of orchids have some characteristics that need to be taken into account when planting.
Cymbidium
This terrestrial epiphytic plant is replanted every 3-4 years, immediately after the end of the flowering period.
One of the important conditions for planting Cymbidium is that it has at least 6 pseudobulbs.
The plant is divided into sectors, 3-4 pseudobulbs with leaves and roots in each, dead roots are removed and planted in a new container with a substrate mixture.
Cumbria
For this type of orchid, the method of planting using bulbs is also suitable. All steps are carried out in the usual manner.
You will learn how to divide the bulbs of the Cambria orchid from the video:
Cattleya
For Cattleya, the most suitable transplantation procedure is carried out by dividing the bush. The entire sequence of this method is carefully observed so that the separated parts take root well and take root.
From the video you will learn how to divide Cattleya:
Wanda
The most effective method for planting Vanda is considered to be separating the children from the mother plant. Of course, this procedure is best performed during a planned transplant, following all the necessary recommendations. They also often use the planting method for Vanda by cutting the apical parts of the shoots.
Dendrobium
For this type of orchid, all methods of planting go well. Separated children, cuttings, shoots and other parts of the plant quickly form a strong root system and continue to develop. Of course, they also require proper care and suitable living conditions.
You will learn about the division of the Dendrobium orchid from the video:
Is it possible to grow an orchid from a leaf?
Some people ask how to propagate an orchid “from a leaf.” This method really exists, only for propagation it is not the leaf that is taken, but the arrow - that same peduncle. It is prepared in the same way as the side shoots - cut into cuttings. It is only necessary that the arrow completely blooms before propagation. Parts of the peduncle are also laid horizontally on moist soil. They must be covered with a cap to create a greenhouse effect.
Propagating orchids is a good way to add to your plant collection. Quite a few people breed orchids for sale, which is a fairly popular business.
[media=
https://youtu.be/BCk2ls5Tdt8
]
Baby separation technology
In order not to sigh sadly about why you can’t grow an orchid from a peduncle at home, you should follow simple rules:
- the flowering stem is cut off at the base;
- Each part when divided must have a bud;
- the length of one cutting is 4-5 cm;
- the bud should be located in the center of the piece.
Stimulation: use of cytokinin paste
The maximum benefit for using the drug, created on the basis of the phytohormone of the same name, is achieved with proper application. To do this, a dense scale is cut on the uppermost or lower dormant bud. You can use a knife, needle, scalpel (pre-disinfect). Remove the cut off scale and apply a ball of paste with a diameter of 2 mm to the opened green dot (this is the bud). Spread over the surface of the kidney.
With the correct process, the result will be noticeable after 7-10 days.