Callas are beautifully flowering perennial plants; they can be grown as a potted crop or planted in the garden. With the arrival of the first frosts, the question arises: how to store callas in winter? For a productive winter they need a temperature not lower than -2ºС. Not all climate zones have such mild winter weather, so these perennials need to be dug up for the winter to create optimal conditions for them.
The main stages of preparing for winter
Experienced gardeners do not have a question about whether they need to dig up callas for the coming winter. The plant is stored exclusively indoors; the necessary conditions are created for this. Tubers must be properly prepared for storage. The timing of this work also differs. You should focus on the onset of the first frost.
- In the middle zone they begin in mid-October.
- In the southern regions, persistent cold snaps occur in early November.
How to dig calla lilies correctly
Digging of calla bulbs begins with the first drop in temperature to sub-zero levels. They will not damage the plants. The process of ending the growing season will begin. The nutrients of the flower will not be used to maintain leaves or form new ones. Gardeners have several recommendations for properly preparing the plant before digging it up.
- Watering must be stopped approximately 2-3 weeks before the tubers are removed.
- The leaves need to be trimmed, leaving them at a level of 7-8 cm. After the first frost, this can be easily done with pruning shears or scissors.
- It is better to dig up tubers with a pitchfork. This reduces the risk of damage to the part that is underground.
- It is better to make the hole around the root system larger. After completing the process, carefully remove the soil from the tubers.
Drying callas
Planting material needs to be thoroughly dried. The tubers should first be inspected and damaged tissue or parts should be removed. A healthy foundation must remain. To remove individual areas, it is better to use a garden shovel or a teaspoon. After removing the damaged tissue, healthy areas must be treated with a solution of brilliant green and sprinkled with crushed activated carbon. This will eliminate the risk of developing diseases that affect the root system. Dispose of removed areas. They are not used for future fertilizer that will be applied to the garden bed. So, the disease can easily spread throughout the area.
It is better to dry the bulbs in low cardboard boxes or plastic boxes that are used for storing fruit. The bottom of the container should be lined with paper. Drying is carried out:
- in a dark and cool place;
- subject to free air circulation;
- in the absence of sunlight;
- The temperature in the room should be 15-20 degrees.
Gardeners prefer to place boxes with tubers of harvested calla lilies in the basement or well-ventilated garage. After a week, you can easily remove all remaining leaves. In another week, the roots will completely separate from the tubers. Young “children” should not be removed from the mother plant. They do not have a separate partition. When dividing, it is easy to injure the plant. This process is carried out in winter, when the “kids” are already mature.
If the mother plant is damaged at the time of separation, the injured area must be treated with brilliant green and sprinkled with coal. On average, drying time for planting material takes from 2 to 3 weeks.
How to prepare callas for wintering: step-by-step instructions
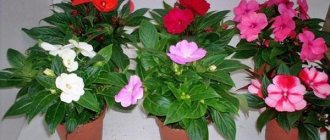
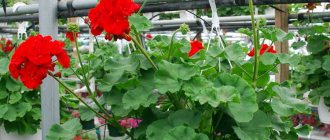
White, purple, pink, red, orange - callas will enliven any front garden and will decorate it from June until the first frost. But with the onset of cold weather, the plant will need your help.
After all, the future fate of the flower depends on the correct extraction from the ground and subsequent storage of the tubers. Therefore, we invite you to study our step-by-step instructions for preparing calla lilies for winter and, if possible, follow these simple recommendations.
What we call calla lily flowers are actually “blanket” leaves. However, this does not at all reduce the decorative value of the plant.
Step 1. When to dig up callas
It is recommended to dig up callas before the first frost. In the northern regions of Russia, the procedure is carried out in early September, and in the southern regions it can be postponed until November. Check the weather forecast and plan to dig up the tubers on a dry, sunny day.
One to two weeks before digging up callas, you need to stop watering them.
- 10 most frequently asked questions about tuberous callas (planting, care, storage)
We answer questions from novice gardeners about growing tuberous calla lilies.
Step 2. How to dig up callas
The best tool for removing tubers is a pitchfork. This way you will reduce the likelihood of injury to the plant. Step back 20 cm from the center of the flower and begin to carefully dig out the calla lilies in a circle. In this case, you should not pull it by the stems; it is better to help lift the earthen lump with your hands and safely remove it along with the tubers.
Step 3. How to prepare the tubers
First you need to clear the tubers from the soil. If it turns out to be wet enough, which makes cleaning difficult, then the callas are placed in a box covered with paper and allowed to dry for several days in a warm place.
At this time we do not touch the leaves. They will dry out and fall off easily without your intervention. Place the peeled tubers (we clean them carefully so that the “babies” are not injured) for 20-30 minutes in a fungicide solution, and then dry them in the sun for 3-5 days.
- What are fungicides and what are they used for?
From the article you will learn why you need to treat plants with fungicides and how to apply them correctly.
Step 4. How to clean rotten tubers
Use a sharp knife to cut off the damaged tissue and treat the cut area with brilliant green. Remember that rot cannot be thrown into a compost pit, it must be disposed of.
Step 5. How to prepare tubers for wintering
After drying, you can easily separate the tubers from the leaves. At the initial stage, we leave them so that the nutrients go into the tuber itself. In about another week it will be possible to free the tubers from the roots.
Step 6. How to store tubers
Clean and dry tubers are placed in a box and covered with sawdust or vermiculite. The container itself is stored in a room with an air temperature of 10-12°C. Inspect the tubers from time to time: they should not rot or dry out.
At the end of winter, you can separate the “babies”.
All these procedures can be carried out with calla lilies that grow in a pot in an apartment. The starting point for action should be yellowed leaves. But if you don’t have a goal to propagate the flower, just move it to a cool place (12-14°C) and gradually reduce watering.
There are no worries with callas until spring. If storage conditions are properly observed, next year your front garden will become even more lush and brighter.
How to store it correctly
Selected material for planting in winter must be periodically inspected. This will prevent any rot that has formed from being missed and, if necessary, remove damaged areas in a timely manner. Bulbs should be stored in cardboard boxes in a cool, dry place. They are dormant from October to April. Of course, these dates vary depending on the region. Indeed, in the northern regions, plants need to be dug up already in August, and planted when constant warmth has established. Gardeners believe that the best place for growing flowers is the Middle Zone, Southern regions.
Wintering a plant in a pot
Calla lilies have successfully become plants found in many homes. They must also be periodically at rest. It is artificially necessary to stimulate the cessation of the vegetative period of the plant. To do this, the pot should simply be placed in a dark, cool place. Watering the flower is also reduced. Many people doubt whether it is necessary to dig calla lilies out of the pot for the winter and store them according to the established technology. Experts say this procedure is not necessary. The tubers will overwinter well in a pot or container.
Choosing a storage location
Proper storage will ensure continued good flowering of the plant. For storage, you can place containers with tubers in your apartment, basement, refrigerator or loggia. Each place has certain features that are important to consider.
Contents in the basement
This place is the most common for wintering planting material. This storage technique requires certain rules to be followed.
- It is important to observe the temperature regime. Boxes with bulbs should be kept in the basement at a temperature not lower than +5 and not higher than +10 degrees.
- Excessive temperature conditions can cause premature germination of tubers.
- The storage period should last until the end of March. Afterwards, the bulbs need to be transplanted into soil and pots.
Winter accommodation on the loggia
A loggia is one of the most common places where it is very convenient to store flower bulbs. This is a great way to grow flowers in pots at home. This technique requires the following conditions to be met:
- by the onset of autumn it is necessary to reduce watering, gradually preparing the plant for hibernation;
- when the leaves die, the flower pot needs to be moved to a balcony (necessarily glazed) or loggia. There they are stored until spring.
Read also How to dilute nb 101 in granules
Location until spring in the apartment
You can store prepared tubers in an apartment for those who do not have the opportunity to place the plant in the basement or on the balcony. Flat storage is a risky storage method. It requires certain conditions:
- The container with tubers should be in the coldest place in the apartment. For example, on window sills, away from the radiator, near the balcony doors;
- It is important to ensure temperature conditions (not higher than +20 degrees). Even at this temperature, the tubers can withstand the winter, however, closer to spring they will dry out and wrinkle. This can negatively affect the flowering process in summer.
In a refrigerator
If you need to overwinter a small number of tubers, then a refrigerator is suitable for this at home. This is the second method of storing flowers after the basement. It requires compliance with two important conditions:
- the tubers must be wrapped in paper and placed in a separate compartment of the refrigerator, in which vegetables are usually stored;
- the temperature should be between +5-7 degrees.
Methods for storing plants
Properly organized storage and compliance with the correct temperature conditions during maintenance are a guarantee of future abundant flowering in the summer.
Depending on the capabilities of a particular gardener, several storage methods can be distinguished:
- in the basement;
- in a refrigerator;
- on the loggia;
- in the apartment.
Contents in the basement
The most common way to store this plant at home is to place them in the basement of the house. Calla lilies are handled as follows:
- To save planting material until spring, boxes or bags with it are placed in the basement, where the temperature is maintained at approximately +5-10 degrees throughout the winter.
- It is extremely important not to allow the temperature to increase - this can provoke premature germination of the planting material.
- Important! Proper storage of garden callas requires a dry room; therefore, they should not be stored in cellars, since there, as a rule, there is consistently high humidity.
- The dormant period for calla tubers lasts until the end of March. After which the tubers can be taken out and planted in pots for growing.
In a refrigerator
If you need to save a small amount of planting material until spring, preferably at home, then you can resort to the refrigerator. This is the second most common method of storage at home. And it has its own specifics:
- The storage procedure is the same: the tubers are wrapped in paper or newspaper and placed in the vegetable storage compartment.
- As a rule, the temperature is maintained between 5 and 7 degrees.
Winter accommodation on the loggia
The balcony is another way out of the situation. This method is suitable for those who grow garden callas in pots at home. If you decide to store there, then:
- with the onset of autumn, watering begins to be gradually reduced;
- After the final death of the leaves, the vessels with plants are transferred to a loggia or glazed balcony, where they are stored until spring.
Location until spring in the apartment
If it is not possible to use other storage methods, then you can risk storing calla bulbs in an apartment. For this:
- You should try to place boxes with planting material in the coolest place, for example, next to the balcony door;
- We take into account that at air temperatures above +20 degrees, callas can easily survive the winter, but by spring their tubers dry out and wrinkle. In the future, this fact may cause weakened flowering in the summer.
Let's wake up the callas with the arrival of spring
The middle zone completes wintering of callas at the beginning of April, the southern regions with the onset of March. To do this, you need to remove the roots and conduct a thorough inspection for damage. Then they need to be treated with potassium permanganate and a fungicide - this will help avoid the development of a fungal infection. If the babies were not separated from the calla lilies before wintering, you can do this now. The flower is then transplanted into a pot for further growth and flowering.
Common mistakes made by newbies
In order for the flower to grow actively, you must adhere to certain recommendations. However, most novice gardeners often make mistakes, which later lead to disastrous consequences and the plant cannot achieve the desired result.
- You need to dig up the tubers carefully - the root system is very delicate, the slightest sudden movement will lead to damage.
- If there are children on the roots, it is better to wait for them to separate on their own, then remove them from the main bulb.
- If you do not remove the small roots from the tuber, they will germinate during the wintering period.
- At the storage location, the temperature should be between 3-7 degrees above zero with a minimum level of humidity.
How to dig up callas correctly?
The time for this technological operation is after the first frost, approximately:
- early October in the middle zone,
- early November - in more southern regions.
There is no need to be afraid that the first small frosts will damage the plant. On the contrary, this will be a signal for him about the end of the vegetative period. The plant will stop using nutrients to produce leaves as it begins to prepare for dormancy.
Before digging up calla lilies, you need to prepare the plant. To do this, stop watering it if the weather is dry, about 2-3 weeks before the expected harvest for the winter. This advice is relevant for the southern regions, where a dry climate in the fall is far from uncommon. Before digging, you need to cut the calla lilies leaves above the soil level by about 7-8 cm. After the first frost, the foliage has already dried out, and this operation is easy to carry out with ordinary scissors.
It is best to dig up calla lilies with a garden fork. This way there is less chance of damaging the delicate parts of the plant.
When digging calla lilies, it is advisable to leave a fairly large distance around their roots. It is better to play it safe and dig a hole of a larger diameter than to treat a plant injured by a shovel or pitchfork. After digging, you need to carefully remove the soil from its roots, being careful not to damage them. You can wash off the remaining soil with running water under a tap or a garden hose. Try not to let the stream be too strong. High water pressure can damage the “children” of calla lilies that have not yet separated from the adult plant.
Calla lilies wintering. How to preserve calla bulbs in winter?
Callas are delicate, beautiful flowers that will be an excellent decoration for the landscape of your summer cottage. This plant is mostly grown in pots, but they can also be grown in the garden, in open ground.
How do calla lilies survive winter? In order for frosts to pass without negative consequences, they need to be dug up, since temperatures below -2 degrees are contraindicated for them.
The topic of this article is calla lilies: how to store them in winter? From it you will learn how to properly dig, prepare planting material and where to store it.
Callas: how to store in winter?
Calla lilies - storage rules for summer residents
Callas are usually dug up after the first frost. In the middle zone of our country - starting in October, and from the beginning of October in young regions. The first frosts do not harm them, but serve as a signal for the end of the growing season.
Two to three weeks before digging, the callas are no longer watered, but light shelters are built to protect them from possible rains. Leaves that have dried out after frost are cut off, but petioles about 7 centimeters high are left. It is better to use a garden fork to dig up the bulbs, this reduces the risk of damaging the plants.
To avoid damaging the roots, you need to dig a hole with a slightly larger diameter.
After the bulbs are dug up, they are cleared of soil. You can use a weak stream of water, since strong pressure often harms babies who are not yet ready to separate. Peeled bulbs should be carefully inspected and diseased ones should be discarded.
If the damage to them is minor, the bulbs can be saved by stripping them down to healthy tissue and disinfecting them with brilliant green or charcoal.
To dry, calla bulbs are placed in low cardboard, wooden or plastic boxes, the bottom of which is lined with newspapers.
Calla lilies should be dried in a dark, cool place where there is good air circulation, at temperatures up to 20 degrees. After about a week, dry leaves are removed from the bulbs, and after another week, the roots are cut off, which provides the bulbs with proper rest.
The babies are not separated at the beginning of storage, because they are not yet ready for this: the film separating them from the mother bulb has not yet formed. This procedure is best carried out closer to the middle of winter.
How long do the bulbs take to prepare before they are stored? The bulbs are dried for two to three weeks, depending on the air humidity in the room.
How to store calla bulbs? To do this, you need to follow some recommendations from experts:
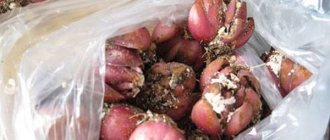
- It is best to store bulbs in thick paper bags or cardboard boxes, which should have holes for ventilation.
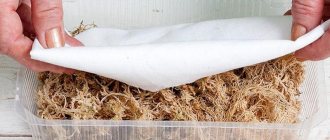
- To prevent the bulbs from touching, use a substrate of moss, sawdust, vermiculite or shavings.
- If the bulbs are too dry, they need to be sprinkled with water.
- The bulbs are well preserved at a temperature of 5-7 degrees in rooms with dry air, without stagnant air, and in the absence of lighting.
- Planting material should not be stored next to vegetables and fruits, as they humidify the air. High humidity can cause the bulbs to awaken early or cause them to rot.
Wintering of calla lilies ends in March in the southern regions and in April in the central zone. Before planting, the bulbs are treated with fungicides. You also need to separate the children if this has not been done before.
Now you know how to store calla lilies in winter, so be sure to take care to dig, prepare and store the bulbs. We hope that our tips will help you grow beautiful, healthy and bright calla lilies in your summer cottage.
Drying callas
Having dug up calla lily tubers that you have grown yourself, you will most likely be surprised by their striking difference from the planting material that you purchased before planting in your own garden. Now these are strong, large and beautiful specimens. Before setting aside the root tubers to dry, you need to carefully inspect them.
It is advisable to discard tubers with signs of rotting. If this is a particularly valuable variety and the damage is minor, you need to strip the damaged tissue to a healthy base. It is best to do this with a teaspoon or a sharp garden tool.
Damaged and peeled tuber tissue must be disinfected with a solution of ordinary brilliant green or sprinkled with crushed coal. You can use activated carbon for this purpose.
Rejected material must be disposed of, but under no circumstances should it be placed in a compost heap. Such actions can contribute to the spread of the disease to other plants. Low cardboard or wooden boxes are best suited for drying root tubers at home. You can use plastic fruit boxes lined with cardboard or old newspapers.
Conditions for high-quality drying of calla lilies:
- dark and cool place;
- good air circulation;
- lack of sunlight;
- temperature not higher than 15-20⁰С.
Read also Autotrophic or heterotrophic lichens
The best premises may be a garage, a ventilated dry cellar or basement, or a barn. It is better to place boxes with calla lilies rhizomes in one row. After a few days, you need to completely remove the dry leaves, and after another week, the roots, which by this time will be removed very easily. When the roots are not removed, the plant may not begin to grow in time, without going through a full dormant period.
During this period, you should not separate the “babies” from the mother plant. They have not yet fenced themselves off from it with a special film - there is a great danger of causing injury to the plant. It is rational to separate the “babies” in winter. Then they ripen and can serve as full-fledged planting material. If this happens, the damaged area is dried and again disinfected with brilliant green or charcoal. The drying period can take from two to three weeks, depending on the ambient humidity.
Storing callas for winter storage
So, what do you need to prepare for wintering? First of all – suitable containers. The best option for this would be thick paper bags or cardboard boxes with ventilation holes. If you store a large collection of various varieties, you need to label them so that in the spring you do not make mistakes in choosing the color scheme when composing a composition of calla lilies. The best material for this would be thick foil - a material that does not rot or deteriorate.
The name of the variety can be written on foil by squeezing out the letters with a regular pen or knitting needle. The tag is attached to the package or to the side of the box.
The main condition for proper storage is the isolation of root tubers from each other and air circulation between them. In order to isolate the tubers from each other, a substrate is poured into a bag or box between the tubers, which can be used as:
If a sick specimen ends up in such a storage facility at home, the insulation will reliably protect other tubers from rot.
Although high humidity is not welcome, wrinkled and overly dried tubers should be sprinkled with water from a spray bottle to prevent them from drying out.
The optimal temperature for storing calla root tubers is 5-7⁰C. Ideal conditions for storing them are a fairly dry room that has good ventilation. If this is a basement, then the harvest should not be stored in it. During storage, fruits and vegetables release moisture and ethylene gas. These factors provoke the awakening of tubers too early, as well as their rotting. If it is impossible to allocate a separate room, then you should at least try to equip a separate compartment in the basement with an exhaust or supply ventilation.
It is advisable to have no lighting so as not to provoke the plants to start the growing season too early. The rest period takes two months or more. This is exactly how long the plant needs to fully recover. All this time you need to closely monitor their health, periodically inspecting the tubers.
Overwintering a potted plant
When calla lilies are grown as a houseplant, they also need a period of rest. To do this, the pot with the plant after flowering is moved to a cool and dark place in order to stimulate the end of the growing season. Watering the plant also needs to be reduced. You can dig up the tubers and process them using the above technology, or you can leave them to overwinter directly in a pot or container.
Let's wake up the callas with the arrival of spring
In order to complete wintering, the best time for the middle zone will be the beginning of April, for the southern regions - the beginning of March. Calla lilies root tubers are taken out, carefully examined, and treated with a solution of manganese or any fungicide against fungal diseases. If you didn’t separate the “babies” from the calla lilies in winter, you can separate them now.
“Children” are not cut off from the mother plant, but broken off. The separation area must be disinfected, treated with brilliant green, and sprinkled with ash.
In order for these beautiful plants to safely endure the period of winter dormancy, you need to properly dig them up, dry them and ensure they are stored in a dry and cool place.
The perennial calla flower, which many consider to be a houseplant, thrives in open ground and decorates many garden areas. Unfortunately, this plant is not resistant to cold weather and cannot overwinter in the ground. Therefore, flower growers dig up these flowers for the winter. But in order to see flowering next year, you need to know how to store callas in winter at home. We'll talk about this today.
Tips for preparing for storage
You need to dig them out carefully. Simple rules on how to store calla lilies at home in winter will help you grow beautiful flowers next season without much difficulty.
- In the last days of September, after the plant has withered, the tuber roots need to be removed from the ground. The part of the plant above the soil should be preserved.
- After digging, drying begins - the tubers with trunks are placed in cardboard boxes for 2 weeks. Transfer them to a ventilated and dry area.
- Once the leaves are detached from the stem, drying can be completed.
- The top part is removed from the tubers. They are then moved into a box for 7-8 days.
After separating the petioles from the tubers, the planting material is removed for storage.
Interesting! How to care for a potted money tree
Selection of planting material
A high-quality, healthy tuber is the key to the normal development of the plant. Therefore, the choice of planting material must be approached very responsibly. The tuber should not be soft or show signs of disease or mechanical damage.
The size of the tubers plays an equally important role. The larger they are, the faster flowering will begin, and the more inflorescences there will be. The number of inflorescences in a plant with a large tuber can exceed 20 pieces.
Before planting in the soil, the tubers are washed in a weak solution of potassium permanganate, then rinsed with clean water and dried.
Preparation
In order for the wintering of plants to be successful, they should be dug out of the soil at a certain time. Harvesting tubers too early will lead to the fact that the plant, whose growing season has not yet ended, will not be able to survive wintering normally. And if you wait until severe frosts to dig it up, the flower may die from the cold.
Read also: How to make a Chinese net with a feeder yourself
In the climate of the middle zone, calla lily tubers are collected with the onset of the first night frosts (the first days of October). And in more southern areas this can be done a month later: in early November.
With the arrival of the first frost, plants need to be pruned. Dry leaves are cut so that they are visible 5-7 cm above the ground.
You should dig up the rhizomes very carefully, using a garden fork, so as not to harm the plants. The flower is dug up at a safe distance from the roots, after which it is pryed up with a pitchfork along with a lump of earth.
Root tubers need to be cleared of soil residues. To do this, they are placed in a container with water, after which they are gently washed under a small running stream.
When the tubers are cleaned, they are carefully inspected. Planting material that has damage, rotten areas and signs of disease is discarded.
Small damaged areas can be removed with a sharp knife, and then treated with brilliant green or crushed coal.
Drying the tubers
The next stage of preparation is drying the tubers. This should be done in places with good ventilation, away from sunlight. In such places it is necessary to maintain a constant temperature within +20°C - +25°C.
Drying of planting material should continue for at least 2 - 3 weeks , after which calla lilies can be stored all winter.
Remnants of dry leaves must be completely removed from the tubers. This is done a few days after the start of storage. After which, after about a week, the roots are removed. By this time, the roots will separate easily. This must be done so that the flower does not begin to grow prematurely without spending enough time in “cool dormancy.”
During this period, small tubers (babies) have not yet formed a special film that allows them to “live independently.” Therefore, it is impossible to separate them from the mother tubers. This should be done in winter, when they are already stronger. Then it will be a full-fledged planting material.
If the babies were separated from the tubers ahead of time and were damaged, they can be treated with brilliant green (coal dust) and dried. Calla lily bulbs should be stored in winter until the last days of March.
How to preserve calla lilies in an apartment until spring. How to preserve calla bulbs in winter?
Callas are delicate, beautiful flowers that will be an excellent decoration for the landscape of your summer cottage. This plant is mostly grown in pots, but they can also be grown in the garden, in open ground.
How do calla lilies survive winter? In order for frosts to pass without negative consequences, they need to be dug up, since temperatures below -2 degrees are contraindicated for them.
The topic of this article is calla lilies: how to store them in winter? From it you will learn how to properly dig, prepare planting material and where to store it.
Callas: how to store in winter?
Calla lilies - storage rules for summer residents
Callas are usually dug up after the first frost. In the middle zone of our country - starting in October, and from the beginning of October in young regions. The first frosts do not harm them, but serve as a signal for the end of the growing season.
Two to three weeks before digging, the callas are no longer watered, but light shelters are built to protect them from possible rains. Leaves that have dried out after frost are cut off, but petioles about 7 centimeters high are left. It is better to use a garden fork to dig up the bulbs, this reduces the risk of damaging the plants.
To avoid damaging the roots, you need to dig a hole with a slightly larger diameter.
After the bulbs are dug up, they are cleared of soil. You can use a weak stream of water, since strong pressure often harms babies who are not yet ready to separate. Peeled bulbs should be carefully inspected and diseased ones should be discarded.
If the damage to them is minor, the bulbs can be saved by stripping them down to healthy tissue and disinfecting them with brilliant green or charcoal.
To dry, calla bulbs are placed in low cardboard, wooden or plastic boxes, the bottom of which is lined with newspapers.
Calla lilies should be dried in a dark, cool place where there is good air circulation, at temperatures up to 20 degrees. After about a week, dry leaves are removed from the bulbs, and after another week, the roots are cut off, which provides the bulbs with proper rest.
The babies are not separated at the beginning of storage, because they are not yet ready for this: the film separating them from the mother bulb has not yet formed. This procedure is best carried out closer to the middle of winter.
How long do the bulbs take to prepare before they are stored? The bulbs are dried for two to three weeks, depending on the air humidity in the room.
How to store calla bulbs? To do this, you need to follow some recommendations from experts:
- It is best to store bulbs in thick paper bags or cardboard boxes, which should have holes for ventilation.
- To prevent the bulbs from touching, use a substrate of moss, sawdust, vermiculite or shavings.
- If the bulbs are too dry, they need to be sprinkled with water.
- The bulbs are well preserved at a temperature of 5-7 degrees in rooms with dry air, without stagnant air, and in the absence of lighting.
- Planting material should not be stored next to vegetables and fruits, as they humidify the air. High humidity can cause the bulbs to awaken early or cause them to rot.
Wintering of calla lilies ends in March in the southern regions and in April in the central zone. Before planting, the bulbs are treated with fungicides. You also need to separate the children if this has not been done before.
Now you know how to store calla lilies in winter, so be sure to take care to dig, prepare and store the bulbs. We hope that our tips will help you grow beautiful, healthy and bright calla lilies in your summer cottage.
Under what conditions should it be stored?
Conditions for storing calla lilies in winter are as follows:
- constant temperature within +5°C - +10°C;
- ensuring ventilation in places where planting material is stored;
- low level of humidity to prevent mold from forming;
- storing rhizomes at some distance from each other, sprinkled with sand, wood shavings or covered with moss and peat;
- regular inspection of planting material for timely identification of diseased tubers.
The container in which the rhizomes are located can be placed on an insulated balcony, in a cellar, basement, cool pantry, or refrigerator.
In a refrigerator
If you need to save some planting material, use a refrigerator. The tubers must be wrapped in paper or newspaper. Then place in the compartment intended for vegetables, where the temperature is 5-7 degrees. No additional procedures are needed. In this form, planting material is perfectly preserved until spring.
In the basement
Storing calla lilies at home is best done in drawers, in a basement or cellar. Good ventilation and constant temperature are a must. The optimal storage temperature for calla lilies is +5°C - +10°C.
If the room is warmer, the tubers may begin to germinate prematurely, so maintaining the correct temperature is very important. The air should also not be too humid. The development of fungus in this case will destroy the tubers. Therefore, calla lilies can only be preserved in a dry room in winter.
Winter storage
You can store callas in the winter at home in your apartment, but you must first check all the roots. There should be no damage or rot on them.
Flower growers advise placing great emphasis on the integrity of planting material. If black spots appear, they are removed using a special tool. Then the tubers are left for 3 hours to dry the damaged areas.
Then the “scratches” are treated with crushed activated carbon or brilliant green. This ensures disinfection. The procedure is also performed when the mother root is broken to separate the “children”.
After work, the tubers are placed on napkins and transferred to cardboard boxes. Periodic inspection of planting material for integrity is required. It is important to ensure that rot does not appear. But with proper processing it does not form.
The box should be placed in a cool, dry place. The container is closed with a lid. And they need to be taken out in the spring. This method of storing calla lilies at home in winter ensures the viability of the plant for a long time.
A suitable storage place where the temperature is maintained is considered a guarantee of good flowering in summer.
Interesting! What to do with hyacinths after flowering in a pot
In the apartment
When there are no other options, you can store calla tubers in a city apartment in winter. To do this, boxes with planting material are placed in the coolest places. A vestibule, a pantry, a place near the balcony door, etc. are best suited.
To prevent the tubers from drying out and shriveling, they should be kept as far as possible from hot radiators and other heat sources. Even if planting material that has been exposed to temperatures above +20°C can maintain viability, flowering will not be as abundant as we would like. If the warm place is also damp, the flowers will quickly begin to sprout.
On the loggia or in the apartment
Storage on a balcony or loggia is another effective method. It is ideal for anyone who grows calla lilies in pots at home. If this method is chosen, then:
- In autumn, watering is reduced over time;
- when the leaves die, the containers are sent to the loggia or balcony, where they remain until spring.
This procedure allows you to keep the plants viable. If the balcony is not glazed, then the plants can be left in the apartment for the winter. The storage procedure is simple: boxes with calla lilies are left in a cool place, for example, near a balcony door.
Temperatures of +20 degrees may be suitable for wintering calla lilies, but you need to make sure that in the spring the tubers do not dry out and begin to wrinkle. Since because of this in the summer they will bloom poorly.
Flowers in pots
How to store calla bulbs, if they are indoor plants, worries many housewives. After all, these flowers also require a period of rest.
When flowering is finished, containers with callas are placed in a dark place with a low temperature so that their growing season ends faster. In this case, watering the plants should be reduced to a minimum.
You can store tubers of indoor calla lilies in winter directly in pots. Or you can dig up the bulbs, carry out the treatment as indicated above, and keep them in the general conditions for this plant.