Alocasia (in Latin - Alocasia) is a tropical plant native to South America, common in Eastern Australia, and appeared in Russia during the reign of Catherine II. The flower belongs to the aroid family and grows in open spaces, but can also be found in rocky areas.
Alocasia is called weatherweed and arum, and in alternative medicine - trefoil. This name is due to the fact that an adult plant rarely has more leaves. When the fourth one appears, the oldest leaf begins to dry out, and after a while it dies.
What does alocasia look like?
- The flower grows from 40 to 200 cm, has a strong and long stem directed vertically upward, sometimes creeping.
- The roots of alocasia are short and very thick, in the form of tubers.
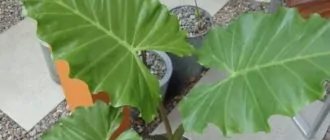
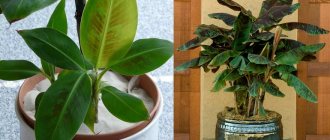
- In the photo you can see that the plant has both one and three rounded leaves with a length of 20 to 90 cm. The foliage is colored emerald green, it may have reddish spots and yellowish-white veins.
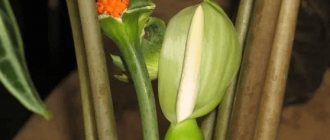
- Alocasia fruits have the shape of an ellipse or an inverse cone; they can be split longitudinally. In the center of the fruit there are seeds (from 1 to 5 pieces).
The plant is distinguished by its beauty, which brings an element of exoticism to any room it occupies.
How to propagate alocasia
There are many ways to propagate alocasia, but not all of them are effective at home.
Seeds
It is not easy to get alocasia seeds, because “in captivity” the plant blooms quite rarely. This does not apply to hybrid varieties, but they do not retain varietal characteristics during such propagation. When grown at home, alocasia seeds ripen around mid-November. They are removed from the “box” and immediately planted.
Alocasia seeds quickly lose their viability
They work like this:
- Flat containers are filled with a mixture of peat chips and coarse sand. The substrate is moistened and leveled.
- Seeds are laid out on the surface, deepening them no more than 5 mm.
- The containers are covered with glass or plastic film. The greenhouse is ventilated daily for 3–5 minutes. As the soil dries, moisten it. The plantings are provided with bright light and a constant temperature of 23–25ºС.
- Seeds germinate in 1 to 3 months. After the first true leaf appears, the alocasia is planted.
- After about a year, the plants are replanted again.
This is what alocasia grown from seeds looks like about a year after germination
Root tubers and cuttings
The daughter tubers are separated simultaneously with the next plant transplant, cutting them off so as to cause as little damage as possible to the alocasia . If no new tubers have formed, the existing tuber can be cut into several parts so that at least one “eye” or rosette of leaves remains on each.
Cuttings are used as a last resort, cutting off the upper part of the shoot about 15 cm long. This method also does not guarantee the preservation of the variegated color, therefore it is used only for alocasia with monochromatic leaves.
New tubers are removed from the pot with aloasia at the same time as transplantation; they form on the roots, closer to the trunk
Rooting process:
- All sections are disinfected, separated parts of alocasia are treated with a root formation stimulator (Zircon, Epin, Topaz, Kornevin) in liquid or powder form.
- Cut down, the tubers, their parts or cuttings are immersed in a well-moistened substrate consisting of an equal amount of perlite, chopped sphagnum moss and universal soil for indoor plants, covered with glass jars of suitable volume. Containers are chosen about 7 cm in diameter. For the fastest possible rooting, bottom heating is desirable . The remaining conditions are the same as for seed germination.
- When the leaf embryo appears, the plant begins to be accustomed to normal conditions by removing the jars and gradually increasing this period of time.
By the time the sheet unrolls, remove the jars completely. When a leaf embryo appears, gradually increase the time the alocasia stays in the air - The second true leaf means that the alocasia can be transplanted into larger pots using adult potting soil and cared for as usual.
Experienced gardeners sometimes use a little trick. A shallow circular cut is made on the stem 4–5 cm from the root collar. After a couple of hours, any root formation stimulator is rubbed into the “wound”. The damaged area is wrapped in strips of sphagnum moss, securely fixing them. The “bandage” is constantly kept moist. In a month and a half, the flower will give roots. Then it is finally cut off and planted in a new pot. Usually, daughter shoots will soon appear around the remaining “stump”.
Video: propagation of alocasia by tubers
The most famous types and varieties of alocasia
Alocasia is represented by different species, each of which is beautiful in its own way and will take its rightful place among other plants. The most popular are:
- Alocasia amazonica is an Amazonian variety that does not produce fruit when grown at home:
- stems from 10 to 20 cm tall;
- petioles about half a meter;
- the leaves are elongated, 20 cm wide, dark green with white stripes.
Amazonian alocasia
- Alocasia cuprea is a copper-red species of plant, classified as not too large, decorative:
- the foliage is directed vertically upward, has the shape of an oval heart, about 20 cm wide and 30 cm long, its color is unusual: copper-green with a metallic sheen on top and rich purple below;
- the stem is not high, up to 10 cm;
- The flower stalks also have a purple tint, they are collected in 3 pieces.
Alocasia Cuprea
- Alocasia cucullata – hooded alocasia:
- it reaches a height of a meter, its stem has a diameter of 5 cm;
- petioles grow up to 80 cm;
- the foliage is quite dense and wide (about 80 cm), slightly pointed, has shades from dark to bright green;
- varieties with rich foliage bloom, and the inflorescence is quite high up to 30 cm.
Alocasia capulata
- Alocasia odora – odorous:
- the rhizome is very short and strong, tuberous;
- shoots stretch up to 1 meter in height;
- the foliage is very fleshy, 70 cm wide and about a meter long (young leaves look like a shield, and old ones look like arrows);
- the inflorescences of this species are cobs that have a specific aroma;
- The juice secreted by this type of alocasia is poisonous; you only need to work with the plant while wearing gloves.
Scented alocasia
- Black Velvet is a small type of alocasia (its stem reaches 25 cm):
- the foliage of the plant is velvety, oval-shaped, heart-shaped with a dark burgundy top and a pattern of veins;
- The peduncle grows up to 10 cm, its cover has a soft pink tint;
- does not produce inflorescences at home.
Alocasia Black Corduroy
- Alocasia Lowii - Low's alocasia, has underground root shoots and a short trunk:
- oval or arrow-shaped foliage is green with snow-white veins, they are purple on the inside;
- The petioles of the foliage are quite long.
Alocasia Lowe
Features of the plant
In height, depending on the variety, it can reach from 40 cm to 1 m. Some species belong to the deciduous species. This representative of the Araceae family is unique in that it is capable of throwing droplets of liquid onto its leaves before the rain. For this it received a second name - weatherman.
Usually there are always three sheets of unusual shape available. As soon as the fourth appears, one of the leaves falls off. There are species that have one leaf remaining during the flowering period. In addition, alocasia can be equipped with cataphylls that protect new leaves. In other varieties, the previous leaf forms a long sheath for the beginner.
Alocasia Sandera
The Filipino guest is quite often found on the windowsills of our country. Sandera has some characteristic features:
- very short stems, substantial and thick;
- petioles somewhat elongated;
- the foliage is large, up to 40 cm long, about 15 cm wide;
- the foliage has an arrow shape and wavy edges;
- leaves have color variations from soft olive to deep green, with obligatory veins of light shades;
- Sandera's flowers are rather inconspicuous; after they disappear, bright orange fruits appear.
Sandera is especially active in the warm season, but in winter she has time to rest. During this period, you should not actively water the plant; it is better to spray it periodically. When placing a flower, you should take into account its love for wide space and provide it with maximum freedom.
Alocasia Sandera
This medicinal species is also called large-rhizome. In the wild, it can grow up to 3 meters in height; at home, the flower’s reach is somewhat weaker. The homeland of this alocasia is Sri Lanka; local residents use the leaves of the plant as umbrellas, they are so large.
Plant characteristics:
- stems more than 2 meters long;
- petioles have a height of 1 meter;
- the foliage is heart-shaped, with brightly defined lobes diverging in the middle of its plate;
- The peduncle is large, grows up to 30 cm;
- the berries are quite large, red, more than a centimeter in diameter;
- The juice of the plant is poisonous, but it is actively used in alternative medicine.
Description of Alocasia
Alocasia is an evergreen herbaceous plant with large roots that resemble stolons or elongated tubers. At the top there is a shortened stem. The leaves grow on elongated petioles. They can be thyroid, oval or heart-shaped. Their edges can be either smooth or ribbed.
This plant is often called a “weather forecaster”, since it can be used to determine the weather. On the eve of rain, when air humidity rises, the plant begins to get rid of excess moisture and droplets appear on its leaves.
At home, alocasia blooms extremely rarely. Its flower resembles a shortened ear of white or yellowish hue. On top it is covered with a kind of blanket. Gradually it cracks and bright red fruits can be seen inside. During the flowering of alocasia, the leaves of the plant may fall off, so some deliberately trim the ovary of the flower.The plant is poisonous, so care must be taken when caring for it. Alocasia juice can be irritating to the skin. But this plant also has medicinal properties. The essential oils and phytoncides included in its composition have analgesic properties and can stimulate the body. Traditional medicine specialists prepare tinctures from alocasia that can relieve stomach, dental and joint pain. At the same time, to prevent such a product from becoming poisonous, it is important to correctly observe all proportions when making it.
How often does alocasia bloom?
To see alocasia bloom, you need to create special conditions for it with high tropical humidity. In modern apartments this is not an easy task. Some plants of this species are occasionally capable of throwing out the inflorescence, while others will never bloom.
In general, alocasia that has reached the age of 7 years is capable of blooming. Most often, inflorescences appear in pairs with a new leaf, replacing the old one that falls off. The flower is covered with a kind of blanket that wraps it in a cocoon; after the seeds ripen, it gradually disappears.
The weatherflower flower has a rather strong aroma. Its flowering period falls in the summer, when the plant receives sufficient light and moisture. Moreover, it is not constant watering, but a slight drought that can stimulate alocasia to bloom.
Interesting fact: the plant is not able to nourish both foliage and flower at the same time. Therefore, the owner must choose what he likes to admire more: the blooming crown or lush foliage. It is worth noting that after the end of the flowering period, alocasia rests for 3 months.
Alocasia flowering
The structure of an alocasia flower
Plants that have reached the age of 5-7 years bloom. In this case, in flowers with falling leaves, the peduncle appears simultaneously with the young leaf. The leaf petiole is always longer than the peduncle. The blanket tightly wraps a developing flower like a cocoon, gradually making room for its appearance. The veil moves away as the flower opens, but falls off only when the seeds ripen.
The spadix consists of small inflorescences on short stalks, they are attached to the body. The cob is divided into female and male zones. Closer to the base, the thickened part is female. The male zone is the cylindrical upper part.
The flowers are monoecious. The males consist of fused stamens in reverse pyramidal synandry. In the female flower, the stigma is short with 3-4 lobes. After pollination, several ruby or orange berries are formed on the cob, each of them carrying several seeds.
Proper care of the alocasia flower allows you to propagate the plant without depletion due to flowering. Moreover, the seeds do not convey all the properties of the mother bush. Flowering will be short-lived, and the aroma is not for everyone. The peduncle can be carefully removed. If the time has come for alocasia to bloom, a peduncle has appeared, you should decide for yourself what is better, the beauty of a mature plant or its flowering with consequences.
What to do after the plant has bloomed
The flowering of alocasia takes a lot of energy from the plant, after which the plant necessarily loses one or more leaves. During this period, the trunk is exposed. Most often, the owners prefer to remove the peduncle, which is not very beautiful, but can destroy the rich foliage. It is important to remember: it is not the bud that needs to be removed, but the peduncle itself as soon as it begins to appear, without waiting for the plant to become exhausted.
When the inflorescence is removed or the flowering period is over, it is necessary to feed the plant with a complex of fertilizers, both mineral and organic.
Why doesn't the flower bloom?
The flowering process is a great stress for the plant, as the formation of a bud occurs. And therefore, only the healthiest and strongest plants are prepared for flowering. Photos of the flower are given in the article.
By the age of 5-7 years, with proper care, this stress is reduced to a minimum. But excessive ventilation, dry surroundings, lack or insufficient fertilizer can inhibit the growth and development of leaves, and as a result, the absence of the flowering process. After flowering, it is worth cutting off the peduncle so that the resulting berries do not further deplete the plant.
This perennial will definitely bloom if you do not make mistakes in caring for this rather unpretentious plant.
Optimal time for planting
Alocasia should be planted in permanent soil immediately after purchasing it in a store.
You need to plant alocasia in a pot like this:
- The roots of the plant must be cleaned of soil and carefully inspected, identifying those that are dried out and rotten. The latter need to be removed.
- Alocasia roots need to be washed from the substrate and soaked for half an hour in a nutrient solution to improve the adaptive process of the plant.
- Now the flower needs to be placed in a previously prepared pot and filled with new soil. The root collar remains half-open, located at the very border of the soil.
The ideal time for planting alocasia is considered to be spring, when the plant enters the active growth phase. During the summer, the plant will have time to settle into its new location and will survive the winter well. However, if the plant was purchased in the autumn-winter period, it can and should also be planted in a pot. Only the adaptive period in this case takes a little longer.
General rules for transplanting alocasia
In order for the processes to happen faster, the gardener’s task is to organize constant heating of the soil, where the process of creating the first roots takes place. In this case, the litter itself should contain peat, perlite, sphagnum moss and sand. That is, the place for rooting should be moist, warm and breathable. However, systematic ventilation is necessary.
Another general action for all types of propagation except seed. All sections must be dried and sprinkled with a disinfectant. It can be:
On this topic:
BACK
FORWARD
1 of 7
- finely crushed charcoal or crushed black activated carbon tablet;
- cinnamon powder;
- wood ash.
Treatment with root formation stimulants is also used.
For propagation of alocasia, spring is usually chosen, when intense biological activity in nature begins. But rooting can be done at any time of the year, except winter. In winter there is a high percentage of lunges.
Requirements for the composition of the soil for plants that have already sprouted their first roots and are being planted for a long time. For alocasia, the soil selected is loose and low in acidity. This composition can be purchased at a specialized store or prepared yourself. Flower growers use different soils based on peat and leaf soil.
The main thing is that the soil must be moisture-absorbing, light, and breathable. A slightly acidic environment ensures the dissolution of the required amount of mineral salts from the soil
Therefore, it is important to comply with all requirements. An example of such soil could be:
On this topic:
BACK
FORWARD
1 of 5
- humus or vermicompost – 2 parts;
- leaf soil – 2 parts;
- turf soil - 2 parts;
- peat and sand - 1 part each;
- chopped sphagnum moss - 2 parts;
- crushed coal, vermiculite, brick chips in total - 1 part.
Purchased soil must be supplemented with the latest components. Disinfection of the composition by any means is of great importance. Steaming the soil for alocasia is often used. To plant plants in a permanent place, the pot must be high; the ideal shape is a bucket. It is stable and high at the same time. Expanded clay is traditionally chosen for drainage, but you can use pebbles or broken ceramic dishes.
Soil selection, feeding and fertilizing alocasia
The ideal composition for growing alocasia will be one of the following:
- special soil with the inclusion of disintegrants (charcoal, sand or perlite);
- mixture for coniferous soil and birch coal;
- the presence of sphagnum and moss in the soil for alocasia is important;
- a good composition includes: garden soil, peat, orchid mixture, perlite and sphagnum, which is finely chopped;
- the plant behaves well in soil with the following composition: pine soil, high peat, sphagnum;
- a mixture of peat and soil from a greenhouse.
Most species of this plant love slightly acidic soil, and copper-red alocasia only accepts a substrate containing dolomite flour or lime. In addition, it is important to organize drainage at the bottom of the pot; its thickness should not be less than 2 cm.
Principles of fertilizing alocasia:
- In the summer, fertilizers are applied once every two weeks, and it is better to dilute the dose so as not to overload the plant with excess salt content.
- In winter, fertilizing is carried out once a month.
- Alocasia tolerates Agricola and Belvito fertilizers well.
- Fertilizing with bird droppings, which is diluted with water in a ratio of 1 to 30 and left for 5 days, helps the growth of the flower well.
- You can also use surface fertilizers for foliage. They should be less concentrated to prevent burning of the leaf plates.
There is also an opinion that there is no need to fertilize and feed alocasia. It is enough to replant it in fresh soil once a year.
How to transplant alocasia
Young alocasia grows quite quickly, so plants under 3 years of age need annual replanting. Further, the procedure is carried out as necessary - every 2-3 years. It is best to replant a flower in early March, when the active growing season has not yet begun.
A new pot is selected so that its diameter exceeds the previous one by 2–3 cm . It must be massive and stable. The preferred materials are unglazed ceramics - they are heavy and allow air to pass through. Choose containers that are shaped like a bucket.
A pot for alocasia must be massive, deep and stable
Alocasia prefers light, slightly acidic soil with good drainage. When buying soil in a store, check the acid-base balance. If the soil is acidic, add crushed chalk (about 50 g per liter of soil). If you have the opposite problem, use soil for azaleas (in a ratio of 1:5). Acidity is determined using strips of indicator paper; instructions for use are included in the kit.
The soil mixture can be like this:
- substrate for aroids;
- universal soil for decorative foliage plants and drainage - sand, coal, perlite, sphagnum or coconut fiber (4:1);
- rotted leaves, pine needles, peat chips and sand (1: 1: 1: 0.5).
Alocasia juice causes irritation and allergic reactions on the skin, so proceed with transplantation only with rubber gloves, and wash your hands after the procedure.
Transplant process:
- Fill a quarter of the volume of the new pot with drainage.
- Sprinkle about 2–3 cm of substrate on top. Lightly moisten it.
- Tap the walls of the old container and carefully remove the plant.
- Without destroying the earthen ball, move the alocasia to a new pot and add soil.
Make sure that the root collar does not end up in the soil.
- The substrate is moistened again, the pot is placed in its original place.
Boarding after purchase
Alocasia purchased in a store needs to be replanted within 3–4 days, completely replacing the transport soil.
Progress:
- The pot is lowered into a container of water so that it completely covers the soil.
- After 10–15 minutes, the flower is removed from the substrate, the remaining soil is washed off with water and several crystals of potassium permanganate.
- Rotten, dried roots are cut off with a well-sharpened, disinfected knife. The cut areas are sprinkled with crushed chalk or activated carbon powder. The roots are dried for an hour.
- The plant is placed in a new pot and watered abundantly.
Lighting alocasia flowers
There has long been a widespread misconception that alocasia is shade-loving. This is not true, the plant respects bright light, which should be slightly diffused. This especially applies to those varieties that have variegated colors. If you keep alocasia in the shade, its foliage will become monochromatic and faded. New leaves will not grow large, and the weakened flower may dry out.
Installing the plant on a sunny windowsill would also be the wrong decision. The ideal option would be to create artificial shade using blinds or to grow alocasia in the east or west; the southern part is unlikely to be suitable. A window sill facing north can also be a good place for this flower to live. It is important, if necessary, to use artificial lighting, especially in winter, when daylight hours are already quite short.
Origin and appearance of alocasia
Alocasia is an evergreen shrub native to the South Asian tropics. The peculiarities of the climatic conditions of these places endowed the plant with the specific ability to release excess moisture through the surface of the leaves, which accumulates during the rainy season.
Interesting! Indoor alocasias are also sensitive to changes in humidity. They can notify about waterlogging or warn about upcoming rain by droplets protruding on the leaves.
Alocasia is one of the most beautiful representatives of the Araceae family, characterized by highly decorative leaves . It is noteworthy that they all grow from a short, almost invisible stem, creating the illusion of its absence. In this way, a luxurious evergreen bush is formed, although alocasia is considered a herbaceous plant. The rhizome of Alocasia looks like a tuber. The height of different types of this plant ranges from 30 cm to 2–3 m. This allows the gardener to choose a specimen that suits his desires and capabilities.
There are about 4–8 leaves on one bush. It is noteworthy that when the fourth leaf appears, the process of natural death of old leaf plates begins. However, even with such a small number of leaves, the plant looks simply enchanting.
The main decoration of alocasia is its unusual leaves.
The leaves of most types of alocasia are quite large (up to 50 cm in length), hard, with a glossy surface. Their shape resembles a heart with pointed corners and curly edges. The clear and relief veins of a light tone attract attention.
The alocasia flower is quite inconspicuous compared to the leaves. It looks like a peculiar sailboat with a pinkish, yellowish or greenish sail and a cob-shaped mast.
The alocasia flower is quite modest
House alocasia rarely blooms. And although the main beauty of this plant is in the leaves, it is pleasant to contemplate the graceful flowering of the plant and inhale the aroma of the flower. You just need to create the necessary conditions for alocasia, which is not so difficult to do. After all, this tropical plant is well adapted to the climatic conditions of our apartments, not to mention greenhouses, where large species look especially exotic.
Important! Many experienced flower growers advise removing flower stalks even before flowering, as they take a lot of energy from the plant, which leads to stunting of leaf growth.
If a rare flower is of interest and you want to keep it, then after flowering as a result of self-pollination, fruits may appear on the cob. In the middle of each of them, as a rule, there are up to 5 seeds.
Tightly packed alocasia berries resemble sea buckthorn
Popular varieties
General characteristics are characteristic of all varieties of alocasia, but they differ in a significant variety of leaves and dimensions. Experts identify about 70 species of this tropical beauty, but not all of them are suitable for growing at home.
Let's take a closer look at the favorites recognized by flower growers:
- Sandera. It has large elongated (approximately 50 x 20 cm) leaves with pointed tips and a curly edge. The dark green leaves with a mercury sheen have brightly “drawn” white veins. The leaf blade has a light edge. The leaves are formed on powerful petioles about 60 cm high.
- Polly. This is a variety of Sandera, which is distinguished by more patterned leaf edges and relatively frequent flowering.
- Amazonian. A smaller variety of Sandera, 40–60 cm high. It is distinguished by almost smooth leaf edges, without teeth.
- The Dragon. A low (30–40 cm) plant with leaves in the form of rounded hearts, colored light green with dark green veins.
- Large-rooted . This is a representative of large species of alocasia. The height of such a plant is about 2 m. The length of the petioles is about 1 m. The peculiarity of the leaf shape is that the edges diverge quite strongly in different directions from the petiole. This giant forms huge dark salad leaves 40 x 30 cm, sometimes up to 90 x 80 cm. During flowering, it forms a large (about 20 cm) cob with a yellow-green sail. The berries are glossy, dense, juicy red. This variety of alocasia has a variety with elegant leaves covered with white spots and more modest sizes.
- Klobuchkovaya. It can grow up to 1 m. The leaves are green, with raised veins. Their shape is similar to a regular heart with a sharp end. The average sheet size is 25 x 15 cm.
- Copper red. The type most adapted to indoor conditions. It is distinguished by rounded edges of leaves with an average size of 30 x 15 cm. The front part of the leaf plate has a greenish-copper color with a glossy sheen, and the lower part is purple. The veins are dark green.
Species diversity of alocasia in the photo
Alocasia largeleaf - the largest type of alocasia
Clear white veins are a feature of the Sandera variety
Alocasia Polly - Sandera hybrid with more pointed and curly leaves
A distinctive feature of copper-red alocasia is the reddish-green color of the leaves.
Alocasia Dragon is distinguished by rounded leaves and dark veins
Alocasia Amazonica is a hybrid of Sandera with smoother serrations on the leaves.
Seasonal conditions of detention
Alocasia, like all tropical plants, is quite demanding of humidity, heat and light. However, growing a luxurious tropical beauty on your own windowsill is not so difficult. You just need to create the necessary conditions for it.
Specifics of seasonal maintenance at home - table
| Season | Temperature | Humidity level | Features of lighting | Optimal placement | Air composition |
| Spring | 21–26 degrees | High. Spray every three days. In hot weather - every day. | Particularly intense for newly planted plants. For green-leaved plants, light shading is possible. Complete exclusion of direct sunlight. | Window sills facing east or west. | Fresh air from a ventilated area. Complete exclusion of drafts. |
| Summer | |||||
| Autumn | |||||
| Winter | Minimum 18 degrees. Elimination of sudden temperature changes during ventilation. | High. Weekly spraying. The warmer the room, the more often the spraying. | Artificial additional lighting for 1–2 hours for varieties with variegated leaves. | South window. |
Temperature, air humidity and watering of alocasia
Undoubtedly, a guest from the tropical forests needs to be watered frequently and abundantly. The following principles for organizing watering and air humidification for this plant can be noted:
- not all varieties can be sprayed (this applies to “Black Velvet” and “Royal Alocasia”); for them, wetting the leaves on their lower part through the small holes of a watering can is suitable;
- Installing trays under pots that will be filled with wet expanded clay helps a lot in maintaining the required level of moisture;
- From time to time you can take the flowers into the bath and give them a shower at room temperature;
- Lightly moistened sphagnum should be placed around the stem and the soil should be mulched;
- it is important to ensure regular ventilation of the room to prevent stagnant air, which can become an excellent place for the development of fungal infections;
- the optimal air temperature will be 20–25 degrees, occasionally you can drop it to 16 degrees;
- it is very important to prevent waterlogging of the soil and remove water from the trays in a timely manner;
- Alocasia does not like cold air flows from air conditioners, and at the height of summer it will definitely appreciate additional spraying.
Separately, it is necessary to note the difference in watering depending on the season:
- In the spring and summer, an active vegetation process occurs: the soil must be watered as soon as its top layer dries out.
- In autumn and winter, the soil requires watering no more than twice a week.
Brief description of cultivation
- Bloom . Alocasia is cultivated as an ornamental foliage plant, because when grown at home it blooms extremely rarely.
- Illumination . Variegated forms need a lot of bright, but diffused light, while green-leaved forms can grow in slight shade. The scorching direct rays of the sun can harm any of the species of this plant.
- Temperature regime . In the spring-summer period - from 23 to 25 degrees, in the winter months - approximately 20 degrees, but not less than 18 degrees.
- Watering . During the growing season, watering should be done abundantly and only after the top layer of the soil mixture has dried. In the cold season, the earth mixture is moistened only after 1–2 days have passed after its surface has dried.
- Air humidity . She must be tall. The foliage must be systematically moistened with a sprayer or wiped with a damp cloth. On hot days, pour moistened pebbles into the tray and place the pot on it.
- Fertilizer . During the growing season, the flower is fed once every 15 days; for this, complex mineral fertilizers for decorative foliage plants and organic matter are alternately used.
- Rest period . It begins in the middle of autumn and ends in early spring.
- Transplant . While the plant is young, it is replanted every year, and a more mature bush - once every 2 or 3 years. This procedure is carried out in the spring.
- Soil mixture . Coniferous, leafy and peat soil, as well as sand (2:2:2:1). A handful of charcoal is poured into the prepared substrate.
- Reproduction . By cuttings and seed method.
- Harmful insects . Scale insects, spider mites, aphids and mealybugs.
- Diseases . Alocasia can only get sick if it is not properly cared for or kept in conditions that are unsuitable for it.
- Properties . This plant contains poison.
Alocasia Polly (Alocasia): flowering, care and maintenance (part 1)
Plant care at different times of the year
| Season | Lighting | Air temperature | Fertilizer | Transfer |
| Spring | At any time, the flower will appreciate soft, diffused light. The shade can lead to the death of the plant, and too bright sunlight can burn the foliage. This is especially important for alocasia with leaves of bright colors. | During this period, the plant is comfortable at 20–26 degrees | From April to October, nitrogen and other mineral-based supplements should be applied. The benefits from them will be maximum | Held annually in spring or early summer |
| Summer | ||||
| Autumn | 17–20 degrees is enough, occasionally you can lower the temperature to 16 degrees | The soil fertilization process is suspended | Not carried out. At this time, the plant is resting, and it is not recommended to replant it | |
| Winter |
Lighting and temperature conditions
Alocasia requires bright light, but in summer it must be protected from direct sunlight. Some varieties will need additional lighting during the cold season.
The tropical plant prefers warmth and does not tolerate sudden temperature fluctuations. It is necessary to avoid drafts - alocasia reacts very negatively to them.
The temperature that is comfortable for her is about +20 degrees; in winter the thermometer should not fall below +18.
Features of caring for Alocasia Polly
Alocasia Polly or Amazonica will definitely delight the owner with a wealth of lush greenery, if you manage to choose the right soil and ensure proper organization of watering the plant.
The plant will appreciate this indoor soil:
- air- and moisture-permeable;
- no fluid retention;
- ideal composition: peat, garden soil and mixture for growing orchids;
- There must be expanded clay or a small amount of pebbles in the tray under the pot, which must be periodically moistened with water.
Watering Alocasia Polly is very important; the soil should not dry out or, conversely, be too wet. The ideal option would be to water the plant with water that is at room temperature and pre-settled (ideally, boiled).
In summer or spring, all alocasia greens should be periodically sprinkled with water at room temperature; in winter, you can simply wipe the foliage with a soft, slightly moistened cloth. It is worth noting that exposure to a large amount of sunlight can cause Polly to turn yellow. In this case, it is important to increase the intensity of watering.
If polly begins to turn yellow and lose leaves, this may be evidence of a lack of water and light, and perhaps heat. It is important to optimize the care of the plant so that the flower will quickly resume its development and stop fading.
Reproduction
Alocasia propagation occurs in the spring using suckers, stem cuttings or tuber division. In professional greenhouses it is possible to obtain seeds, but in indoor conditions this is almost impossible. In addition, the varietal characteristics of some forms, such as Alocasia Polly, are not transmitted during seed propagation.
Separation of daughter tubers or division of the mother tuber is usually carried out during spring transplantation. In the first case, the young offspring are carefully disconnected, kept in a fungicidal solution, planted in a tight container and placed in a greenhouse. When dividing, the bush is cut so that each half has growing points and healthy roots. Be sure to sprinkle the cut area with charcoal.
Cuttings occur according to the usual rules for aroids:
- the cutting is selected so that it has several growth points and a bent root;
- the cut is processed with charcoal;
- for rooting use an equal mixture of peat and sand;
- It is necessary to have a greenhouse, high (20-25 degrees) temperature and bottom heating.
It is important that a dormant bud remains on the stem under the cut, otherwise the mother plant may no longer begin to grow.
Transplantation and propagation of alocasia
It is advisable to replant alocasia 1–2 times a year. As a rule, a young plant can grow out of its pot in just 4 months, so it will have to be replanted twice a year. But a mature alocasia can be replanted after a year in order to give it more nutrients with new soil.
Breeding alocasia goes like this:
- You need to shake off the soil from the roots;
- tubers found among the roots can be planted separately;
- to obtain adventitious shoots, you can slightly deepen the roots of the plant;
- you need to replant the flower in a pot that is wider than the original one, and be sure to put expanded clay drainage on the bottom.
Rhizome division
Alocasia can be propagated by dividing its rhizomes. It is important to remember that this method must be combined with the annual replacement of the plant’s soil (from late March to early May).
Reproduction by dividing the rhizome is done as follows:
- first you need to carefully remove the soil without damaging the rhizomes;
- if the soil is compacted, you can moisten it a little under running water;
- Now you need to divide the rhizomes with a knife, be sure to leave a growth bud or rosette with foliage on each part;
- now the place where the rhizome was cut needs to be sprinkled with charcoal dust and left for 1 hour to dry completely;
- when the cut dries, it is transplanted into prepared soil and watered abundantly;
- now it is enough to maintain the air temperature at 24 degrees and regularly spray the plant; during this period you need to keep alocasia away from sunlight.
Tuber planting
In the spring, when tubers appear on the surface of the soil, they can be transplanted. It is not uncommon for tubers to begin to grow directly in the pot with the flower from which they came. In this case, careful separation of the tuber from the mature plant is required.
After this, the tubers need to be germinated; sphagnum moss will help for this purpose; it should be regularly moistened, preventing changes in the ambient temperature and maintaining it within 22–24 degrees. You can put a plastic bag over the pot with the germinating tubers to create the maximum level of humidity.
After the tuber germinates and the leaf peeking out from it unfolds, the young plant can be transplanted into the soil. You can start feeding this plant with fertilizers and minerals immediately after at least three leaves appear.
Using cuttings
Those varieties of alocasia that are decorated with emerald foliage can easily be propagated by cuttings. To do this, the following manipulations are carried out:
- The top of the shoot is cut with a knife at an angle of 45 degrees.
- Before planting the cutting, you need to treat it with a special product to stimulate growth (for example, “Novinka”).
- Now the cuttings can be planted in the soil prepared in a pot and watered generously with warm water.
- For better growth of alocasia, you need to create the most comfortable conditions for it:
- air temperature at 23 degrees;
- regular watering and spraying;
- no drafts.
It is important to remember that all work with alocasia should be carried out wearing protective gloves. At the same time, avoid allowing the plant juice to come into contact with the skin of the hands, face or mucous membranes.
Watering and humidification
The main requirement for watering is that the soil should never dry out completely. Needs watering with settled water. The top layer of soil should remain moist at all times, but stagnation in the pan should not be allowed. In winter, water more carefully and moderately to avoid root rot.
- Advantages of Gardena gardening equipment
Bathhouse made of 6x6 timber
- Ktenanta - types, cultivation characteristics and instructions for care at home. 110 photos of plants
The plant needs to be provided with high air humidity; in the hot season it will require regular spraying. To provide additional moisture, it is better to place the pot on expanded clay soaked in water, and use a humidifier in winter.
Plant pests and diseases
Alocasia, like other indoor plants, is not without problems with the occurrence of pests or diseases. To preserve the plant, you need to take timely measures to eliminate these problems.
What to do if problems appear with the plant?
Alocasia is not a very capricious flower, however, it does have some problems:
- The plant loses its growth rate: lack of nitrogen fertilizers, which can be compensated for with an aqueous solution of urea.
- Foliage withers: the soil is either too dry or waterlogged. In this case, you need to adjust the watering regime and, if necessary, replace the substrate in the tray.
- The color of the leaves turns pale: the flower lacks light, which can be increased by adding artificial lighting.
- The tips of the foliage dry out and turn brown: the air in the room is too dry or the plant does not have enough water. It is necessary to carry out regular spraying and watering with warm water.
- The leaves begin to rot: the plant is infected with root rot. It needs to be treated with an antifungal agent (“Fundozol”), the leaves that have rotted are removed. The plant itself requires transplantation into a substrate of a looser consistency.
Signs of infestation and pests
Alocasia is susceptible to infection by the following diseases and pests:
- Scale appears due to excessive moisture of the plant: the foliage of alocasia is covered with dark spots that also cover the stem of the plant. You can get rid of scale insects by spraying the flower with a solution of tobacco and soap mixed with kerosene. Pests should be removed with a cotton pad soaked in this solution.
- Aphids settle on the lower surface of leaves, which can cause them to curl and dry out. The flower must be treated with a special anti-aphid agent; after a day, the alocasia is washed and re-treated.
- A sign of a flower being damaged by a mealybug is the appearance of a whitish fluff and a stop in the growth of alocasia. The plant is treated with an alcohol solution, carefully wiping the foliage and stems.
How to deal with spider mites
The appearance of a small red spider should alert the owner; it could be a spider mite. It can cause alocasia a lot of trouble, including yellowing of the foliage.
You can get rid of spider mites by spraying the leaves with insecticides, followed by washing them with warm water. It is important to carefully treat the lower surface of the foliage, carefully removing all cobwebs.
Remedies for spider mites:
- tobacco infusion;
- pollination with store-bought insecticides (carried out only outdoors);
- ground sulfur;
- water.
Alocasia diseases
Alocasias are susceptible to disease, so it is important to constantly inspect them in order to recognize the problem in time.
Root rot. The main symptom of the disease is leaves that wither for no apparent reason. But in fact there is a reason - excessive watering and too cold soil.
The plant can be saved only in the initial stages of the disease. And the first thing you need to do is take it out of the old pot, cut off all the rotten roots, sprinkle the cuts with crushed coal and plant the bush in a new pot with fresh soil. It is useful to add a Glyocladin tablet to the top layer of soil. And spray the plant itself with Alirin (3).
Late blight. This disease is also associated with rot, but the rot begins at the base of the shoots and then rises upward. It can be triggered by high soil or air humidity at low temperatures.
For the treatment of late blight, the drugs Consento, Revus, Ordan (3) are suitable.
Anthracnose. It appears as gray or brown spots on the leaves. The cause is often excessive watering and stagnation of water in the root zone.
In the fight against the disease, treating the plant three times and watering the soil with Fitosporin or Alirin have worked well (3).
Powdery mildew. It also occurs from excess moisture. You can recognize it by its white spots, as if dusted with flour.
Fundazol (3) will help cope with the disease.
Medicinal properties of alocasia
The characteristics of alocasia indicate that this medicinal plant, pleasing to the eye with its flowering, however, can cause many problems. The thing is that the plant contains poison (mercuric chloride and cyanide), and in all its parts. Therefore, it is important to carry out all actions carried out with alocasia only with protective gloves, preventing the poison from getting on the mucous membranes and skin. You cannot die from exposure to the poison, but you can get quite noticeable burns. If there are children and animals in the house, you should think about the need to purchase alocasia.
This odorous, poisonous flower, which is dangerous in essence, has beneficial contents. That is why its cultivation is so widespread in the East. The medicinal properties of the plant allow it to be quite successfully used in the treatment of such diseases:
- pneumonia;
- tuberculosis;
- joint diseases;
- streptococcus and Escherichia coli;
- oncological diseases;
- gastrointestinal problems;
- flu;
- cardiovascular diseases.
Alocasia spreads phytoncides around itself and has a bactericidal effect on the air, which, together with the splendor of its emerald foliage, makes it a popular inhabitant of indoor greenhouses.
Is the plant poisonous?
The plant is toxic to people and pets due to calcium oxalate crystals contained in its sap. However, this is more of a defense mechanism, and consumption of the plant tends to have unpleasant side effects and is rarely fatal.
Transplantation, breeding of alocasia
For adult plants, replanting is needed every 2-3 years, as the soil becomes compacted and depleted of nutrients. Transplantation is carried out in early spring, when the plant is just beginning to develop. If the plant is healthy and has been replanted recently, it would be best to re-transfer
That is, the plant is carefully removed from the previous container and placed carefully on a layer of drainage and sprinkled substrate with a lump of earth. Since the pot is larger in size, soil is added, but not mechanically compacted, but only slightly shaken
The plant lowered into the vessel is watered, the soil settles, it is poured up to the neck and the replanting is completed.
In other cases, the plant is completely washed from the old soil and dried in a horizontal position with the roots straightened. At the same time, the children choose, sort out the bushes and plant each one in a separate container.
Other methods of reproduction are carried out:
- leaves;
- seeds;
- stem buds;
- rhizome segments.
In order for the plant to completely replicate the shape of the mother bush, a bud is taken from the trunk, cut out with pulp, and rooted into the substrate under a hood in a warm place. The resulting wound on the trunk is treated with crushed coal.
Propagation by cuttings obtained from the upper part of the shoot provides 100% survival rate. The cutting is cut at 45 degrees, treated with “Kornevin” or another biological preparation and placed in warm soil, controlling its humidity.
The plant propagates by seeds only when fresh. They are immediately sown in warm soil; the soil is kept moist, sprayed from above. Seeds germinate unevenly, from several days to three weeks. Seedlings are transplanted when they have created a good root system.
Rhizomes disassembled into pieces for replanting should have either a finished plant with leaves or a growth bud. They are also rooted in the substrate after the wounds of the separated roots have dried. Rooting is carried out only in warm, moist soil.
Poisonousness of Alocasia
It is very important to know about this feature of a beautiful indoor flower, because poison is contained in absolutely every part of this plant. This means that when performing procedures for transplanting or propagating Alocasia, it is very important to use protection in the form of rubber gloves. At the end of the work, throw away the gloves and wash your hands up to the elbows to stop all possible ways of poison entering your body. Alocasia also needs to be planted where your children or pets cannot reach it. Otherwise, they may accidentally become poisoned by the poisonous juices of this plant.
Possible problems in growing alocasia
In alocasia, diseases rarely occur, but you may still have to face some difficulties.
Leaves turn yellow
This symptom may occur due to the following reasons:
- lack of nutrients in the soil;
- lack of moisture;
- sunburn.
Treatment consists of removing damaged leaf blades and creating favorable conditions for the plant.
The tips of the leaves are drying out
Lack of watering, low humidity.
The lower leaves fall off
Stagnation of water, incorrectly selected soil.
Pests
Large alocasia rarely suffers from insect attacks, but the appearance of aphids or spider mites on it cannot be ruled out. The reason for the appearance of pests is improper care, low humidity, and too high temperatures. Treatment – treatment of leaf plates with a soap solution. If there are too many insects, use Actellik at a dosage of 2 ml per 1 liter of water.
Alocasia is a very beautiful plant with excellent decorative characteristics. Since it is quite easy to care for, it is often kept in offices. Despite the fact that the appearance of a bud in “captivity” is almost impossible, the plant is loved for the splendor and splendor of its leaf blades.
Growing: planting, transplanting, propagation
To plant alocasia polly, the main thing is to choose the right soil. It should have a low density, slightly acidic environment (pH = 5.5 - 6), and also allow air and moisture to pass through well. You can easily prepare such soil yourself.
For this you need:
- leaf soil;
- coniferous soil;
- humus;
- peat:
- coarse sand or perlite
Their ratio: 2:1:2:1:1. Coniferous soil can be replaced with dry pine needles. It’s even easier if you buy ready-made soil in a store. It should be for decorative deciduous plants. The pot for planting the flower must be spacious, with drainage holes, then the roots will be able to breathe and the leaves will be larger.
The pot can be made of plastic or terracotta. The bottom of the vase is filled with expanded clay or pebbles; small crushed stone or broken majolica will do. The roots of the alocasia should be carefully placed so as not to damage them and covered with soil. Plants need to be replanted every spring, but only young ones. Adults are replanted every three years by transferring the root with an earthen lump.
The transplant is quite simple:
Choose a flowerpot 2-4 cm larger than the previous one.
- Fill drainage to the bottom.
- Add new soil.
- Remove the flower from the pot.
- Place the rhizome in a new flowerpot.
- Add new substrate and compact it a little.
- Water using the drip method or use bottom watering.
- Place in partial shade, as sunlight can interfere with the rooting process.
Reproduction of Alocasia polly, as well as transplantation, should be carried out in the spring. Manipulation is done in several ways.
The simplest three are:
- cuttings;
- rhizome division;
- planting tubers.
Cuttings are used if the plant is damaged.
The following actions are carried out:
- the broken stem splits;
- each is cut into pieces (the stem should have one or two buds);
- place 1-2 cm in a sand-peat substrate;
- water;
- create a greenhouse effect using a jar, film or glass;
- ventilate for 10-15 minutes every day;
- maintain humidity and temperature +23…+24 °C;
- after 3-6 weeks the greenhouse should be removed;
- plant young plants.
It is advisable to divide the rhizome together with spring replanting.
It's easy to do. First you need to remove the earthen lump from the flowerpot and wash the soil from the roots. After this, use a sharp, clean knife to separate the shoots and sprinkle the sections with charcoal powder. And then plant them in new pots. Reproduction of Alocasia polly by planting tubers is carried out as follows:
- a flower is taken out of a pot;
- the soil is washed off from the rhizome;
- Use a sharp, clean knife to separate the tubers that form on the roots;
- cuts are processed with crushed coal;
- the tubers are lowered into sphagnum moss 1-2 cm so that the top is visible and watered;
- there should be good lighting and a temperature of +23. . . +25°C;
- a greenhouse is made with a jar or film;
After these manipulations, the plant will sprout in 3-6 weeks.
There is another method of propagation - by seeds. But it is more complex. It must be borne in mind that the seeds, like the flower itself, can die in very dry soil. Therefore, before planting, they are sprayed and the soil moisture is regularly maintained. Alocasia polly seedlings at home are plucked twice and only then planted in small pots in which they grow. When the roots fill the volume of the container, the young alocasia is planted for permanent residence.