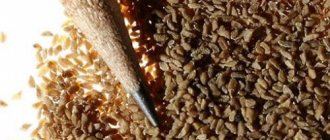
Light brown seeds, similar to miniature tubes, open in literally three days, revealing to the world a tiny, but already quite fleshy plant. Thanks to its rapid germination and further active growth, adeniums can be safely recommended to the most impatient home gardeners.
Despite the apparent simplicity and understandable joy from the sight of the first shoots, one should not forget that adenium is a native of Africa, and its seedlings require a special approach in indoor conditions.
How to grow adenium from seeds, properly organize sowing, germination and care of seedlings?
Choosing adenium variety
Nowadays there are a large number of subspecies and varieties of crops with beautiful flowering, so lovers of indoor plants are faced with a difficult choice of what exactly is worth growing. Popular varieties of adenium:
- Arab;
- Crispum;
- Mini;
- Swazicum;
- Soqotran;
- Somali;
- Fat.
Blooming adenium
Most often for indoor growing they take: Squasikum, Somali, Suchny or Mini. These plants are considered the most unpretentious of all the abundance of varieties, and they bloom earlier than others.
Before you figure out how to grow adenium, you should find out about the sowing time.
Somali adenium
Advantages and disadvantages of this method
The advantage of propagating adenium by sprouting from seeds is the rapid growth of the caudex - the thickened trunk of the plant, which is formed from the root system and, depending on the owner’s imagination, can take on a wide variety of forms. Adenium grown from seeds immediately begins to branch extensively and grows quickly .
In addition, by showing imagination, you can simulate the amazing shape of a pet from the first months of life.
But, unfortunately, it is very difficult to get fresh seeds! But it is the shelf life of planting material that affects the germination of the plant.
Therefore, purchasing from an online store is not safe: you can not only purchase a variety and color that is different from the desired one, but also not get any results from your subsequent work.
It is better not to take packages that indicate a seed shelf life of several years . Collected no earlier than a year in advance is the only suitable option.
We also suggest learning how to propagate adenium from cuttings from this article.
Selecting a container for sowing
Why Adenium does not bloom - reasons
A minimal size pot is the best container for seeds. In such a container, small plants will not suffer from excess humidity. The main requirement for the container is the presence of a large number of holes through which unnecessary moisture, harmful to the roots of the flower, will be removed.
The lid on the container is a significant advantage, because such a pot will serve as a small greenhouse. At the bottom of the planting container you need to lay out a drainage mixture (expanded clay, pieces of foam plastic, crushed brick or coal). Place soil on top and moisten it moderately.
Pots for adenium
Conditions for seed germination
If all the conditions described below are met exactly, then the first shoots can already be noticed 3 days after planting the seeds. On average, it will take about 2 weeks for the seeds to germinate at home; in some cases, the period can be extended to a month. The time of emergence of seedlings directly depends on the planted variety.
- The place where you place the containers should be warm;
- In the morning and in the evening, such a small greenhouse is ventilated for half an hour;
- Lighting for seed germination needs to be bright;
- The temperature at which the seeds will germinate must be at least 25 degrees Celsius. It is best to use places with temperatures between 30 and 35 degrees Celsius. If the temperature is lower than expected, the seeds will begin to rot.
After all the seeds have sprouted, the lid or film is removed from the containers, otherwise the sprouts will rest against the film and grow crooked.
Soil preparation
Adenium - pruning and crown formation
The two main requirements for soil are nutrition and breathability. In terms of acidity, the soil should have either a weak or neutral indicator. Components of an ideal soil:
- coconut fiber – 50%;
- leaf-humus mixture – 25%;
- fine expanded clay (broken brick) up to 3 mm – 20%;
- foam crumbs - 1 handful;
- baking powder (vermiculite or perlite) – 5–10%.
Important! Peat has too dense a consistency, which will prevent root growth at all stages, so there is no need to use such soil.
Mixtures for succulents are also suitable for growing adenium at home. This product is diluted with crushed charcoal and coarse river sand that has been calcined.
Coconut fiber
How to plant adenium seeds correctly
When starting planting work, it is necessary to prepare the seed material. To do this, you will need a solution of potassium permanganate, where the seeds are placed for half an hour. Then a warm zircon solution is prepared and the material is left in it for another 2–3 hours.
Then the seeds are laid out on the ground and sprinkled with a small amount of the mixture. All that remains is to place the container in a room where the air temperature is +33... +35 °C.
On a note! Cooler temperatures mean that seedlings take a long time to germinate or do not grow at all.
Sowing in peat tablets
Planting adenium seeds in peat tablets follows the same principle as in a container with soil. You will need a lot of space to place individual cups with seedlings.
Adenium seeds
Basic landing rules
Choosing the right soil
In order for this plant to take root at home and sprout in a short time, you need to follow some rules.
In addition to the correct choice of container and soil, adenium should be prepared for planting and sequential sowing.
Even seedlings need care, so let’s figure out what to do during and after planting.
Soaking the seeds
To avoid death or rotting of the seed material, you need to treat it before planting.
To do this, the seeds are soaked in dechlorinated warm water for 120-180 minutes. Instead of water, you can use a solution of potassium permanganate or a suspension mixed with crushed coal. But then the soaking time is reduced to 30-35 minutes.
Then the seeds are treated with a biological or systemic fungicide like Fitosporin. This measure protects the plant from fungus.
You can also soak the Adenium seed in the fast growing stimulator Energin or Epin for 120-180 minutes.
Some gardeners avoid soaking, but this often reduces the chance of seed germination.
Sowing
Let's look at the algorithm of actions for sowing seeds of Adenium varieties Arabicum, Multiflorum and any other suitable for growing at home:
- Place the drainage on the slightly moistened bottom of the container, and on top - the substrate prepared in advance;
- The seeds of the plant are laid out flat, the distance between them is 3 cm; this rule must absolutely not be violated;
- The seed is sprinkled with earth on top, the maximum thickness of the top layer is 1 cm;
- The container with the seeds where the future flower was planted is lightly irrigated with water and covered with a lid or a layer of cling film.
Seeds will germinate quickly only if certain conditions are met. And the most important thing is maintaining a uniform temperature. It should not fall below 30°C.
When the temperature drops, the sensitive roots begin to rot, and if this happens to a young plant, it cannot be saved.
Therefore, you need to keep the sown seeds near heating systems. You can also install a special lamp above them. It will provide enough light and will heat the surface of the earth, without which germination of adenium is impossible.
You need to take care of the sowing daily or as written in the instructions for the seed material. In the morning and evening, the lid is removed for ventilation for 30 minutes. At this time, it is necessary to protect the plants from drafts and direct sunlight.
If you follow all the steps, the sowing will turn into shoots in two or three days.
Shoots
Adenium seedlings appear quickly, although they bloom and reproduce only many months after emergence. They are too weak to exist as adult plants, so they need sensitive care.
- Hatched seeds are illuminated with a special lamp 24 hours a day.
- Gradually the backlight is reduced to 18, 16, 14 and 12 o'clock. But you cannot remove the bottom heating. It can be a regular battery, a heater, a shoe dryer, or any other device that emits enough heat.
- Water is regularly added to the container: a spoon is enough for a young plant.
- Often small sprouts are covered with a shell - it will prevent the leaves from fully opening, so it must be removed in a timely manner, otherwise germination will be pointless. They do this either with their hands or with tweezers - in any case, be careful, because the injured flower will not survive.
What affects germination
How quickly sprouts appear from the seeds depends on temperature indicators. Ideally, the room should be quite warm - 33-35 °C. Achieving such values is not very easy, so you will have to use lower heating to germinate the seeds. For this use:
- thermal mats;
- reptile mats;
- warm floor;
- heating batteries.
Adenium seedlings
Transplantation to a permanent place
When planting seed material in one common container, picking is carried out when the plants have 2-3 pairs of true leaves. The first pot should be about 50 ml. You can use disposable cups.
Note! If the root systems of seedlings are too intertwined, they must be separated as carefully as possible.
The next time adenium is planted at six months of age. For flowers that were planted in individual containers, this may be the first transplant. It is important to follow these rules:
- The culture is transplanted after it has completely mastered the existing capacity.
- It is not recommended to take a growing pot where there is a lot of free space. This way the plant will not be able to cope with the incoming liquid, which can cause the root system to rot.
Plants are transplanted to a permanent place from the age of one year, observing the following rules:
- It is not recommended to make very nutritious soil for adult flowers, since their nutrition is regulated by applying fertilizers. In a poor substrate, adenium will develop its caudex better.
- Plastic containers are excellent as pots for this crop. For those who are growing a flower for the first time, it is recommended to use transparent plastic to make it easier to determine the soil moisture level.
- Be sure to have a drainage layer at the bottom of the container.
- After transplanting, the plants can be watered only after 2 days. This time is enough for the injured roots to heal.
Transfer
Aftercare
- Lighting.
The plant is suitable for a south or south-east window. The more light it receives, the more abundant and brighter the flowering will be. Adult leaves are not afraid of the hottest rays of the sun, but young leaves need to be shaded at midday.Attention! On cloudy days, the plant requires illumination with a fluorescent or phytolamp. In winter, during the dormant period, it is better to remove adenium to the back of the room.
- Watering .
Summer watering is abundant and frequent, when the top layer of soil dries out, about 2-3 times a week. In winter - rare, only when the entire mixture in the pot is dry. The water used is filtered and warm. - Temperature .
The higher the ambient temperature, the higher the air humidity should be and vice versa. Optimal mode: 25-30 degrees in summer, in winter at 16-20 the plant sheds its leaves and goes into hibernation. - Top dressing.
Fertilizer is applied only during the period of active development. Organic fertilizers based on pigeon or chicken droppings, as well as complex mineral fertilizers (Monophosphate, Kemira), are used.Young plants (up to 3 years old) are fed with fertilizers with a large amount of nitrogen, while older plants - with a small amount.
If the plant is healthy and the conditions are optimal, mineral fertilizers are used once a week (1/4 of the recommended concentration), organic fertilizers are used once every 3-4 weeks (also 1/4).
In other cases, fertilizing is once a month in the same volumes. An hour before fertilizing, the plant is watered and sprayed. Fertilizer should not get on the above-ground parts of the plant. Foliar feeding is rarely used when there is a clear deficiency of microelements.
- Trimming.
Required for:- Formation of a beautiful crown.
Activation of plant growth. This procedure is especially necessary for plants older than 5 years.
For young plants, from 3 months to 3 years, it is better to pinch, i.e. removing 2-3 centimeters of the top or branches from the side. Before pruning, the adenium is washed in warm, clean water, the cut is made at a distance of 1-1.5 cm from the caudex.
Diseased parts of the plant are removed to healthy tissue, and the cutting tool is disinfected in alcohol. The abundant secretion of juice will stop after 1-2 days. The minimum cutting height is 10 centimeters above the soil. Very thin shoots that emerge after pruning are plucked out.
Crooked, soft stems that rub against each other are also removed. To stimulate growth, you can also remove those that are too thick. There should be no stump left after pruning. The cut area is air-dried for several minutes and lubricated with garden varnish, a special balm or paste. The lack of putty is not critical, but it may affect the healing of the cuts.
Important! Adenium is a poisonous plant. Small wounds and scratches should be covered with adhesive tape. It is best to work with gloves, and then thoroughly wash your hands and tools with soap.
To avoid getting juice in the eyes or mouth, keep pets and children away from the plant.
Pruning and pinching are not done during the dormant period (winter and autumn). Suitable months are March-April, simultaneously with plant transplantation.