How to grow sphagnum
Sphagnum, like almost any plant, can be grown independently and then used not only as a useful additive to the soil, but also as a decorative unit.
The dense soft coating of a cheerful emerald color significantly decorates and cultivates the landscape of the garden plot. To plant, you need to prepare a mixture of crushed moss and an ingredient that will serve as a nutrient medium for it. Any fermented milk product, which must be natural, is suitable for this purpose, for example, yogurt or kefir. For two glasses of liquid you need to take one glass of crushed moss. As a result, the consistency of the mixture should be the same as that of low-fat sour cream.
How to grow moss at home
Take a natural bristle brush, dip it in the mixture and apply it in a thin layer, avoiding smudges, on the place where you plan to grow moss (wall, stone, brickwork, etc.). It is desirable that the surface be grainy and rough.
The planting should be regularly sprayed with water at room temperature, every day for the first 3 weeks, then the frequency of spraying can be reduced to once every 3 days.
Home grown sphagnum moss
In the first weeks, young moss will resemble a thin film of greenish mold. It must be treated with care, protecting it from abrasion. Whether the sphagnum has taken root will finally become clear in about 6 weeks. Areas where the film will not grow and develop are renewed by applying a freshly prepared mixture to them.
How to grow moss in the garden
Planting material for growing in open ground is prepared in exactly the same way as described above. The optimal time for sowing is autumn. Planting and care are carried out observing the following rules:
- The planting area should be shaded. In places exposed to wind and sun, moss quickly dries out and does not take root.
- The surface relief can be any. Before planting, it must be cleared of debris, leaves, branches, and stones.
- Moss takes root not only on natural surfaces, but also on artificial ones, for example, paving slabs or decorative stones. The main condition is the roughness of the surface, otherwise it will not adhere to the nutrient mixture.
Another way to grow sphagnum moss in your summer cottage is to cut out a piece of turf with moss and transfer it to garden soil in a shaded and moist place or to a tray with warm peat and water it daily. Sphagnum moss is not poisonous, so you can handle it with your bare hands.
How to grow moss at home?
When preparing a plant for planting at home, follow these rules:
- The site from which the sample for transplantation was taken and the new site must have identical characteristics and conditions. If you plant the material on the ground, take pads only from the ground. Similarly, the tree “inhabitant” will take root only on the trunk. Accordingly, how to grow moss on the roof of a house becomes clear;
- When cutting the substrate, try not to injure the lower part of the material;
- Only mature and overgrown specimens that have a rich green color are suitable for planting;
- The collected material is dried for 2–3 days, then it is finely chopped and ground in a ceramic mortar;
- The resulting powder is mixed with any fermented milk product and applied to the desired surface with a brush. If moss is planted over a large area (for example, a wide wooden container), the area under the plantation is watered with the prepared mixture.
By growing bryophytes in an apartment or in a private house (in the interior or in an open area), you get not only a unique decorative element. Of course, moss on the wall of a house is an original and environmentally friendly decoration , but it also has other valuable properties.
- Some types of sphagnum are actively used as a dressing in medicine. It has high bactericidal properties;
- Due to its hygroscopicity, it is used in the manufacture of insulation materials in construction;
- Moss is an indispensable filler in floristry (similarly for its hygroscopic properties);
- Bryophyte growing in open ground helps the soil resist erosion and weed development.
Why are bryophytes valuable on a natural scale?
- Serve as participants in the biocenosis;
- Maintain and regulate the water balance of landscapes;
- They form peat.
Planting and care
To plant moss, you need to prepare a mixture of crushed plants and a component that will serve as a nutrient medium for it. Its role is played by any natural fermented milk product (kefir or yogurt). The proportion of the composition is two glasses of liquid per glass of finely chopped greens. The consistency of the mixture should resemble low-fat sour cream.
How to plant a plant:
- Dip a natural bristle brush into the prepared mixture and apply to the area where you plan to plant (stone in a pot, brickwork, concrete wall, etc.);
- Try to spread the mixture in a thin layer so that it does not drip down.
The result of the work done will be visible in approximately 40 - 42 days. Then it will become clear whether the moss has taken root or not. To improve the conditions and speed of its growth, follow these instructions:
- Spray the planting only with warm water. The first three weeks - daily. Then the watering regime is reduced;
- Areas where the plant has not taken root are renewed by applying freshly prepared composition;
- In the first weeks, growing moss looks like a thin green mold film. Protect it from abrasion.
Features of growing moss in a jar
It must be admitted that bryophytes look most impressive in transparent vessels. It is glass that most favorably emphasizes the beauty of the texture of representatives of the Bryophyte department. The question arises: how to grow moss in a jar at home if it reproduces by spores?
There is nothing critical in this process. You need to tackle it, starting with finding a suitable container. This can be an ordinary three-liter glass jar, vase or aquarium. A thick layer of drainage litter is poured onto its bottom . It is prepared from small river or sea pebbles, broken shards or ordinary expanded clay. A stone or ceramic “pillow” will help prevent moisture stagnation. But that is not all. Be sure to lay down a layer of granular charcoal. The substrate is poured on top. Use small stones, coconut shells or fiber, or wood chips or driftwood.
There is no point in growing moss in a glass jar unless you approach the composition with creativity. Play with the structure, think about the foreground and background planting. Remember that your creation will become part of the interior or landscape design, so it should look attractive. Using decorative stones, pieces of wood or sand mounds, you can achieve a naturalistic effect. If you plant moisture-loving plants or succulents next to the moss, the composition will look like a real landscape in miniature.
Planting material is moss taken from the forest . It is cut off along with the turf (the thickness of the lower layer of turf is left about 2.5 - 3 centimeters). Simply place the moss on the prepared substrate and press lightly. Press lightly on the pad so that it does not fall apart. For the first 5 - 7 days it is sprayed regularly. After a week, the moss has adapted sufficiently and moisture is reduced. Further spraying regime is once every three to five days. Excess moisture is undesirable.
For full development, bryophytes require air flow, cool temperatures and moderate lighting. The ideal option is to place a jar of moss on the windowsill every morning for two to three hours.
Basic requirements for caring for bryophyte
Irrigation is carried out focusing on the soil layer. If it dries out, you need to moisturize it. Moss does not like excess liquid. If its color becomes much darker, it is recommended to reduce the amount and frequency of irrigation.
By the way, you can irrigate such a plant using a small watering can or by drilling holes in the cap of a plastic bottle. The optimal interval between moisturizing after the end of the adaptation period is once every three to five days.
Tiny mossy pads love cool air, high humidity, and partial lighting. They do not tolerate direct sunlight. It is recommended to install a container with such a plant in a dimly lit corridor, near the aquarium.
This plant is perfect for the office. Bryophyte only needs two hours of indirect sunlight per day for normal growth and development. Thanks to properly created lighting, their emerald hue acquires an even more saturated color.
Method one
Prepare a mass of crushed sphagnum moss and one of the selected dairy products (it will serve as a nutrient medium): kefir or natural yogurt in a 1:2 ratio. The consistency of the mixture should resemble store-bought sour cream. Dip a natural brush into this mixture and apply a thin layer of it to the place where you are going to grow moss. Try to avoid drips. If the surface you choose is too smooth, moss is unlikely to grow. But on rough and grainy surfaces it’s easy!
Spray this planting with water from a spray bottle. This must be done daily for the first three weeks, after which the frequency of watering is reduced to once every three days. Water, please note, should be at room temperature.
Don’t be alarmed if at first your planting looks like a layer of green mold, as this is normal. Protect it from abrasion. After a month and a half, it will become clear whether your sphagnum has taken root. If bald areas appear during this time, re-apply a layer of composition to them.
Vegetable cocktail
If you simply put the plant plate on the bottom of the aquarium, it will dry out. And you won’t get a beautiful landscape. So we'll make a cocktail. No, not for drinking. For lubricating surfaces. To prepare it you only need a blender. Here are some recipes:
- 100 g moss, 2 tbsp. l. sour cream, 200 ml of clean water.
- 200 g of plant, 400 ml of any beer, 1 tbsp. l. granulated sugar.
- 1 tbsp. moss, 2 aspirin tablets, 2 tbsp. plain water.
- 200 g plant, 200 ml kefir, 300 ml water, 1 tsp. Sahara.
We take ingredients from any recipe. Well, those that are at hand. Together and cheerfully we put it in a bowl or jug. Then vigorously grind with a blender. Let me warn you right away: the smells of cocktails using dairy products are disgusting. Well, nothing. Beauty always requires...
Decorative or stabilized moss
Decorative, or stabilized, moss is a new design solution that can decorate any home. This moss is used to make paintings and panels, which are attached to boards and hung on the wall. This composition looks very original. Stabilized moss (or sleepy) does not require watering or other special care.
Advantages of decorative moss:
- retains its appearance for 15 years;
- does not require special lighting;
- being in a state of sleep, moss does not grow, which means it does not need to be pruned;
- dust does not settle on it;
- does not cause allergies;
- moss is not toxic;
- resistant to mold and fungi, and not susceptible to diseases.
On an industrial scale, moss is collected by hand. This selection of material allows you to control the balance of the ecosystem. After collection, the moss is thoroughly cleaned of remnants of grass and dirt, and then subjected to a stabilization process. In fact, the plant is put into a dormant state. But it is precisely thanks to the stabilization process that moss can retain its color and properties for a long time, but not grow. The essence of the process is that a special solution based on glycerin is introduced into the moss. As a result, the decorative moss turns out to be soft, elastic and very beautiful.
Is it possible to make decorative moss with your own hands? There is nothing complicated in the process itself. Another thing is that to create a large-scale painting you will need a lot of moss. If you have enough material available, you can make stabilized moss at home.
Icelandic moss is most suitable for growing sleepy moss. This is what is most often used in decoration.
To prepare a solution for creating decorative moss you will need:
- moss - 3 handfuls;
- kefir - 0.5 liters;
- sugar - 2 teaspoons;
- hydrogel - 2 teaspoons;
- purified water - as needed.
All components are loaded into a blender and blended for two minutes. Now you need any natural base, for example, a board or cork tile. The prepared solution must be applied to the surface of the substrate, after which moss should be laid out. It will take five weeks for a sufficient layer of moss to form. All this time, the moss must be kept under the film, thus creating a greenhouse.
While the moss is not sleeping, it needs to be looked after: water it periodically and avoid direct sunlight. If you are not happy with the color of the plant, you can paint it with natural paints. To prepare a mixture that will put moss to sleep, you will need boiling water and glycerin. They must be diluted in a ratio of 2:1, respectively. You should get a thick mass, which should be poured over the entire surface of the moss. In a month, the bryophyte will fall asleep and can be hung in a permanent place.
Buying decorative moss is not a cheap pleasure. The average price per kilogram is $28. If you buy moss in the form of tiles, the price of the panel is $400 per square meter.
If you have any questions, we suggest watching the video, which describes stabilized moss in more detail.
Growing sphagnum moss at home
Forest sphagnum moss (from the Greek “sponge”) is a type of marshy plant that actively absorbs and retains water throughout its green mass.
Dried sphagnum moss is an environmentally friendly material that is used in construction, floriculture, pharmacology, and veterinary medicine.
Overheating, the lower layers eventually turn into peat, forming a natural nutritious sponge. It is this feature that is valued by flower growers.
Forest sphagnum moss is actively used when growing phalaenopsis, mixing the dried plant with the bark. Young plants and cuttings are rooted in it.
What to do with an acquired bump
For planting, sphagnum is collected in the forest (only in the northern swampy regions) or purchased from breeders by mail. Before shipping, the green layer is removed from the container, rolled tightly and placed in a sealed bag. During delivery, the green hummock does not die, since a humid microclimate remains in the tightly closed package.
After receiving the parcel you must:
- open the packaging and visually assess the condition of the plant;
- for further rooting and growth, use the green part;
- For long-term storage, dry the sphagnum moss in a cardboard box in a dark place or freeze it in parts in the freezer.
Before shipping, the plant is packaged in bags of about 1 liter. This volume can be divided into several parts: for use, for storage and for cultivation.
How to grow moss yourself
To grow at home you will need:
- parent tussock with green patches of moss;
- container 10–15 cm deep, 15–20 cm wide, up to 30 cm long;
- melted, distilled or filtered water;
- spray;
- film;
- scotch;
- scissors.
To plant you need:
- pour warm water into a clean, disinfected container (layer no more than 5 - 7 mm);
- distribute planting material evenly;
- spray clean water on top with a spray bottle;
- cover the container with film, securing the film with tape;
- Leave a hole along the edge for air to enter or make several holes directly in the film.
Necessary growing conditions
After planting, the container covered with film is placed under a fluorescent lamp. It is not advisable to open the container. During the growth period, you should monitor the amount of water in the container and the presence of evaporation on the film. If necessary, sphagnum is sprayed again and water is added.
Description
Bryophytes are considered one of the most ancient plants on Earth. There are more than 20,000 thousand species. Bright and beautiful green pieces can decorate any interior, garden or vegetable garden.
“Is it possible to grow different types of moss at home with your own hands? How to do this correctly? What care is needed for an unusual plant? What type of moss should I choose? - all this interests everyone who decides to grow it at home.
In our article you can find answers to all questions.
Types of moss
There are a huge variety of types of moss. But they are all united by the lack of a root system and flowers. Green pads need very little to grow: moisture and diffused light. Many people believe that moss causes allergies.
However, this opinion is erroneous, as people often confuse moss and mold. Therefore, if you want to decorate your apartment, garden, aquarium or vegetable garden with a beautiful green carpet, then you should not deny yourself this.
Bryophyte will not cause any harm, as it is a full-fledged ornamental plant.
The following types of moss are distinguished:
- Forest moss (or Christmas moss).
This species got its name because of the shape of the leaves: they resemble Christmas tree needles that grow in layers. © https://ydoo.info/qa/kak-vyrastit-moh.htmlForest moss grows very slowly and only under optimal conditions. The temperature should not exceed +22 degrees. The light should be diffused: there is more shadow than sun. - Fern. The name speaks for itself, since moss leaves are very similar to fern leaves. This species loves shade. Moss grows quickly and thickly.
- Richia.
This representative is the most common throughout the world. Moss grows in a ball shape and, unlike other species, needs sunlight. - Key. This species is no less common than richia. The color of moss depends on the lighting, for example, you can find red and dark green shades. The main feature of key moss is its unpretentiousness. Grows quickly and well.
- Hypnotic. This type of moss grows on stones, soil and branches. Hypnum bryophyte especially needs shade.
- Peat (or sphagnum). Anyone who loves indoor plants and grows them knows that some flowers, such as orchids, cannot live without peat moss. The “native” habitat of sphagnum is a swamp.
- Weeping. The height of such moss is no more than 50 centimeters. Bryophyte branches fall down, forming a beautiful green crown. You can find moss on trees.
- Javanese. This type of moss is easy to care for and feels great in both dark and light ponds. Quite often, Javan bryophyte is placed in aquariums.
- Icelandic (or bryozoan subulate). This plant is different in that it can bloom (usually from July to September). At this time, the green lump is decorated with small white leaves. Icelandic moss is one of the few that can be grown from seeds.
- Scandinavian moss (or moss) is a plant that reindeer eat in winter.
This type looks very beautiful in jars that can be placed on the windowsill.
Source: https://florantino.ru/moh-sfagnum-vyrashhivanie-v-domashnih-uslovijah.html
Moss in the garden
The situation is much simpler with the cultivation of moss cover in the open air. Here you don’t have to painstakingly create the necessary conditions and plant pads. You need to get a sufficient piece of moss, healthy, without dried or suspicious areas. Two glasses of water and milk are loaded into the blender, plus extraction from the forest. Having obtained a cocktail consistency, you “paint” the intended area with this composition. Thanks to milk, moss takes root over the entire treated surface with a probability of 90-95 percent.
With some hard work and expressed artistic talent, your fence, wall or house can become a real work of art. Your immediate task will only include regular watering of the “picture” until the moss is firmly established in the territory provided to it.
Mosses are among the oldest living land plants.
They require moisture and some light to live comfortably.
Emerald moss pads are not quite ordinary plants - they lack roots, flowers, and seeds.
Bryophytes, known as bryophytes, obtain the necessary nutrients from water, absorbing it throughout the surface.
Growing moss at home is not at all difficult, and caring for it does not require much effort.
With the help of these tiny plants you can create amazing living compositions, miniature gardens and forest landscapes that will give your home an atmosphere of harmony and unity with nature.
Bryophytes can be grown in any container, but they look most impressive at the bottom of transparent round vases, bowls, and small florariums.
To begin, place a layer of small pebbles at the bottom, either the size of a pea or slightly larger, in the container of your choice. This will improve water permeability and prevent moisture stagnation. Lay out the next layer of granular coal. Then add the substrate.
The surface does not have to be flat. You can make small mounds and depressions, add pieces of wood, pebbles, plant small moisture-loving plants and lichens, adding depth and definition to the composition, which will look like a real forest landscape.
From an artistic point of view, it is better to use stones of the same type, but of different sizes.
Among indoor plants, it is better to plant small ferns, selaginella, alocasia, coleus, asparagus, which can be placed in separate areas of the landscape.
Moss pads can be taken from the forest by cutting off the top layer along with the turf, but it is better to purchase them in specialized stores to prevent various plant diseases from entering the house. In the first days after planting, the pads should be sprayed daily.
After a short adaptation period, the moss will begin to grow.
Excess moisture can be recognized by the color of the moss layer - if it has darkened, then reduce the frequency of spraying. The optimal hydration regime after adaptation is once every 3-5 days.
Moss fragments look beautiful on the surface of wood or large stones. You can secure them using thin fishing line and nylon thread, or you can grow a moss layer yourself.
To do this, prepare a thick suspension in a blender from pieces of moss, kefir or beer and apply it to the desired surface. Beer or kefir will provide the plant with the necessary nutrients, stimulating its growth. You should spray 2-3 times a week.
Tiny bryophytes prefer cool, moist air and partial light. 2-3 hours of morning sun or indirect sunlight per day is sufficient. This lighting makes the green tint of bryophytes more intense.
Growing sphagnum at home
I would like to have another useful thing to be lazy about, which I have been using for some time now. In general, it’s a lifehack for floriculture, but it’s also very useful for terrarium making.
I think everyone has heard about the healing properties of Sphagnum. But not everyone knows that it can be grown at home, not even in the forest. I prefer going to the forest, of course) but in winter you can’t go for sphagnum..)
Sphagnum moss is excellent not only for flowers, but also for our beloved reptiles, as it has disinfecting properties when it is fresh. Its name literally translates as “Sponge”, also known as Peat moss (the same one from which peat is formed in swamps). But not everyone knows that you don’t have to go to the forest to get it, but you can grow it yourself at home from a piece. Some gardeners actively use this.
Why might this be necessary at all?
For example, in order to always have a small supply that can be used not only for animals, but also some flowers at home will thank you for it:
- Sphagnum moss is hygroscopic. It can absorb huge amounts of water (1 part of sphagnum absorbs 20 parts of moisture - in a humid chamber it causes condensation to form)
- Breathable. Nothing turns sour or moldy.
- It has antiseptic properties, which is why it is used in medicine.
All this allows you to perfectly maintain humidity in the terrarium or wet chamber, and you can change the moss once or twice a year, or even less often, but only if the animal does not defecate in the moisture or the moss has turned brown and began to crumble into dust (turning into peat).
If someone had a bad shed and tore off a piece of his skin, we put him in a chamber with wet sphagnum moss and the animal recovers faster, without any additional medical intervention such as ointments. (We do not consider those cases when it is stripped to the meat - a completely different method of treatment) Florists use it for the same purposes (for example, to support or resuscitate Orchids) But only if it is fresh - if not fresh, it will mold.
Important
- Fresh Sphagnum cannot be washed with bitter water, this can destroy it, and it will lose its antibacterial properties, and the worst thing is that it will mold, and in some cases very quickly and violently.
- If you grow it at home, you cannot use water with fertilizers or water it with fertilizers - it does not tolerate this.
- Do not use Sphagnum from flower shops, it is most likely already dead and will not bring any benefit to the animal, and it may also contain some kind of mycelium incomprehensible (I somehow came across this in 2 out of three Leroy bags, along with lingonberry leaves - just luck) . If this is not critical for the flower, and then it must first be dried and scalded with boiling water, then it can harm the pet.
How to grow Sphagnum at home?
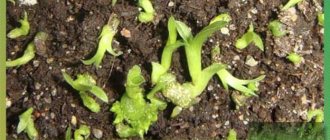
It's very simple: You just need to get a piece of fresh moss, it is important that it is green and slightly damp.
- We pinch off the tops (0.5-2 cm will be quite enough). I also grew very small tops that broke off accidentally during transportation, so don’t throw them away.
- We put them in a container, no matter what it is, a jar, a food tray or something else. The main thing is that it is transparent and there is a lid. A lid is needed to prevent the water from evaporating quickly. We make several holes in the lid for air exchange, you can make them just a little.
- Pour some water into the container so that there is about 5 millimeters of liquid at the bottom and close the lid.
- We put it in a bright place with a moderate temperature or under a phytolamp and forget about it.
- Sometimes check to make sure the moss has water.
If you have a phytolamp at home, you can place it nearby, the moss will grow fluffy and dense, like in a forest.
This is what it looks like for me, it grew from 6 millimeters to 2 cm in 2.5 weeks:
How to plant a plant on the site
In garden plots, bryophytes serve not only as a decorative decoration, but also bring benefits:
- in flooded areas absorb excess moisture;
- on rocky soils they are used instead of a lawn.
Learn about the benefits and harms of Icelandic moss, as well as how to care for Irish and coral mosses.
How to grow on the ground
Let's look at the detailed steps for planting bryophytes:
- Prepare the area in advance: level and clear of weeds and plant debris.
- Bring the soil acidity level to neutral. Acidic soil is limed; aluminum sulfate is added to soil with a low acidity level (both components can be found in the store).
- Using a spray nozzle, generously moisten the prepared “bed.”
- The optimal planting method is to divide a larger piece of moss into small pieces and plant them at some distance from each other, pressing them into the soil.
- Water the moss daily after planting for two weeks. During this time, the seedlings adapt to the new location.
How to grow on rocks
The instructions given above will not work when planting on rocks, since this requires some kind of adhesion to the surface. Several mixtures can play this role - use the one that is more convenient for you:
- 200 g/ml each of moss, kefir and water;
- 200 g of moss, 0.4 l of beer, 20 g of sugar;
- 200 g of moss, powder of two aspirin tablets, 200 ml of water.
Important! If the color of the plant is too dark, this means an excess of water; if it takes on a light green tint, there is not enough moisture.
Any of the three proposed mixtures must be crushed with a blender, then applied to the required surface. Treated stones should be sprayed with water twice a week.
How to grow in a decorative pond
To grow a green carpet frame on a pond, you need to purchase water- and breathable geotextiles, which are used in landscape design. On the surface of the water, in the place where landscaping is planned, lay strips of fabric and pieces of moss on top of it. There is no need to water, since the fabric immediately absorbs and retains water, and accordingly, the seedlings are also sufficiently moisturized.
It will be interesting to consider the most common representatives of forest bryophytes.
Care
Key points in caring for bryophytes:
- mandatory weed removal - mosses, in the absence of root shoots, cannot compete with herbs in the fight for nutrition and moisture;
- a few hours of sun in the morning is not necessary, but desirable;
- direct sunlight, especially at the peak of its activity, can burn the plant and change its color;
- Watering should be carried out exclusively with a sprayer - the plant absorbs moisture over its entire surface;
- equally bad conditions for moss are too acidic soil or low soil acidity;
- It is imperative to clear the planting of fallen leaves or tree branches.
How to grow sphagnum moss at home?
The tiny plant, which creates a soft, dense emerald-colored covering, is an integral part of the forest landscape. Moss growing in a garden area greatly enhances the landscape. Now imagine that you can grow this green carpet right at home! How to do it? Let's find out.
Kinds
Representatives of the Bryophyte family, along with ferns, are among the oldest inhabitants of the Earth.
The earliest paleontological finds place their age at approximately 0.4 million years ago, towards the beginning of the Carboniferous period.
In total, there are over 10 thousand species of moss on the planet, and the botanical classification defines about 177 families. Experts identify the following families among the main varieties:
- Tetraphys mosses;
- Andreevs;
- Leafy (95% of the whole class);
- Polytrichous;
- Sphagnum;
- Takakiaceae;
- Hepatic;
- Anthocerotaceae;
- Pottiaceae (the largest family - 3223 species).
Classification according to the type of green cover created by bryophytes is also acceptable:
- Pleurocarpous – creates a “carpet” that spreads low over the surface and actively grows in breadth;
- Acrocarpous - grows in bushes and at first grows tall, becoming thicker, and then begins to grow horizontally.
Moss is extremely easy to grow. It grows and develops without feeding, does not require special care, and can withstand harsh conditions, diseases and temperature changes. The peculiarity of the plant is that it does not bloom and has spore reproduction.
Dry sphagnum moss: growing indoors
The word “sphagnum” is heard by many, but not everyone knows what exactly it means. But this is the same plant from which peat layers are formed. Sphagnum is the last species of Bryophytes from the ancient family Sphagnaceae that has survived to this day.
It grows on the moist soil of raised and transitional bogs. Since sphagnum is highly hygroscopic, it absorbs and retains large amounts of moisture. Because of this, areas where there are large concentrations of plants often become swampy.
But it is precisely for these properties that it is highly valued in gardening and floristry.
Dry sphagnum moss is actively used in orchid breeding. Since it has low thermal conductivity, its use as an insulating material is widespread in finishing works.
Live peat moss is not sold in flower shops: you can only buy dry one. If you are lucky enough to find it in nature, do not rush to take the plant home.
It can be infected with larvae of pests and pathogens of various infections that attack your indoor plants. But you can try to revive dry sphagnum for cultivation at home.
But this should not be a store-bought sample (industrially dried moss cannot be restored).
To stimulate the growth of sphagnum moss, fill it with rainwater and place it in hydroponics. To prevent rapid evaporation of water, cover the container with sphagnum with film and place it in a shaded place with moderate temperature. Please note: the chances that the moss will grow are minimal. Therefore, the answer to the question “How to grow dry sphagnum moss” is rather negative.
Growing moss in the garden
Preparing planting material for planting in an open area is no different from the methods described above. But if you want to grow moss in your garden, you can't do without these tips:
- The place where the plant will be planted should be shady. A hot area open to the sun and winds is not suitable. In such an area, the moss will dry out quickly;
- The planting area is completely cleared of debris, branches, leaves and stones. The surface topography does not matter;
- The best time to sow spores is autumn;
- Moss taken from a rotten tree is planted on a similar substrate or wood that has not been treated with antiseptic impregnation;
- The plant takes root not only on natural, but also artificial surfaces, including decorative stones. The key condition is that the surface must be rough so that its adhesive properties allow adhesion to the nutrient mixture.
The area chosen for planting is spilled with a solution of kefir (yogurt) and crushed moss. The seedlings do not require special care. The main thing is to protect the plantation from direct rays and regularly moisten the moss with warm water for the first three weeks.
Source: https://fitohome.ru/lekarstvennye-rasteniya/kak-vyrastit/kak-vyrastit-mox-v-domashnix-usloviyax.html
Appearance
Now it’s worth telling what sphagnum moss looks like - the photos still give only a fairly superficial idea.
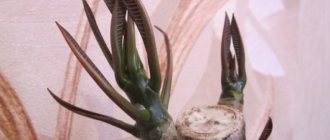
He cannot boast of a particularly outstanding appearance. It has a very thin green stem that starts at the root and stretches upward. It is distinguished by its emerald green color. The upper part is covered with small leaves arranged in a spiral. By the way, for the sake of clarity, it should be noted that this moss actually has no roots. And that brown part, which not very experienced botanists perceive as a root, is an old, dead part of the plant.
Sphagnum, despite its small size, is a perennial plant. As cold weather approaches, it freezes to continue life in the spring. It only grows upward, not sideways. The lower part dies over time, rots, becoming peat.
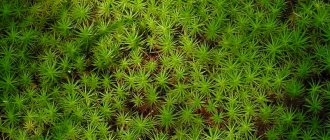
The stems grow very densely, most often in damp places. Because of this, only the upper part receives the light necessary for the development of green plants. And in the lower, shaded area, chlorophyll is destroyed over time, and it becomes white. Over time it rots, turning brown.
It reproduces, like most mosses, with the help of spores. They contain germ cells grown on the stem. After ripening, the sac bursts, and thanks to water and wind, light spores are carried over a considerable distance.
Beneficial properties of sphagnum moss
Summer residents are willing to spend a lot of money to create optimal conditions for the growth and reproduction of garden crops and ornamental plants. But many expenses can be avoided if you have sphagnum in stock. After all, the properties of this moss are truly unique.
- Absorbs moisture 20-25 times its own weight . Sphagnum leaf cells have amazing water-storing properties. This moss has no equal in its ability to maintain moisture levels.
- Kills bacteria . Sphagnum moss contains carbolic acid, which makes it used as an antiseptic.
- Doesn't rot . Antiseptic properties allow sphagnum to avoid the process of rotting. It contains virtually no nutrients, which further slows down decomposition.
- Turns into peat . Dying parts of moss form up to 2 mm of bog peat per year.
- Increases soil acidity . The polyhydric alcohol contained in sphagnum creates an acidic environment. This can be used in case of alkalization of the soil on the site, as well as for crops that like acidic soil.
- Improves soil breathability . Sphagnum makes the soil looser, allowing air to flow freely to the root system of plants.
Advantages and disadvantages
So, proper use of moss can help with many problems. The advantages include:
- long-term moisture retention (even if your home is hot and dry);
- indispensable aid in the growth of young or weakened plants;
- disinfecting properties (orchids with sphagnum moss in a pot are less likely to get sick);
- aesthetic appearance: moss on the surface of the pot (especially if it is alive) looks very beautiful, and a block with a blooming orchid and lush green moss can, at first glance, transport you to the tropics.
But with inexperienced gardeners, a plant covered with moss often dies. There are the following disadvantages:
- It’s easy to “overdo it” with moss; by laying it in a dense thick layer, you are almost guaranteed to block access to the roots and destroy the plant;
- moss in a pot contributes to root rotting; proper watering with moss is more difficult to calculate;
- if the moss was not properly harvested, it will harbor pests that will quickly destroy your orchid;
- Because of moss, the soil can become salty and algae form on it.
ATTENTION: If you are just starting to grow orchids, it is best to take ordinary phalaenopsis and practice on them and pine or pine bark, without any moss. Only when you learn how to properly water on a “clean” substrate can you start experimenting with moss. Whether a plant takes root in moss or not depends on many factors:
Whether a plant takes root in moss or not depends on many factors:
- watering frequency;
- humidity;
- temperature of a specific irrigation.
Growing rules
The rules are quite simple, but they must be followed, otherwise even such an unpretentious plant may not survive in new conditions. When growing moss, it is recommended to use the following instructions:
Select a container in which the moss will be placed. Clean it thoroughly and dry it before filling. Line the bottom of the selected container with a not too thick layer of pebbles (it should be small, large pebbles will not work and will look ugly) or expanded clay (should also not be too large). This is necessary so that the moisture can be retained for a longer period. Lay a loose layer of granular coal. Add substrate to the current layers. Place the necessary elements in the resulting soil (these can be pieces of wood or other plants that you later want to see decorated with moss
When adding plants, it is important to take into account their attitude to moisture; if they do not like it, they will not be able to develop normally, so preference should be given to moisture-loving plants. Which plants belong to this type can be found in books or on specialized websites). Add moss. It is recommended to spray the moss daily for the first two weeks.
This will provide the plant with the necessary level of moisture and allow it to quickly take root in a new place. To flavor the plant, you can also initially place it on soil watered with beer or kefir. This will initially provide the moss with a fairly high level of moisture, but this will not eliminate the need for spraying. You will need to carefully spray the moss at the initial stage, because the plant will have an acute lack of moisture when planted in a new place.
Once the moss has taken root, it does not need to be watered every day; watering once every three to five days will be sufficient. If you notice that the moss has become very dark, this indicates that the plant has an excess of moisture. In this case, the frequency of watering should be reduced.
Moss does not like sunlight too much, so only three hours will be enough to interact with the rays of the Sun. The rest of the time it is recommended to keep the plant in the shade. Depending on how much light hits the moss, its color may change. In particular, with a lot of light, the moss will become lighter in color.
Where to buy moss?
You can purchase it yourself at any forest site, but this is not the best solution, because it risks that, in addition to moss, you will bring some pests into your home. Therefore, it is best to purchase moss in specialized stores; it is not too expensive. The key positive is that it won't contain any surprises.
Landscape creation
A separate point is, of course, the placement of the necessary elements and the formation of the landscape. Approaches may vary, but here are a few recommendations that, if followed, will allow you to create a truly beautiful composition:
- When placing stones in a container, try to use them the same in style, but different in size;
- It will be aesthetically beautiful to add ferns, alocasia and coleus to the container. These plants love moisture and also get along with each other without any difficulties;
- In order to beautifully fix the moss in the right place (for example, on pieces of wood or stones), you can use nylon threads or fishing line.
How to grow in the country?
The easiest way to grow bryophyte is in the country, in the yard or in the garden. There is no need to create optimal conditions or maintain the required level of humidity. The main thing is to choose a dark place for planting. If at the beginning of spring seeds were planted at home and moss has already grown from them, then at the end of May it can be safely transferred to the site.
Before planting, you must inspect the specimen. There should be no dry areas on it, and if there are any, it is better to remove them. You will also need two glasses of water and the same amount of milk. All ingredients, including moss, are loaded into a blender and crushed. After this, the mixture must be taken to the place reserved for the moss and distributed over the surface. Now all that remains is to wait for the bryophyte to take root and begin to grow.
In summer, moss does not grow well due to high temperatures and insufficient rain, so it is better to spray the plant yourself to prevent it from drying out.
You can grow moss in an apartment, in a country house, or in an aquarium. The main thing is to choose the right planting material, and in terms of care, bryophyte is unpretentious. An elegant green lump will be a wonderful decoration for the interior, the outer surface of the walls or the local area.
Forest sphagnum moss: how to grow at home
Forest sphagnum moss is actively used when growing phalaenopsis, mixing the dried plant with the bark. Young plants and cuttings are rooted in it.
What to do with an acquired bump
For planting, sphagnum is collected in the forest (only in the northern swampy regions) or purchased from breeders by mail. Before shipping, the green layer is removed from the container, rolled tightly and placed in a sealed bag. During delivery, the green hummock does not die, since a humid microclimate remains in the tightly closed package.
After receiving the parcel you must:
- open the packaging, visually assess the condition of the plant,
- for further rooting and growth, use the green part,
- For long-term storage, dry the sphagnum moss in a cardboard box in a dark place or freeze it in parts in the freezer.
Before shipping, the plant is packaged in bags of about 1 liter. This volume can be divided into several parts: for use, for storage and for cultivation.
How to grow moss yourself
To grow at home you will need:
- parent hummock with green patches of moss,
- container 10 – 15 cm deep, 15 – 20 cm wide, up to 30 cm long,
- melted, distilled or filtered water,
- spray,
- film,
- scotch,
- scissors.
To plant you need:
- pour warm water into a clean, disinfected container (layer no more than 5 - 7 mm),
- distribute planting material evenly,
- Spray clean water on top with a spray bottle,
- cover the container with film, securing the film with tape,
- Leave a hole along the edge for air to enter or make several holes directly in the film.
Necessary growing conditions
After planting, the container covered with film is placed under a fluorescent lamp. It is not advisable to open the container. During the growth period, you should monitor the amount of water in the container and the presence of evaporation on the film. If necessary, sphagnum is sprayed again and water is added.
How to make a decoration with decorative moss with your own hands?
The simplest would be a wall picture filled with natural moss. Then you only need stabilized moss itself, frame and floral glue or double-sided adhesive tape! The moss pieces should be firmly pressed to the glue or tape, but should not come loose. You can work with other shapes; not only a flat surface is available for decoration. Floral glue is a great solution for creative expression. By using floral glue, you can add additional layers to your desired thickness and cover up any gaps - it just gives you more room to be creative.
Large surfaces such as walls or large paintings will be much easier to fill with moss panels. You can freely adjust their position in space and quantity because they are suitable for cutting into smaller pieces. If you want you can easily cut them into unusual shapes. The panels themselves are flexible and can be cut with a wallpaper knife or even scissors.
There are also methods of "green graffiti" that grow directly on the wall. However, this requires growing moss on the surface and more work.
https://ydoo.info/qa/kak-vyrastit-moh.htmlhttps://agronomu.com/bok/6612-kak-vyrastit-moh-v-domashnih-usloviyah.htmlhttps://businessideas.com.ua/ business-ideas/kak-vyrastit-stabilizirovannyy-moh
Method two
Make a plant-based smoothie. For this you will need a blender. There are three recipes.
- For 100 grams of moss - two tablespoons of sour cream and 200 milliliters of purified water;
- For 200 grams of moss - 400 milliliters of beer and one tablespoon of sugar;
- For one glass of moss - two tablets of acetylsalicylic acid and two tablespoons of water;
- For 200 grams of sphagnum, 200 milliliters of kefir, 300 milliliters of water and a teaspoon of sugar.
Place the ingredients from the selected recipe in a blender bowl and grind. Be prepared for unpleasant odors to spread throughout the room, so, if possible, perform this procedure outside.
Apply the resulting composition, as in the first method, to the surface with a brush.
Method three
If you are going to plant moss on a pond, then purchase geotextiles that are water-resistant and air-tight. Place pieces of this fabric on the water in those places where you intend to grow moss. Place seedlings on top of the material. There is no need to water such a planting, since geotextiles retain water on their own.
Method four
Shaded areas are suitable for planting moss in the garden; the topography does not matter, but debris and foliage must be removed. Planting can be done not only in the ground, but also on any surfaces, such as stones, paving slabs. Choose materials that have a rough surface. The acidity of the soil must be brought to a neutral level. If the soil is too acidic, it is recommended to lime it. If the acidity is high, add ammonium sulfate. The bed must be sprayed with a sprayer.
Divide a large plate of moss into small pieces and plant them, compacting them well into the soil, at a considerable distance from each other. Moss planted in the ground must be watered daily for 15 days. During this period, the plant will take root well.
Method five
For decorative purposes, such as painting, a large amount of moss is needed. It's easy to get. Experts advise preparing a special solution: three handfuls of moss, half a liter of kefir, two teaspoons of sugar and the same amount of hydrogel. If necessary, you can add purified water.
Place all ingredients in a blender and blend for two minutes. After this, take any natural material with a flat surface and apply the prepared mixture to it. Moss is placed on top of this mixture. Within a month and a half, the layer will grow and cover the entire surface. Keep the planting under a layer of film to provide the moss with optimal conditions for development.
Note that designers willingly use sphagnum in their projects , since it does not lose its attractive appearance for 15 years and does not require special lighting. The plant can remain dormant for a long time, and during this period it does not need to be pruned. It is also curious that dust does not settle on sphagnum moss, and it is not susceptible to diseases and damage from fungi and pests.
We create compositions
Small pads of moss will perfectly complement the surface of wood or large pebbles. You can fix it using a thin fishing line or nylon thread, or simply grow a layer of moss on the surface of the pebbles. To do this, sprinkle a small amount of soil and fix the moss between the stones.
Not quite standard means are used as fertilizer for moss - beer and kefir. You can mix these ingredients with a mixer or blender and add them every few days.
Thanks to this unusual feeding, the plant will receive all the necessary positive vitamins, micro and macroelements, with the help of which its growth will be enhanced. Irrigation should be carried out no more than three times a week.
Thanks to such tiny unusual plants, you can create unusual living collages with your own hands, with the help of which each apartment will become unusual.
And if you mix several varieties of bryophytes simultaneously on one surface, after their combination and growth, you can get a stunning composition of different shades and colors - from red to bright emerald.
With the right approach to choosing, planting, and caring for moss, you can easily grow such an original plant at home, which will become a real highlight among other indoor plants.
How to plant at home
Mosses have been used in design for a long time and in a variety of ways: they are grown for bonsai, used as a decorative substrate around other plants and indoor mini-gardens. Bryophyte can be grown in any container and on any surface. For indoor plantings, you can use decorative glass bowls with a wide bottom and neck, small aquariums, florariums and containers, and glass jars.
You can buy planting material at a garden store or nursery, or you can dig it up in the forest.
Read about how to deal with Marchantia moss in your area.
Drainage in the form of small river pebbles or expanded clay is placed at the bottom of a selected container. The ideal soil for growing moss is coconut substrate for the following reasons:
- it has neutral acidity;
- it retains moisture well;
- is natural and environmentally friendly;
- it is a breathable material.
Important! When searching on your own, it is advisable to choose clean forests away from the road. It is better to collect the material itself from trees, since bacteria can be brought into the house with the soil. We thoroughly moisten both the soil and the planting material, lay out the seedlings, slightly pressing them into the substrate
You can see the landing process in detail in the following video:
We thoroughly moisten both the soil and the planting material, lay out the seedlings, slightly pressing them into the substrate. You can see the landing process in detail in the following video:
Care
In the first few days, seedlings should be sprayed with a spray bottle daily. The water must be clean: filtered, rain or melt. Regular tap water can leave a white coating on the planting surface.
Did you know? Reindeer moss (Scandinavian moss), which is practically the only food for reindeer in winter, has healing properties. Usnic acid, recently isolated from the plant, is a strong antibiotic that, in minute doses, destroys entire colonies of pathogenic microorganisms.
When you see that the seedling has taken root and begins to grow, reduce watering to twice a week. The moss should be kept shaded, but in the morning when the sun appears, expose it to the rays for a couple of hours.
How to grow moss yourself
To grow at home you will need:
- parent tussock with green patches of moss;
- container 10–15 cm deep, 15–20 cm wide, up to 30 cm long;
- melted, distilled or filtered water;
- spray;
- film;
- scotch;
- scissors.
To plant you need:
- pour warm water into a clean, disinfected container (layer no more than 5 - 7 mm);
- distribute planting material evenly;
- spray clean water on top with a spray bottle;
- cover the container with film, securing the film with tape;
- Leave a hole along the edge for air to enter or make several holes directly in the film.
Types and applications
Most often, gardeners use dry sphagnum, which can be purchased at any specialty store. However, there are situations where live moss is a more effective remedy. For example, it is used for the resuscitation of sickly and fading flowers, rooting cuttings and layering, as well as for germinating seeds that are sensitive to lack of moisture.
Video. Harvesting sphagnum
Unfortunately, live peat moss can only be found in the wild, but it is worth remembering that when bringing sphagnum from the forest, you risk introducing various infections and pest larvae, which can be very dangerous for your home flowers. Therefore, it is better not to use the source material directly, but only for breeding new moss.
Sphagnum grows best hydroponically, i.e. in a container with distilled water. Melt water from snow is also suitable, but not tap water. To prevent water from evaporating too quickly, cover the container with moss with film, creating a greenhouse effect. The temperature is average - about 20 degrees Celsius. For home cultivation of sphagnum, the north side with variable shade is suitable.