In this article we will consider issues regarding the care and planting of gladioli.
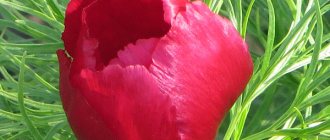
Surely, many of us know what a beautiful flower looks like – gladiolus. Speechweed, as this crop is also called, really cannot help but attract flower growers with its lush color and variety of species.
However, not all gardeners and gardeners are in a hurry to plant these plants on their plots, because they believe that caring for them requires a lot of effort. Whether this is true or not, today we will try to figure it out.
When to prepare gladioli for planting in the spring, take them out of the refrigerator for germination: timing
Gladioli cannot be called too picky flowers, however, they, of course, need some care.
Let's start, perhaps, with preparing flowers for planting in spring:
- First you need to remove the gladioli from their storage place - the refrigerator. This should be done about a month before planting in the ground.
- Next, you should look at the condition of the corms. Be sure to clean them of scales. This must be done extremely carefully, as the eyes of the plants can be damaged. Then we take brilliant green and treat all the “wounds” of the crop with it.
- After this, you can move on to the next job. If you have corms that have formed a pair of eyes, you can divide them. They do this, of course, very carefully, and the damaged area is necessarily treated with either ash or activated carbon in tablets, which must first be crushed.
- Further, if desired, you can sort the flowers according to different criteria: variety, size, age.
Preparing the bulbs
- All corms that are unsuitable in your opinion need to be selected and eliminated. Dry, rotten, blackened corms are definitely not suitable for planting.
- Now we carefully put the gladioli in a box or box and send them to a fairly bright place, but without direct rays of the sun. It is better to use a box made of cardboard.
- When laying corms, pay attention to their position. The eyes should not be pressed against anything, otherwise they will grow crookedly. Each bulb should take its place and not lie on top of another.
- That's all, the gladioli are prepared for further planting. Now you need to wait for the right time and temperature and start planting flowers.
Preparing a site for a garden bed
Starting in the fall, you should clearly decide on the place to plant flowers in open ground .
If gladioli are low-growing, then they can be planted in open spaces. If they are tall, then they should be allocated an area on the leeward side, under the protection of a fence or structure. In tall plants, sharp gusts of wind break stems and knock buds to the ground.
Every year the planting site needs to be changed . The plant can grow twice in one place, but it takes root again much worse. The composition of the soil should not be alkaline. The soil should warm up well and not accumulate excess moisture. The bed itself needs to be formed on a small hill. It is necessary to water moderately.
What soil is needed for gladioli, what kind of soil do gladioli like?
Particular attention should be paid to the soil in which the flowers will be planted, because if it is chosen incorrectly, the crop will not take root and, accordingly, will not bloom.
- This crop responds well to black soil, which is rich in humus. It is also suitable for light loamy and sandy soils.
- The acidity of the soil in which gladioli will be planted should be neutral or weak.
Soil for flowers
- If the soil is not suitable, most often it is improved, and only then flowers are planted in it.
- If the soil is heavy clayey, it is worth adding weathered peat, if the soil is sand - humus.
How to prepare, divide, clean and what to soak gladioli bulbs in before germination?
Having taken the flower bulbs out of the cool place in which they were stored, you need to immediately start processing them.
- Earlier we talked about the fact that all corms must be cleared of scales. It is necessary to do this, because various parasites and pests can live in them. To clean the children, you need to take them in your hands, lightly press the film, and then pry it with your fingernail and remove it. Clean them immediately before planting.
- It is not at all necessary to divide the bulbs, but almost all gardeners do this. To do this, you need to take the onion that has 2 growth buds and divide it into 2 parts. Treat the cut area with ash or coal.
Before planting, it is important to prepare the bulbs
- An important step in preparing gladioli is soaking them. To do this, you need to place all the bulbs in garlic infusion. Prepare the infusion as follows: peel and grate 270 g of garlic, then pour 10 liters of water into the vegetable. We place not only adult bulbs in this liquid, but also children, and wait a couple of hours. Garlic disinfects gladioli and affects various pests.
- If the option with garlic does not suit you for some reason, use solutions of potassium permanganate and karbofos. First you need to carry out the procedure with a solution of potassium permanganate. To do this, dissolve 1 g of the product in 10 liters of water and dip the onions in the resulting liquid for half an hour. Afterwards, dissolve 25 g of karbofos in 10 liters of water, and put the plants in this solution for half an hour.
- After all such manipulations, you can treat the crop with means that will accelerate its growth. To do this, add 1 tablet of heteroauxin, 1 g of sodium humate and 1 g of succinic acid to 10 liters of water. Plants must spend at least 8 hours in this liquid.
Questions and answers about planting gladioli
Is it possible to plant gladioli before winter?
To form a root system, gladioli require low positive temperatures (10-15 °C); active shoot growth occurs at 20-25 °C. However, in order for the corms to develop well, they must first be stored at temperatures of about 3-9 °C. During this period, the root system is not yet formed, so low temperatures cannot delay the development of the plant.
Corms can withstand not only low positive temperatures, but also short-term negative ones, but their development is delayed. Large corms die at minus 2 °C. Therefore, planting before winter is possible only in the southern regions with shelter to create a wintering regime similar to the storage regime.
A baby with a hard, dense shell can more easily tolerate low temperatures, which can be observed during warm winters in the Non-Black Earth Zone. In such cases, it can withstand temperatures down to minus 4 °C.
Those gardeners who provide conditions on the site that protect the soil from freezing also plant gladioli before winter.
Gladiolus, variety 'Little Fawn'. © Stand My Ground
Is it possible to grow gladioli for the New Year and March 8th?
This is possible, but for normal plant growth in winter, additional lighting is necessary, maintaining a certain air and soil temperature, humidity and good air exchange - ventilation. All this is difficult to provide in a residential area.
In specially equipped greenhouses, gladioli bloom at any time. However, the process of preparing planting material and culture conditions are very complex. For example, to obtain cuttings by March 8, corms are dug up early, for cutting by the New Year, corms from the previous year’s harvest are preserved under certain conditions.
Employees of the Main Botanical Garden in Moscow have developed a light culture of gladioli. Articles describing their methods were published at different times in the journal Floriculture.
How to ensure that gladioli do not bloom all at once?
There are several ways:
- plant corms of varieties with different flowering periods at the same time;
- plant corms of the same variety at different times;
- plant corms of the same variety that are unequal in size at the same time, since plants from small planting material bloom later than from large ones.
Is it possible to cut a corm with two shoots?
A corm with two sprouts is cut if they want to propagate a variety and get many flowering plants. Cut vertically, making sure that part of the bottom is preserved on both halves. Immediately after the operation, the cut is sprinkled with crushed coal or filled with brilliant green and planted.
Is it possible to plant a baby with a cracked shell?
You can plant such a baby if it is not affected by fungal and bacterial diseases, which can be noticed when examining the tubers.
During the winter the corms dried out greatly. What should you do with them before planting?
A healthy corm will never dry out. If it wrinkles and becomes hard, then it is undoubtedly affected by some kind of disease. If the corm has been stored at elevated temperatures, it may dry out a little, but will remain healthy. Before planting, such corms are soaked for several hours in a warm solution of baking soda (one teaspoon per 1 liter of water). However, it is better to soak the planting material in a solution of microelements (see Table 2).
I bought an interesting variety. How to reproduce it faster?
If you bought a baby, then you need to increase the growing season for it, that is, plant it early in a greenhouse, under film or in boxes at home. If there is one or more corms, then before planting they are cut into several parts so that each part contains one bud and part of the bottom.
Is it possible to plant a baby in a shell without cleaning it?
You can plant it in a shell, but the baby will not germinate longer. To speed up germination, before planting, it is soaked for a day in a warm 0.2% solution of potassium permanganate or 0.1% baking soda. After planting the children, water the area well and cover with film until shoots emerge.
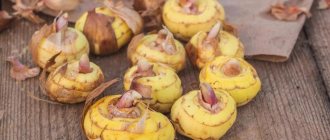
Gladioli sprouted in January, February, March: what to do?
Due to improper storage, the bulbs of this crop often germinate before the required time.
- The thing is that gladioli, during their forced rest, go through 2 stages: the first stage is the time during which the flowers are at rest for reasons beyond our control, the second stage is the time during which we provide peace to the culture, creating certain conditions for her
- By conditions we mean air temperature of about +10 degrees and humidity no more than 70%
When the storage conditions of the crop are violated, we get flowers that sprouted in winter. In this case, the algorithm of actions should be as follows:
- We carefully transfer all the corms to a drier place. This place should be warm enough. In a few weeks the plants will dry out properly.
- After this, we take the corms and transfer them to a place where the air temperature will not exceed +6 degrees. The humidity in this room should be lower than normal.
- A couple of weeks before planting gladioli, they need to be moved to a room with a temperature of about +15 degrees. Such conditions will contribute to the awakening of culture.
It is not recommended to plant prematurely sprouted flowers in the ground, since they, in principle, will not yet be able to take root and grow normally.
Checking germination in winter
In winter, seed material should not show signs of germination . Occasionally it needs to be taken out of the cellar and refrigerator and inspected. If the storage temperature conditions have been violated, the seedlings may appear earlier than expected (in February or even March).
If signs of growth are detected, choose one of two options for further action:
- With significant germination, the bulbs are planted in flower pots and grown in this form until planted in open ground.
- A little germination is not a problem. The storage temperature should be slightly changed to stop the growth process. To do this, planting material is placed in cooler conditions. For example, they move from the top shelf of the refrigerator to its lower compartment.
What to do if a gladiolus sprout breaks?
Very often we order new varieties of crops from various online stores. At the same time, the transportation of flowers often leaves little to be desired. And in everyday life it happens that the sprouts of culture break. If this happens to you, it is important to know the following information.
- Most often, good healthy bulbs have so-called spare buds
- If you create conditions that are comfortable for the plant, it will survive and after planting it will definitely delight your eye with lush flowering
- If there is still a lot of time before planting in the ground, place the onion with the broken sprout in a fairly cold and, most importantly, dry place
- If you need to plant the crop very soon, then the bulb with the broken sprout should be left in a warm, bright place. This is necessary so that the spare kidneys begin to wake up faster
In any case, do not rush to throw away the plant, try all available methods and only then make a decision.
When should I take the bulbs out of the refrigerator or cellar after winter storage?
In winter, flower bulbs are wrapped in a layer of newspaper or hard paper, wrapped in a plastic bag and placed in a dry cellar or refrigerator.
Seed material must be removed from storage places 2–3 weeks before planting directly into open ground. The soil should warm up to 10 °C by this time.
Too cold soil will not give gladioli lasting immunity, and the flowers will wither. When the soil is overheated, the danger is that the root system will lack moisture, and this will lead to anomalies in its development. If the temperature threshold is observed, the peak of flowering will occur at the beginning of September. In this case, the following feature must be taken into account: large specimens germinate faster than small ones.
Reference! The ripening time of the bud and its opening also depends on the selected variety. There are early gladioli that bloom 70 days after planting, medium ones - after 80 days and late ones - after 90 days.
Time to plant gladioli in open ground in spring: month, air temperature
In order to choose the right time and month for planting a crop, it is recommended to pay attention to the weather outside the window.
Most often, nature itself tells flower growers when it is time to plant plants.
- If the spring is early and warm enough, gladioli bulbs can be planted at the beginning or end of April.
- If spring is not as warm as we would like, then planting should be postponed until the beginning of May, or even its first week.
Planting bulbs
- You can navigate by folk tips. If small leaves begin to form on the birch tree, this is a sure sign that the bulbs can be planted.
- You also need to focus on the soil temperature. The most suitable soil is considered to be one that has warmed up to +10 degrees. The depth of the soil being tested is about 12 cm.
How to plant gladioli in spring
In order for gladioli to grow and develop normally in open ground, they not only need to be planted in a suitable area, but also done correctly. Below we will describe in detail how to do this.
Selecting a location
When choosing the most suitable area for planting gladiolus, you should pay attention to the fact that low-lying areas where there is stagnation of melt and rainwater are not suitable for it. The fact is that stagnation of liquid in the soil can contribute to the development of rot on the bulbs.
Also, slopes with hummocks are not suitable for planting. You should choose a dry and completely flat area, which should be sunny and have reliable protection from gusts of wind. However, it should be taken into account that if the flowers are not blown by the wind at all, a fungal disease may develop as a result. Shaded areas are suitable for planting early varieties. If you plant late varieties in such an area, the gardener will not see them bloom, since they will not have enough light.
Also, special attention should be paid to predecessors.
- Gladioli will grow best in areas where marigolds, dahlias, tomatoes, strawberries or legumes were previously grown.
- The worst predecessors of such a flower are: carrots, potatoes, cabbage and other crops that were fed with manure.
- Also remember that gladioli can be grown in the same area for no longer than two years.
Preparing the soil for planting
Gladioli are very demanding on the composition of the soil, and they grow best in loamy or sandy loam soil, which should be slightly acidic (pH 6.5–6.8). If the soil is excessively acidic, flowering will be more sparse and less spectacular. Also, in acidic soil, the likelihood of the plant being damaged by fusarium increases. If the soil in the area is alkaline, then because of this the foliage on the bushes turns yellow.
If the soil on the site is clayey, then before planting gladioli you need to add sand to it. Digging of the soil is carried out immediately before planting. However, if the region has an arid climate, then it is recommended to start preparing the site in the fall. To do this, deep digging of the soil is carried out, into which dry phosphorus and potassium fertilizers are simultaneously applied. Thanks to this, it will be possible to retain more moisture in the soil, and immediately before planting the bulbs, all that remains is to loosen it.
If the soil is infertile, then during digging you can add a couple of glasses of wood ash, 2 buckets of compost, 1 glass of bone meal and a couple of tablespoons of complex mineral fertilizer and superphosphate per 5 m2 of bed.
Some gardeners begin to warm up the soil in the area from mid-April, because gladioli can only be planted in warm soil. To begin, dig up the area using the bayonet of a shovel and cover it with film. Then install the arcs, on which the film is also thrown. After about 7 days, remove the film from the soil surface, and leave the shelter on the arches until the beginning of June, until the threat of frost has passed.
Planting bulbs and children
Adult gladiolus bulbs are planted separately from the children. To do this, grooves are made in the prepared area, the distance between which should be about 20 centimeters. If the soil is clayey, then the bulb is planted to a depth equal to three times its diameter, and in sandy, lighter soil - four times its diameter.
First line the bottom of the groove with sphagnum moss or sprinkle it with sand, and then you can start planting. Maintain a distance of about 15 centimeters between the bulbs. First fill the furrows with a not very thick layer of soil and water. When the first shoots appear, the grooves are completely covered with earth, the surface of which is slightly compacted and moistened again.
Growing new flowers from babies
If you plant gladiolus babies correctly and provide them with good care, then by the end of the season they will become young bulbs. This method of propagating this flower is very simple, and therefore is popular among gardeners.
Select a well-lit area for planting and prepare the soil as described above. Make a furrow about 50mm deep. This depth will allow children to receive the necessary amount of moisture. If they are planted closer to the soil surface, they may lack moisture, causing their growth to slow down significantly.
Moisten the prepared groove generously with water and only then plant the children in it, which are then covered with soil. Before planting, be sure to remove the husks from the children, otherwise they may not germinate. Lightly compact the soil surface and water the plantings. If everything is done correctly, the first shoots should appear after 15–20 days. They need to be cared for in much the same way as adult plants.
Preparing gladiolus babies for planting: video
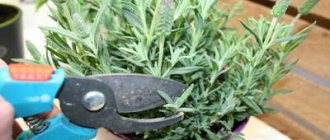
Preparation and treatment of gladioli bulbs against thrips before planting in spring: means, description
Thrips are special enemies of flower growers, as they cause considerable harm to many crops.
To save gladioli from these pests, use these methods.
- Before planting, you need to take the plants and place them in fairly hot water - 50°C. You can keep gladioli in such water for no more than 3-5 minutes.
- You can also treat the culture in Actellik solution. This product has a complex effect on all parts of the plant, destroying many pests. At the same time, the product is safe for flowers and can be used with other drugs. To prepare the required solution, take 10 liters of water and dilute 15 g of the product in it.
Bulb processing
- You can use a folk remedy, which, according to flower growers, is no less effective than special means. We take 800 g of garlic, peel it, pass it through a press, collecting the juice. Dilute the resulting juice with 10 liters of water. Dip the plants in this solution for 1 hour before planting.
- It is also recommended to disinfect the crop bulbs with karbofos. Take 10 liters of water and dissolve approximately 50 g of the product in it. Immerse the plants in the solution for 5 minutes. The procedure must be done immediately before landing.
- A good remedy is Inta-Vir. To use it, dissolve 1 tablet of the substance in 10 liters of water. Place the plants in the resulting liquid for 5 minutes. After the procedure, we immediately plant the crop.
How to treat gladioli bulbs before planting
To speed up germination, as well as to help the plant fight pests and various diseases, pre-sowing treatment of planting material is carried out. This procedure will not take much effort and time, but will have a beneficial effect on gladioli. Therefore, you should not neglect it.
Processing is carried out in 2 stages:
- Disinfection;
- Growth stimulation.
It is best to disinfect in a fungicide solution. Fitosporin and Fundazol are suitable. You can use potassium permanganate the old fashioned way. But after processing, the planting material must be completely dried.
After disinfecting all the bulbs that can be planted this spring, they are placed in a liquid solution of a growth stimulator for 10 hours. Usually Humate or Kornevin are used. After soaking in the stimulant solution, the corms are dried again.
Proper planting of gladioli in the spring so that they bloom well and do not fall: depth, planting rules
Planting of this crop begins when the soil warms up to at least +10 degrees at a depth of 10 cm.
Most often, the planting period falls at the end of April, beginning of May. In order for the planting of flowers to be successful, and the gladioli to please you with their flowering, it is recommended to adhere to the following rules when carrying out this process:
- Plant the healthiest, highest quality plant bulbs first.
- Gladioli are planted in sandy soil, because such soil has a beneficial effect on plant bulbs and performs a protective function.
- To achieve a similar effect, proceed as follows: pour a little sand into the holes dug for the bulbs. It will be enough to fill each hole with a layer of sand of 1.5 cm.
- An already planted plant is also lightly sprinkled with sand, and then with soil.
Planting in spring
- When planting plants, keep an eye on the distance between them. If the bulbs of the crop are large enough, then the distance between them should not be less than 15 cm, between the rows of such plants the distance should be at least 20-25 cm. If you are planting children, then it will be enough to make the distance between each bulb 5 cm, and between rows – 15 cm.
- The depth at which plants need to be planted also depends on the soil and their size. If the crop is planted in chernozem or sandy soil, then the depth should be approximately 15 cm, but if the soil is clayey, then it will be enough to plant the bulb to a depth of 8 cm. On average, corms are planted to a depth of 12 cm. Children are planted to a depth of 4 cm.
- Before planting plants, be sure to moisten the soil. However, do not turn the hole into a small swamp.
Preparing the bulb for seedlings
To prepare the bulbs for spring planting, you need to carefully inspect them. For planting in a flower bed, it is advisable to use only healthy and undamaged specimens. You need to check the planting material especially carefully for the presence of rot and plaque. Such bulbs will lead to the development of diseases.
If it’s a pity to throw away damaged tubers, they can be made healthier. To do this, it is recommended to remove the affected areas with a sharp knife and then place them in a light pink solution of potassium permanganate. The sections are treated with Fundazol or brilliant green and sprinkled with ash.
There is no need to rush to plant such material, as it can hardly withstand the effects of low temperatures. Treated bulbs should not be planted in a flowerbed, but in a separate bed.
It is also recommended to plant children separately from other plants. This improves their development and does not create competition with strong adult crops for lighting, moisture and nutrients from the soil.
After selecting healthy bulbs, they need to be prepared for planting. This is done in several stages:
- Calibration Healthy bulbs of each variety are sorted by size. The planting pattern and depth depend on this.
- Cleansing from covering husks. This procedure is performed as carefully as possible. In some situations, bulbs begin to sprout even in the refrigerator, so it is very important not to injure the sprouts.
- Disinfection. To do this, the bulbs are placed in a light pink solution of potassium permanganate for 20-30 minutes. They must be placed in different containers. It is not recommended to mix different varieties at this stage.
- Soaking in boric acid. This step requires a solution with a concentration of 0.2%. The planting material needs to be soaked for 48 hours. This contributes to his recovery. Thanks to the procedure, it is possible to obtain tall stems and large flowers.
- Germination. The bulbs are placed in boxes with a mixture of humus, turf soil, peat and sand. These components should be taken in equal parts. To speed up the germination process, superphosphate, wood ash, and bone meal are added. Before the sprouts appear, the boxes are moved to a room with a temperature of +18 degrees.
Experts who breed gladioli have different opinions regarding their preparation for planting in the spring. Some gardeners claim that germination helps to weed out non-viable material and achieve earlier flowering.
Other gardeners believe that it is quite difficult to replant a sprouted plant without damaging the thin roots. Therefore, it is recommended to germinate the bulbs by laying them out in one layer on a table or other flat surface. The temperature should be +17-18 degrees.
At the same time, by the time of planting, the height of the arrows should be 3-5 cm. It is important that the root tubercles are swollen, and the roots themselves are still absent. It is not recommended to moisten the tubers, use growth stimulants or spray them with water.
Choosing the optimal planting method can only be done experimentally. The first method allows you to get earlier and more friendly flowering. It is best used when there are a large number of bulbs. The second method helps reduce bulb culling. However, in this case, a lot depends on the grower.
How often to water gladioli?
This crop loves water, so plants must be watered properly. Otherwise, the root system of plants may be damaged, and this in turn will affect the development of flowers.
- Watering is carried out exclusively with warm water. Cold or even cool water is not suitable for watering this crop.
- Gladioli do not need frequent watering, however, there is no need to skimp on water when watering the plants. The soil should be moistened to at least 25 cm in depth, or even to the full 30 cm.
- For each plant you need to use about 10 liters of water.
- The amount of water used also depends on weather conditions. If the weather is hot outside, the amount of water can be increased by 1.5 times.
- After the procedure, it is recommended to lightly weed the soil and loosen it.
Selection of soil and location for gladioli
In shaded areas the culture does not develop well.
She has problems with flowering. Therefore, when choosing a place for planting, you should choose sunny places. This will ensure high-quality flowering and prevent the development of diseases. The causative agents of many pathologies develop well in wetlands. An illuminated place cannot be found in every area. Therefore, it is necessary to take into account that shading plants on the eastern side will delay flowering by 15-20 days. If the shadow is in the south, gladioli may not bloom at all.
With the constant presence of groundwater on the surface, plants experience oxygen deficiency. In such conditions, the beds are made higher. However, this method is not suitable for regions with hot weather.
To ensure that moisture from irrigation is consumed exclusively by gladioli, they are planted no closer than 3-5 meters to trees and other plantings. It is advisable that the flowerbed be protected from western and northern winds. Shrubs will help do this.
If an unsuccessful site for seedlings is chosen, gladioli will not bloom and form high-quality bulbs. As a result, next year it will not be possible to get full-fledged flowers, since there will be no high-quality planting material.
The choice and preparation of the soil is of no small importance. Gladioli love black soil. They can also be planted in loamy or sandy soil. Sandy, peaty and clay soils need improvement. It is recommended to add sand to peat, and peat to sandy soil. Clay soil is mixed with sand and peat.
Gladioli are suitable for soil that is characterized by a slightly acidic reaction. The pH level should be 5.5-6.5. Therefore, before planting bulbs, it is worth carrying out a soil study.
To do this, you need to take a glass of soil in 4-5 places on the site and submit it to the laboratory. It is recommended to do this analysis in the spring. Based on its results, it will be possible to determine the acidity of the soil and the amount of nutrients. If there is high acidity, chalk or quicklime should be added to the soil. Take 100-200 g of substance per 1 square meter.
The soil under the gladioli is dug up to the depth of the roots. This is done at 45-50 cm. All weeds are removed at the same time. If possible, legumes should be grown in this area the previous year before planting flowers. This helps improve the soil structure and protects against wireworms, which pose a great danger to gladioli.
In the fall, fertilizers with phosphorus and potassium are added to the soil. The amount of fertilizing is determined taking into account the results of soil testing and the selected crop nutrition system. Beginning flower growers can use nitrophoska. 30 g of the drug is used per 1 square meter. Chernozem does not require additional fertilization.
Can gladioli withstand spring frosts?
It should immediately be noted that gladioli are heat-loving crops, so temperature fluctuations have an adverse effect on plants.
- It is generally accepted that air temperatures from +17 to + 25°C are most suitable for the normal growth and development of this crop.
- It is also important to consider that nighttime cold snaps have a much greater effect on plants than daytime ones.
- Plant roots feel good at a soil temperature of +10°C.
- During the growing season, the crop may suffer if the air temperature drops to -4°C.
- Spring frosts are dangerous for gladioli. If the plant stays for about 8 hours. at a temperature of -5°C, its leaves will suffer, however, not critically. If the temperature drops to -7°C, then during the same time the flowers will die.
- In order for plants to tolerate frost as best as possible, they need to be hardened off in a timely manner. This procedure will significantly reduce the risk that gladioli will not survive spring frosts.
At what depth to plant gladioli bulbs?
One of the most important nuances of planting Speech corms is the depth of the hole. It must be optimal. If you bury the corm too deeply, the flower will emerge late and will be weak and inconspicuous. If you plant it close to the surface, the flower may fall.
There is no single planting depth for Gladiolus corms. This indicator should be calculated independently. This is done like this: the diameter of the bulb is multiplied by 3. The resulting number is the depth of the hole for planting.
INTERESTING! Deep planting ensures bright and lush flowering, and planting closer to the surface will allow you to get more babies.
How to feed gladioli when planting, in spring, during flowering: fertilizers, folk remedies
Fertilizing plants plays a huge role, because in this way the flowers receive all the microelements and substances they lack.
- Initially, fertilize the soil in which gladioli will be planted. To do this, urea, ash, potassium sulfate and superphosphate are added to the soil. For example, you need to take approximately 45 g of ash per 1 m2, if the choice fell on urea, then 30 g will be enough, potassium sulfate is used in an amount of 20 g, and superphosphate - 30 g
- Next, the plants themselves are fed. As soon as the second leaves appear on the crop, you can fertilize it with chicken droppings. To do this, prepare a solution based on a ratio of 1:20. Also, the first fertilizing can be done using nitrophoska. To do this, dilute 50 g of the product in 10 liters of water. Leave this liquid for a day, and then fertilize the plants with it.
Next, we will feed the gladioli when 5 true leaves appear on them. For this fertilizing, add the following components to the soil per 1 m²:
- Ammonium sulfate – 15 g
- Superphosphate – 15 g
- Potassium sulfate – 15 g
Feeding
As soon as a peduncle appears on the plant, it is time to make the next feeding. For this stage, it is recommended to take the following substances per 1 m²:
- Urea – 7 g
- Superphosphate – 30 g
- Potassium sulfate – 25 g
- Final fertilizing is carried out after the crop has flowered. It is appropriate to water the flowers with a solution of wood ash. To do this, dilute 1 glass of the substance in 10 liters of water.
Before buds begin to form on the plants, it is recommended to spray. To do this, mix the following substances:
- Boric acid – 1.5 g
- Copper sulfate – 2 g
- Cobalt nitrate – 1.5 g
- Zinc sulfate – 1 g
- Liquid soap – 15 g
- Water – 10 l
We spray the flowers with this solution so that the liquid gets onto the entire plant. For the procedure, choose the evening time.
Caring for gladioli after planting
After planting gladiolus bulbs in open ground, it will take some effort to grow a specimen worthy of being cut to present to your favorite teacher on September 1st. And the simple decoration of the home interior instills in the soul of the florist pride in the work done.
Watering
So, timely watering comes first. In dry weather, gladioli are watered every other day, on hot, dry days - daily and in the evening. Water is used that has been settled and heated to ambient temperature.
You should not irrigate gladioli directly under the root, as this can cause rotting of the bulbs. Water is supplied between the rows followed by loosening the soil.
Weeding and loosening
Loosening not only helps retain moisture after watering, but also provides air access to the bulb. Loosening is usually combined with weeding. Excess vegetation in a bed with gladioli takes away nutrients that the plant urgently needs to form a large and strong peduncle.
Feeding
It is necessary to provide gladiolus with mineral and organic fertilizers at all stages of cultivation.
- The first application of organic fertilizers is carried out when the above-ground part of the flower reaches 10 cm. Humus or ready-made compost will enrich the soil with nitrogen, and will also serve as mulch and protection from overheating of the corm.
- The second feeding is carried out during the formation of 3-4 leaves, and is prepared from mineral nitrogen: 2 tbsp. urea or ammonium sulfate is dissolved in a bucket of water and consumed per 1 m2 of planting. You can apply fertilizer in dry form, scattering it between the rows and deepening it into the soil by loosening.
- The third and fourth dressings should contain phosphorus-potassium fertilizers, and they are applied during the formation of 5-6 leaves and during the formation of buds on the flower shoot, respectively.
Throughout the cultivation of gladioli, you can fertilize with an infusion of green fertilizer or an infusion of bird droppings. Any of the proposed funds is spent in a ratio of 1:10 and is paid once every 10-14 days.
Tying up
Growing tall flowers in a garden plot is always associated with the risk of damage by winds, rains and other natural anomalies.
And the weight of huge flower stalks can bend a tall gladiolus to the ground. To prevent this from happening, flowers are tied to the supports in advance. There are a lot of mounting methods and it all depends on the imagination of the grower and on the option of planting flowers.
- If the bulbs were planted in a circle, then you can install a support in the center of the planting and tie it to one peg, which will be invisible behind the greenery.
- When growing in a garden bed, stakes are driven into the ground along the edges, a wire is pulled along each row and each gladiolus is attached to it individually.
- With a small number of flowers, you can provide each plant with a support and tie it.
A procedure such as hilling should not be neglected. It gives the flower a more stable position.
Proper cutting of flowers
When a gardener decides to pamper himself with a bouquet of gladioli grown with his own hands, he must follow several rules that will help keep the bulb remaining in the soil intact.
- The flower can be cut when at least 3-4 lower buds have fully opened.
- There should be at least 4 leaves above the soil surface.
- The cut of the stem should be smooth and hidden by foliage.
- Flowers are cut in the evening or early morning.
Particularly good for cutting are gladioli varieties that can keep up to 10 flowers open at once.
When do gladioli bloom, in what month?
The flowering period of gladioli directly depends on when you planted them in the ground.
- Some gardeners plant this crop in mid-March. Gladioli planted at this time will delight you with their flowering around the first week of July
- Plants planted in mid-April will bloom in late July
- If you planted the plants at the end of May, then you need to wait for them to bloom around the last days of August
- And those gladioli that went into the ground at the end of July will delight you with color no earlier than mid-September, or even in early October
Knowing this information, you can adjust the time of planting flowers, so that you can admire them all summer and even a little bit of autumn.
Varieties of gladioli
Today there are more than one thousand varietal varieties of gladioli. Almost all of them are suitable for cutting and for producing seedlings.
Many varieties of these flowers quickly adapt to soil conditions. Therefore, when buying material for planting, you should take one that is grown in conditions closest to yours.
The description of gladioli varieties occurs using the international classification system. The first number characterizes the size of the flower, and the last two numbers indicate the color.
By diameter, gladioli are divided into:
- miniature (d less than 6.5 centimeters);
- small-flowered (d from 6.5 to 9.0 centimeters);
- medium-flowered - (d from 9.0 to 11.5 centimeters);
- large-flowered - (d from 11.5 to 14.0 centimeters);
- giant - (d more than 14 centimeters).
Photos of giant gladioli
Depending on the flowering period, gladioli can be:
- early,
- average,
- late.
According to the shape of the flower, they are not corrugated, corrugated and super corrugated . There are also ten main color groups. Gladioli can be blue, brown, green and almost black. Some of them can be seen in the photo.
Gladioli after flowering: what to do, how to prune gladioli for the winter, how much stem to leave?
The gladioli have faded, however, they still need care and attention. After all, proper cleaning of plants after they bloom is the key to their successful storage and future flowering.
- After the crop has flowered, proceed as follows. After about a month, 40 days, the gladioli need to be dug up. This must be done extremely carefully so as not to damage the root system of the plants. First, the plants are slightly dug up, prying them up with a pitchfork, and then pulled out with their hands.
- Now we remove the remaining soil from the flowers and lay them on a dry surface. In this case, immediately inspect the dug up bulbs. All sick, damaged bulbs should be removed to the side. The stems of the crop should be trimmed as much as possible. It is permissible to leave only a small piece of the stem, approximately 5 cm
- Leave the plants for a couple of days for them to dry out.
- After this, we treat the gladioli in a solution of potassium permanganate. Then dry it again
- Then the plants need to be stored in nylon bags for a whole month.
- After this time, transfer the bulbs to a box and store it for about a month.
- After this, the culture must be moved to a cold place.
- You need to dry gladioli monthly, taking them out of the basement or refrigerator
- While doing this procedure, inspect the plants for pests and diseases.
How can you germinate?
On dry paper or cloth
After winter storage, the seed is taken out and dried in the fresh air , having previously placed a cloth or piece of paper under it.
There should be a small distance between adjacent specimens for air to pass through. Place gladioli in a warm room away from heating appliances.
The room should have diffuse lighting and moderate humidity. Under such conditions, the roots will not rot, but will germinate rather slowly.
In the sawdust
To speed up the germination process, you need to use slightly damp sawdust . This environment creates ideal conditions for the formation of a strong root system. As a result, the plant quickly takes root and takes root well when planted in open ground.
The sawdust must be properly prepared. They are first soaked twice for 10–20 minutes in boiling water to get rid of resinous substances. Then they are squeezed out, cooled and transferred to a flat container for further germination. The seed is placed on sawdust with the sharp end down and slightly buried.
What to do with gladioli babies in the fall?
The only thing we can say for sure is that you definitely shouldn’t throw them away.
- Having dug up the plant bulbs and cleared them of soil, we leave them to dry
- After this, it is necessary to separate the children from the main bulb. To do this, you need to carefully unscrew them.
- Adult and baby bulbs should be stored separately.
Gladioli babies
- In this case, the children need to be folded into paper and then into cardboard boxes.
- The best places to store them are in a cellar, balcony, or refrigerator.
- The temperature in the room where children are kept should be about +5 degrees
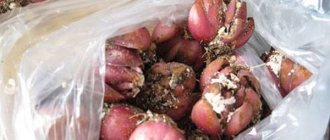
How to preserve gladioli bulbs until spring
Before storing, separate the old bulb from the replacement bulb. Planting material is placed in cardboard boxes or paper bags, labeled with the name of the variety and stored in a cool place for storage. At home, this could be the bottom shelf of the refrigerator or some drawer on a glazed balcony.
Since autumn and for 2-3 months, gladioli are stored very well and no problems arise. However, closer to spring, the bulbs begin to awaken and premature emergence of sprouts and the occurrence of putrefactive diseases are possible. To prevent this situation, it is necessary to establish control over the condition of the bulbs, starting in February.
For preventative purposes, it is recommended to put peeled garlic cloves in a bag with onions. It will have a disinfecting effect on the surrounding air, but good ventilation will be required in the storage area.
Reproduction of gladioli by children: description
Propagating gladioli by children is the surest way to provide yourself and your garden with beautiful flowering crops.
- In the fall, as you already know, the children are separated from the mother bulb, and, properly processed, stored until spring
- Next, before planting, the children need to be treated. First, we clear them of scales. After this, we make a solution of potassium permanganate by mixing 10 liters of water and 5 g of the product. We treat children with this liquid
- We plant children only when the soil temperature at a depth of 10 cm is +10 degrees
- Plant plants to a depth of 5 cm
- Between plants you need to leave a distance of 5 cm, between rows - 15 cm
- As soon as the shoots appear, it is necessary to water the plants and loosen the soil
- You can fertilize gladioli a month after you see the shoots
- It happens that children shoot arrows and bloom, but this should not be allowed in the first year
- Around the end of September, the bulbs need to be dug up and then prepared in a way already familiar to you for storage.
How to get gladiolus seeds?
This crop can also be propagated using seeds. To do this, you need to get seeds, and this happens as follows.
- The plant must be pollinated by pollen from another flower.
- After the gladioli have faded, the process of drying begins
- When the flowers dry, small boxes with seeds will appear in their place.
- Our task is to remove the boxes and collect the seeds
When we have the seeds at hand, we can think about propagating this crop with their help.
- The process of growing a crop from seeds begins at the end of winter
- We take our seeds and soak them in a solution of sodium humate (a 0.01% solution is suitable for this) for a couple of hours.
- Next, mix humus and sand in a 2:1 ratio. We plant seeds in this soil
- Next, we care for the seeds in the standard way: water them, feed them if necessary
- If the weather in your region allows, plant the seeds directly in open soil.
- When the season is over, your seedlings will delight you with the appearance of children
- We carefully separate the babies from the stem, dry them and put them away for storage.
- Store in a fairly dry and warm place
How to choose a breeding method
Gladioli are propagated by seeds, buds or bulbs. The seed method is considered the most difficult. Therefore, flower growers use it quite rarely. Transferring varietal characteristics using seeds is very problematic. This method is usually used by breeders to create new varieties.
Gladioli are usually propagated by bulbs or buds. Such a plant can bloom well for 5 years. After this period, it is replaced.
When propagating a crop using a bulb, it is divided into several parts. Each fragment must contain several buds. The cut areas are treated with carbon powder. It is recommended to dry the resulting material, and then proceed to planting work.
With this method of propagation, you can get 4 full-fledged plants from one bulb. This method is used for those varieties that form few buds.
Propagation of gladioli by buds is considered a simple and effective method. Thanks to this, it is possible to obtain a plant that completely replicates all the varietal characteristics of the parent. Approximately 30 buds appear on each bulb during the season. Of these, it is worth choosing the largest ones measuring 10-20 cm. They will be able to develop quickly and begin to bloom a year earlier than the smaller ones.