The Usambara violet (or Saintpaulia) has been a popular houseplant for decades. This lushly blooming beauty can be propagated in two ways - vegetative and seed. Propagation of violets by leaf cuttings and stepsons is a very common method and known to many. With such propagation, new plants completely repeat the varietal characteristics of the mother plant (almost always).
Growing violets from seeds is used for propagation much less frequently. This process is painstaking and requires a lot of time and attention. But the result can be quite interesting.
Popular varieties of violets
- Flamenco. The flowers are semi-double, lilac-pink in color with a greenish fringe and a bright yellow core. The green “ruffle” is a distinctive feature of the species.
- Fire moths. The flowers are red or burgundy, with simple petals with slight fringe. Less common with a light border.
- Mars. With large buds of a crimson hue, distinguished by the presence of a wide frill. The edges may be decorated with a white border.
- Rococo Viol. These homemade violets are double varieties. Their flowers are deep blue in color. The shape resembles curly balls that go perfectly with the light green foliage.
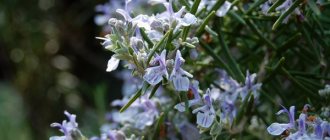
- Rosemary. Plants with double star-shaped flowers. The main color is pink, with ink splashes and a lightish border.
- Rococo Rose. They look like small roses, delicate pinkish color. They belong to terry varieties.
Propagation of violets at home: rooting violet leaves
Hello, dear flower growers!
Let's talk about violets today. Well, who can remain indifferent when looking at these dense, rounded leaves covered with delicate down and beautiful, bright flowers?
One falls in love with violets once and for all. They are beautiful, unpretentious, easily reproduce, and willingly delight their owners with long and lush flowering.
I have been interested in violets for a long time and periodically replenish my company with new wonderful varieties.
Yes, this is the kind of flower that develops a craving for collecting. It has so many varieties, different from each other, and at the same time absolutely stunning, that you want to collect them all.
How to plant violet seeds?
To successfully grow Saintpaulia from seeds, you need to complete a number of preparatory steps and approach each of them very seriously. Here's what you need to do before planting violet seeds at home:
- purchase high-quality and healthy seeds;
- properly prepare the soil mixture;
- choose a suitable flower pot;
- prepare seed material for sowing;
- carry out sowing using technology.
Purchasing or preparing substrate
Individual flower growers purchase ready-made substrate for flowers at retail outlets. This is also the right approach, since it is correctly combined and contains all the necessary nutrition.
However, if you have financial difficulties, you can make the soil mixture yourself. The substrate is usually prepared from the following ingredients:
- turf land - 50%;
- peat - 40%;
- sand - 10%.
Attention! It is well known that violet prefers slightly acidic soil. For this purpose, peat is added to the mixture.
Selecting a suitable pot
Growing violets at home cannot be called an extremely difficult task, but to obtain results you will have to fulfill a number of requirements
It is very important to choose the right pot for her. Do not use large pots, since violets have few roots and will not develop normally in a large pot.
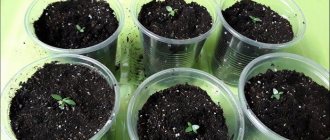
Many gardeners who grow Saintpaulia from seeds use plastic cups rather than pots. The violet feels great in them and develops normally.
You can use plastic cups to germinate seeds.
Preparing for sowing
Some varieties of violets, such as the Usambara violet, have very small seeds. In this connection, they are pelleted before planting. It is easier to maintain the planting pattern with pelleted seeds and the seed material is used more economically.
Instructions on how to properly sow violet seeds with panning:
- First stage. The seeds are moistened with water and the same amount of crushed charcoal is added to them. The mixture is poured into a jar, a lid is put on it and shaken for several minutes. As a result of shaking, coal dust is fixed on the seed shells, increasing their size;
- Second phase. Sand is added to the composition and shaken again. The seeds prepared in this way are placed in containers on moist soil and covered with a lid. The container should be in a warm place out of direct sunlight. During the germination process, you need to moisten the substrate and control the temperature until the seeds germinate.
Technology
When all the preparatory work has been completed, you can proceed directly to sowing annual or perennial violets. It must be carried out according to the following algorithm:
- sift the soil mixture through a sieve;
- Fill the sowing containers with the sifted mixture;
- spill the substrate with a solution of potassium permanganate;
- wait a while for the substrate to dry;
- level and slightly compact the surface of the substrate;
- make shallow grooves on the surface;
- sow violet seeds into the furrows;
- Cover the seeds with a thin layer of the mixture on top;
- Spray the soil after sowing.
Care
After the seeds are planted, you need to monitor the temperature, since it determines how long the violets will sprout:
- at a temperature of +20 degrees, the first shoots can be expected approximately 20 days from the day of sowing;
- if the temperature of the substrate is raised 5 degrees higher, then the first sprouts of Saintpaulia will appear on the surface in 15 days.
Time and methods of planting seeds
The most suitable time for sowing Saintpaulia seeds is spring and early summer. In winter, if the air temperature is insufficient and the humidity is high, the seeds may rot. They are planted in the following ways:
- Pour the seeds onto a white sheet of paper and, shaking it, scatter it evenly over the surface of the prepared soil.
- Planted in peat tablets, which are previously kept in warm water until swelling. Place 2 seeds on each tablet and place them in plastic cups or boxes.
- Mix the seeds with sand (1:1) and pour into the grooves.
The seeds of the Uzambara violet are so small that they are compared to dust. If you carry out pelleting, they will be convenient to pick up and evenly distributed over the soil surface, and their quantity required for sowing will be reduced by 1.5-3 times.
Seeds are coated on their own as follows:
- Moisten and mix with an equal amount of crushed and sifted charcoal, place in a glass bottle and shake. Coal dust should cover each seed.
- Add fine sand (the same amount as coal dust).
Dried seeds have a shorter shelf life.
Getting a plant from seeds
For a positive result of growing violets from seeds, you need to adhere to certain rules:
- Take a plastic container that is wide and not deep, and fill it with a thin layer, up to 3 cm, of special soil consisting of a mixture of peat and earth. You can buy ready-made soil or prepare it yourself, observing the proportions; there is no need to fertilize it at first. To ensure oxygen exchange, the pot must be placed on a special raised saucer; its design allows oxygen to pass through the drainage hole.
- Violet seeds should be purchased in specialized stores. Preparing seeds for sowing involves mixing them with sand in a one to one ratio.
- The seeds germinate well in a warm and bright place, so the pot should be covered with a transparent film or lid and placed in a bright place. Direct sunlight and drafts should be avoided. On a note. The soil should always be slightly moist; a spray bottle works well for this. The ideal temperature for germination from seeds is considered to be 22-25 degrees Celsius.
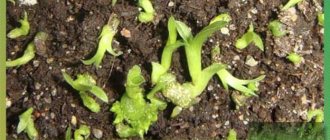
- The first sprouts from the seeds begin to germinate already on the 20th day, all this time the mixture should be moistened with a spray bottle.
- The first picking of seedlings should be done when they reach a height of about half a centimeter and produce their first leaves. Plant at a distance of 2 cm from each other in fertile soil, which should be fertilized with charcoal.
The next transplant should be carried out as needed, when the sprouts begin to interfere with each other and are already planted in separate small containers. Before transplanting into a permanent pot, time must pass for the root system to strengthen.
The peculiarity of growing violets from seeds is that the new plants that sprout are of the same size and have multi-colored flowers.
From the video you will learn how to grow violets from seeds:
Germination and emergence of seedlings
Seeds germinate, depending on conditions, within two weeks . Before the sprouts appear, the container is placed in a warm (up to +20⁰С) and dark place. The created greenhouse is ventilated every day.
After the first signs of growth appear, the container is moved to a bright place. As they grow, ventilation becomes more frequent and by the second week they are removed completely. The temperature is reduced to +15⁰С, periodically sprayed and protected from the sun.
Important! The greenhouse with seeds must be ventilated every day, removing droplets of condensation.
Wittrock's garden violet has large, bright flowers reaching 10 centimeters in diameter. For seedlings of this plant, 10 degrees and no direct sun are required. March seedlings need cold lighting with an increase in daylight hours to 14-15 hours.
Young violets are planted at a distance of 25 centimeters from each other in sunny places.
Pansies prefer sunny places.
The larger the flower, the later it blooms.
Viola or Pansy come in many forms of colors. Their flowers are smaller than Wittrock's, but they can live at a distance of 15 centimeters from each other. Viola survives temporary darkening well, but in constant shade it produces smaller and faded flowers.
How to plant a violet leaf without roots?
Selection of capacity
A good container for rootless propagation directly into the ground can be small cups or pots, up to 200 ml in volume and about 5 cm in diameter.
Experienced violet growers advise using disposable plastic cups for these purposes.
Their transparency allows you to monitor the condition of the soil, and the material is easy to make drainage outlets.
Priming
An important component when planting a leaf with a cutting is the selection and arrangement of the soil mixture. If ready-made soil is purchased, it should be intended for flowering ornamental plants
Leavening agents made from inert materials or sphagnum moss must be added to it.
Experienced violet growers prefer to prepare the mixture themselves. To do this, they mix perlite and vermiculite in equal proportions, without adding them to the soil composition. Perlite provides breathability to the roots, and vermiculite provides moisture absorption and looseness
Inexperienced flower growers are better off purchasing ready-made soil and adding perlite and sphagnum moss, which has antibacterial properties.
Inexperienced flower growers are better off purchasing ready-made soil.
Some gardeners recommend growing on pure perlite, but with this composition you should strictly monitor the humidity level. A fragile plant without a sufficient amount of moisture, and perlite is not a moisture-intensive component, dries out quite quickly, which can result in death for such a weak future plant.
Selection and preparation of planting material
The correctly selected material is important and decisive for the further development of Saintpaulia, so this step must be taken responsibly. If you thoroughly examine the structure of the violet, you will notice that the leaves are arranged in rows on the rosette
First of all, you need to decide which row is preferable to take the material from:
- 1st, bottom row - the leaves are relatively old and, due to their age, may not bear children for a long time. In addition, their close location to the ground often provokes the picking up of various diseases and pests;
- 2nd-3rd rows - with young, already strong leaves. The most optimal option for planting material;
- the middle of the rosette - the leaf is usually small, and if torn off there is a risk of damage to the growth point of the Saintpaulia, which can lead to unpredictable consequences;
- the upper rows are young leaves that have not yet become stronger and have not gained enough energy.
The second stage is the selection of the leaf itself for propagation:
- the sheet must be free of any kind of defects (stains, scratches, breaks, etc.);
- must be healthy, with the color characteristic of the variety;
- the structure of the sheet plate should hold its shape well and be elastic.
Important! The leaf is taken only from a healthy plant!
Often, planting material has to be taken from friends or somewhere else, which causes it to wither during long delivery. In this case, it should be immersed for 1.5-2 hours in clean, warm water, slightly tinted with potassium permanganate, and then dried.
The final step before planting is leaf preparation.
Separating a leaf blade from a plant can be done in two ways:
- a simple break;
- using sharp cutting tools.
Experienced flower growers recommend using a sharp knife or pruning shears, performing the operation in a more civilized and safe way.
The cut should be made with a very sharp tool.
The correct cut is considered to be a cut at an angle of about 45° (the area of root formation and nutrition increases). Do not forget about disinfecting the cutting tool and treating the cut site on the mother plant with crushed activated carbon. The length of the stump should be at least 5 mm and no more than 4 cm. Longer cuttings should be shortened.
Breeding Saintpaulia rooting in water
Place the cutting in a small container so that its leaf blade does not touch the water. It is better to take boiled water. Place the sheet in a warm, bright, but not sunny place. As soon as the roots appear (1–2 mm), plant the leaf in a pot (no more than 200 ml) in the following soil mixture:
- high-moor peat -2 parts
- vermiculite -1 part
- soil for adult Saintpaulias - 1 part.
At the same time, try to deepen it no more than 1–2 cm. For stability, you can support the sheet with a small plastic stick or toothpick. Water and place the cuttings in a bag (under a jar, in a plastic conveyor, etc.) until the babies appear. Make sure that condensation does not accumulate inside the bag; if this happens, ventilate until the drops dry.
Water very carefully and only if you see that the soil on top has dried out.
To root in the ground, plant the cuttings directly into the soil and then proceed in the same way.
Main varieties
We recommend that you read
Violets are distinguished by the following characteristics:
- 1 Sizes of sockets: micromini (up to 6 cm), mini M (10-15 cm), midi (15-20 cm), standard (20-40 cm) and large (from 40-60 cm in diameter). Some varieties are hanging or trailer indoor flowers.
- 2 Inflorescences. The types are classic, star-shaped, bell-shaped, wasp-shaped or spider-shaped. Petals can be semi-double, double or single. In hybrid varieties, they can be pointed, rounded, corrugated, smooth or torn at the edges. Based on color, they are divided into single-tone, two-tone and multi-tone.
- 3Leaves, more precisely their type and color. They can be oval, round, kidney-shaped and elongated. The edges of the foliage are entire, corrugated, serrated or wavy. They are usually olive, dark brown, green or greyish.
The following varieties can be grown at home:
- 1Caprice. The inflorescences are white, double. The fringe on them is greenish. The foliage is very variegated. They have a wavy structure.
- 2Macho. The flower is purple, but the edges are white. Terry petals. The leaves are simple in shape and green in color.
- 3Your Majesty. This is a pink Saintpaulia with double petals that have wavy edges. The foliage is bright green.
- 4Sea Wolf. A very large blue flower with a net pattern on its petals. The leaves are dark.
- 5Water. The inflorescence itself is blue, but turns into pink and then bronze-green. Light colored leaves.
- 6Jabot. Dark blue inflorescence. Along the edges there are light green ruffles. The leaves are also wavy.
- 7Tomahawk. This violet is a bright red hue. Blooms profusely. The leaves are dark green.
- 8Max Black Pearl. A black violet with a purple tint. Velvet petals. The foliage is small. The plant is very compact.
- 9Parisian secrets. The inflorescence has a dark black-purple hue and a purple-red pattern. There are whitish ruffles. The foliage is variegated.
There are other names for both the domestic violet itself and individual varieties. Now varieties such as Frozen, Green Lace, Irish Cream and others are appearing, which are distinguished by their greenery. New varieties have also appeared with pure yellow petals or with a pattern of this color on them - these are Lemon Kissis, Sunkist Rose and Worm Sunrise.
Violets at home care and propagation
Violets can be grown not only in a greenhouse, but also independently at home. This plant is actively growing. It can reach up to 30 centimeters in height.
Caring for violets independently at home will not take you a lot of time and effort.
Lighting
It is necessary to provide excellent lighting to the plant, but not under the burning rays of the sun. Windows facing north are the best location for a flower. From time to time you need to turn the plant for its uniform development.
Priming
For the active development of the plant, peat moss or sand with large grains must be added to the soil. Be sure to ensure good drainage.
Watering
The soil in the pot should be constantly moist; violets love water. Just don't overdo it. After all, excessive watering can cause rotting of the root system.
Transfer
Violets are transplanted annually into a pot of the same size or into an old container. It will be enough just to replace the soil with a new one.
Propagation of violets by leaves
If desired, the process of propagating violets with leaves can be done independently at home.
The process of rooting a whole leaf in water
1. To do this, you need to pinch off a leaf from the parent plant. The petiole should not exceed 4 centimeters in length.
2. The cut area should dry for 15 minutes.
3. Now take a dark glass container and pour a little water into it, no more than 1.5 centimeters from the bottom.
4. Cover the top with a plastic cup, creating a greenhouse effect.
Rooting a whole leaf in the soil
1. We prepare the soil.
2. Now we take a plastic glass in our hands and make several small holes for draining.
3. Place the prepared soil in the glass.
4. Place the leaf at a depth not exceeding 1.5 centimeters.
5. If possible, you need to select an appropriate support for the leaf.
6. We water the leaf with boiled warm water.
7. Place our container in a well-lit and always warm place.
8. And finally, cover our container with a plastic cup to create a greenhouse effect.
Rooting part of a leaf in water or soil
Are resistant violet species used during the growing procedure? This means that the appearance of shoots can be expected no earlier than half a year after their planting. If you deliberately harm the leaf plate, you can provoke the speed of development of the children. The method of propagating a fragment of a leaf is identical to propagating the whole.
If you follow all these simple rules for the care and propagation of violets, you will subsequently be able to admire the beautiful blooms for a long time.
Care
To get beautiful and healthy Saintpaulias, you need to take care of them. Lighting, temperature, location of the flower, and appropriate care are important. Let's consider the basic rules for growing violets, the observance of which will allow you to achieve the desired result.
- Violets need light, but despite this, it is better to isolate them from direct sunlight.
- It is bad for the flower when the leaves come into contact with the glass.
- Violets love moisture, but you should not water them with cold water, or get them on the leaves when watering. You need to water regularly, as the soil dries, but you should not overwater the violet.
- It is necessary to promptly remove dried flowers and damaged leaves.
- Violets are afraid of temperature changes and cold.
- Fertilizing is carried out once every two weeks using mineral fertilizers (10 g per 3 liters of water). Plants especially love nitrogen. Its deficiency can lead to poor growth and lack of flowers.
- When replanting a plant, it is necessary to make drainage from perlite, moss, and expanded clay balls.
- The lower leaves should be left slightly above the soil. A rosette is placed at ground level. Wrong choice of depth leads to poor flower growth.
Some gardeners propagate violets using leaves. To do this, you need to take a few leaves from an adult violet and place them in a container of water. Choose small jars made of dark glass so that the light does not shine directly on the cut, but the container is transparent. The stalk must be long. The cutting is cut diagonally. Change the water regularly.
In about a month, roots will appear. After they appear, plant the cuttings in the ground. A new rosette of leaves is formed. If you are planting several sprouts in one container, do not miss the moment of picking
It is important that the plant gets stronger. This method is faster than propagation from seeds, but the plant may turn out weaker and wilder
Propagating violets is a wonderful hobby. Find one of the many varieties to suit your taste and get a real flower garden that will delight you every day. Despite some subtleties of care, violet is not a very fastidious plant, so even a novice gardener has a chance of successfully breeding these flowers.
Propagation of violets by leaf cuttings
As already said, home violet is easily propagated by leaf cuttings, preferably in spring or summer, but it can also be done at other times of the year. Usually the leaf is cut with the longest petiole. This is necessary so that if the petiole rots, you can shorten it and try to root it again.
Rooting is possible in water, substrate, moss. The sections are slightly dried and the sheet is placed in water. It is necessary that only the lower part of the cutting is in the water. The leaves need to be provided with bright, diffused light and covered with a glass cap or placed in a greenhouse at a temperature of at least 18 degrees. This will protect the cuttings from drafts.
When numerous roots 0.5 cm long appear, you can transfer the leaf to a wide bowl with a mixture of sand and peat or simply sandy loam soil
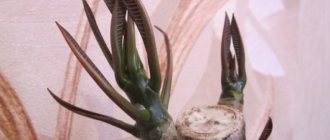
It is important to position the cutting almost horizontally so that only the lower part with the roots is in the substrate. After miniature rosettes with leaves grow on the surface of the substrate, they can be planted in pots in a permanent place
It is advisable to use pots that are shallow and fairly wide. Young violet plants bloom after cuttings in 6 - 10 months.
As violets grow, they develop side shoots (stepchildren) growing on the main stem, which are recommended to be promptly removed as soon as they become noticeable. This promotes better flowering. As they grow, they spoil the appearance of the violet, breaking its symmetry and deforming the leaves. In the spring, when replanting, you can divide the overgrown plant into as many parts as the number of rosettes formed. Young and mature violet plants are usually replanted every year, preferably in the spring.
As soil, you can use purchased soil for Saintpaulia or a mixture of leaf, turf, coniferous and peat soil in a ratio of 3:2:1:1 with the addition of raising agents - perlite, vermiculite, coarse river sand and chopped sphagnum. Fertilizing with complex mineral fertilizers is carried out regularly during the growth and flowering period, approximately once every 2 weeks.
In some countries there is a mail order system for selling Saintpaulias. Supplier companies pack leaf cuttings in special test tubes with water and send them to customers. During shipment, the violets, that is, the leaf cuttings, have time to take root. Modern varieties of violets are sometimes quite expensive, but this does not stop true lovers of these beautiful flowers. If you are going to acquire a collection of Saintpaulias, then it is better to sign the name of the variety...
When and how are seeds collected?
To use the seeds for further propagation of violets, they must be collected correctly. It is difficult to track the moment of full ripening, so at home it is better to remove the box from the peduncle in advance so that the seeds do not fall into the same pot when the doors open on their own. This should be done when the peduncle dries out and the fruit turns brown.
The main thing is that the seeds are viable. This may not happen if the box is removed too early. If you collect the fruits 3-4 weeks before the natural opening of the fruit, then the germination of the seeds will be as much as 80%.
After separating the fruit capsule from the violet, it must be finally dried in a warm room. This will take 1-3 weeks. You can open the dried box with the tip of an ordinary needle. The seeds are hidden inside the box.
Where to get seeds?
High-quality seed material is a guarantee of obtaining a good result. It is best to purchase violet seeds from experienced collectors of these plants or in trusted specialized stores. The easiest way to do this is at violet exhibitions, which are periodically held in every big city.
You can purchase seeds of an already familiar specific variety, or you can take surprise seeds obtained by pollinating two different plants. Thus, it is impossible to predict what kind of flowers violets grown from such seeds will have. You can get rare unusual specimens.
Another way to obtain violet seeds is to self-pollinate the flowering plant. This process is quite long and scrupulous, but at the same time interesting. If pollination is successful, a fruit capsule with seeds will be formed that need to ripen - this will take about 4 months, and sometimes up to six months.
There is no need to rush to separate the fruit from the plant; unripe seeds will not sprout, and all work will be in vain. After removing the seed capsule from the plant, it must be completely dried and only then the seeds must be removed. You need to be extremely careful, because violet seeds are quite small.
Basic care elements
Some varieties of violets, especially large-flowered ones, take a long time to germinate. The timing of the appearance of the first sprouts can exceed 1 month
If seeds are bought in a store, then you should pay special attention to this feature. Without waiting for the shoots to sprout, the grower mistakenly disposes of the material
To prevent seedlings from being exposed to blackleg disease, they must be ventilated and not flooded. The soil should be moist, but not watery. If a grower accidentally “nailed” a sprout to the ground with water, then it must be urgently lifted with a toothpick or a needle. A weak plant will not be able to straighten up and will die.
Ventilate seedlings to avoid rotting.
The viola bush requires space to grow and develop, so in the two-leaf phase the seedlings are planted in separate containers. If violets are used for flowerpots or balcony boxes, then the seedlings are planted directly in them, maintaining the recommended distance between plants.
Important! When transplanting plants, they are buried down to the first leaves.
All types and varieties of violets respond very well to fertilizers.
Viola feeding time:
- young shoots are sprayed with a solution of a growth stimulator;
- weekly fertilizing includes watering with diluted mineral fertilizers at the root;
- After planting in the ground, flowers need monthly complex fertilizer.
Garden violets do not tolerate fresh manure and droppings as fertilizer. It causes burns and death of the bush. It is best to use autumn humus, leaves and special fertilizers for flowering plants.
Preparing seeds for sowing
For planting, they take seeds from last year , and for purchased ones they look at the planting dates. Violets have a short shelf life, so you should not buy expired packages.
Before planting the seeds, they are soaked in a damp cloth or paper scarf. To protect future plants from fungi, add a little phytosporin or other antifungal agent to the water. To speed up hatching, growth stimulants are used.
After a day, the seeds swell and become saturated with moisture. The finished material can be planted.
Growing violets from leaves in soil
If you adhere to the opinion of experienced flower growers, they advise planting violets directly in the ground, as the plants are stronger and more resilient, and they also produce more children. How the process of growing violets occurs is discussed below.
To make it easier to plant violets in the soil, you can buy synpolia soil at a specialized store. The following disintegrants must be added to it:
- Styrofoam;
- vermiculite – perfectly loosens the soil and absorbs moisture;
- sphagnum moss;
- perlite is the main one, it is always used in growing violets.
Rooting of violets in the soil occurs according to the following scheme:
- The stem of the leaf must be pulled to the side and broken, then it is cut off at an acute angle.
- It is necessary to release the stem and leaf into the manganese solution for a few seconds.
- Then leave to air dry for about thirty minutes.
- A disposable cup is filled with warm, moist soil.
- Plant the violet leaf and stem and compact the soil around it.
- There is no need to water the plant.
- It is worth covering the glass with the flower with plastic wrap. Watering is carried out once every seven days. In order for the violet leaf to take root faster, it does not need to be fertilized additionally.
The history of the origin of violets and flower selection in different countries (with photos)
Violets have been the favorites of many peoples since ancient times, so it is quite natural to assume that in ancient times people not only admired this flower, but also tried to grow it near their homes.
Unfortunately, exact information about the history of violet cultivation has not survived to this day, but legends say that the fashion for violets was so great that they were grown in huge plantations in the vicinity of ancient Athens and Rome.
The number of violet plantations was so great that even Pliny complained that it would be better if the Romans planted fields with olive groves rather than useless flowers.
Most likely, here we are talking about the history of the origin of fragrant violets (V. odorata) , since in those days there were no large multi-colored,
Varieties of Wittrock
Pansy (F. x wittrockiana)
The main advantage of these plants was their wonderful aroma.
From the Romans, the love for violets passed to the Italians. In the Middle Ages, a large-flowered double variety of fragrant violet was created in Parma - Parma violet (V. odorata var. parmensis) , which was used mainly as an aromatic plant.
In 1870, based on its flowers, the famous perfume “Vera Violetta” was created in France, which is still produced today.
Other types of violets, apparently, were introduced into cultivation much later than the fragrant violet. Thus, the tricolor violet flower is known from the history of the cultivation of garden plants in the first half of the 16th century.
One of the first attempts to make U. tricolor common in home gardens was made by the German botanist Joachim Camerari the Younger, as well as Prince Wilhelm of Hesse-Kassel, who lived at the end of the 16th century. The first complete botanical description of this flower dates back to the same time.
In the 17th century, Vandergren, the gardener of the Prince of Orange, began to pay special attention to the tricolor violet. He bred 5 varieties that can rightfully be considered the ancestors of cultivated pansies. In 1819, Lady Mary Bennet, daughter of the Earl of Tankerville, became interested in the viola.
Her gardener, William Richard, sowed the entire garden and the entire terrace of Tankerville Castle in Walton (England) with pansies, and then began collecting seeds from the largest and most beautiful specimens and sowing them again.
As a result, wonderful varieties were soon created that attracted the attention of many flower lovers and made pansies the favorites of flower growers.
However, the main triumph of violet selection was yet to come. In the 1830s, i.e. 15 years after the experiments of William Richard and Mary Bennett, the tricolor violet was crossed with the European large-flowered yellow violet (V. lutea) , horned violet (V. cornuta) , known in culture since the end of the 18th century (the first mention of it as a cultivated plant is by 1776), and Altai violet (V. altaica) , brought to Europe at the beginning of the 19th century.
In this case, many hybrid forms were obtained. Interesting fact: such violets were so different from the original species that they were identified as a new species - Wittrock violet. In 1835, Charles Darwin counted more than 400 forms of this species, among which there were specimens with velvety and satiny flowers, similar to modern varieties.
These photos show what different types of violet flowers look like:
A significant number of violet species were introduced into cultivation in the 20th century due to the emergence of fashion for rock gardens and alpine plants. In addition, some species are widely used in natural style gardens, especially shady ones.
In the history of Russian gardening, the first mention of violets dates back to the 17th century. According to the famous botanist Arnold Regel, at that time gardens were decorated with the most simple flowers taken from nature, including violets.
In subsequent centuries, the cultural exchange established between Russia and European countries also affected gardening.
Entire collections of ornamental plants began to arrive in Russia, spreading widely throughout parks and gardens. At the beginning of the 20th century N.F. Zolotnitsky wrote about hundreds of varieties of pansies that decorate our gardens; the most interesting of these violets he called the varieties 'Emperor Wilhelm' with variegated flowers and 'Germany' with twisted petals.
In Soviet times, the Wittrock violet also occupied the main place in urban and home gardening. The famous florist G.E. Kiselev in 1954 wrote about a huge number of varieties of this species, belonging to two main groups - large-flowered and gigantic.
Of the other types of violets, he mentions only three: fragrant violet, horned violet and purple violet.
These photos show the results of violet selection:
In recent decades, in Russia, as in many other countries of the world, interest in the introduction of new species and the creation of original varieties based on them has sharply increased. This process did not bypass violets either. Descriptions of new species of violets introduced into cultivation began to appear in the literature.
Thus, in the well-known directory of ornamental garden plants E.S. and N.A. Aksenov (2000) describes 8 species of violets used in landscaping, and the 1999 edition of the British Royal Horticultural Society encyclopedia of garden trees, shrubs and flowers describes 21 species of violas.
Recently, a new hybrid species has appeared in catalogs - Williams violet (V-. x williamsii) , and also lists a large number of hybrid varieties of perennial violets, the pedigree of which is extremely difficult to determine.
After reading the photo and description of violets, you need to get an idea of how to choose the right plants when purchasing: