Botanical description of the plant
It belongs to the evergreen plants of the Tea family, which are widespread in Japan and China, where they are planted as ornamental shrubs.
More than 2 thousand varieties and hybrids of Japanese camellia have been bred, which differ in height - from 50 cm to 2 meters (shrubs), taller specimens grow in the form of trees with a thick single trunk, reaching 11 m in height. In indoor conditions, the height of the bush does not exceed 1 m.
The leaves are distinguished by their oval shape, leathery structure and glossy sheen on the surface.
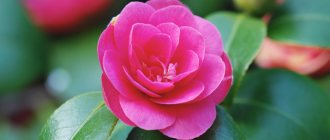
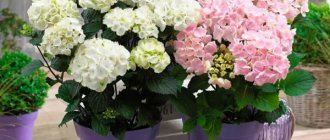
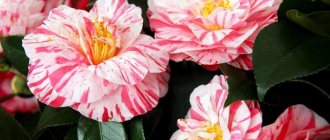
The flowers are smooth, double or semi-double, without a distinct scent, pink or peony-shaped with many petals. Usually presented in white, pink, red or shades thereof, they can be two-tone. They bloom in winter, when the air temperature drops to +10°C. Flowering lasts 1–3 months.
The fruit of Camellia japonica is an oval or round dry capsule with five compartments containing 8 seeds.
| Root system | Well developed, powerful |
| Stem | Long, thick, with many shoots |
| Leaf Shape | Elliptical or ovoid |
| Leaf color | Dark green with a glossy sheen |
| Flower shape | Rose-shaped and peony-shaped |
| Flower color | White, pink, red |
| Fruit shape | Oval capsule with five compartments, similar in appearance to a nut |
| Fruit color | Green, large, dark brown seeds |
| Taste of the fruit | Not eaten |
How to propagate Camellia
Since camellia is a perennial shrub, its reproduction is possible. There are two options: cuttings and seeds. Each method has its own advantages and disadvantages.
Propagation by cuttings
For propagation of the camellia variety, the vegetative method of cuttings is more suitable. You can choose shoots of the current year with two or three internodes with developed buds.
The size of the cuttings is individual, varies from 3 to 12 cm and depends on the varieties of camellia. An oblique cut is made from the bottom of the stem under the depression; the bottom leaf should also be cut off.
To increase the likelihood of rooting, the cuttings are placed in a stimulant solution (for example, Kornevin) for 5-7 hours and planted in clean river sand, screened with glass or film. An important condition for rooting is maintaining a constant temperature from 23 to 27 °C. Propagation of camellia by cuttings is very common.
Important! Rooting takes quite a long time - one and a half to two months.
Growing from seeds
Camellia can also be propagated from fresh seeds. Typical germination rate is 80-90%. Seeds are not stored for long as they quickly lose their ability to germinate. Camellia seeds are ordered from catalogs of well-known companies.
The ideal soil for planting is a mixture of river sand and peat in equal proportions. To speed up seed germination, the air in the room where the seedlings are grown is heated to + 22 °C. Seedlings and their rooting occur throughout the year.
Important! The resulting young seedlings are characterized by a low level of resistance to adverse influences, but with quality care they develop intensively, increasing the degree of winter hardiness.
To make the cutting take root faster, you can treat it with Heteroauxin, then plant it in a damp, loose mixture of sand and peat.
The shoot will give roots in 2-3 months, after which it can be transplanted into a full-fledged substrate. All this time the cutting should be kept warm (+22-25 ºC).
It is more difficult to germinate seeds: they are first soaked in water to swell, then kept for an hour or two in a weak solution of manganese. Afterwards, they are sown in a mixture of peat and sand, to a depth of about 1.5 cm.
The container with the seeds should be covered with film and stored in a warm place. The substrate with seedlings requires regular irrigation: the seeds should be watered with a spray bottle so as not to wash away the top layer of soil.
In about a month and a half, the first shoots should appear. When a pair of leaves form on the shoots, they can be planted in pots.
Varieties
There are many varieties of Japanese camellia, but the most popular are:
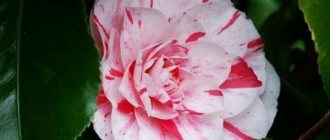
- Vittorio Emanuele II is a variety with semi-double buds, which consist of slightly convex petals bent in the opposite direction. The color of the buds is white-pink with rich longitudinal stripes of crimson or pink on each petal.
- Guilio Nuccio - characterized by crimson buds on which there are 2 types of petals - large round petals are attached in 2-3 rows, and in the center of the bud there is a small lush “cap” of small oblong petals.
- Double White - has double flowers of snow-white color, with spherical petals that are attached to the base in a clear checkerboard pattern, which is clearly visible when the bud is completely open.
- Desire is a variety with semi-double buds, has a two-color color: white on the inside, pink on the outside, with a smooth color transition.
- Margaret Davis - characterized by the presence of two-color semi-double buds. The petals located on the outside of the flower are round in shape, large in size and white in color, which at the edges turns into a bright crimson torn border. The inner petals are small, often closed, covering the center of the bud; they also have a crimson border, but not so bright.
- Lady Vansittart Pink is a variety with smooth flowers, characterized by an elegant bud shape. There is a clear geometry in the arrangement of the petals; in the center of the bud there are long yellow stamens, surrounded by 3 petals; under them, in a checkerboard pattern, are the remaining rows of petals, which form a medium-sized flower. The petals are white-pink with darker veins, some petals have bright crimson splashes.
- Chandlers Red is a variety with bright red buds and heart-shaped petals. The lower 2 rows of petals are large and slightly bent outward. In the center there are small oval petals, creating a lush “cap”. Externally, the flower resembles peonies.
- Asahi-No-Mai is a smooth-flowered variety with bright red wide petals arranged in 1-2 rows and a large dense center with bright yellow stamens.
- Tricolor - characterized by semi-double flowers, the petals are white-pink in color, with a small amount of red splashes and ragged thick stripes of scarlet color. In the center of the flower there are sparse long yellow stamens.
- Pink Perfection - considered one of the most beautiful varieties. It has double buds of soft or bright pink color, which consist of petals slightly bent in the opposite direction. The bud shows a clear geometry of the arrangement of the petals; in the center of the bud the petals are closed and resemble an unopened peony bud.
Transplantation after purchase into open ground
The density of its flowering in the future depends on how accurately all the conditions for planting garden camellia were met.
What is needed for planting
To plant a plant in open ground, you should decide on the plant variety and purchase a seedling. The optimal time for acquisition is from early May to mid-July. Seedlings must be older than 4 years. The roots should look powerful, the shoots should look woody. If the seedling is younger than this age, it can grow in a tub, but in the open air. During frosty periods, it is brought onto a covered veranda or balcony.
Optimal place
The ideal place for camellia is an area with diffused light. Moreover, there should be scattered sunlight throughout the day. It is advisable to avoid direct sunlight on the leaves of the plant.
Planting camellia
When choosing a location, areas with through winds should be excluded. It is recommended to plant the semi-shrub on a small hill. This will prevent water from stagnating in the root system.
Step by step planting process
- Dig a planting hole. Its diameter should be 2 times larger than the root system.
- A drainage layer consisting of medium-sized pebbles is laid on the bottom. The layer thickness should be approximately 15 cm.
- A layer of prepared substrate is laid out on the drainage layer.
- If the camellia was purchased in pots, then the seedling is removed in such a way that a lump of earth remains on the root system. This lump is placed in the planting hole on a layer of substrate and sprinkled with prepared soil on top. If the roots of the seedling are bare, then they are carefully laid out on a layer of soil and sprinkled with soil. It is recommended to press it down on top to avoid air accumulation between the roots.
- The plant should be watered abundantly.
Conditions for successful growing at home
Ignorance of the basic nuances of growing camellia japonica often causes the death of a flower. We list the optimal indicators of the indoor microclimate and the rules for choosing a suitable place to place the pot.
Lighting
Choose a place to install a pot with an indoor flower that is well lit, but protected from direct sunlight. Windows facing west or east are suitable for placing the flower. If you plan to place the plant on a south-facing window, it must be shaded.
Important! The plant will not be able to exist normally on northern windows. Even if it grows, flowering will not occur.
The leaves may grow unevenly, and the shoots may lean towards brighter lighting, so it is recommended to periodically turn the pot in different directions. When buds form on the plant, do not turn the pot - any changes in lighting can cause the buds to fall off.
Ventilation
Regular ventilation of the room is the key to the health of the plant, since pathogenic microorganisms accumulate in stagnant air, and the risk of developing flower diseases or damage to its parts by pests increases. To minimize risks, the room is ventilated daily for 1–2 hours.
In summer, it is better to take the camellia outside or onto an open balcony, protecting it from drafts or strong winds.
Temperature
For flower development in the summer season, the air temperature in the room must be maintained at +20...+25°C; in winter it is important to maintain +10...+15°C to allow the camellia to form buds.
Important! If in winter the air temperature exceeds the specified values, the buds may fall off before they begin to bloom.
Air humidity
Japanese camellia suffers from dry air. The problem manifests itself in winter, during the heated period, when artificial heat sources dry out the air. The optimal humidity for camellia is 60–75%.
To increase the humidity in the room, use containers with wet expanded clay or place sphagnum moss near the trunk of the plant and spray it regularly. Evaporation from expanded clay or moss can provide the required level of humidity and keep the flower healthy.
Preparing the soil and planting site
Ordinary garden soil is not suitable for growing japonica. Camellias grow well only in acidic soil with a pH value no higher than 5.
Recommended proportions when composing the substrate:
- humus (preferably leafy) – 2 parts;
- crushed peat – 2 parts;
- coarse sand – 1 part;
- It is useful to add crushed conifer bark and perlite to the substrate.
It is best to use ready-made commercial soil for camellias. Substrates for azaleas or rhododendrons are also good.
For the Japanese camellia bush, choose a place without drafts. The light-loving plant needs light, but does not tolerate direct sunlight. Therefore, western or eastern windows are allocated for the flower. When placed on the south side, the container is placed at a short distance from the window or nearby on the floor. For the harmonious development of the bush, the pot is regularly rotated.
The best containers for growing japonica are small oak tubs or ceramic pots with an unglazed interior. Even young bushes or 2-year-old seedlings can be planted in large containers. The root system of such plants develops quickly and harmoniously.
Home care
In order for the camellia to grow and bloom, it is provided with care, consisting of regular watering, fertilizing, mechanical treatment of the foliage and replanting.
Watering
It is necessary to water the camellia regularly and ensure that the soil does not dry out. The soil should not be over-moistened and water should not stagnate in the container. Failure to comply with the watering schedule often causes leaves and buds to fall off and the development of diseases.
For irrigation use soft, settled water at room temperature. Water the camellia at the root and drain the excess water from the pan, which accumulates during heavy watering. In summer, the plant is watered 2-3 times a week, in winter - 1-2 times.
Top dressing
After the camellia fades and young shoots appear, the flower should be fertilized with a complex fertilizer for indoor ornamental flowering plants, according to the instructions. Next, the plant should be fertilized every 3 weeks until new buds begin to appear in the next season. During the flowering period, the application of fertilizers is suspended.
Trimming
To make the plant thick and lush, it is recommended to prune it. However, often this procedure is not carried out, since camellia painfully tolerates such an intervention. During this period, you should pay attention to the buds - remove weak and diseased ones with sharp scissors so that the remaining flowers grow better and the plant has enough nutrients to develop shoots.
On one shoot you should leave 2-3 buds, choosing large and strong ones, and remove the rest.
At the end of October - beginning of November, it is recommended to prune the shoots to stimulate the growth of axillary buds. Each shoot is cut by 5–10 cm, based on the size of the plant.
Transfer
Camellia grows quickly, so it needs annual replanting. When the flower is 5 years old, replanting is no longer required so often - once every 3 years. The right time for replanting is considered to be mid-summer, when the active growth of the plant stops.
Find out how and when to replant indoor plants.
The flower grows well in acidic soils, so the composition for replanting is selected accordingly. For young plants, prepare a mixture containing leaf soil (1 part), coniferous soil (2 parts), peat soil (1 part) and river sand (0.5 parts). For adult plants (5 years and older), prepare a substrate of the same composition, but adding 1 part of coniferous soil.
In order not to prepare the soil mixture yourself, you can purchase ready-made soil for rhododendrons, which is also suitable for camellias.
Each flower transplant should be carried out in a larger pot than the previous one, 2–3 cm in diameter. It is better if the pot is wide and of medium height. The material of the pot is chosen in accordance with financial capabilities and personal preferences.
Transplant process:
- ¼ of the volume of expanded clay is poured into the bottom of the new pot.
- 3 cm of earthen mixture is laid on top of the expanded clay.
- Carefully remove the plant with the earthen lump from the old pot.
- Having slightly destroyed the earthen lump and reached the bulk of the roots, they are examined for the presence of diseases, damage, and rot.
- Dead and damaged parts of the root system are removed with a sharp knife or scissors, and the sections are sprinkled with crushed activated carbon.
- The prepared plant is placed in a new pot and soil is added so that all the voids are filled. In order for the procedure to occur quickly and efficiently, it is necessary to shake the container periodically.
- When the plant is well fixed, the soil around the trunk should be compacted a little and watered with warm water.
Transfer
Camellias are replanted not in February-March, like other indoor flowers, but in late autumn or winter. She begins a period of rest, coinciding with flowering. Therefore, you can replant a flowering plant, being careful. Young plants need to be replanted every year. Large bushes can be replanted by transshipment once every two to three years, when the roots fill the entire volume of the pot.
In preparation for transplanting (planting), it is necessary to prepare a wide pot, at the bottom of which a layer of drainage is poured. You can buy land ready for azaleas and camellias. Since different manufacturers allow deviations in the composition, when purchasing a ready-made earthen mixture, you should pay attention to the presence of the following components in the soil:
- peat;
- sand;
- leaf soil;
- vermiculite.
You can prepare the mixture yourself by mixing peat, sand, leaf and coniferous soil. All ingredients are taken in equal parts, and sand - half as much. The soil must be loose to prevent stagnation of water. Soil acidity should be between 4.0–5.5 units. To increase its permeability, it is recommended to add ground coniferous tree bark. Its pieces are usually sold for planting orchids.
This may be interesting: Caring for popular varieties of Episcia
When replanting a flower, you should pay special attention to the root collar, which should not be covered with soil, but be at ground level. When transferring an adult plant to a larger pot, add fresh mixture. If it is necessary to increase the acidity of the soil, mulch it on top with sawdust or small pieces of bark.
Reproduction
Camellia japonica can be propagated in three ways. Let's take a closer look at each.
Cuttings
A popular method at home. The best period for cuttings is August.
Let's look at the process step by step:
- Young cuttings that have not yet become woody are selected.
- The selected cuttings are cut at an angle with a sharp knife, maintaining a length of 8 cm.
- On the cut cuttings, remove all leaves except the top two.
- In order for the cutting to take root better, the cut is dipped in Kornevin and planted in a pot 5 cm in diameter to grow roots.
- Planting depth is 3 cm. A peat-sand mixture (1:1) is used as a substrate.
- After planting the cuttings, water the soil, cover the container with a transparent plastic bag, place it on a bright window and maintain the air temperature at +20...+25°C.
- The bag is removed regularly (once a day for 1 hour) to ventilate the plant.
- When the roots grow (after 2 months), you will notice active growth of the cuttings; during this period, you can remove the bag and transplant the cuttings into an acidic substrate with the same composition as for transplanting young plants.
- For transplanting, choose pots 7 cm in diameter.
- It is necessary to care for rooted cuttings in the same way as for an adult plant.
Seeds
Usually this method is not practiced, since the collected seeds quickly lose their viability, and often the resulting plant develops poorly.
Did you know? Camellia seeds contain valuable oil, which is widely used in Japan and China in the cosmetics industry (usually in the production of lipstick).
If you decide to propagate camellia by seeds, you need to take into account the following tips:
- Sowing is done in small containers (solid wooden boxes) with a peat-sand mixture (1:1).
- It is necessary to sow according to the following pattern: 3 cm deep, 6 cm between seeds, 5 cm between rows.
- After sowing, the soil is watered and the container is covered with glass.
- The glass is periodically removed for ventilation (once a day for 1 hour).
- Seed germination should occur at a temperature of +20...+25°C.
- The soil is sprayed daily with a spray bottle.
- When the first shoots appear, the glass is removed.
- When 3 leaves appear on the plant, the camellias are planted in separate containers with acidic soil (as with cuttings). The pot should be 6–7 cm in diameter.
- Care continues as for an adult plant.
By layering
Camellia can be propagated by air layering.
Let's look at how to do this correctly:
- A central or lateral young shoot is selected on the plant at the beginning of active flower growth. The stem of the selected layer should have a rich green, not dark color, and its thickness should be 4–6 mm.
- The shoot is cut with a sharp knife so that it is not separated from the mother plant, but at the same time there is 2–3 mm of living tissue for the formation of roots.
- All leaves are removed from the shoot, leaving only 1 leaf - the first from the growth bud.
- At the place where the cutting is cut, an incision should be made into the shoot to a depth of 1 cm.
- The cut area is treated with Kornevin, wrapped in damp sphagnum moss and plastic film and secured with wire.
- The room temperature for normal root formation should be +20…+25°C.
- When roots 1–2 cm long appear on the layering, it is carefully separated from the mother plant and planted in acidic soil.
Did you know? The camellia appeared in Europe in 1738, brought from the Philippine Islands by the Jesuit monk Joseph Kamel. The plant was named in his honor.
When does Camellia bloom?
Camellia will delight you with flowers once a year, in the dark winter period from December to March, in red, pink or white, depending on the variety.
In order for the flowers to bloom from the buds, this plant must feel the lower temperatures.
The flowers range in size from 6 to 17 cm in diameter and are somewhat reminiscent of peonies and roses.
Possible difficulties during cultivation
In the process of indoor cultivation of Japanese camellia, some difficulties may arise associated with:
- rotting of plant roots under the influence of black mold or root rot. Common signs of disease are: wilting of buds and leaves, unpleasant odor from the pot. The problem can be solved by timely replanting the plant, removing all diseased roots and completely changing the soil and pot;
- the appearance of scale insects on the leaves of the flower, the signs of which are dark tubercles on the back of the leaves. You can overcome scale insects by treating the plant with Fitoverm, according to the instructions;
- the appearance of mealybugs, which manifests itself as a white coating on the leaves. The flower must be treated with Karbofos, according to the instructions.
Growing Japanese camellia indoors is not easy, but by following the flower care recommendations, you can get a healthy and beautifully flowering plant that will definitely become the center of attention.
Diseases and pests, preventive measures
Camellia is rarely affected by diseases and pests. But nevertheless, errors in care can sometimes lead to undesirable consequences, the rules for eliminating which you need to know.
Camellia plants are susceptible to several pests, including aphids, mealybugs and scale, which can be controlled with insecticidal soap or systemic insecticides.
Uneven watering can cause camellia buds to drop before they open, while soil that is not acidic enough can cause the leaves to turn yellow.
| Disease/pest | Signs of appearance | Control measures |
| Chlorosis | The leaves acquired a light color and green veins became noticeable. |
|
| Oidium | Gray spots appear on the plant. | An excellent remedy for combating oidium is Colloidal sulfur (30 g per 10 l); a 2% solution of DNOC is also used. |
| Yellow spot | Yellow spots of irregular shape appear on some leaves and shoots. This is caused by genetics or a virus. |
|
| Cucumber mosaic virus | The leaf veins turn yellow. |
|
| Phyllosticosis | Brown spots of irregular shape appear on the leaves. |
|
| Scale insects and false scale insects | White tubercles appear on the stems and leaves, looking like a dense coating. | If the pest is small. it is removed with a toothbrush, after which the plant is smeared with a swab soaked in kerosene. But if the problem has managed to grow, use a soap solution (15 g of liquid soap, 10 ml of denatured alcohol per 1 liter of warm water), Actellik il Fosbecid (20 ml per 10 l). |
| Thrips | The leaves in some places are unevenly colored yellow-white. When severely damaged, they turn yellow and fall off. | Repeated treatment with Aktara, Actellik, Fufanon (10 ml per 10 l), Fitoverm (2 ml per 1 l) and Iskra (1 tablet per 10 l) is used. |
| Spider mite | At first the leaves are covered with small white specks, and then become discolored. Sometimes you can see a thin web between them and the mites themselves on the underside of the leaf. | You can use a soap solution for mild damage, but for a massive attack you should use Fitoverm, Akarin (2 ml per 1 l), Vermitek (5 ml per 10 l) and Molniya (2 ml per 10 l). |
| Aphid | The leaves turn yellow, become discolored and dry out. Accumulations of aphids can be found on the stems and inside of leaves. | The simplest and most effective way is to use a soap solution. If there are few aphids, they are collected by hand. In case of severe damage, you can use Fitoverm or Aktara. |
| Weevil weevil | The leaves are eaten away at the edges. If the pest attacks the roots, the plant dies very quickly. | Generally accepted means for combating this pest are Bazudin (15 g per 10 sq. m.), Fly eater (40 g per 1 sq. m.) or Iskra. |
Root Rot on Camellia
Several different fungi that infect and kill fine feeding roots cause these diseases. Root diseases are associated with plants grown in poorly drained soil
If you do decide to try growing camellias at home, place the plant in the coolest part of the house. Places such as verandas and greenhouses.
Provide indoor-grown camellias with 8 to 10 hours of light per day.
Houseplants are susceptible to root rot. It is important that you only water the plant when the soil is just dry.
Camellias grown indoors will grow much slower than their outdoor counterparts. Fertilize every 3-4 months.
Growing from seeds
Propagation by seeds will allow you to grow camellia at home, but the seeds themselves must be purchased in specialized stores, or better yet, in flower greenhouses. If you collect seeds from a plant yourself, they will lose all their original characteristics of the variety.
Important!
Only mature seeds, which can be identified by their dark brown color, are suitable for sowing. If the seeds are white, then they are not yet ripe.
If the seeds are fresh, then before sowing they need to be stored only in a cool place, otherwise they will simply dry out. If you use seeds from bags for sowing, they need to be soaked in water and left overnight. It is also better to break the integrity of the shells of dry seeds, so they will germinate faster.
The following soil mixtures are suitable for sowing seeds:
- a mixture of perlite and sphagnum moss;
- a mixture of peat and river sand;
- substrate for azaleas or camellias;
- heather compost;
- vermiculite
You can plant the seeds of the plant immediately in small pots with a diameter of 9 cm. To do this, fill them with soil mixture, water them, put the seeds on top, press them a little into the ground and sprinkle them. Cover the pots with film and place in a dark, warm place. Before the seeds germinate, it is important to monitor soil moisture, avoid stagnation of water and ventilate.
As soon as the seedlings grow to 8 cm and form 4 true leaves, the seedlings can be transplanted into a pot with a diameter of 1 liter, and you need to trim the tip of the root system to stimulate its branching. The next transplant can be done as soon as the sprouts are well established.
Note!
Camellia grown from seeds will bloom only at 5-6 years of age.